 Primeira página > Programação > Nestjs, Firebase, GCloud. Como configurar rapidamente um back-end de API em TypeScript.
Nestjs, Firebase, GCloud. Como configurar rapidamente um back-end de API em TypeScript.
It's great that you decided to open this article. My name is Fedor, and I've been a full-stack developer on a permanent basis since the end of 2021. Just in case, here is my github profile. In this brief article, I want to:
- Kickstart a small series of tutorials on setting up a backend API
- Provide an example of a NestJS project integrated with Firebase
- Help developers with a frontend background quickly set up an environment for backend development
This specific article is a step-by-step guide to Firebase integration with some nuances.
I also want to warn the reader in advance: This and future articles are generally suitable for beginners, but you should be familiar with JavaScript/TypeScript in general, or at least not be afraid to Google things that are not covered in detail here.
Table of Contents
- Nuances of working with Firebase
- Personal Experience
- Before Initialization
- My Setup
- Configuration
- Env files
- Preparing to work with Firebase
- Project configuration for Connecting to Firebase
- Firestore Module
- Example Module
- Husky
- Testing and building indexes for api/example
- Firebase Storage
- Conclusion
Nuances of working with Firebase:
- At a certain point, you will need to set up a billing account in Google Cloud.
Integration of IaaS/PaaS solutions like Firebase doesn’t differ much from each other. Firebase is a conditionally free platform if you stay within the plan limits. Additionally, using Firebase imposes constraints on poorly designed code. In my experience, a mistake in designing the frequency of requests to Firestore resulted in a loss of $800 per day for the company during a surge in traffic. After some time debugging, we managed to reduce expenses by 30 times.
Note: The proposed stack is well-suited for pet projects and small production projects. The final boilerplate repo will include the necessary minimum configuration to start development. If you haven’t worked with Node.js and Nest.js before, you may encounter difficulties with some concepts and code constructs; I recommend preparing, for example, by reading Nestjs docs in advance.
Personal Experience
Although I only started working full-stack a few years ago, I have already had the chance to try my hand at cross-functional projects on different stacks and platforms, mainly JS/TS. I got acquainted with NestJS when I joined a company that chose the path of isomorphic full-stack development, and since then, this path has stuck with me. Over the years of working on various projects, I managed to create a simple and minimal boilerplate for the next MVP startup or pet project. I sincerely hope that this article and the final repo will make your life easier.
Before Initialization
I will be writing this boilerplate from my perspective and environment, so first things first: I work on the MacOS platform. All suggested actions should be cross-platform, but I do not rule out some difficulties. I welcome any questions and recommendations in the comments under this post.
My Setup
In the terminal, I use the ZSH shell instead of the standard BASH, so the first link is ohmyzsh.
I also need to keep different versions of Node.js due to the accumulation of projects of varying ages over the years, plus old habits die hard. For convenient work, I recommend installing NVM, a version manager for Node.js.
Lastly, since developers often have many projects, I use pnpm.
Direct Initialization
Let's move on to the main set of commands and project configuration. First, let's install Node.js version 20 using nvm: nvm i 20 && nvm use 20, and then install pnpm: npm i -g pnpm.
Before proceeding, let's check that all packages are available in the terminal.
➜  my pnpm -v
9.6.0
➜  my nvm -v
0.39.2
➜  my npm -v
10.8.1
➜  my nvm ls
->     v20.16.0
Moving forward, install the Nest CLI globally: npm i -g @nestjs/cli. After successfully installing the CLI, we can proceed to the project creation step. This is done using the command nest new nestjs-startup-boilerplate, where you can replace nestjs-startup-boilerplate with your project's name. Next, you will be prompted to select the project initialization configuration.
- Step 1: Choose the package manager. I will select pnpm.

- Step 2: That's it for now; the main thing is to choose the package manager.
At this point, you should have this set of changes in your project's files.
Configuration
Linting, tsconfig, and env files. Let's configure all of these.
In any project, it's useful to have path aliases to avoid frequently seeing imports like import something from '../../../../modules/something'. I prefer something like this: import something from '~/modules/something'. It's much more readable and easier to maintain. We'll make a few changes to the tsconfig file; I won't go into detail here, but you can read more about tsconfig settings here.
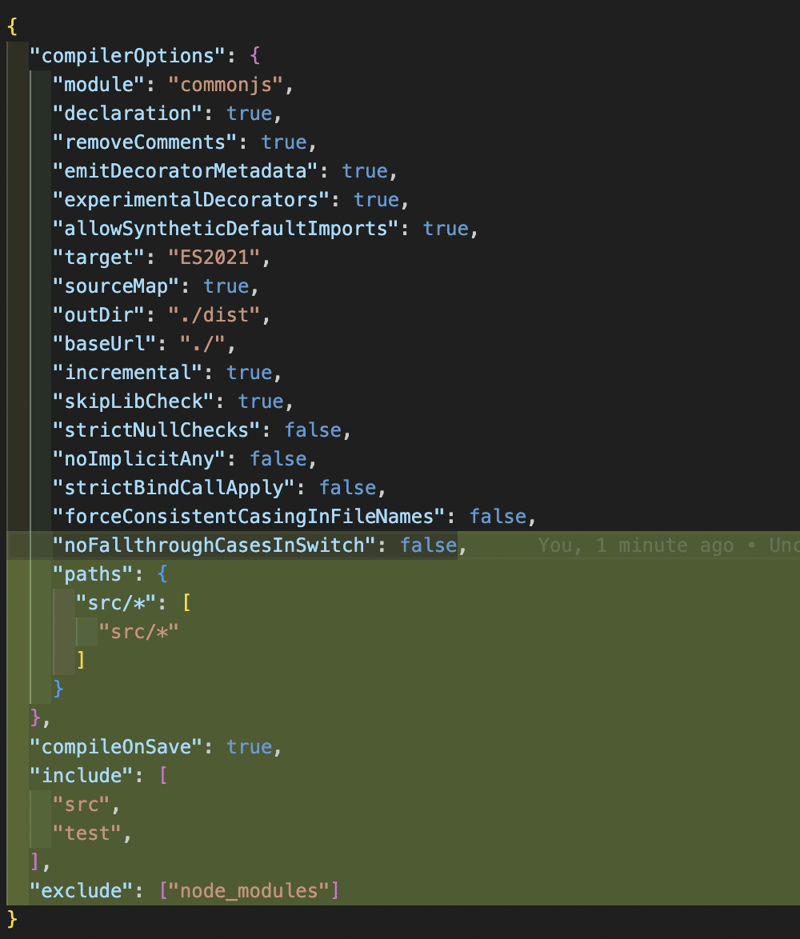
Next, I want to make changes to eslint.js and add my preferred configuration.
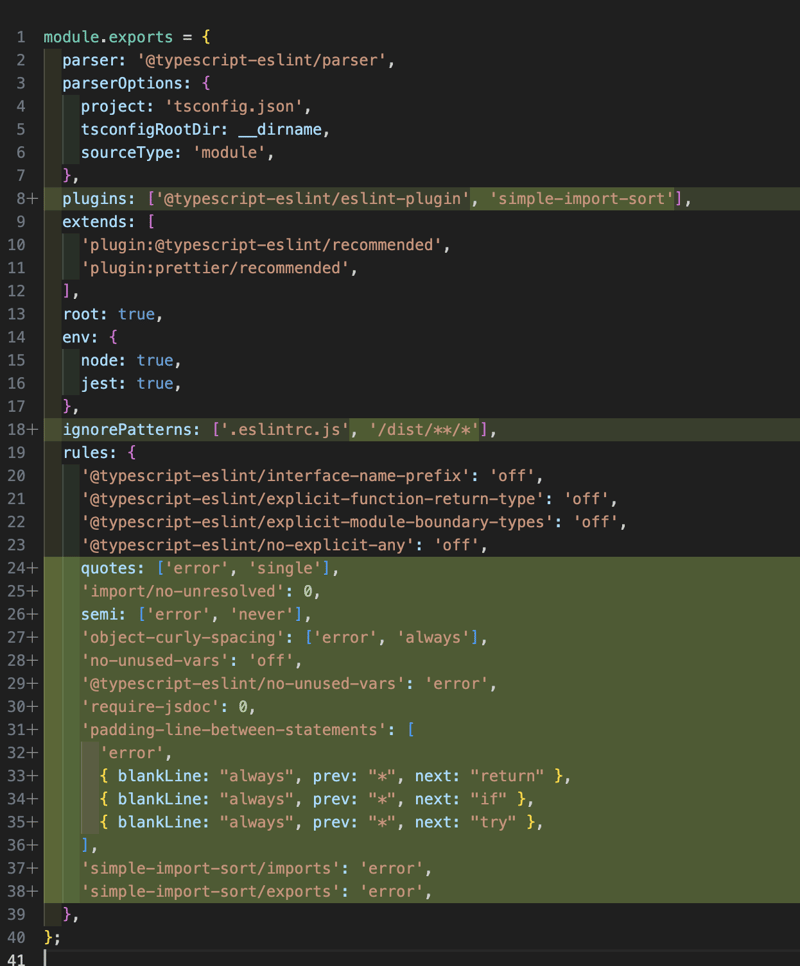
Let's update the package.json by adding the following commands to the scripts section:
...,
scripts: {
  ...,
  "lint": "eslint \"{src,apps,libs,test}/**/*.ts\"",
  "lint:fix": "eslint \"{src,apps,libs,test}/**/*.ts\" --fix"
},
...
Be sure to install a new dependency (this is a plugin for the eslint configuration):
pnpm add -D eslint-plugin-simple-import-sort
Next, let's configure the prettier file.

ENV Files
First, let's add our .env.example file. In this file, we'll give developers an idea of which variables can be configured in the project. For now, it looks like this:
SA_KEY=path_to_service_file

MINI_APP_URL=domain_to_mini_app # we'll leave this as a placeholder for future use.
Make sure to configure the .gitignore file by adding the following:
# all env files except example
.env*
!.env.example

# google service account file (by firebase)
service-account*.json

# firebase config file
.firebaserc

# tg library local cache file
sessions.json
Here is the commit with these changes. If we also run the command pnpm run lint:fix, we'll get the linted files.
At this stage, the basic project configuration is ready. Next, we'll set up the Firebase project through the console.
Preparing to Work with Firebase
In my projects, I usually use Firebase as a provider for Google Cloud Storage, Firestore Database, and Firebase Auth. Let's set up the first two services.
First, open the Firebase project console. If you've never worked with Firebase before, you'll have a mostly empty dashboard.
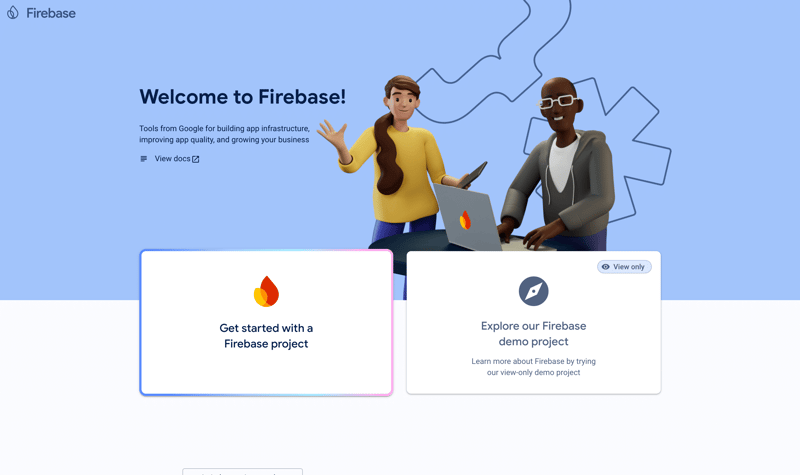
Click on "Get Started" to begin creating a project. On the first screen, you'll be asked to enter a project name; I'll name mine: nestjs-boilerplate-example. This name will be used in the future for configuring the project's env files. On the second screen, you'll be asked to enable analytics; I don't need it, so I decline and create the project. After successful creation, the project will appear on your dashboard, and you can proceed by clicking "Continue" on the project creation confirmation screen.
In the dashboard of the created project, you'll see something like this:
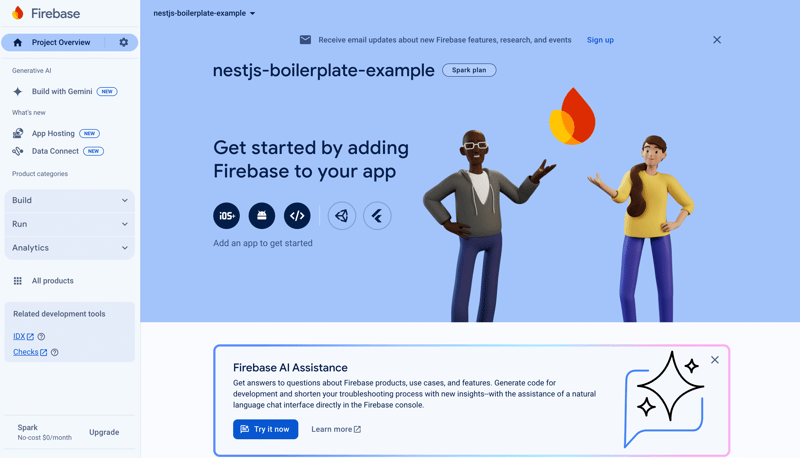
So far, so simple. Next, we need to enable the services: Firestore, Authentication, and Storage. These sections can be found on the left sidebar of the console, under the "Build" section.
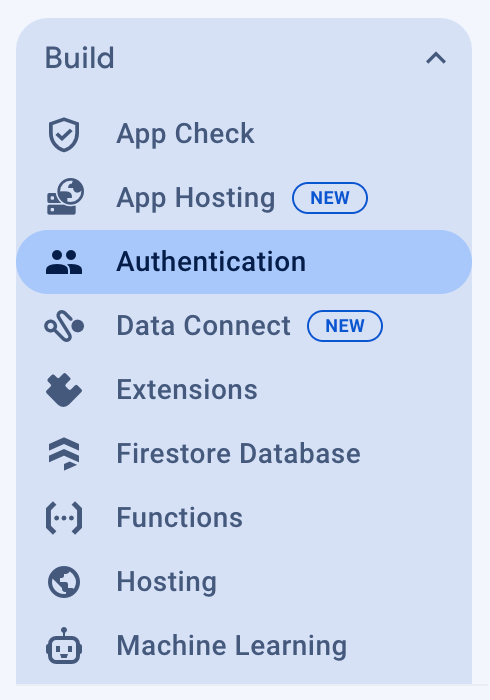
When you open each section, you'll first see a prompt to enable the functionality. Click "Get Started," "Create Database," etc. Up to certain usage limits, these services are free. More about pricing and limits.
Creating a database will require you to choose a server location; you can choose whichever is convenient for you depending on where your users are located. I usually choose Europe (Eur3). You can also select the launch mode; it's safe to leave the database in production mode. Note: I’ve tried us-central1 and eur3, and haven’t noticed any significant difference in runtime speed.
Now you have a fully set up Firebase project. By the way, you can easily generate multiple Firebase projects for different environments (Production/Stage/Local/Test); for most of my projects, this setup is sufficient.
Let's move on to the next step. We need to obtain the necessary data to run the project. To do this, go to your Project Settings (This link is for my project, you won't be able to open it, but you can use it as an example) (located in the popover menu by clicking on the gear icon).
Once in the project settings, select the "Service Accounts" tab and click the Generate New Private Key button. This will allow you to download a .json file. We'll need this file to connect to Firebase.
Project Configuration for Connecting to Firebase
Now, let's set up the environment variables.
Move the previously downloaded Firebase service JSON file to the root of your project, and, for example, name it service-account.json.
Add the service file name to your .env.dev file in the field SA_KEY=service-account.json. The .env.dev file can be created based on the example in .env.example. Also, update the commands in the scripts section of your package.json.
...
"scripts": {
  ...
  "build:prod": "NODE_ENV=production nest build",
  "start": "NODE_ENV=production nest start",
  "start:dev": "NODE_ENV=development nest start --watch"
  "start:prod": "NODE_ENV=production node dist/main"
  ...
}
...
In essence, we just added the NODE_ENV variable. This value can then be accessed via process.env.NODE_ENV. It's better to pass other environment variables through specific .env files. As an example, let's also add an .env file now (you can create a copy from .env.dev, which we'll use later for the production environment).
Next, let's connect our environment variables in the project code.
We’ll need two files: app.module.ts and main.ts.
Let's start with the src/env.ts file and fill it with some basic logic and flags from process.env.NODE_ENV:
const ENV = process.env.NODE_ENV

export const isDevelop = ENV === 'development'
export const isProduction = ENV === 'production'

export const getEnvFile = () => {
  if (isDevelop) {
    return '.env.dev'
  }

  return '.env'
}
Note: The NODE_ENV value passed at runtime can be accessed immediately. Other values will be loaded using ConfigService in AppModule.
We'll also need a library to read and load environment variables: pnpm add @nestjs/config.
Now we can make some changes to app.module.ts:
import { Module } from '@nestjs/common'

import { AppController } from './app.controller'
import { AppService } from './app.service'
import { ConfigModule } from '@nestjs/config'
import { getEnvFile } from './env'

@Module({
  imports: [
    ConfigModule.forRoot({
      isGlobal: true,
      envFilePath: getEnvFile(),
    }),
  ],
  controllers: [AppController],
  providers: [AppService],
})
export class AppModule {}
This way, environment variables can be used throughout the project.
Now we can add the step to connect to Firebase. For this, we need to install the package pnpm add firebase-admin. Open the main.ts file and add the Firebase Admin initialization.
import { ConfigService } from '@nestjs/config'
import { NestFactory } from '@nestjs/core'
import * as admin from 'firebase-admin'
import * as fs from 'fs'

import { AppModule } from './app.module'

async function bootstrap() {
  const app = await NestFactory.create(AppModule)
  const configService: ConfigService = app.get(ConfigService)
  // Retrieve the service file name from the env file
  const accountPath = configService.get('SA_KEY')
  // You can refine the type definitions for the service file; as you can see, I haven't focused on that yet
  const serviceAccount: any = JSON.parse(fs.readFileSync(accountPath, 'utf8'))

  const adminConfig: admin.ServiceAccount = {
    projectId: serviceAccount.project_id,
    privateKey: serviceAccount.private_key,
    clientEmail: serviceAccount.client_email,
  }

  admin.initializeApp({
    credential: admin.credential.cert(adminConfig),
    databaseURL: `https://${adminConfig.projectId}.firebaseio.com`,
  })

  // The port value can also be moved to the env file if needed; I’ve skipped this step
  await app.listen(8080)
}

bootstrap()
So, the Firebase connection to the project is set up.
But that's not all! Next, we will cover:
- The Firestore module
- Examples of data models with controllers and services
- Adding the gcloud bucket module for file operations
Firestore Module
Let's start with the module itself. Create a folder src/providers/firestore. In this folder, we will organize the necessary code for connecting to Firestore collections.
First, install the Firestore package: pnpm add @google-cloud/firestore.
In the firestore folder, add 4 files:
- firestore.module.ts - for connecting to the project's AppModule
- firestore.providers.ts - for listing Firestore entity documents
- types.ts - for typing the module
- index.ts - for cleanly re-exporting the Firestore module
// firestore.providers.ts
export const FirestoreDatabaseProvider = 'firestoredb'
export const FirestoreOptionsProvider = 'firestoreOptions'
export const FirestoreCollectionProviders: string[] = [/* Next, you will need to add classes for Firestore collection documents.
 */]
// types.ts
// Add a type for typing the module arguments
import { Settings } from '@google-cloud/firestore'

export type FirestoreModuleOptions = {
  imports: any[]
  useFactory: (...args: any[]) => Settings
  inject: any[]
}
// firestore.module.ts
// Here, we are creating our own module provider for Firestore collections
import { Firestore } from '@google-cloud/firestore'
import { DynamicModule, Module } from '@nestjs/common'

import {
  FirestoreCollectionProviders,
  FirestoreDatabaseProvider,
  FirestoreOptionsProvider,
} from './firestore.providers'
import { FirestoreModuleOptions } from './types'

@Module({})
export class FirestoreModule {
  static forRoot(options: FirestoreModuleOptions): DynamicModule {
    const collectionProviders = FirestoreCollectionProviders.map((providerName) => ({
      provide: providerName,
      useFactory: (db) => db.collection(providerName),
      inject: [FirestoreDatabaseProvider],
    }))

    const optionsProvider = {
      provide: FirestoreOptionsProvider,
      useFactory: options.useFactory,
      inject: options.inject,
    }

    const dbProvider = {
      provide: FirestoreDatabaseProvider,
      useFactory: (config) => new Firestore(config),
      inject: [FirestoreOptionsProvider],
    }

    return {
      global: true,
      module: FirestoreModule,
      imports: options.imports,
      providers: [optionsProvider, dbProvider, ...collectionProviders],
      exports: [dbProvider, ...collectionProviders],
    }
  }
}
Finally, connect the module in app.module.ts
...
import { ConfigModule, ConfigService } from '@nestjs/config'
...
import { FirestoreModule } from './providers'
...

@Module({
  imports: [
    FirestoreModule.forRoot({
      imports: [ConfigModule],
      useFactory: (configService: ConfigService) => ({
        keyFilename: configService.get('SA_KEY'),
      }),
      inject: [ConfigService],
    }),
  ],
  ...
})
At this stage, we are generally ready to create modules with controllers, repositories, and so on. Here is the current set of changes.
Example Module
Finally, we get to creating an example module. We will implement basic CRUD operations using an abstract entity called example. Specifically, I won’t implement the delete method; its implementation is no different from other operations, except that in repository methods, we would call .delete(documentId) and that’s it. Instead of deleting a document, you could implement a soft delete, which under the hood changes the status field of the document (e.g., status: ACTIVE/ARCHIVED). This example module won’t include that.
In general, we will start by creating src/modules, where we will set up the example module. This entity is only for demonstrating how to organize project code. Of course, you are free to structure your code however you like.
I suggest a structure for the modules as follows:
src/modules
  - example
    - repositories
      - example.repository.ts
      - index.ts
    - controllers
      - example.controller.ts
      - index.ts
    - services
      - example.service.ts
      - index.ts
    - entities
      - example.document.ts
      - index.ts
    - dto
      - example.request.ts
      - example.response.ts
      - index.ts
    example.module.ts
helpers
  - time.ts
  - id.ts
  - index.ts
Let's get started. First, add the helpers, pnpm add dayjs uuid
// time.ts
import * as dayjs from 'dayjs'
import * as duration from 'dayjs/plugin/duration'
import * as isToday from 'dayjs/plugin/isToday'
import * as timezone from 'dayjs/plugin/timezone'
import * as utc from 'dayjs/plugin/utc'

// In general, you can do without all of this; it depends on your project. I left it as an example.

dayjs.extend(utc)
dayjs.extend(timezone)
dayjs.extend(isToday)
dayjs.extend(duration)

export const time = dayjs
// id.ts
import { v4 } from 'uuid'

const getUniqueId = (): string => v4()

export { getUniqueId }
Now, let's focus on the files for the Example module. I won’t change the name of the module or the table, but I suggest using example as an abstraction of a post, including properties such as title, text, published flag, and additional attributes, along with the document ID and creation and last update dates.
For dates, Firestore has a suitable model called Timestamp, which is quite easy to work with and filter documents by. For the document ID, we will use the uuid/v4 utility.
// example/entities/example.document.ts
import { Timestamp } from '@google-cloud/firestore'

export class ExampleDocument {
  static collectionName = 'example'

  id: string
  title: string
  text?: string | null
  isPublished: boolean
  createdAt?: Timestamp | null
  updatedAt?: Timestamp | null
}

// example/dto/example.filter.ts
export class ExampleFilter {
  public isPublished?: boolean
}

// example/dto/example.request.ts
export class ExampleRequestBody {
  public title: string
  public text?: string
}

// example/dto/example.response.ts
export class ExampleResponseItem {
  public id: string
  public title: string
  public text?: string | null
  public isPublished: boolean
  public createdAt?: string | null
  public updatedAt?: string | null
}
Let's add our controller with the following methods:
- Retrieve a list of example documents with query parameters for filtering by the isPublished flag and without filtering
- Retrieve a single example document by ID
- Create a new example document
- Edit an existing document
- Update the isPublished flag (there will be one method to toggle the flag without parameters)
// example/controllers/example.controller.ts
import { Body, Controller, Get, NotFoundException, Param, Patch, Post, Query } from '@nestjs/common'

import { ExampleFilter, ExampleRequestBody } from '../dto'
import { ExampleDocument } from '../entities'
import { ExampleService } from '../services'

@Controller('v1/example')
export class ExampleController {
  constructor(private readonly exampleService: ExampleService) {}

  @Get('/')
  async getList(@Query() query?: ExampleFilter): Promise {
    const response = await this.exampleService.getList(query)

    if (!response?.length) {
      throw new NotFoundException('Examples are not exist')
    }

    return response
  }

  @Get('/:id')
  async get(@Param('id') id: string): Promise {
    const response = await this.exampleService.getItem(id)

    if (!response) {
      throw new NotFoundException('Example does not exist')
    }

    return response
  }

  @Post('/')
  async create(@Body() body: ExampleRequestBody): Promise {
    return this.exampleService.create(body)
  }

  @Patch('/:id')
  async update(@Param('id') id: string, @Body() body: ExampleRequestBody): Promise {
    return this.exampleService.update(id, body)
  }

  @Patch('/publish/:id')
  async togglePublish(@Param('id') id: string): Promise {
    return this.exampleService.togglePublish(id)
  }
}
Most of the implementation is delegated to the ExampleService. Let's add that as well.
// example/services/example.service.ts

import { Injectable, NotFoundException } from '@nestjs/common'

import { ExampleFilter, ExampleRequestBody } from '../dto'
import { ExampleRepository } from '../repositories'

@Injectable()
export class ExampleService {
  constructor(private readonly exampleRepository: ExampleRepository) {}

  public async getList(filter: ExampleFilter) {
    return this.exampleRepository.find(filter)
  }

  public async getItem(id: string) {
    return this.exampleRepository.getDataByDocumentId(id)
  }

  public async create(body: ExampleRequestBody) {
    return this.exampleRepository.create(body)
  }

  public async update(id: string, body: ExampleRequestBody) {
    const { doc, data } = await this.exampleRepository.getUpdate(id)

    if (!doc || !data) {
      throw new NotFoundException('Example document does not exist')
    }

    const response = this.exampleRepository.getValidProperties({ ...data, ...body }, true)
    const changedKeys = Object.keys(body)
    const valuesToUpdate: Partial = {}

    for (const key of changedKeys) {
      const newValue = response?.[key]
      const currentValue = doc?.[key]

      if (newValue !== currentValue) {
        valuesToUpdate[key] = newValue
      }
    }

    if (Object.keys(valuesToUpdate).length > 0) {
      await doc.update({ ...valuesToUpdate, updatedAt: response?.updatedAt })
    }

    return response
  }

  public async togglePublish(id: string) {
    const { doc, data } = await this.exampleRepository.getUpdate(id)

    if (!doc || !data) {
      throw new NotFoundException('Example document does not exist')
    }

    const newPublishedState = !data?.isPublished

    const response = this.exampleRepository.getValidProperties({ ...data, isPublished: newPublishedState }, true)

    await doc.update({ isPublished: newPublishedState, updatedAt: response?.updatedAt })

    return response
  }
}
So far, only the example.repository.ts file is shrouded in mystery; it is responsible for interacting with the Firestore database for the Example collection. Let's add its implementation as well.
// example/repositories/example.repository.ts

import { CollectionReference, Query, Timestamp } from '@google-cloud/firestore'
import { Inject, Injectable, Logger } from '@nestjs/common'
import { getUniqueId, time } from 'src/helpers'

import { ExampleFilter } from '../dto'
import { ExampleDocument } from '../entities'

@Injectable()
export class ExampleRepository {
  private logger: Logger = new Logger(ExampleRepository.name)

  constructor(
    @Inject(ExampleDocument.collectionName)
    private collection: CollectionReference,
  ) {}

  async getDataByDocumentId(id: string): Promise {
    const snapshot = await this.collection.doc(id).get()

    if (!snapshot.exists) {
      return null
    } else {
      return snapshot.data()
    }
  }

  /**
  * The method returns the document value and additional methods for working with the collection document, with a particular focus on the .update(...props) method.
  **/
  async getUpdate(id: string) {
    const doc = await this.collection.doc(id)
    const snapshot = await doc.get()

    if (!snapshot.exists) {
      return { doc: null, data: null }
    } else {
      return { doc, data: snapshot.data() }
    }
  }

  /**
  * Essentially, this method will handle adding new filters to the collection query.
  * At the moment, it only uses the `isPublished` flag.
  **/
  private findGenerator(filter: ExampleFilter) {
    const collectionRef = this.collection
    let query: Query = collectionRef

    if (typeof filter?.isPublished === 'boolean') {
      query = query.where('isPublished', '==', filter.isPublished)
    }

    return query
  }

  async find(filter: ExampleFilter): Promise {
    const list: ExampleDocument[] = []
    const query = this.findGenerator(filter)

    const snapshot = await query.get()

    snapshot.forEach((doc) => list.push(doc.data()))

    return list
  }

  async create(payload: Pick & Partial) {
    const validPayload = this.getValidProperties(payload)
    const document = await this.collection.doc(validPayload.id)
    await document.set(validPayload)

    return validPayload
  }

  /**
  * This method is needed to prepare data before writing to Firestore.
  * The input document may be missing an ID and other fields, so we provide fallback values and set document timestamps.
  * The `newUpdatedAt` flag is used to set the current date in the `updatedAt` field.
  **/
  public getValidProperties(
    document: Omit & { id?: string; isPublished?: boolean | null },
    newUpdatedAt = false,
  ) {
    const dueDateMillis = time().valueOf()
    const createdAt = Timestamp.fromMillis(dueDateMillis)

    return {
      id: document.id || getUniqueId(),
      title: document.title,
      text: document.text ?? null,
      isPublished: document.isPublished ?? false,
      createdAt: document.createdAt ?? createdAt,
      updatedAt: newUpdatedAt ? createdAt : (document.updatedAt ?? null),
    }
  }
}
Of course, in the example/index.ts file, we will set up re-exporting of the module and document.
// example/index.ts
export * from './entities'
export * from './example.module'
Now we can update the firebase.providers.ts file.
// firebase.provider.ts
import { ExampleDocument } from 'src/modules/example'

...

// In this way, we add the document to the list of Firestore collections for working with `ExampleDocument`.
// In the future, you will need to add other new Firestore collections here.
export const FirestoreCollectionProviders: string[] = [ExampleDocument.collectionName]
To get the example module working, add it to the app.module.ts file.
...
import { ExampleModule } from './modules/example'
...

@Module({
  imports: [
    ...,
    ExampleModule,
  ],
  ...
})
export class AppModule {}
It seems we forgot something. Working with Firebase without configuration files is not very convenient, especially when dealing with different environments. You will need to install the Firebase CLI globally: npm install -g firebase-tools. After that, you will likely need to authenticate by running firebase login. Once you complete the required steps, you can proceed to configure Firebase from the terminal.
In the terminal, in the root of your project, you need to run the command firebase init. This command will start the initialization process for a new or previously created Firebase project. Select Firestore from the options provided. If, like me, you have already created a Firebase project, choose Use an existing project, find your project in the list, and select it. Continue the setup; usually, there’s no need to change anything further; you can keep the default file names as they are.
Note: Selection is made by pressing the spacebar, and continuation is done by pressing enter/return (depending on your keyboard). Options are presented as hollow circles (essentially radio buttons).
Note 2: Sometimes the required project may not appear. In that case, you can use the configuration files from the commit that will be at the end of these setup instructions.
You might also encounter a problem, like the one I faced: Error: It looks like you haven't used Cloud Firestore in this project before. Go to https://console.firebase.google.com/project/nestjs-boilerplate-example/firestore to create your Cloud Firestore database. This can be resolved by adding a billing account. If you run firebase init --debug, you can see the specific error.
Here is my error log for initialization due to an inactive billing account:
":{"code":403,"message":"Read access to project 'nestjs-boilerplate-example' was denied: please check billing account associated and retry","status":"PERMISSION_DENIED"}}
[2024-07-28T18:40:19.841Z] error getting database typeHTTP Error: 403, Read access to project 'nestjs-boilerplate-example' was denied: please check billing account associated and retry {"name":"FirebaseError","children":[],"context":{"body":{"error":{"code":403,"message":"Read access to project 'nestjs-boilerplate-example' was denied: please check billing account associated and retry","status":"PERMISSION_DENIED"}},"response":{"statusCode":403}},"exit":1,"message":"HTTP Error: 403, Read access to project 'nestjs-boilerplate-example' was denied: please check billing account associated and retry","status":403}
[2024-07-28T18:40:19.842Z] database_type: undefined
You can set up a billing account on the page: GCP Billing.
After creating a billing account in GCP and linking the project to this account, you should be able to complete the configuration without any further issues.

After completing all the steps, the following files will be added to your project:
- .firebaserc
- firebase.json
- firestore.indexes.json - list of current indexes, which we edit in this file
- firestore.rules - contains the rules for working with Firestore. We do not change its value in the project dashboard.
Note: Instead of the .firebaserc file, we keep its example, .firebaserc.example, in the Git repository. How to set up CI/CD for all of this will be covered in the next article about deploying the backend on a VPS.
In the future, we will be mainly interested in .firebaserc (which will contain the Firebase project name) and firestore.indexes.json (where you can configure your indexes and deploy them to the project using the command firebase deploy --only firestore:indexes).
The final set of changes at this stage can be found in this commit.
At this stage, you can already work comfortably with the project and add the necessary indexes to Firestore, and so on. However, that’s not all. For example, I can’t live without Husky. Additional pre-commit hooks and many other settings can be configured through it. This is especially useful in team development for additional quality control. You can safely skip the next step if you don’t need it. The final boilerplate repository will already include all necessary settings for working with Husky. After setting up pre-commits, we will also review the current api/example work and add the necessary indexes for the example collection. I hope you’re not tired yet; let’s continue!
Continuing with Additions
Having completed all the above steps, we now have:
- A functional backend API that can be run locally and tested using curl or, for example, Postman.
- A working connection to the Firebase project and Firebase/Firestore configuration.
Next, we want to discuss:
- Setting up a Husky pre-commit hook to run code linter
- Reviewing the current CRUD operations and adding indexes
- Adding an API for uploading files to Google Cloud Storage (also known as Google Cloud Bucket)
Husky
Follow the Husky Get Started documentation for detailed instructions.
In your terminal, run the command pnpm add -D husky, then initialize Husky by running npx husky init. This will add a .husky folder to your project, along with a pre-commit file that will run during the commit stage. Let’s modify the package.json to include a new command in the scripts section.
...
"scripts": {
  ...,
  "prepare": "node .husky/install.mjs"
}
Next, add the .husky/install.mjs file
// Skip Husky install in production and CI
if (process.env.NODE_ENV === 'production' || process.env.CI === 'true') {
  process.exit(0)
}
const husky = (await import('husky')).default
console.log(husky())
This script is needed to avoid installation errors with Husky after running the dependency installation command npm i/pnpm i.
Additionally, we will need to edit the .husky/pre-commit file.
pnpm run lint-staged && pnpm run lint:fix
Since we need to run a hook that checks files, you also need to install the package pnpm add -D lint-staged and add additional configuration to package.json.
This setup ensures that only the staged files are linted before committing, which helps maintain code quality and avoid committing files with linting errors.
...
"scripts": {
  ...,
  "lint-staged": "lint-staged --allow-empty",
},
"lint-staged": {
  "*.{js,jsx,ts,tsx}": [
    "pnpm lint --fix"
  ]
}
...
As a result, we will end up with this commit. From now on, all future commits will be validated for JavaScript/TypeScript files using ESLint/Prettier, and fixes will be applied for future commits using the previously added command lint:fix. You can consider this pre-commit hook example as a foundation for your personal configurations. You can view the full list of available Git hooks in githooks.
Testing and building indexes for api/example
The app.module already includes an example working controller in app.controller.ts, which can be accessed by sending a request to http://localhost:8080 from a browser or Postman. I will use Postman for a more convenient demonstration.
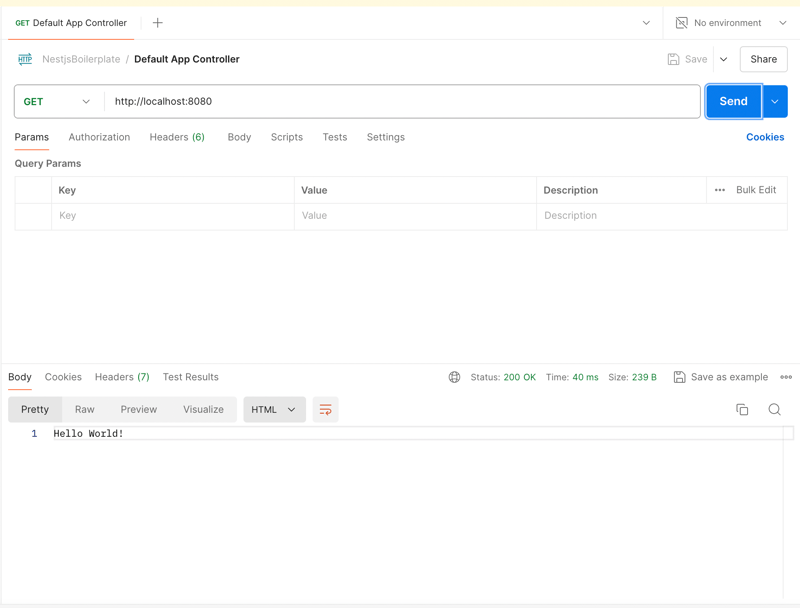
Let's make a few more requests.
List of example documents.
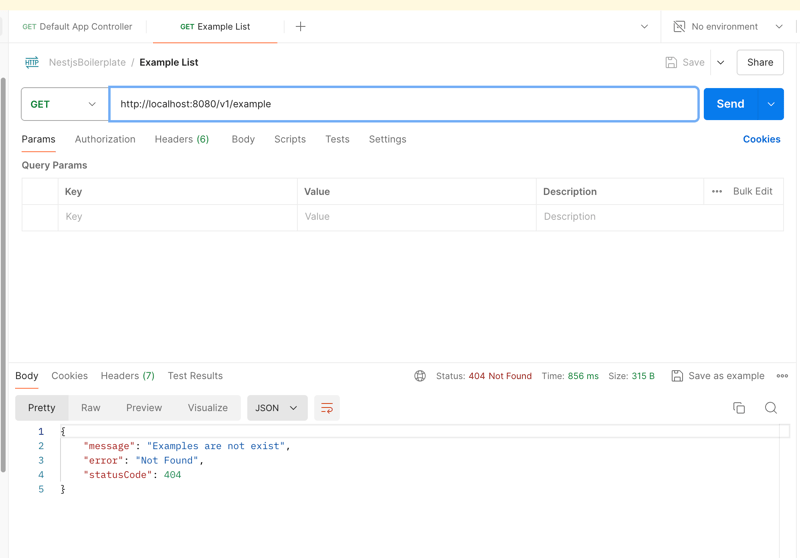
As a result, we will get the expected 404 error about missing documents. (This behavior is initially set in the controller code, you can configure it as you see fit)
Now, let's request a list of examples with a filter in the query parameters ?isPublished=
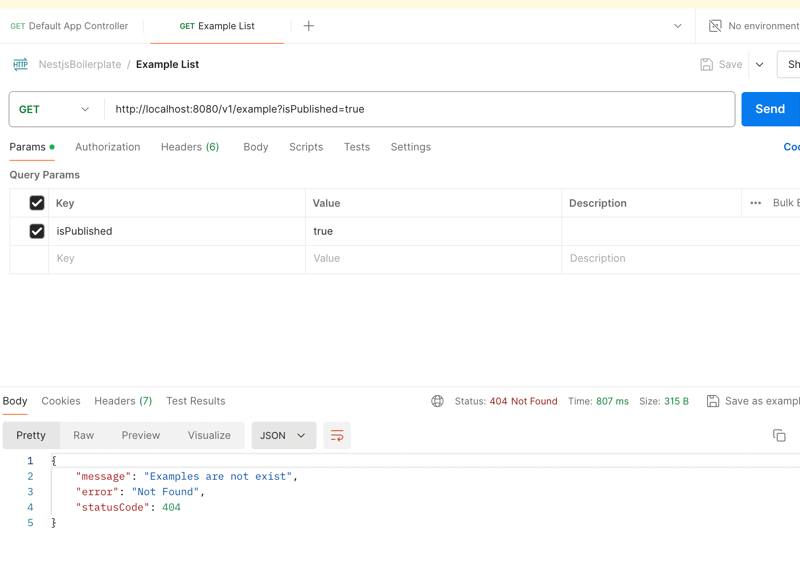
So, we sent a request with a parameter, but we get the same error. In fact, this is normal, but there is a problem. At the moment, our API cannot read and work with boolean values, they are displayed in controllers and services as string values 'true' | 'false'.
If we log the incoming query argument in the GET v1/example controller, we will see the following picture
{ isPublished: 'false' }
There are several ways to solve this problem.
- At the repository level, in the findGenerator method, manually convert the boolean string to the Boolean type.
// Instead of
if (typeof filter?.isPublished === 'boolean') {
  query = query.where('isPublished', '==', filter.isPublished)
}

// Something like this
if (filter?.isPublished) {
  const isPublished = filter?.isPublished === 'true' ? true : false
  query = query.where('isPublished', '==', isPublished)
}
- Add an additional step to transform them
Let's try the second step. Edit the controller method.
// example/controllers/example.controller.ts
import {
  ...,
  ParseBoolPipe,
  ...,
} from '@nestjs/common'
...
  @Get('/')
  async getList(@Query('isPublished', ParseBoolPipe) isPublished?: boolean): Promise {
    const response = await this.exampleService.getList({ isPublished })
    // ...
  }
...
Thus, we transform the incoming isPublished parameter into a boolean value.
Creating a new example document
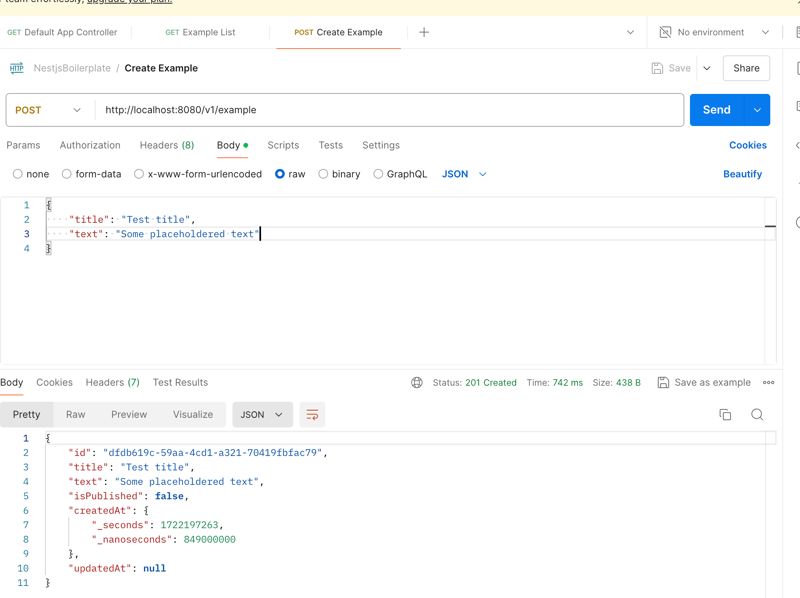
I created several documents as an example. Let's request our list again, with a filter for isPublished=false
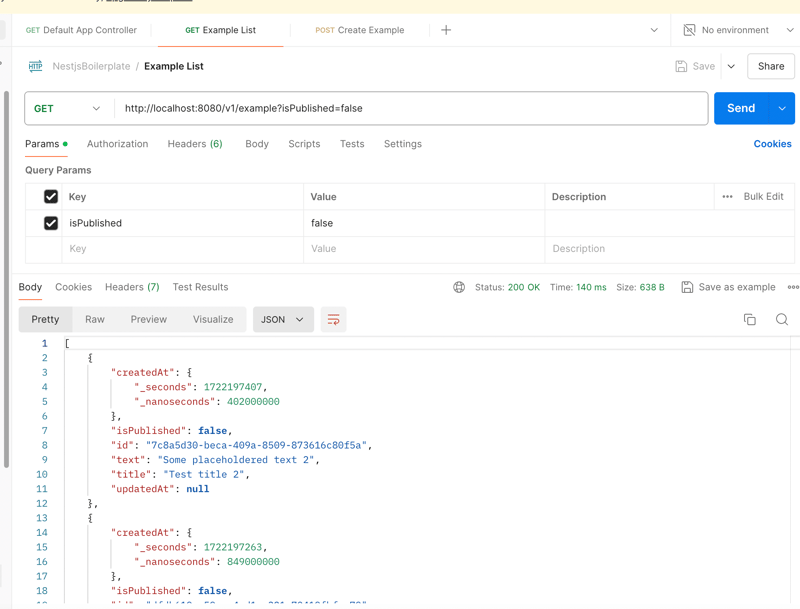
If you look closely, you can see that the list is being fetched correctly. However, for many collections, it's necessary to change directions or guarantee the return of a list, for example, taking into account the creation date by descending/ascending values.
// repositories/example.repository.ts ... async find(filter: ExampleFilter): Promise{ ... let query = this.findGenerator(filter) query = query.orderBy('createdAt', 'desc') ... } ...
After attempting to request the list method again, we will see that the response has changed to a 500 error. If we go to the console, we will see that Firestore has thrown an error about the absence of an index for such a list query.
9 FAILED_PRECONDITION: The query requires an index. You can create it here:
Feel free to follow this URL to the project console, where you'll see a suggestion to add a new index. Don't rush to add it from there (you can initiate index creation from the console, but I'd prefer to do this through the firestore.indexes.json file)
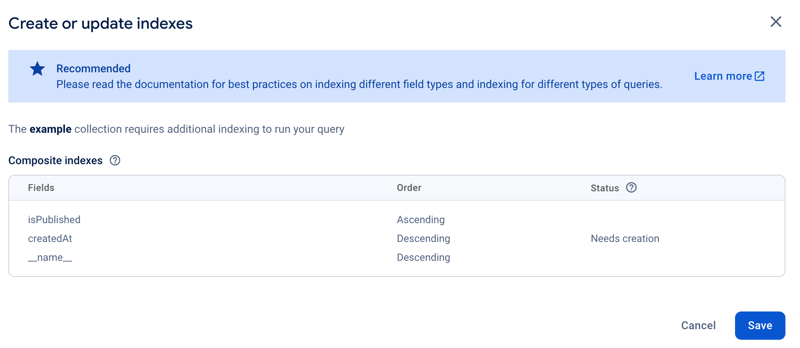
We need to take the data from this modal and manually create a new index, it will look like this:
// firestore.indexes.json
{
  "indexes": [
    {
      "collectionGroup": "example",
      "queryScope": "COLLECTION",
      "fields": [
        {
          "fieldPath": "isPublished",
          "order": "ASCENDING"
        },
        {
          "fieldPath": "createdAt",
          "order": "DESCENDING"
        }
      ]
    }
  ],
  "fieldOverrides": []
}
The __name__ field does not need to be specified in this config; during deployment, it is added automatically. It's also important to maintain the order of fields.
After editing the file, feel free to run the deployment command firebase deploy --only firestore:indexes
After launching, in the same Firebase console, in the indexes tab, you will see your index with the status Building... You need to wait for it to build and then make a request for the list again.
Getting Example by ID
Now we can check the method of getting an example document by id. I won't include a screenshot as this request should already work without problems. In my case, it's http://localhost:8080/v1/example/7c8a5d30-beca-409a-8509-873616c80f5a, your ID may differ from mine.
Editing Example Document by ID
Let's check the method of editing an example document, I will edit the title.
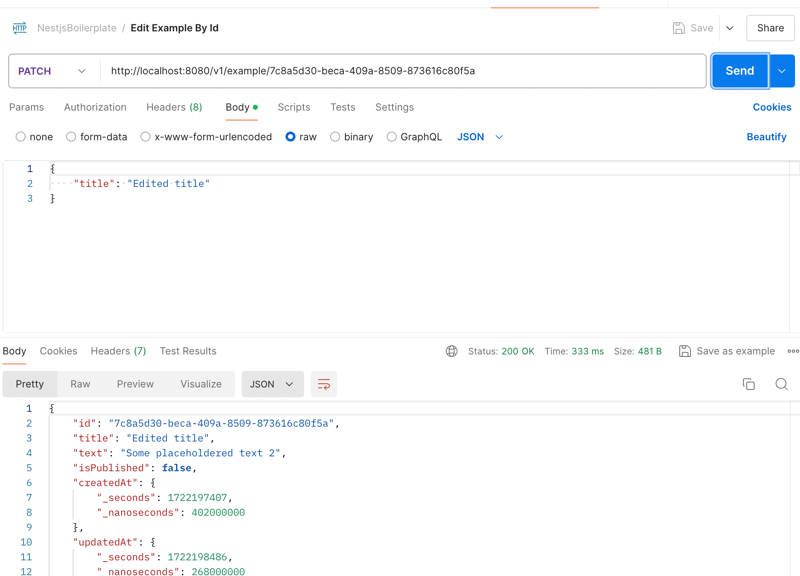
If we request the list or document by id again, we will also see the changed data.
Changing the isPublished flag
In addition, let's change the value of isPublished in the document by making a request to another endpoint.
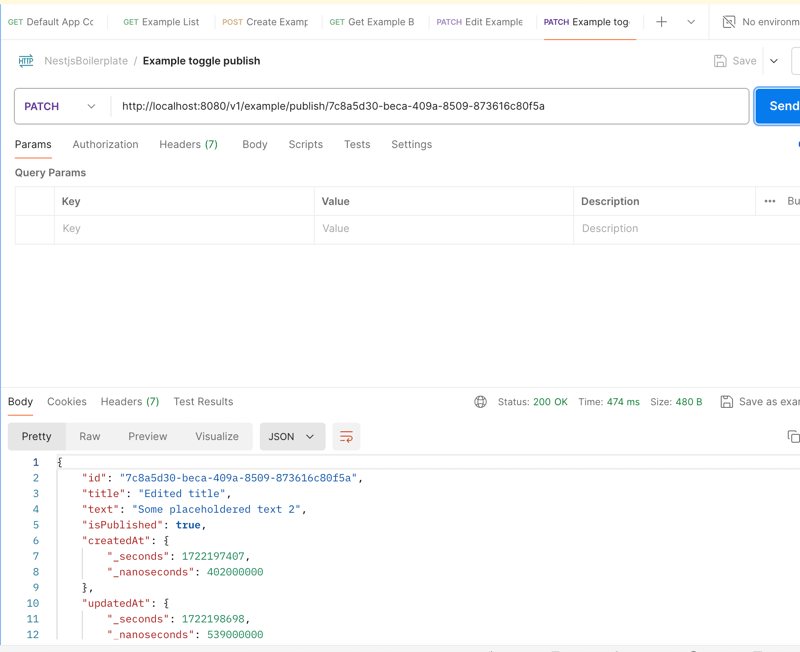
If you check the state of the list with isPublished=false or true, you will see changes in the returned data.
I'm also attaching a link to the current set of API calls in Postman json file. You can download it and import it into your Postman workspace for quick deployment of the request environment.
Another commit with changes. At this point, I could stop, but we haven't yet covered the aspect of publishing files to GCloud Storage...
Firebase Storage
Let's define in advance the aspects of working with Storage that I'm aware of.
- Nest.js provides documentation on file uploading
- Free Storage provides 5GB of storage, beyond this volume you'll have to pay monthly for each byte of data.
- The free Spark plan doesn't allow creating separate buckets, but we'll account for this case in the code. However, I recommend using the project's default bucket and resolving the files themselves by folders and subfolders in the code.
Use cases for Storage
- Reading and writing a file to a temporary folder in the project root, /uploads in our case
- Writing and deleting a file in Storage
- Generating a public link to the file, if such a need exists (by default, we will always provide a public link, you can rewrite or supplement the necessary piece of code according to your use cases, I will provide a working example)
Let's get started, we have N new files waiting for us.
In the providers folder, next to firebase, let's add a new folder - bucket.
In it, we will create, of course, the bucket.module.ts file and a bunch of auxiliary ones. By the way, I almost forgot, let's install the packages pnpm add @google-cloud/storage multer lodash, and necessarily pnpm add -D @types/multer.
Proposed structure:
src/providers
  - bucket
    - providers
      default.bucket.ts
      index.ts
    bucket.constants.ts
    bucket.module.ts
    bucket.providers.ts
    bucket.shared.service.ts
    bucket.types.ts
    index.ts
    utils.ts
Let's describe each file, there will be relatively little code. And we'll add uploading and deleting to a separate endpoint for working with images via api/example/:id/image. Let's start with the auxiliary files.
// default.bucket.ts
export class DefaultBucketProvider {
  static bucketName = 'default'
}

// bucket.constants.ts
export const getDefaultOptions = (role: string) => ({
  entity: 'allUsers',
  role: role,
})
bucket.providers.ts represents the same concept as the firestore.providers.ts file.
// bucket.providers.ts
import { DefaultBucketProvider } from './providers'

export const StorageBucketsProvider = 'StorageBucketsProvider'
export const StorageOptionsProvider = 'StorageOptionsProvider'

export const StorageBucketProviders: string[] = [DefaultBucketProvider.bucketName]

// bucket.types.ts
import { Bucket, Storage } from '@google-cloud/storage'

export type StorageProps = {
  keyFilename: string
}

export type FirestoreModuleOptions = {
  imports: any[]
  useFactory: (...args: any[]) => StorageProps
  inject: any[]
}

export type BucketProvider = {
  bucket: Bucket
  storage: Storage
}
Our service for working with Bucket.
// bucket.shared.service.ts
import { Bucket } from '@google-cloud/storage'
import { Logger } from '@nestjs/common'
import { extname } from 'path'

export class BucketSharedService {
  private bucket: Bucket
  private logger: Logger

  constructor(bucket: Bucket, logName?: string) {
    this.bucket = bucket
    this.logger = new Logger(`${BucketSharedService.name}_${logName}`)
  }

  public async isFileExists(name: string) {
    try {
      const fileName = name
      const file = this.bucket.file(fileName)

      const [isExists] = await file.exists()

      return isExists
    } catch (error) {
      throw error
    }
  }

  public async deleteFileByName(path: string, folderPath: string) {
    return new Promise(async (resolve, reject) => {
      const pathes = path?.includes('/') ? path?.split('/') : path?.split('/')
      const fileName = pathes?.[pathes?.length - 1]
      const file = this.bucket.file(`${folderPath ? `${folderPath}/` : ''}${fileName}`)

      const [isExists] = await file.exists()

      if (!isExists) {
        reject(new Error('File does not exist'))
      }

      /**
       * There are no guarantees that it definitely deletes, but it seems that files become inaccessible for search by their links
       */
      file
        .delete()
        .then((res) => {
          resolve(res)
        })
        .catch((err) => {
          this.logger.error('Error with file bucket removing', err?.message)
          reject(err)
        })
    })
  }

  /**
   * Using with internal upload folders
   */
  public async saveFileByUploadsFolder(definedFile: Express.Multer.File, folderPath?: string): Promise {
    const uniqueSuffix = `${folderPath || 'main'}/${Date.now()}-${Math.round(Math.random() * 1e9)}`
    const fileName = `${uniqueSuffix}${extname(definedFile.path)}`

    return new Promise((resolve, reject) => {
      this.bucket
        .upload(definedFile.path, {
          destination: fileName,
        })
        .then((response) => {
          const [uploadedFile] = response || []
          const file = this.bucket.file(uploadedFile?.metadata?.name)

          file.makePublic(async (err) => {
            if (err) {
              this.logger.error(`Error making file public: ${err}`)
              reject(err)
            } else {
              this.logger.log(`File ${file.name} is now public.`)
              const publicUrl = file.publicUrl()
              this.logger.log(`Public URL for ${file.name}: ${publicUrl}`)
              resolve(publicUrl)
            }
          })

          return true
        })
        .catch((err) => {
          reject(err)
        })
    })
  }

  /**
   * Using without multer storage option, only memory buffer
   */
  public async saveFileByUrlAndBuffer(path: string, folderPath: string, buffer: Buffer): Promise {
    return new Promise(async (resolve, reject) => {
      const uniqueSuffix = `${folderPath || 'main'}/${Date.now()}-${Math.round(Math.random() * 1e9)}`
      const fileName = `${uniqueSuffix}${extname(path)}`
      const file = this.bucket.file(fileName)
      await file.save(buffer)

      file.makePublic(async (err) => {
        if (err) {
          this.logger.error(`Error making file public: ${err}`)
          reject(err)
        } else {
          this.logger.log(`File ${file.name} is now public.`)
          const publicUrl = file.publicUrl()
          this.logger.log(`Public URL for ${file.name}: ${publicUrl}`)
          resolve(publicUrl)
        }
      })
    })
  }
}
Adding a module with logic for connecting to Storage.
// bucket.module.ts
import { Storage } from '@google-cloud/storage'
import { DynamicModule, Module } from '@nestjs/common'
import * as fs from 'fs'

import { getDefaultOptions } from './bucket.constants'
import { StorageBucketProviders, StorageBucketsProvider, StorageOptionsProvider } from './bucket.providers'
import { FirestoreModuleOptions, StorageProps } from './bucket.types'

@Module({})
export class BucketModule {
  static forRoot(options: FirestoreModuleOptions): DynamicModule {
    const bucketProviders = StorageBucketProviders.map((providerName) => ({
      provide: providerName,
      useFactory: async (storage: Storage) => {
        console.log(storage, 'storage')
        /**
         * Use default bucket name
         */
        const bucket = storage.bucket(providerName === 'default' ? `${storage.projectId}.appspot.com` : providerName)

        const [isExist] = await bucket.exists()

        /**
         * Basic steps to create public bucket with writer rules, available only for BLAZE price
         */
        if (!isExist) {
          const options = getDefaultOptions(storage.acl.WRITER_ROLE)

          await bucket.create().catch((err) => console.error(`bucket ${providerName} creation get error`, err))

          console.info(`bucket ${providerName} created successfully`)

          bucket.acl.add(options, (err) => {
            if (!err) {
              console.info(`acl added successfully to ${providerName} bucket`)
            } else {
              console.error(`bucket ${providerName} error`, err)
            }
          })
        }

        return { bucket, storage }
      },
      inject: [StorageBucketsProvider],
    }))

    const optionsProvider = {
      provide: StorageOptionsProvider,
      useFactory: options.useFactory,
      inject: options.inject,
    }

    const provider = {
      provide: StorageBucketsProvider,
      useFactory: (config: StorageProps) => {
        const serviceAccount: { project_id?: string } = JSON.parse(fs.readFileSync(config.keyFilename, 'utf8'))

        return new Storage({ ...config, projectId: serviceAccount.project_id ?? '' })
      },
      inject: [StorageOptionsProvider],
    }

    return {
      global: true,
      module: BucketModule,
      imports: options.imports,
      providers: [optionsProvider, provider, ...bucketProviders],
      exports: [provider, ...bucketProviders],
    }
  }
}
Next, we need configuration for uploading files from the API to the temporary folder /uploads.
// utils.ts
import { diskStorage } from 'multer'
import { extname } from 'path'

export const storage = diskStorage({
  destination: './uploads',
  filename: (_, file, cb) => {
    // Proposed file name regeneration
    const uniqueSuffix = `${Date.now()}-${Math.round(Math.random() * 1e9)}`
    cb(null, `${uniqueSuffix}${extname(file.originalname)}`)
  },
})
The constant storage will be needed to avoid overloading memory when working with uploaded images. If diskStorage is not used, we may encounter a shortage of RAM as traffic grows.
// index.ts - for short imports
export * from './bucket.module'
export * from './bucket.shared.service'
export * from './bucket.types'
export * from './providers'
export * from './utils'
To successfully launch the bucket module, it needs to be imported into app.module.ts.
// app.module.ts
...

@Module({
  imports: [
    ...
    BucketModule.forRoot({
      imports: [ConfigModule],
      useFactory: (configService: ConfigService) => ({
        keyFilename: configService.get('SA_KEY'),
      }),
      inject: [ConfigService],
    }),
  ],
  ...
})
export class AppModule {}
Let's add a helper for file validation. In it, we will describe the allowed file extensions and sizes.
- helpers
  ...
  - fileValidation
    constants.ts
    utils.ts
    index.ts
// constants.ts
export const listDefaultImageExt = 'image/png,image/jpeg,image/webp'

export const listPngAndJpegImageExt = 'image/png,image/jpeg'

export const IMG_MAX_SIZE_IN_BYTE = 716800 // 700kb

export const IMG_MAX_1MB_SIZE_IN_BYTE = 1048576 // 1mb

export const IMG_MAX_5MB_SIZE_IN_BYTE = 1048576 * 5 // 1mb

// utils.ts
import { reduce } from 'lodash'

export const getFileTypesRegexp = (ext: string): string => reduce(ext.split(','), (acc, key) => `${acc}|${key}`)
Now let's focus on the controller and the image handling method, along the way, we will add a new parameter to example.document.ts and example.repository.ts, detailed changes can be viewed in the commit at the end of this section.
// example/controllers/example.controller.ts
...

@Post('/:id/image')
@UseInterceptors(FileInterceptor('file', { storage, limits: { files: 1 } }))
async updateExampleImage(
  @UploadedFile(
    new ParseFilePipe({
      validators: [
        new MaxFileSizeValidator({ maxSize: IMG_MAX_1MB_SIZE_IN_BYTE }),
        new FileTypeValidator({ fileType: getFileTypesRegexp(listPngAndJpegImageExt) }),
      ],
    }),
  )
  file: Express.Multer.File,
  @Param('id') id: string,
): Promise {
  return this.exampleService.updateImage(id, file)
}
...
// example/services/example.service.ts
...
export class ExampleService {
  private bucketService: BucketSharedService

  constructor(
    private readonly exampleRepository: ExampleRepository,
    @Inject(DefaultBucketProvider.bucketName)
    private readonly bucketProvider: BucketProvider,
  ) {
    this.bucketService = new BucketSharedService(this.bucketProvider.bucket, ExampleService.name)
  }
...
  public async updateImage(id: string, file: Express.Multer.File) {
    try {
      const { doc, data } = await this.exampleRepository.getUpdate(id)

      if (!doc || !data) {
        throw new NotFoundException('Example document does not exist')
      }

      const imageUrl = await this.bucketService.saveFileByUploadsFolder(file, `example/${data?.id}`)

      // It is possible to add deletion through an additional check if (data?.imageUrl, but in general this is not necessary, for the case when the file is missing, we definitely wrap the delete method call in a try-catch block)
      try {
        /**
         * Try to remove previously file
         */
        await this.bucketService.deleteFileByName(data?.imageUrl, `example/${data?.id}`)
      } catch {}

      const response = this.exampleRepository.getValidProperties({ ...data, imageUrl }, true)

      await doc.update({ imageUrl, updatedAt: response?.updatedAt })

      /**
       * Need for deletion uploads file by file.path
       */
      fs.unlinkSync(file.path)

      return response
    } catch (error) {
      /**
       * Need for deletion uploads/ file path
       */
      fs.unlinkSync(file.path)

      throw error
    }
  }
...
}
In general, everything is fine with file uploads. We have added a simple example of uploading an image to the example document. Let's make a request and check that everything works correctly.
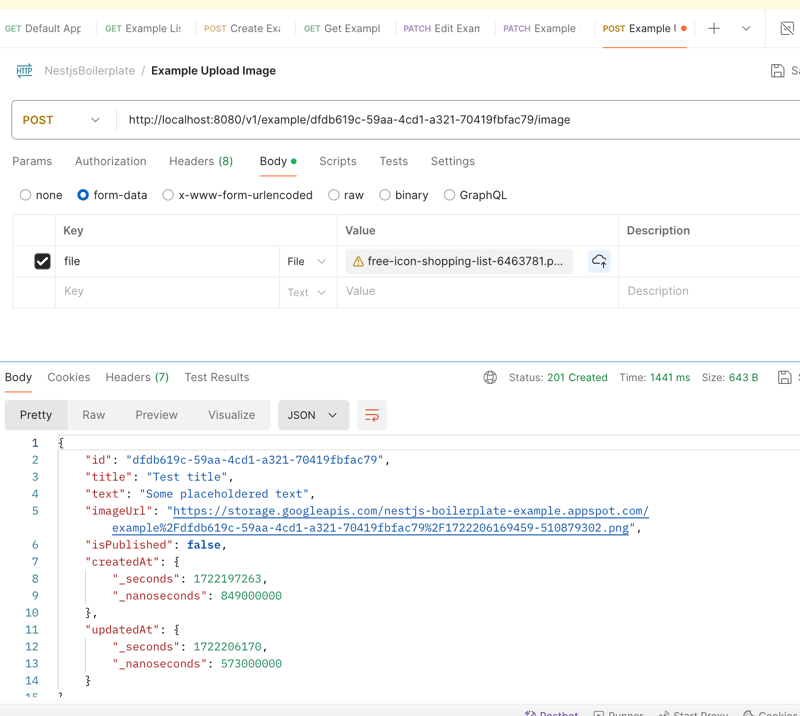
It can be noticed that the imageUrl field has been added to the model with a link from GCloud Storage. The full set of changes can be found in this commit.
Conclusion
I hope that with this article we have achieved the intended goal of describing the minimum project configuration with an example of code structure, working with Firestore and GCloud Bucket. The full example of a NestJS project can be found on my GitHub. I hope that I have been able to clearly and with a sufficient amount of code describe the basic steps for generating a CRUD application. I would not like to stop at this article. I will be glad to receive feedback and criticism. The final repo can serve as a not bad example for your quick start in developing an MVP or pet project on Nest.js integrated with Firebase or any other PaaS solution.
In the next articles, we will return to this boilerplate and try to do more:
- Implement methods for working with authorization and authentication in Firebase in a Nest.js API (Based on this article and the current example project).
- Add Swagger for convenient viewing of contracts and API testing.
- Dive a little into deploying the resulting backend application and set up notifications in the team chat Telegram.
- Try to write a Telegram Bot based on the nestjs-startup-boilerplate.
- Create a Mini-App in conjunction with the resulting Telegram bot.
-
 Uma nova maneira de contribuir no Hacktoberfest: diretamente no Frontend AIO Hacktoberfest está de volta e este ano traz uma nova maneira emocionante para os desenvolvedores participarem. Em vez das solicitações pull tradicio...Programação Publicado em 2024-11-07
 -
 Por que \"cout\" imprime \"1\" quando um ponteiro de função é usado sem parênteses?Por que "cout uma função sem chamá-la (não f() mas f;). Imprimir 1 sempre?"Neste código, o código tenta "chamar" uma função chamad...Programação Publicado em 2024-11-07
 -
 Torne sua página da web mais rápidaO que é um DOM? O que ele come? O DOM (Document Object Model) é a base das páginas web e seu desenvolvimento. É uma interface de programação ...Programação Publicado em 2024-11-07
 -
 exigir vs importação em JavaScriptLembro que quando comecei a codificar, via alguns arquivos js usando require() para importar módulos e outros arquivos usando import. Isso sempre me c...Programação Publicado em 2024-11-07
 -
 Implantando um aplicativo Vite/React com imagens: um guia completoImplantar um aplicativo Vite/React nas páginas do GitHub é um marco emocionante, mas o processo às vezes pode vir com desafios inesperados, especialme...Programação Publicado em 2024-11-07
 -
 Como otimizei chamadas de API em meu aplicativo ReactComo desenvolvedores do React, frequentemente enfrentamos cenários em que várias mudanças rápidas de estado precisam ser sincronizadas com uma API. Fa...Programação Publicado em 2024-11-07
 -
 Vamos!Por que você precisa experimentar GO Go é uma linguagem compilada rápida, leve e de digitação estática, perfeita para criar aplicativos efici...Programação Publicado em 2024-11-06
 -
 Como codificar imagens PNG como Base64 para URIs de dados CSS?Usando codificação Base64 para imagens PNG em URIs de dados CSSPara incorporar imagens PNG em folhas de estilo CSS usando URIs de dados, os dados PNG ...Programação Publicado em 2024-11-06
 -
 Carrossel JavaScript responsivo para dados horários de APII almost mistook an incomplete solution for a finished one and moved on to work on other parts of my weather app! While working on the carousel that w...Programação Publicado em 2024-11-06
 -
 Quais são as principais diferenças entre PHP e JavaScript para desenvolvimento web?PHP vs JavaScript: lado do servidor vs lado do cliente PHP desempenha uma função diferente do JavaScript. PHP é executado no lado do servidor...Programação Publicado em 2024-11-06
 -
 Como posso iterar membros de estrutura e classe em C++ para acessar seus nomes e valores em tempo de execução?Iterando sobre estrutura e membros de classeEm C , é possível iterar através dos membros de uma estrutura ou classe para recuperar seus nomes e valore...Programação Publicado em 2024-11-06
 -
 Item Evite o float e o double caso sejam necessárias respostas exatasProblema com float e double: Projetados para cálculos científicos e matemáticos, executam aritmética binária de ponto flutuante. Não são adequados par...Programação Publicado em 2024-11-06
 -
 Usando WebSockets no Go para comunicação em tempo realCriar aplicativos que exigem atualizações em tempo real, como aplicativos de bate-papo, notificações ao vivo ou ferramentas colaborativas, requer um m...Programação Publicado em 2024-11-06
 -
 Como executar o Selenium Webdriver com proxy em Python?Executando o Selenium Webdriver usando um proxy em PythonQuando você tenta exportar um script Selenium Webdriver como um script Python e executá-lo a ...Programação Publicado em 2024-11-06
 -
 Quando acontece o || Operador atua como operador padrão em JavaScript?Compreendendo o objetivo do || Operador com operandos não booleanos em JavaScriptEm JavaScript, o || O operador, muitas vezes referido como operador l...Programação Publicado em 2024-11-06
Estude chinês
- 1 Como se diz “andar” em chinês? 走路 Pronúncia chinesa, 走路 aprendizagem chinesa
- 2 Como se diz “pegar um avião” em chinês? 坐飞机 Pronúncia chinesa, 坐飞机 aprendizagem chinesa
- 3 Como se diz “pegar um trem” em chinês? 坐火车 Pronúncia chinesa, 坐火车 aprendizagem chinesa
- 4 Como se diz “pegar um ônibus” em chinês? 坐车 Pronúncia chinesa, 坐车 aprendizagem chinesa
- 5 Como se diz dirigir em chinês? 开车 Pronúncia chinesa, 开车 aprendizagem chinesa
- 6 Como se diz nadar em chinês? 游泳 Pronúncia chinesa, 游泳 aprendizagem chinesa
- 7 Como se diz andar de bicicleta em chinês? 骑自行车 Pronúncia chinesa, 骑自行车 aprendizagem chinesa
- 8 Como você diz olá em chinês? 你好Pronúncia chinesa, 你好Aprendizagem chinesa
- 9 Como você agradece em chinês? 谢谢Pronúncia chinesa, 谢谢Aprendizagem chinesa
- 10 How to say goodbye in Chinese? 再见Chinese pronunciation, 再见Chinese learning


