Réagir – Actions du serveur
React form Actions.
React has introduced new form Actions and related hooks to enhance native forms and streamline client-server communication. These features enable developers to handle form submissions more effectively, improving both user experience and code maintainability. For an in-depth exploration of React form Actions, you can refer to my detailed post on my post about React Form Actions.
Server Actions
With React 18, the Server Components feature was introduced. Server components are not Server-Side Rendering (SSR), Server Components are executed exclusively on the server during both runtime and build time. These components can access server-side resources, such as databases and the file system, but they are not capable of performing client-side actions like event listeners or hooks.
Prerequisites
To demonstrate the capabilities of Server Components and Server Actions, we'll use Next.js and Prisma.
Next.js is a React framework for building full-stack web applications. You use React Components to build user interfaces, and Next.js for additional features and optimizations. Under the hood, Next.js also abstracts and automatically configures tooling needed for React, like bundling, compiling, and more. This allows you to focus on building your application instead of spending time with configuration. learn more
Prisma is an ORM that simplifies database access and operations, allowing you to query and manipulate data without writing SQL. Learn more
Initial Setup
Start by creating a new Next.js application:
yarn create next-app server-example
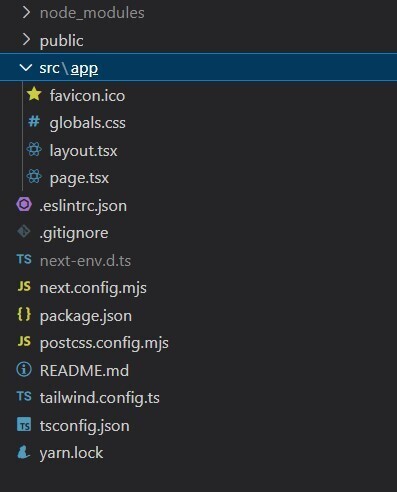
Your initial folder structure will look like this:

Upgrade to the Canary Release to access React 19 features, including Server Actions:
yarn add next@rc react@rc react-dom@rc
install Prisma
yarn add prisma
Prisma Configuration
Create a Prisma schema file at src/lib/prisma/schema.prisma:
generator client {
  provider = "prisma-client-js"
}

datasource db {
  provider = "sqlite"
  url      = "file:./dev.db"
}

model User {
  id    Int     @id @default(autoincrement())
  email String  @unique
  name  String?
  age Int
}
For demonstration purposes, we are using SQLite. For production, you should use a more robust database.
Next, add a Prisma client file at src/lib/prisma/prisma.ts
// ts-ignore 7017 is used to ignore the error that the global object is not
// defined in the global scope. This is because the global object is only
// defined in the global scope in Node.js and not in the browser.

import { PrismaClient } from '@prisma/client'

// PrismaClient is attached to the `global` object in development to prevent
// exhausting your database connection limit.
//
// Learn more:
// https://pris.ly/d/help/next-js-best-practices

const globalForPrisma = global as unknown as { prisma: PrismaClient }

export const prisma = globalForPrisma.prisma || new PrismaClient()

if (process.env.NODE_ENV !== 'production') globalForPrisma.prisma = prisma

export default prisma
Configure Prisma in package.json:
{
  //other settings
  "prisma": {
    "schema": "src/lib/prisma/schema.prisma",
    "seed": "ts-node src/lib/prisma/seed.ts"
  }
}
And update TypeScript settings in tsconfig.json:
{
  //Other settings here...

  "ts-node": {
    // these options are overrides used only by ts-node
    // same as the --compilerOptions flag and the
    // TS_NODE_COMPILER_OPTIONS environment variable
    "compilerOptions": {
      "module": "commonjs"
    }
  }
}
Install ts-node globally:
yarn global add ts-node
Seeding Initial Data
Add a seed file at src/lib/prisma/seed.ts to populate initial data:
import { PrismaClient } from "@prisma/client";
const prisma = new PrismaClient();
async function main() {
  await prisma.user.create({
    email: "[email protected]",
    name: "Anto",
    age: 35,
  });
  await prisma.user.create({
    email: "[email protected]",
    name: "Vinish",
    age: 32,
  });
}
main()
  .then(async () => {
    await prisma.$disconnect();
  })
  .catch(async (e) => {
    console.error(e);
    await prisma.$disconnect();
    process.exit(1);
  });
Install Prisma client
yarn add @prisma/client
Run the migration command:
yarn prisma migrate dev --name init
If the seed data is not reflected, add it manually:
yarn prisma db seed
Great! Since the installations are ready, you can create an actions file that performs database operations.
Creating Server Actions
Server Actions are a powerful feature that enables seamless client-server intercommunication. Let's create a file for database operations at src/actions/user.ts:
"use server";
import prisma from '@/lib/prisma/prisma'
import { revalidatePath } from "next/cache";

// export type for user
export type User = {
  id: number;
  name: string | null;
  email: string;
  age: number;
};


export async function createUser(user: any) {
  const resp = await prisma.user.create({ data: user });
  console.log("server Response");
  revalidatePath("/");
  return resp;
}

export async function getUsers() {
  return await prisma.user.findMany();
}

export async function deleteUser(id: number) {
  await prisma.user.delete({
    where: {
      id: id,
    },
  });
  revalidatePath("/");
}
Implementing Server Components
Let's create a React server component to read and render data from the database. Create src/app/serverexample/page.tsx:
import UserList from "./Users";
import "./App.css"
export default async function ServerPage() {
return (
Add some styling in src/app/serverexample/App.css
.App {
  text-align: center;
}

.App-logo {
  height: 40vmin;
  pointer-events: none;
}

.App-header {
  background-color: #282c34;
  min-height: 100vh;
  display: flex;
  flex-direction: column;
  align-items: center;
  justify-content: center;
  font-size: calc(10px   2vmin);
  color: white;
}

input {
  color: #000;
}

.App-link {
  color: #61dafb;
}
Create components to fetch and render the user list:
src/app/serverexample/UserList.tsx
import { getUsers } from "@/actions/user";
import { UserDetail } from "./UserDetail";
export default async function UserList() {
//Api call to fetch User details
const users = await getUsers();
return (
{users.length ? (
users.map((user) =>
src/app/serverexample/UserDetail.tsx
export function UserDetail({ user }) {
  return (


        {user.name}

          {user.email}


  );
}
Run the development server:
yarn dev
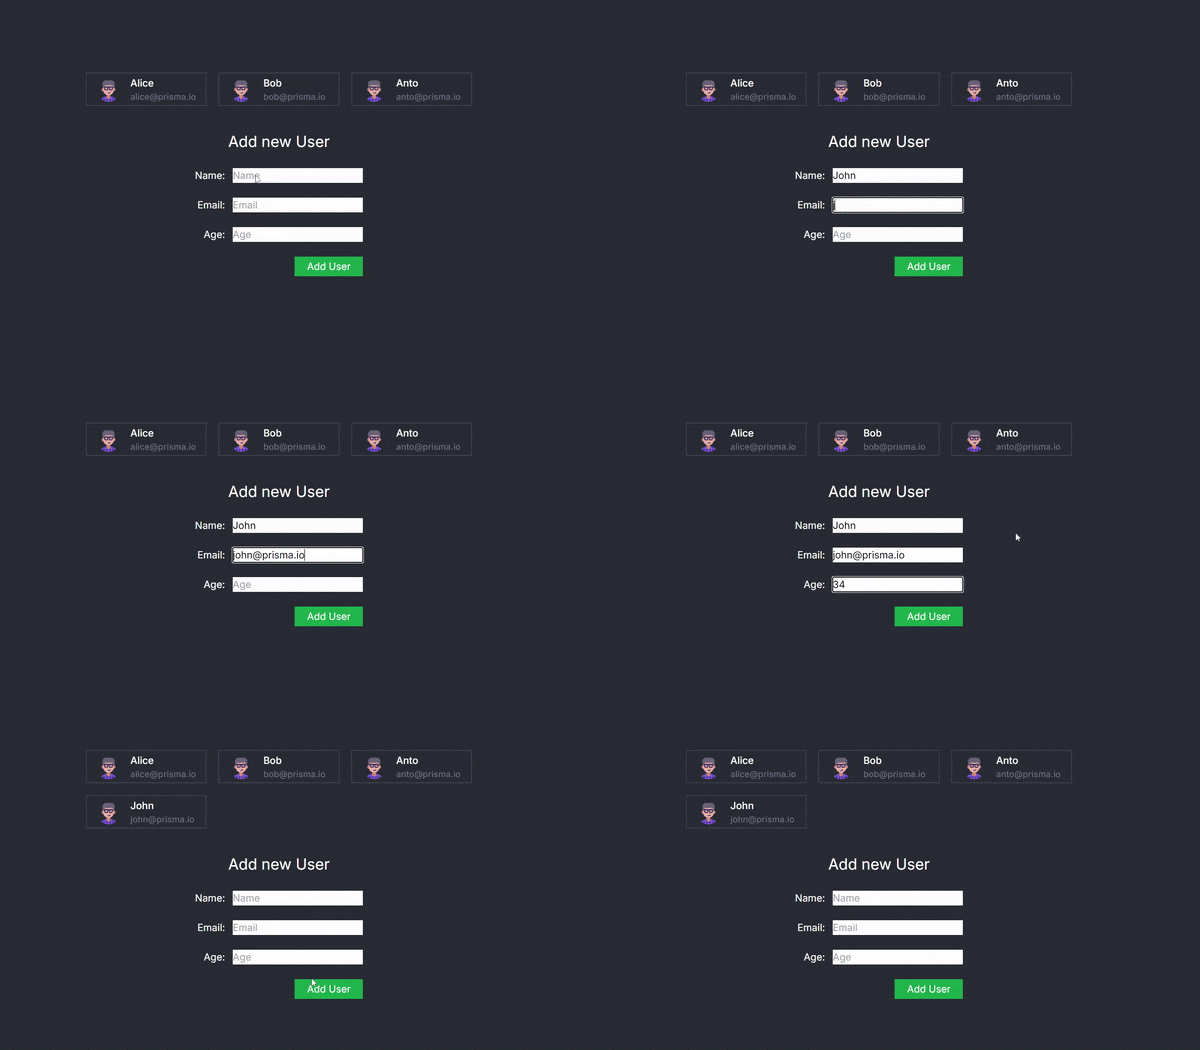
Navigate to http://localhost:3000/serverexample to see the rendered user list:
By default, components in Next.js are server components unless you specify the "use client" directive. Notice two important points:
- Async Component Definition: Server components can be asynchronous as they do not re-render and are only generated once.
- Data Fetching: The line const users = await getUsers(); fetches data from the server and renders it at runtime.
Exploring Server Actions
Server Actions enable seamless client-server intercommunication. Let's add a form to create new users.
Create a new file at src/app/serverexample/AddUser.tsx:
"use client";
import "./app.css";
import { useActionState } from "react";
import { createUser } from "../../actions/user";
const initialState = {
error: undefined,
};
export default function AddUser() {
const submitHandler = async (_previousState: object, formData: FormData) => {
try {
// This is the Server Action method that transfers the control
// Back to the server to do DB operations and get back the result.
const response = await createUser({
name: formData.get("name") as string,
email: formData.get("email") as string,
age: parseInt(formData.get("age") as string),
});
return { response };
} catch (error) {
return { error };
}
};
const [state, submitAction, isPending] = useActionState(
submitHandler,
initialState
);
return (
Add new User
{" "}
);
}
Update src/app/serverexample/page.tsx to include the AddUser component:
import UserList from "./UserList";
// Import new line
import AddUser from "./AddUser";
import "./App.css"
export default async function ServerPage() {
return (
Running the application will now allow you to add new users via the form, with server-side processing handled seamlessly.
The AddUser Component and Seamless Client-Server Interaction
The AddUser component is at the heart of this example, showcasing how React Server Actions can revolutionize the way we handle client-server interactions. This component renders a form for adding new users and leverages the useActionState hook to create a smooth and seamless bridge between the client-side interface and server-side operations.
How It Works
- Form Rendering and Data Handling:
- The AddUser component provides a form where users can input their name, email, and age.
- Upon form submission, the data is captured and prepared to be sent to the server.
- useActionState Hook:
- The useActionState hook is a crucial part of this setup. It simplifies the complexity of managing client-side state and server-side actions by abstracting them into a unified interface.
- This hook accepts an asynchronous handler function, which processes the form data and then calls a Server Action method.
- The brilliance of this approach lies in its abstraction: it feels as though you’re invoking a regular function within the same file, even though it actually triggers a server-side operation.
- Server Action Method:
- The createUser function, defined as a Server Action, executes on the server side. It takes the user data from the form, performs the necessary database operations via Prisma, and returns the result.
- This server-side method is crucial for maintaining a clean separation between the client and server, while still enabling them to communicate effectively.
- Seamless Integration:
From the perspective of a developer working on the client side, it appears as if the form submission is handled locally. However, the heavy lifting such as database manipulation occurs on the server.
The useActionState hook encapsulates this process, managing the state transitions and handling errors, while maintaining an intuitive API for developers.
Server Actions Without Forms
So that's with forms, now lets test an example without forms.
update src/app/serverexample/UserDetail.tsx
"use client";
import { deleteUser } from "@/actions/user";
import { useTransition } from "react";

export function UserDetail({ user }) {
  const [pending, startTransition] = useTransition();

  const handleDelete = () => {
    startTransition(() => {
      deleteUser(user.id);
    });
  };

  return (

      {pending ? (
        Deleting...
      ) : (


            {user.name}

              {user.email}


        >
      )}

  );
}
Key Points:
- Server Action: deleteUser(user.id) is a server action that removes the user from the database. This operation is triggered without any form submission.
- useTransition: This hook allows you to manage the asynchronous state of the deletion process, showing a "Deleting..." message while the operation is in progress.
- User Interface: The component maintains a clean UI, dynamically updating based on the action status.
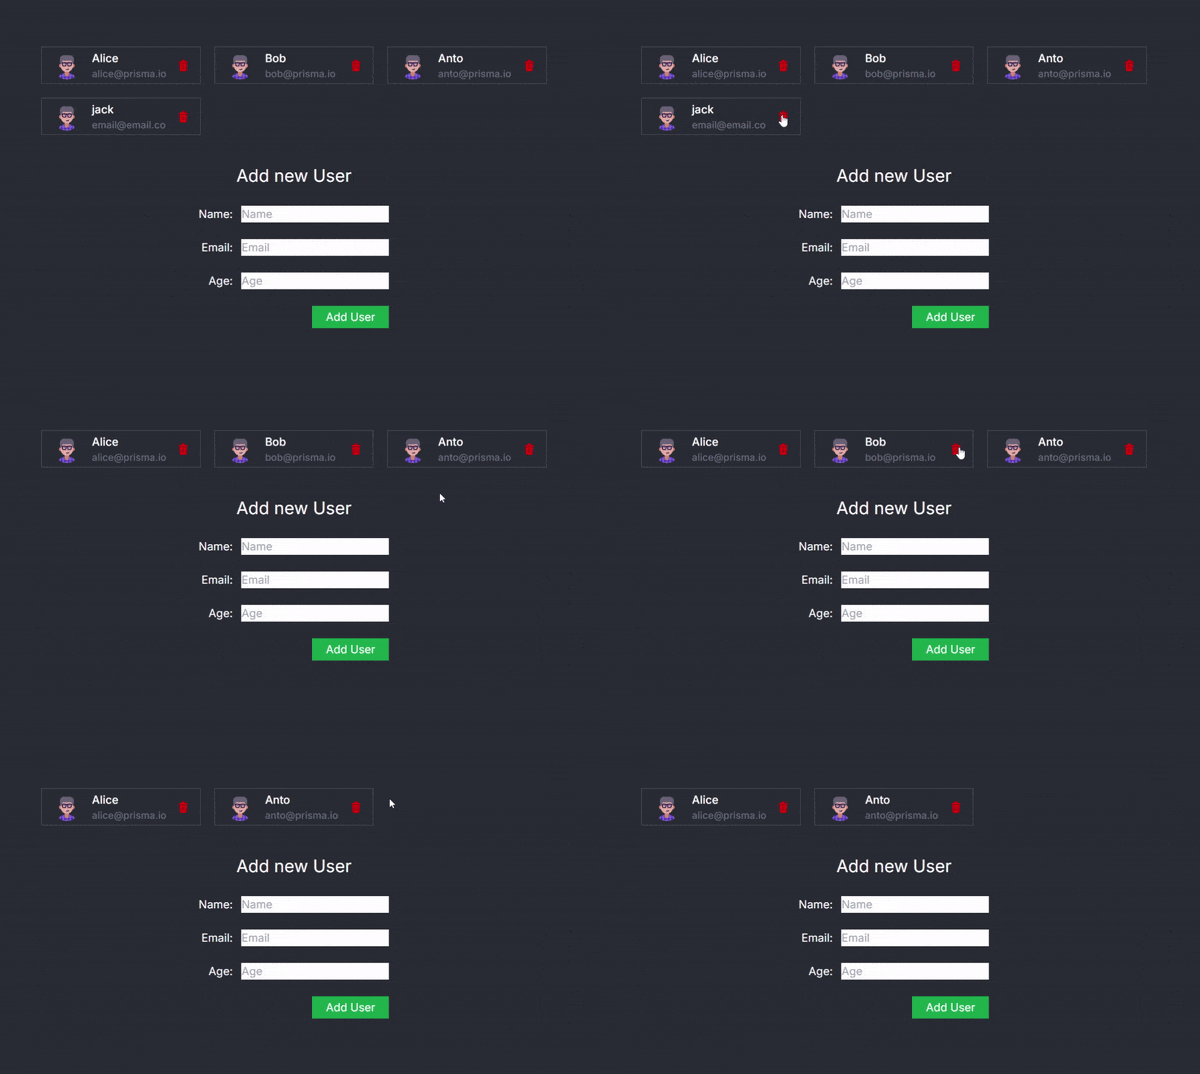
Now, you can seamlessly delete a user within the application:
Conclusion
This approach is transformative because it abstracts away the complexities of client-server communication. Traditionally, such interactions would require handling API endpoints, managing asynchronous requests, and carefully coordinating client-side state with server responses. With React Server Actions and the useActionState hook, this complexity is reduced, allowing developers to focus more on building features rather than worrying about the underlying infrastructure.
By using this pattern, you gain:
- Cleaner Code: The client-side code remains simple and focused, without the need for explicit API calls.
- Improved Developer Experience: Server-side operations are seamlessly integrated, reducing cognitive load and potential for errors.
- Enhanced Performance: Server Actions are optimized for performance, reducing unnecessary client-server round trips and ensuring that server-side resources are used efficiently.
You can find the full code in the repository
-
 Comment lisser les courbes bruyantes à l’aide du filtrage Savitzky-Golay ?Lissage des courbes pour les données bruyantes : exploration du filtrage Savitzky-GolayDans la poursuite de l'analyse des ensembles de données, le...La programmation Publié le 2024-11-06
 -
 Surcharge des méthodes varargsSurcharge des méthodes varargs Nous pouvons surcharger une méthode qui prend un argument de longueur variable. Le programme illustre deux façons de su...La programmation Publié le 2024-11-06
 -
 Comment exploiter les hooks React dans les composants de classe classique ?Intégration des hooks React avec des composants de classe classiquesBien que les hooks React offrent une alternative à la conception de composants bas...La programmation Publié le 2024-11-06
 -
 Comment créer une application monopage (SPA) plus rapide à l'aide de Vite et ReactDans le monde du développement Web moderne, les applications à page unique (SPA) sont devenues un choix populaire pour créer des sites Web dynamiques ...La programmation Publié le 2024-11-06
 -
 Un guide étape par étape sur la concaténation de chaînes en JavaScriptConcaténation de chaînes en JavaScript est le processus de jonction de deux ou plusieurs chaînes pour former une seule chaîne. Ce guide explore diffé...La programmation Publié le 2024-11-06
 -
 Web UX : afficher des erreurs significatives aux utilisateursAvoir un site Web convivial et axé sur l'utilisateur peut parfois être délicat, car cela permettrait à toute l'équipe de développement de con...La programmation Publié le 2024-11-06
 -
 Manipulateur de petite classeNouvelle version majeure du manipulateur Small Class Le code a été entièrement refactorisé et codé pour un nouveau support de la manipulation des attr...La programmation Publié le 2024-11-06
 -
 Gestion efficace des versions de modèles dans les projets d'apprentissage automatiqueDans les projets d'apprentissage automatique (ML), l'un des composants les plus critiques est la gestion des versions. Contrairement au dévelo...La programmation Publié le 2024-11-06
 -
 Comment regrouper des tableaux associatifs par valeur de colonne tout en préservant les clés en PHP ?Regroupement de tableaux associatifs par valeur de colonne tout en préservant les clésConsidérons un tableau de tableaux associatifs, chacun représent...La programmation Publié le 2024-11-06
 -
 Comment exclure des dépendances transitives spécifiques dans Gradle ?Exclusion des dépendances transitives avec GradleDans Gradle, lors de l'utilisation du plugin d'application pour générer un fichier jar, il es...La programmation Publié le 2024-11-06
 -
 L'ART DE VIVRE MINIMALISTEQu’est-ce que la vie minimaliste ? La vie minimaliste est un style de vie dans lequel vous réduisez intentionnellement le nombre de biens que...La programmation Publié le 2024-11-06
 -
 Puzzle d'obscurcissement JavaCome play with our Java Obfuscator & try to deobfuscate this output. The price is the free activation code! Obfuscated Java code Your goal...La programmation Publié le 2024-11-06
 -
 Comment créer des coins arrondis dans les e-mails Outlook sans images ?Style des coins arrondis dans Outlook sans imagesLa création de coins arrondis dans les clients de messagerie peut être simple à l'aide de CSS. Ce...La programmation Publié le 2024-11-06
 -
 Comment comparer efficacement des dictionnaires pour des paires clé-valeur égales en Python ?Comparaison de dictionnaires pour des paires clé-valeur égalesEn Python, comparer des dictionnaires pour vérifier si les paires clé-valeur sont égales...La programmation Publié le 2024-11-06
 -
 Comment faire pivoter les éléments d'un tableau laissés en PHP à l'aide des fonctions de tableau ?Rotation des éléments du tableau laissés en PHPRotation d'un tableau en PHP, déplacement du premier élément vers le dernier et réindexation du tab...La programmation Publié le 2024-11-06
Étudier le chinois
- 1 Comment dit-on « marcher » en chinois ? 走路 Prononciation chinoise, 走路 Apprentissage du chinois
- 2 Comment dit-on « prendre l’avion » en chinois ? 坐飞机 Prononciation chinoise, 坐飞机 Apprentissage du chinois
- 3 Comment dit-on « prendre un train » en chinois ? 坐火车 Prononciation chinoise, 坐火车 Apprentissage du chinois
- 4 Comment dit-on « prendre un bus » en chinois ? 坐车 Prononciation chinoise, 坐车 Apprentissage du chinois
- 5 Comment dire conduire en chinois? 开车 Prononciation chinoise, 开车 Apprentissage du chinois
- 6 Comment dit-on nager en chinois ? 游泳 Prononciation chinoise, 游泳 Apprentissage du chinois
- 7 Comment dit-on faire du vélo en chinois ? 骑自行车 Prononciation chinoise, 骑自行车 Apprentissage du chinois
- 8 Comment dit-on bonjour en chinois ? 你好Prononciation chinoise, 你好Apprentissage du chinois
- 9 Comment dit-on merci en chinois ? 谢谢Prononciation chinoise, 谢谢Apprentissage du chinois
- 10 How to say goodbye in Chinese? 再见Chinese pronunciation, 再见Chinese learning


