これによりデータの取得が簡素化されますが、すべて認証を必要とする API が多数ある場合はどうなるでしょうか? 各呼び出しにヘッダーを追加するのはすぐに面倒になってしまいます。
インターセプターを入力します。
グローバル インターセプターを追加するには、$fetch の周りにカスタムのコンポーザブル ラッパーを構築します。これは、API 呼び出しで常に認証ヘッダーが必要な場合に特に役立ちます。
基礎として、Nuxt 3 の認証に関する以前のブログ投稿と同じプロジェクトを使用しましょう。
まず、コンポーザブル フォルダー composables/useAuthFetch.ts に新しいコンポーザブルを作成します
import type { UseFetchOptions } from \\'nuxt/app\\';const useAuthFetch = (url: string | (() => string), options: UseFetchOptions = {}) => { const customFetch = $fetch.create({ baseURL: \\'https://dummyjson.com\\', onRequest({ options }) { const token = useCookie(\\'token\\'); if (token?.value) { console.log(\\'[fetch request] Authorization header created\\'); options.headers = options.headers || {}; options.headers.Authorization = `Bearer ${token.value}`; } }, onResponse({ response }) { console.info(\\'onResponse \\', { endpoint: response.url, status: response?.status, }); }, onResponseError({ response }) { const statusMessage = response?.status === 401 ? \\'Unauthorized\\' : \\'Response failed\\'; console.error(\\'onResponseError \\', { endpoint: response.url, status: response?.status, statusMessage, }); throw showError({ statusCode: response?.status, statusMessage, fatal: true, }); }, }); return useFetch(url, { ...options, $fetch: customFetch, });};export default useAuthFetch; 説明:
インターセプターの詳細については、こちらをご覧ください
これで、認証された API からデータをフェッチする必要があるときはいつでも、useFetch の代わりに useAuthFetch を使用するだけで、認証がシームレスに処理されます。
Welcome back {{ user.email }}loading...

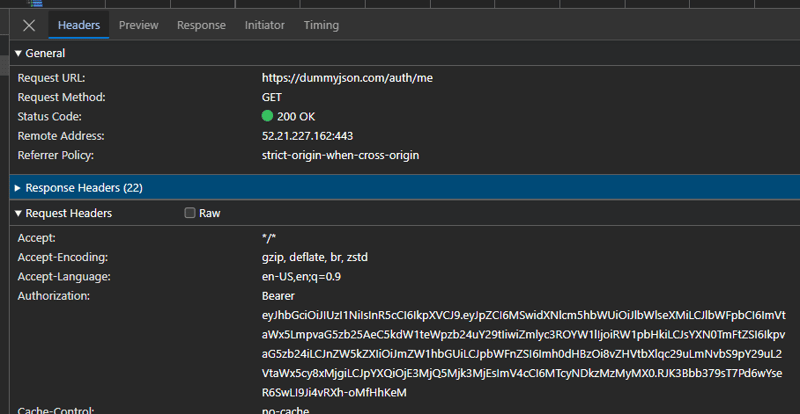
ネットワーク呼び出しを検査すると、baseUrl が正しく、Authorization ヘッダーが存在することがわかります
私のインターセプターには、アプリケーションに Sentry などのツールがある場合に役立つログをいくつか追加しました。
Nuxt に Sentry を追加する方法: https://www.lichter.io/articles/nuxt3-sentry-recipe/
onRequest インターセプターでは、パンくずリストを Sentry に追加できます
import * as Sentry from \\'@sentry/vue\\';Sentry.addBreadcrumb({ type: \\'http\\', category: \\'xhr\\', message: ``, data: { url: `${options.baseURL}${request}`, }, level: \\'info\\',});バックエンドが tracingId を返す場合は、セントリーのタグとコンテキストを追加して、エラーをエンドポイントにリンクすることもできます
onResponseError コンテキストのパンくずリストとタグを追加できます
import * as Sentry from \\'@sentry/vue\\';Sentry.setContext(\\'http-error\\', { endpoint: response?.url, tracingId: 123, status: response?.status,});Sentry.addBreadcrumb({ type: \\'http\\', category: \\'xhr\\', message: ``, data: { url: response?.url, status_code: response?.status, }, level: \\'error\\',});Sentry.setTag(\\'tracingId\\', \\'123\\');tracingId をバックエンドが返すカスタム トレース ログに置き換えます
","image":"http://www.luping.net/uploads/20241003/172795752666fe8a16368ef.png","datePublished":"2024-11-08T14:15:37+08:00","dateModified":"2024-11-08T14:15:37+08:00","author":{"@type":"Person","name":"luping.net","url":"https://www.luping.net/articlelist/0_1.html"}}Nuxt を使用したことがある場合は、便利な useFetch コンポーザブルに遭遇したことがあるでしょう:
これによりデータの取得が簡素化されますが、すべて認証を必要とする API が多数ある場合はどうなるでしょうか? 各呼び出しにヘッダーを追加するのはすぐに面倒になってしまいます。
インターセプターを入力します。
グローバル インターセプターを追加するには、$fetch の周りにカスタムのコンポーザブル ラッパーを構築します。これは、API 呼び出しで常に認証ヘッダーが必要な場合に特に役立ちます。
基礎として、Nuxt 3 の認証に関する以前のブログ投稿と同じプロジェクトを使用しましょう。
まず、コンポーザブル フォルダー composables/useAuthFetch.ts に新しいコンポーザブルを作成します
import type { UseFetchOptions } from 'nuxt/app';

const useAuthFetch = (url: string | (() => string), options: UseFetchOptions = {}) => {
  const customFetch = $fetch.create({
    baseURL: 'https://dummyjson.com',
    onRequest({ options }) {
      const token = useCookie('token');
      if (token?.value) {
        console.log('[fetch request] Authorization header created');
        options.headers = options.headers || {};
        options.headers.Authorization = `Bearer ${token.value}`;
      }
    },
    onResponse({ response }) {
      console.info('onResponse ', {
        endpoint: response.url,
        status: response?.status,
      });
    },
    onResponseError({ response }) {
      const statusMessage = response?.status === 401 ? 'Unauthorized' : 'Response failed';
      console.error('onResponseError ', {
        endpoint: response.url,
        status: response?.status,
        statusMessage,
      });
      throw showError({
        statusCode: response?.status,
        statusMessage,
        fatal: true,
      });
    },
  });

  return useFetch(url, {
    ...options,
    $fetch: customFetch,
  });
};

export default useAuthFetch;
説明:
インターセプターの詳細については、こちらをご覧ください
これで、認証された API からデータをフェッチする必要があるときはいつでも、useFetch の代わりに useAuthFetch を使用するだけで、認証がシームレスに処理されます。
Welcome back {{ user.email }}loading...

ネットワーク呼び出しを検査すると、baseUrl が正しく、Authorization ヘッダーが存在することがわかります
私のインターセプターには、アプリケーションに Sentry などのツールがある場合に役立つログをいくつか追加しました。
Nuxt に Sentry を追加する方法: https://www.lichter.io/articles/nuxt3-sentry-recipe/
onRequest インターセプターでは、パンくずリストを Sentry に追加できます
import * as Sentry from '@sentry/vue';

Sentry.addBreadcrumb({
        type: 'http',
        category: 'xhr',
        message: ``,
        data: {
          url: `${options.baseURL}${request}`,
        },
        level: 'info',
});
バックエンドが tracingId を返す場合は、セントリーのタグとコンテキストを追加して、エラーをエンドポイントにリンクすることもできます
onResponseError コンテキストのパンくずリストとタグを追加できます
import * as Sentry from '@sentry/vue';

Sentry.setContext('http-error', {
   endpoint: response?.url,
   tracingId: 123,
   status: response?.status,
});
Sentry.addBreadcrumb({
 type: 'http',
 category: 'xhr',
 message: ``,
 data: {
  url: response?.url,
  status_code: response?.status,
 },
 level: 'error',
});
Sentry.setTag('tracingId', '123');
tracingId をバックエンドが返すカスタム トレース ログに置き換えます


免責事項: 提供されるすべてのリソースの一部はインターネットからのものです。お客様の著作権またはその他の権利および利益の侵害がある場合は、詳細な理由を説明し、著作権または権利および利益の証拠を提出して、電子メール [email protected] に送信してください。 できるだけ早く対応させていただきます。
Copyright© 2022 湘ICP备2022001581号-3