How to Enable Windows Subsystem for Linux
If you want to run a Linux terminal on Windows, your best bet would be to enable Windows Subsystem for Linux (WSL), a gateway opener that allows you to install a Linux bash shell on a Windows OS. Once you’ve enabled WSL, you can install a Linux distro.
Requirements for Running WSL on Windows 10
Before you enable Windows Subsystem for Linux, you should know of the minimum requirements needed to run WSL.
According to Microsoft, you should be running Windows 10 (64-bit) version 2004 or higher with Build 19041 or higher.
All Windows 11 versions can run WSL.
If you’re not sure of your Windows 10 flavor, it’s easy to check which version of Windows 10 you have installed.
Some older versions of Windows 10 can also work, but you’ll have to manually install WSL.
How to Enable Windows Subsystem for Linux
In order to install the Linux bash shell on Windows 10, you first have to enable Windows Subsystem for Linux.
You’ll know if WSL isn't enabled because you’ll run into the error: “The Windows Subsystem for Linux optional component is not enabled. Please enable it and try again.”
Here’s how to enable WSL in Windows 10:
You first need to get into Windows Programs and Features.
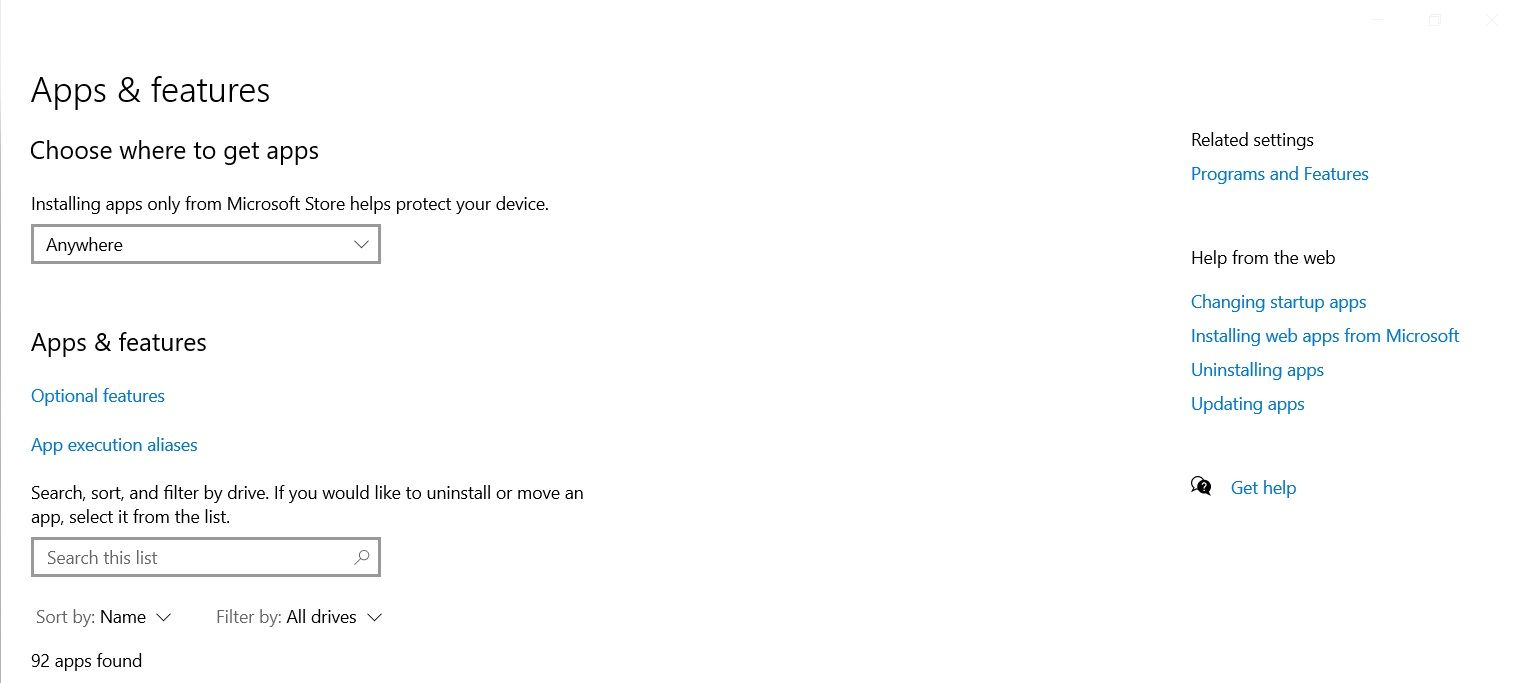
Open Windows 10 Settings and select Apps. On the right side of the window, under Related settings, click on Programs and Features.
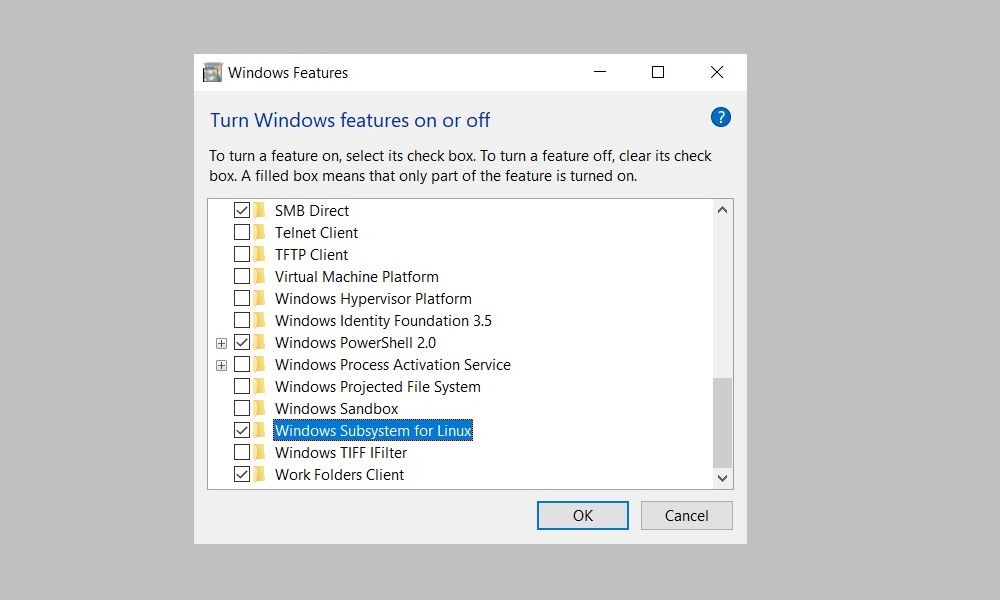
Once you’re in, click on Turn Windows features on or off on the left panel. Then scroll down and check the corresponding box to enable Windows Subsystem for Linux.

Click OK to save your changes and hit Restart now to finish the process.
Installing WSL on a Windows Machine
With WSL enabled on your Windows device, you can install Windows Subsystem for Linux. After that, you can install any supported Linux distro right inside your Windows PC. Choosing a small, lightweight Linux distro might be helpful.
You can also install a Linux desktop in Windows that gives you a graphical UI to work with.
WSL1 or WSL2: Which Is Better For You?
WSL2 is an upgraded version of Windows Subsystem for Linux and is now the default when installing a Linux distribution in Windows. It works with Windows 11 or Windows 10, Version 1903, Build 18362 or higher.
There are a few differences between the two versions of WSL; chiefly, WSL2 offers better performance in addition to support for full system call compatibility and IPv6 support. Also, WSL2 uses a full Linux kernel inside a managed virtual machine (VM), so you don’t have to set up and manage a VM to run a Linux distro.
Reasons to Switch to WSL1
While the latest version of WSL offers better performance and a wider range of support, there are reasons you may want to use the older version. This is because WSL1 runs with older versions of VMware and VirtualBox—and WSL2 does not, although it is compatible with the latest versions of VirtualBox and VMware, which both support Hyper-V.
The main reason to use WSL1 instead of WSL2 is that it offers better performance across OS file systems—a hurdle that can be overcome by creating your project files in the Linux file system.
With WSL enabled and a Linux distro installed, you’ll be on your way to executing commands.
-
 4 Fixes When the Windows 11 Volume Slider Is Stuck on the ScreenBasic Fixes: Restart the computer: A reboot forces all services and processes to shut down, fixing glitches and temporary bugs. Run a malware scan: M...Software tutorial Published on 2024-11-06
 -
 How to Fix “This Setting Has Been Configured by a Profile” on MacBefore moving on with the fixes, we suggest installing the latest software version on your Mac. Open Settings > General > Software Update and then ins...Software tutorial Published on 2024-11-06
 -
 New Laptop but No WiFi? – How to Fix It FastRight-click on your WiFi adapter and select Disable device. Wait a few seconds, then right-click on your WiFi adapter again and select Enable device....Software tutorial Published on 2024-11-06
 -
 4 Fixes for Macbook Not Outputting in High Refresh Rate to External MonitorBasic Fixes Restart your Mac: Restarting your Mac often fixes things by refreshing the configuration, solving software glitches, and reinitializing po...Software tutorial Published on 2024-11-06
 -
 Can\'t Upgrade to Windows 11? Microsoft\'s Advice Is to \"Buy a New PC\"If you're currently using any version of Windows other than Windows 11, then your system is either already unsupported (Windows XP, Vista, 7, 8.1)...Software tutorial Published on 2024-11-06
 -
 How to Fix Birthdays Not Showing up in iPhone CalendarBasic Fixes Force quit and relaunch the app: This will give the app a fresh start and reload it entirely on your iPhone. Update the Calendar app: You ...Software tutorial Published on 2024-11-06
 -
 Top 4 Ways to Fix Android Phone Not Showing Up on MacFix 2: Enable File Sharing on Android Phone By default, when you connect an Android phone to a PC or Mac, the system starts charging the phone. ...Software tutorial Published on 2024-11-06
 -
 Warhammer 40000: Space Marine 2 Low FPS/Lagging/StutteringSince Warhammer 40000: Space Marine 2 was released, many players reported that they encountered the “Warhammer 40000: Space Marine 2 low FPS/lag/stutt...Software tutorial Published on 2024-11-06
 -
 Guide to Fix Enotria: The Last Song Lagging, Stuttering, FreezingEnotria: The Last Song is now available. You can get this game and start your game journey. However, not all players can have satisfactory game experi...Software tutorial Published on 2024-11-06
 -
 8 Best Samsung Galaxy Z Flip6 Tips and TricksBuying a new phone and reviewing its features can be an exciting process. However, in all of this, it’s important to not forget the role of tips and t...Software tutorial Published on 2024-11-05
 -
 Does Your Smartphone Really Need a Screen Protector?Smartphones are expensive—you wouldn't want to spend up to $1,000 or more and end up with a scratched screen. Many people still buy screen protec...Software tutorial Published on 2024-11-05
 -
 How to Enable or Disable Smart App Control in Windows 11Have you ever downloaded an app that was more trouble than it’s worth? We’ve all been there. Fortunately, Windows 11 has a built-in security feature c...Software tutorial Published on 2024-11-05
 -
 How to Fix Google Maps When It\'s Not WorkingGoogle Maps is often a reliable travel companion, yet occasional glitches can leave us stranded. Issues like server outages, lack of internet connect...Software tutorial Published on 2024-11-05
 -
 4 Ways to Disable Hyper-V in WindowsMethod 1: Using Control Panel The simplest method to disable Hyper-V is by using the Control Panel. Repeat the following steps: Step 1: Press the Wind...Software tutorial Published on 2024-11-05
 -
 3 Ways to Fix Safari High Memory Usage on MacBasic Fixes Close irrelevant tabs: Close the tabs that you don’t use frequently in Safari. Every tab uses the RAM of your Mac. Force stop and relaunc...Software tutorial Published on 2024-11-05
Study Chinese
- 1 How do you say "walk" in Chinese? 走路 Chinese pronunciation, 走路 Chinese learning
- 2 How do you say "take a plane" in Chinese? 坐飞机 Chinese pronunciation, 坐飞机 Chinese learning
- 3 How do you say "take a train" in Chinese? 坐火车 Chinese pronunciation, 坐火车 Chinese learning
- 4 How do you say "take a bus" in Chinese? 坐车 Chinese pronunciation, 坐车 Chinese learning
- 5 How to say drive in Chinese? 开车 Chinese pronunciation, 开车 Chinese learning
- 6 How do you say swimming in Chinese? 游泳 Chinese pronunciation, 游泳 Chinese learning
- 7 How do you say ride a bicycle in Chinese? 骑自行车 Chinese pronunciation, 骑自行车 Chinese learning
- 8 How do you say hello in Chinese? 你好Chinese pronunciation, 你好Chinese learning
- 9 How do you say thank you in Chinese? 谢谢Chinese pronunciation, 谢谢Chinese learning
- 10 How to say goodbye in Chinese? 再见Chinese pronunciation, 再见Chinese learning


