 Front page > Software tutorial > 3 Ways to Create Shortcut for Print Management on Windows 10 Desktop
3 Ways to Create Shortcut for Print Management on Windows 10 Desktop
Generally speaking, when people use Print Management, they always click the mouse many times to open the Print Management. In order to skip these complex processes and give you quick access to Print Management. You can create a shortcut for Print Management on Windows 10 desktop. Once created, you can see that a shortcut called Print Management is displayed on your desktop, as shown in the screenshot below.
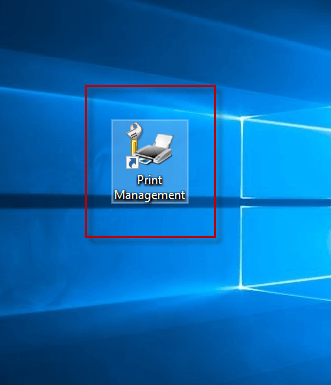
In this article, we'll introduce three specific ways to create a Print Management shortcut on the Windows 10 desktop for better selection. Let's see how it works!
- Way 1: Create a Print Management shortcut on the desktop
- Way 2: Send Print Management shortcut to the desktop
- Way 3: Add Print Management shortcut to the desktop
Way 1: Create a Print Management shortcut on the desktop
Step 1: Go to the Windows 10 desktop.
Step 2: Right-click any blank area on your desktop and select New > Shortcut from the context menu.
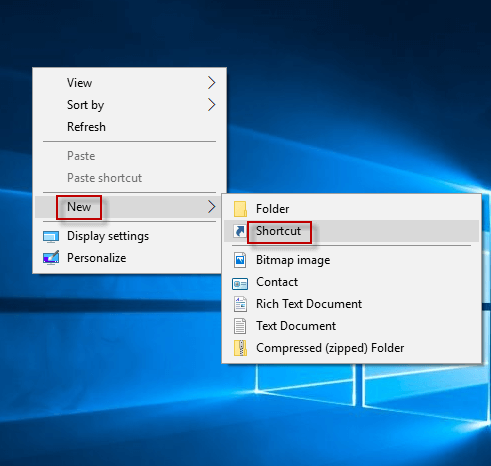
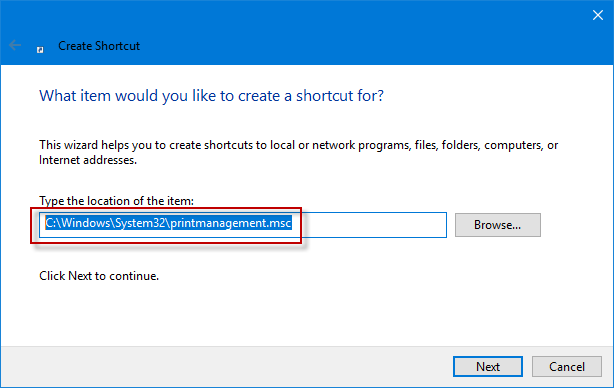
Step 3: In Create Shortcut wizard, input C:\Windows\System32\printmanagement.msc command in the location box and click Next to continue.
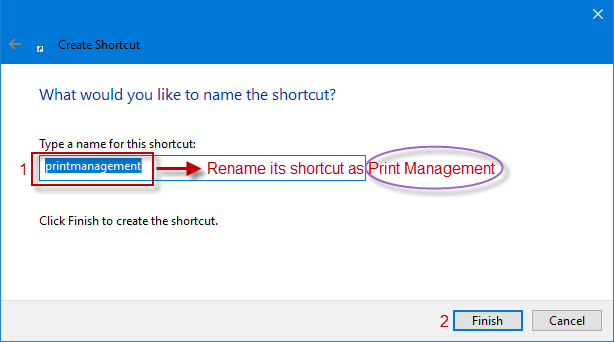
Step 4: You can change its name into Print Management and click Finish to create a shortcut for Print Management on Windows 10 desktop. If you don't rename it, a shortcut named printmanagement is shown on your Windows 10 desktop by default.
Way 2: Send Print Management shortcut to the desktop
Step 1: Open File Explorer in Windows 10.
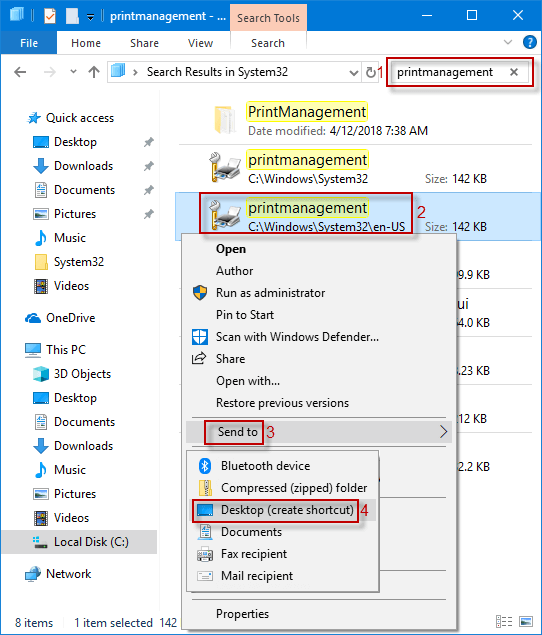
Step 2: In the File Explorer window, go to This PC > Local Disk (C:) > Windows > System32 folder. In the System32 directory, type printmanagement in the upper right-hand corner or scroll down to the printmanagement application and right-click it to select Send to > Desktop (create shortcut) from the context menu.
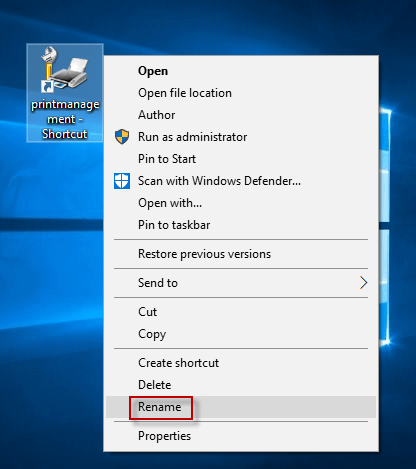
Step 3: When this printmanagement shortcut displays on your Windows 10 desktop, you can right-click it and choose Rename option to change its name as Print Management.
Way 3: Add Print Management shortcut to the desktop
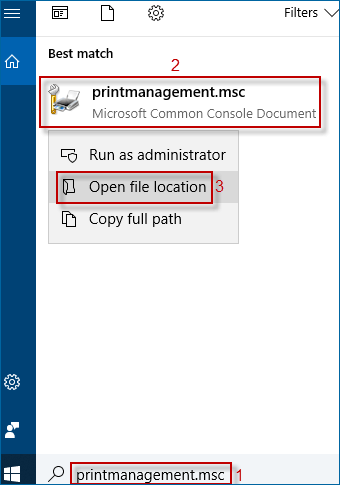
Step 1: Input printmanagement.msc in the Search box on Taskbar, right-click printmanagement.msc from the result list and select Open file location from the drop-down menu to launch File Explorer-System32 window at a blow.
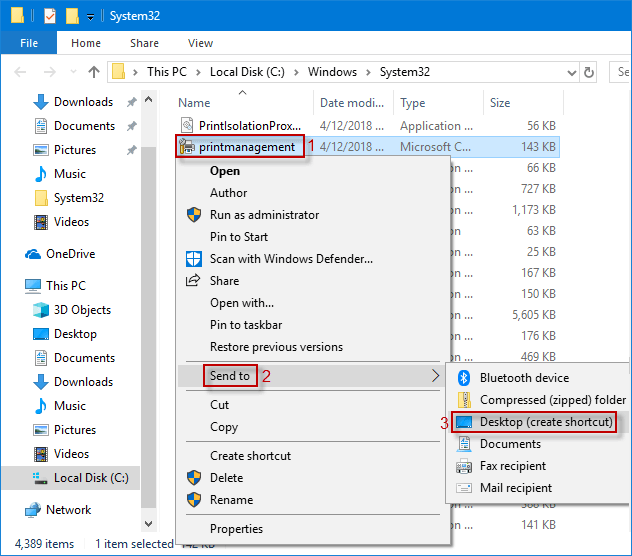
Step 2: Right-click printmanagement to choose Send to > Desktop (create shortcut) from the sub-menu.
Step 3: Execute Step 3 in Way 2.
-
 Fix An Unexpected Error Occurred and Roblox Needs to QuitIf you like playing games, you must be familiar with Roblox. It is a very popular gaming platform. However, sometimes you may encounter this problem –...Software tutorial Published on 2024-11-05
 -
 5 Eco-Friendly Ways to Increase Performance of Your Aging PC1. Clean and Reapply Thermal Paste Over time, regardless of whether you purchased a pre-built PC or laptop or assembled it yourself, the thermal...Software tutorial Published on 2024-11-05
 -
 How to Change Taskbar Color in Windows 11Changing the taskbar color is a simple yet effective way to add your touch to the digital canvas. Whether you’re a minimalist or a fan of bold stateme...Software tutorial Published on 2024-11-05
 -
 How to Turn Off Sent Message Sound on iPhone and AndroidNotifications and sounds tell you about new messages, but some sounds, like the one when you send a message from your phone, may be unnecessary. If yo...Software tutorial Published on 2024-11-05
 -
 iPhone or iPad Getting Hot? Learn Why and How to Fix ItBut there's a difference between a device that's warm to touch and one that's overheating. We'll find out the reasons and discuss why...Software tutorial Published on 2024-11-05
 -
 4 Fixes For Desktop Shortcuts Not Working on Windows 11Basic Fixes: Restart the computer: Sometimes, a restart is all you need because it is strong enough to force problematic processes that trigger the p...Software tutorial Published on 2024-11-05
 -
 How to Fix Windows Update Error 0x80070658: Stepwise GuideTo ensure optimal computer performance, timely installation of the latest Windows updates is crucial. Users may encounter Windows update error 0x80240...Software tutorial Published on 2024-11-05
 -
 How to Use AI to Analyze Excel DataMicrosoft’s Copilot AI has been rolled out across its suite of major applications, including the long-running spreadsheet platform that is Excel. Now,...Software tutorial Published on 2024-11-05
 -
 6 Ways to Fix AirTags Not Showing Up in Find MyFrom tracking your car keys to keeping a check on your pets, the use case of Apple AirTags is multifarious. These AirTags can be traced through the Fi...Software tutorial Published on 2024-11-05
 -
 Windows Update Error 0x800f0985: How to Fix It on Windows 11Windows updates are necessary, but there may be unavoidable problems encountered during the update process sometimes, like Windows update error 0x800f...Software tutorial Published on 2024-11-05
 -
 Windows 11 24H2 ISO Official Version –Download & Offline InstallSpeaking of the Windows 11 24H2 release date, Microsoft has claimed that it is available beginning with October 1, 2024. So how can you download Windo...Software tutorial Published on 2024-11-05
 -
 How to Enable or Disable Safari Pop-up Blocker on MacBlock or Unblock Pop-Ups in Safari for One Website Step 1: Open Safari on your Mac and navigate to a website. Next, select Safari → Setting from the m...Software tutorial Published on 2024-11-05
 -
 3 Ways to Remove Exclamation Mark From iPhone MessagesFix 2: Turn iMessage off and On By turning the iMessage toggle off and on, you’re syncing and downloading your chats all over again. This helps ...Software tutorial Published on 2024-11-05
 -
 How to Fix Critical Steam Component (steamwebhelper) Not Responding on Windows 11Preliminary Fixes Restart Steam with administrator privileges: Steamwebhelper.exe manages all the web features inside the Steam client. Before trying ...Software tutorial Published on 2024-11-05
 -
 How to Fix Windows Setup Aka.ms/WindowsSysReq Error: GuideWhen installing or upgrading to Windows 11, you may encounter various errors, including the Windows setup Aka.ms/WindowsSysReq error. This error occur...Software tutorial Published on 2024-11-05
Study Chinese
- 1 How do you say "walk" in Chinese? 走路 Chinese pronunciation, 走路 Chinese learning
- 2 How do you say "take a plane" in Chinese? 坐飞机 Chinese pronunciation, 坐飞机 Chinese learning
- 3 How do you say "take a train" in Chinese? 坐火车 Chinese pronunciation, 坐火车 Chinese learning
- 4 How do you say "take a bus" in Chinese? 坐车 Chinese pronunciation, 坐车 Chinese learning
- 5 How to say drive in Chinese? 开车 Chinese pronunciation, 开车 Chinese learning
- 6 How do you say swimming in Chinese? 游泳 Chinese pronunciation, 游泳 Chinese learning
- 7 How do you say ride a bicycle in Chinese? 骑自行车 Chinese pronunciation, 骑自行车 Chinese learning
- 8 How do you say hello in Chinese? 你好Chinese pronunciation, 你好Chinese learning
- 9 How do you say thank you in Chinese? 谢谢Chinese pronunciation, 谢谢Chinese learning
- 10 How to say goodbye in Chinese? 再见Chinese pronunciation, 再见Chinese learning


