10 حيل أستخدمها لتصوير مقاطع فيديو بجودة أفضل على iPhone
Your iPhone can shoot great videos, whether you’re creating Instagram reels, documenting your travels, or pursuing higher-quality productions. Here’s how to get the most out of your iPhone and shoot the best possible video, whatever the occasion.
1 Set Up Your Camera Settings Properly
Perhaps the most important step in getting good, usable video capture from your iPhone is to ensure that your camera settings are configured correctly. There’s nothing more frustrating than finding out that you’ve been shooting at the wrong resolution or frame rate after the fact.
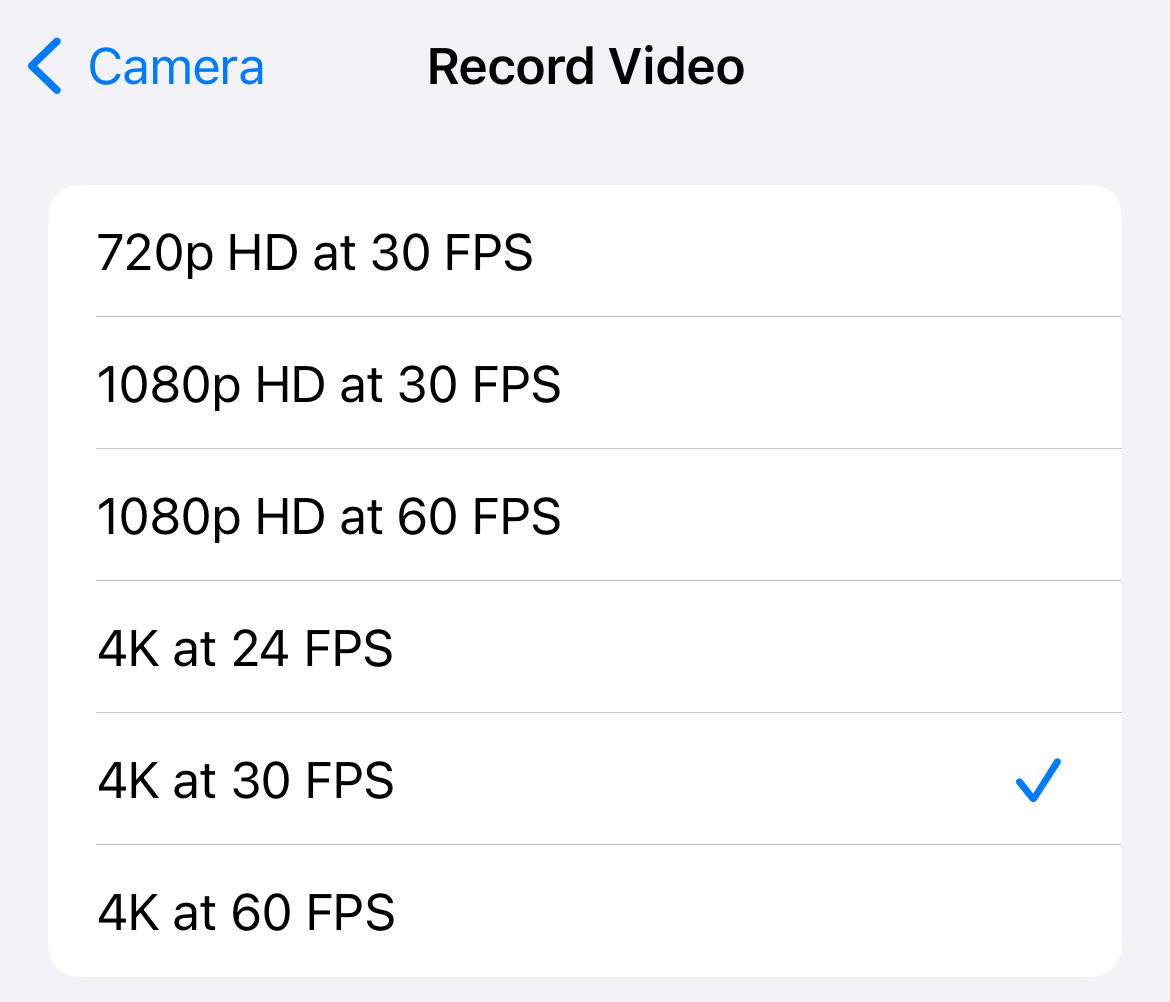
Head to Settings > Camera and tap “Record Video” to toggle between 720p, 1080p, and 4K resolution. Though 4K will take up the most space (about 190MB per minute at 30 fps in HDR), it will give you the best possible quality. Even if you’re shooting for a 1080p resolution production, having 4K footage allows you to “punch in” and crop out parts of the frame without losing quality.

Frame rate is another thing to consider. Depending on your iPhone, you can choose between 24, 30, and 60 fps in 4K mode. 24 fps is the frame rate used by filmmakers to get a “cinematic” look. 60 fps is a high frame rate mode that will take up more space (about 440MB per minute at 4K HDR).
A safe bet is to choose 4K at 30 frames per second, which gives you a solid resolution without sacrificing too much storage space. If you are interested in slowing your footage down, 60 fps is a better option since you can halve the speed of your video and it will still play back smoothly at 30 fps.
HDR is another setting you might want to consider. The iPhone 12 and later can shoot high dynamic range video in Dolby Vision. This captures a wider range of colors, better shadow detail, and higher peak brightness. Enabling this will make your footage stand out on HDR-compatible displays, but any video editor you intend to use will also need to support HDR video if you want to preserve your footage.

Use the “HDR Video” toggle to turn the feature on or off. Once you’ve seen your videos in HDR, it’s hard to go back to SDR footage. Most video editors do a decent job of converting HDR video to SDR when necessary. As time passes, HDR video will become much more prevalent until it is eventually a standard feature.
Think of HDR video a bit like 4K. The iPhone could shoot in 4K way before most people had a 4K-capable TV. If you started shooting old videos in 4K when the setting first became available, you'll probably notice how good they look on modern TVs when you watch them today. HDR will pay off in the future, though it consumes more storage space.
2 Better Lighting Means Better Video
The problem with smartphone cameras isn’t necessarly the optics, it’s the size of the sensor. Because your smartphone is essentially a handheld computer first and a camera second, there’s not a lot of room available for camera components. Your iPhone may have two or three lenses, but the sensors beneath those lenses are tiny.
This is why your iPhone struggles in low light, despite advances made in computational photography. The greater a sensor’s surface area, the more light can enter the shot. Poor lighting results in grainy footage, which can become blocky and garbled when it’s compressed. To give yourself the best chance of success, take lighting into account when shooting video.
This isn’t necessarily always possible when you grab your phone to shoot a quick video. But if you’re using your iPhone for something more deliberate, like when creating content for Instagram, or even when speaking on a FaceTime call, it’s well worth it.
This may mean standing next to a window and using the available light to better light your face or subject. It could mean buying an iPhone ring light or other video light for use in dark conditions. It might even simply mean turning a few lamps on, or standing beneath a streetlight when shooting at night.
3 Lock Focus and Exposure When Shooting
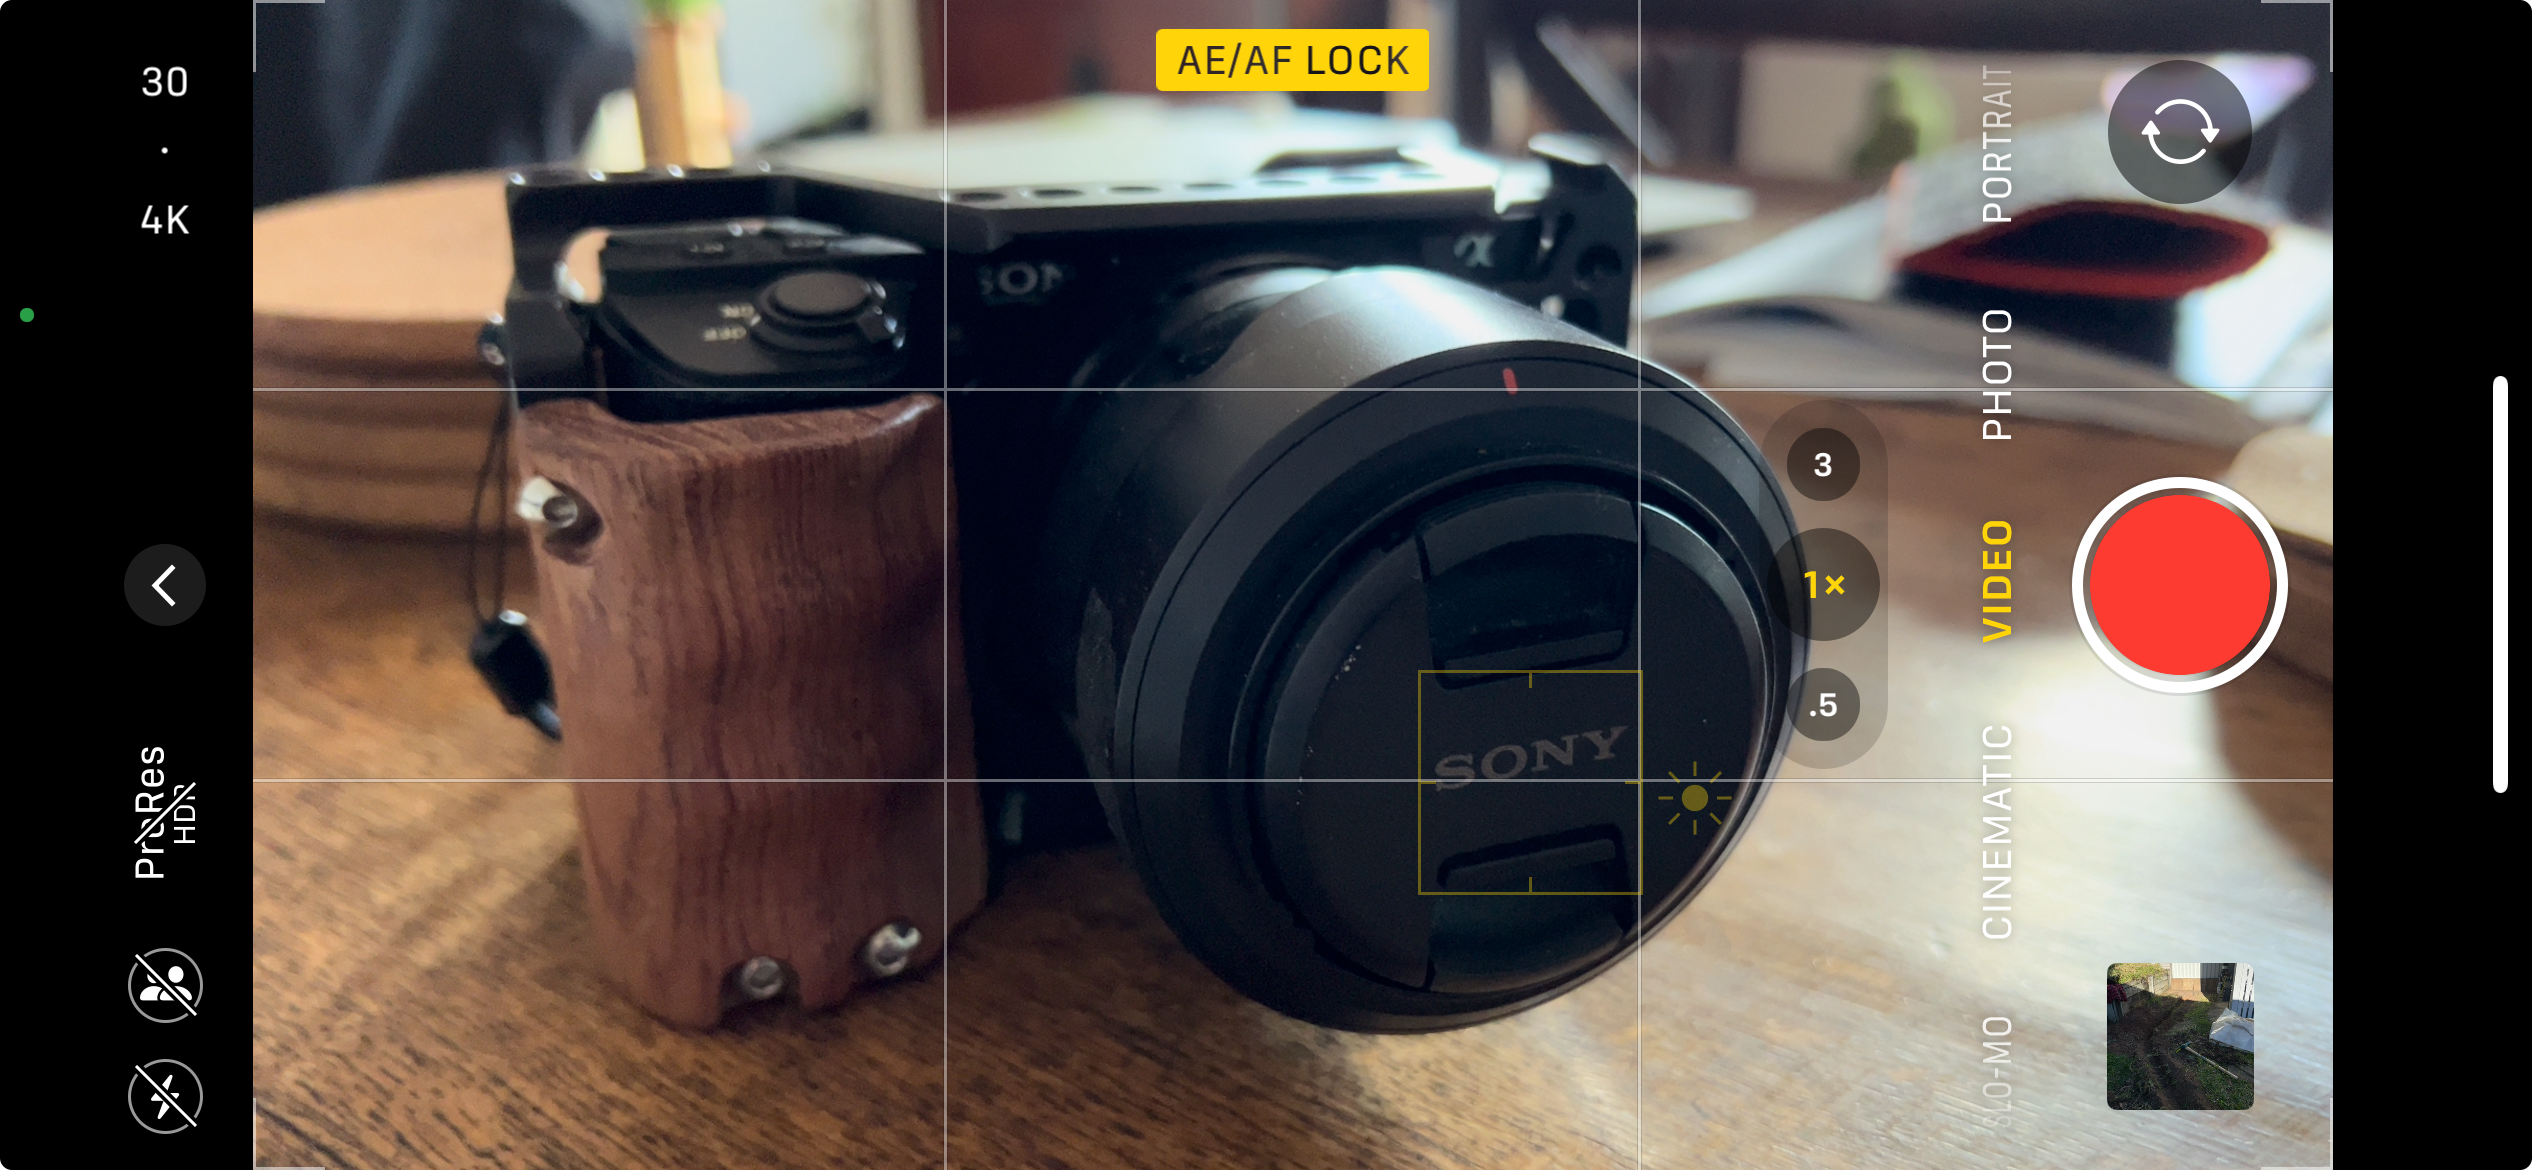
There’s one small thing you can do to improve the production quality of your iPhone video: lock focus and exposure. While setting up your shot, tap and hold on a focus point until you see “AE/AF Lock” appear on the screen. This means that your focus point won’t move, and your iPhone won’t adjust its exposure while you shoot.
Sometimes the focus point doesn’t necessarily match up with your desired exposure, so tap and drag your finger up and down the viewfinder to adjust how much light is entering your scene. Now hit record and start shooting. You can always adjust the exposure by smoothly dragging your finger up and down on the viewfinder as you shoot.
This prevents your iPhone from “hunting” for focus points. It means you’ll be locked to a specific focus distance for as long as the “AE/AF Lock” label appears, and it allows you to do things like capture a shot of a sunset through trees without the camera constantly adjusting the exposure and losing the focus point.

It’s great for shots where you’re moving, like if you’re walking down a street or along a narrow path and you always want to be focused on a set point in the distance. It's also good for avoiding the iPhone “blooming” and adjusting exposure constantly.
4 Not All Focal Lengths are Equal
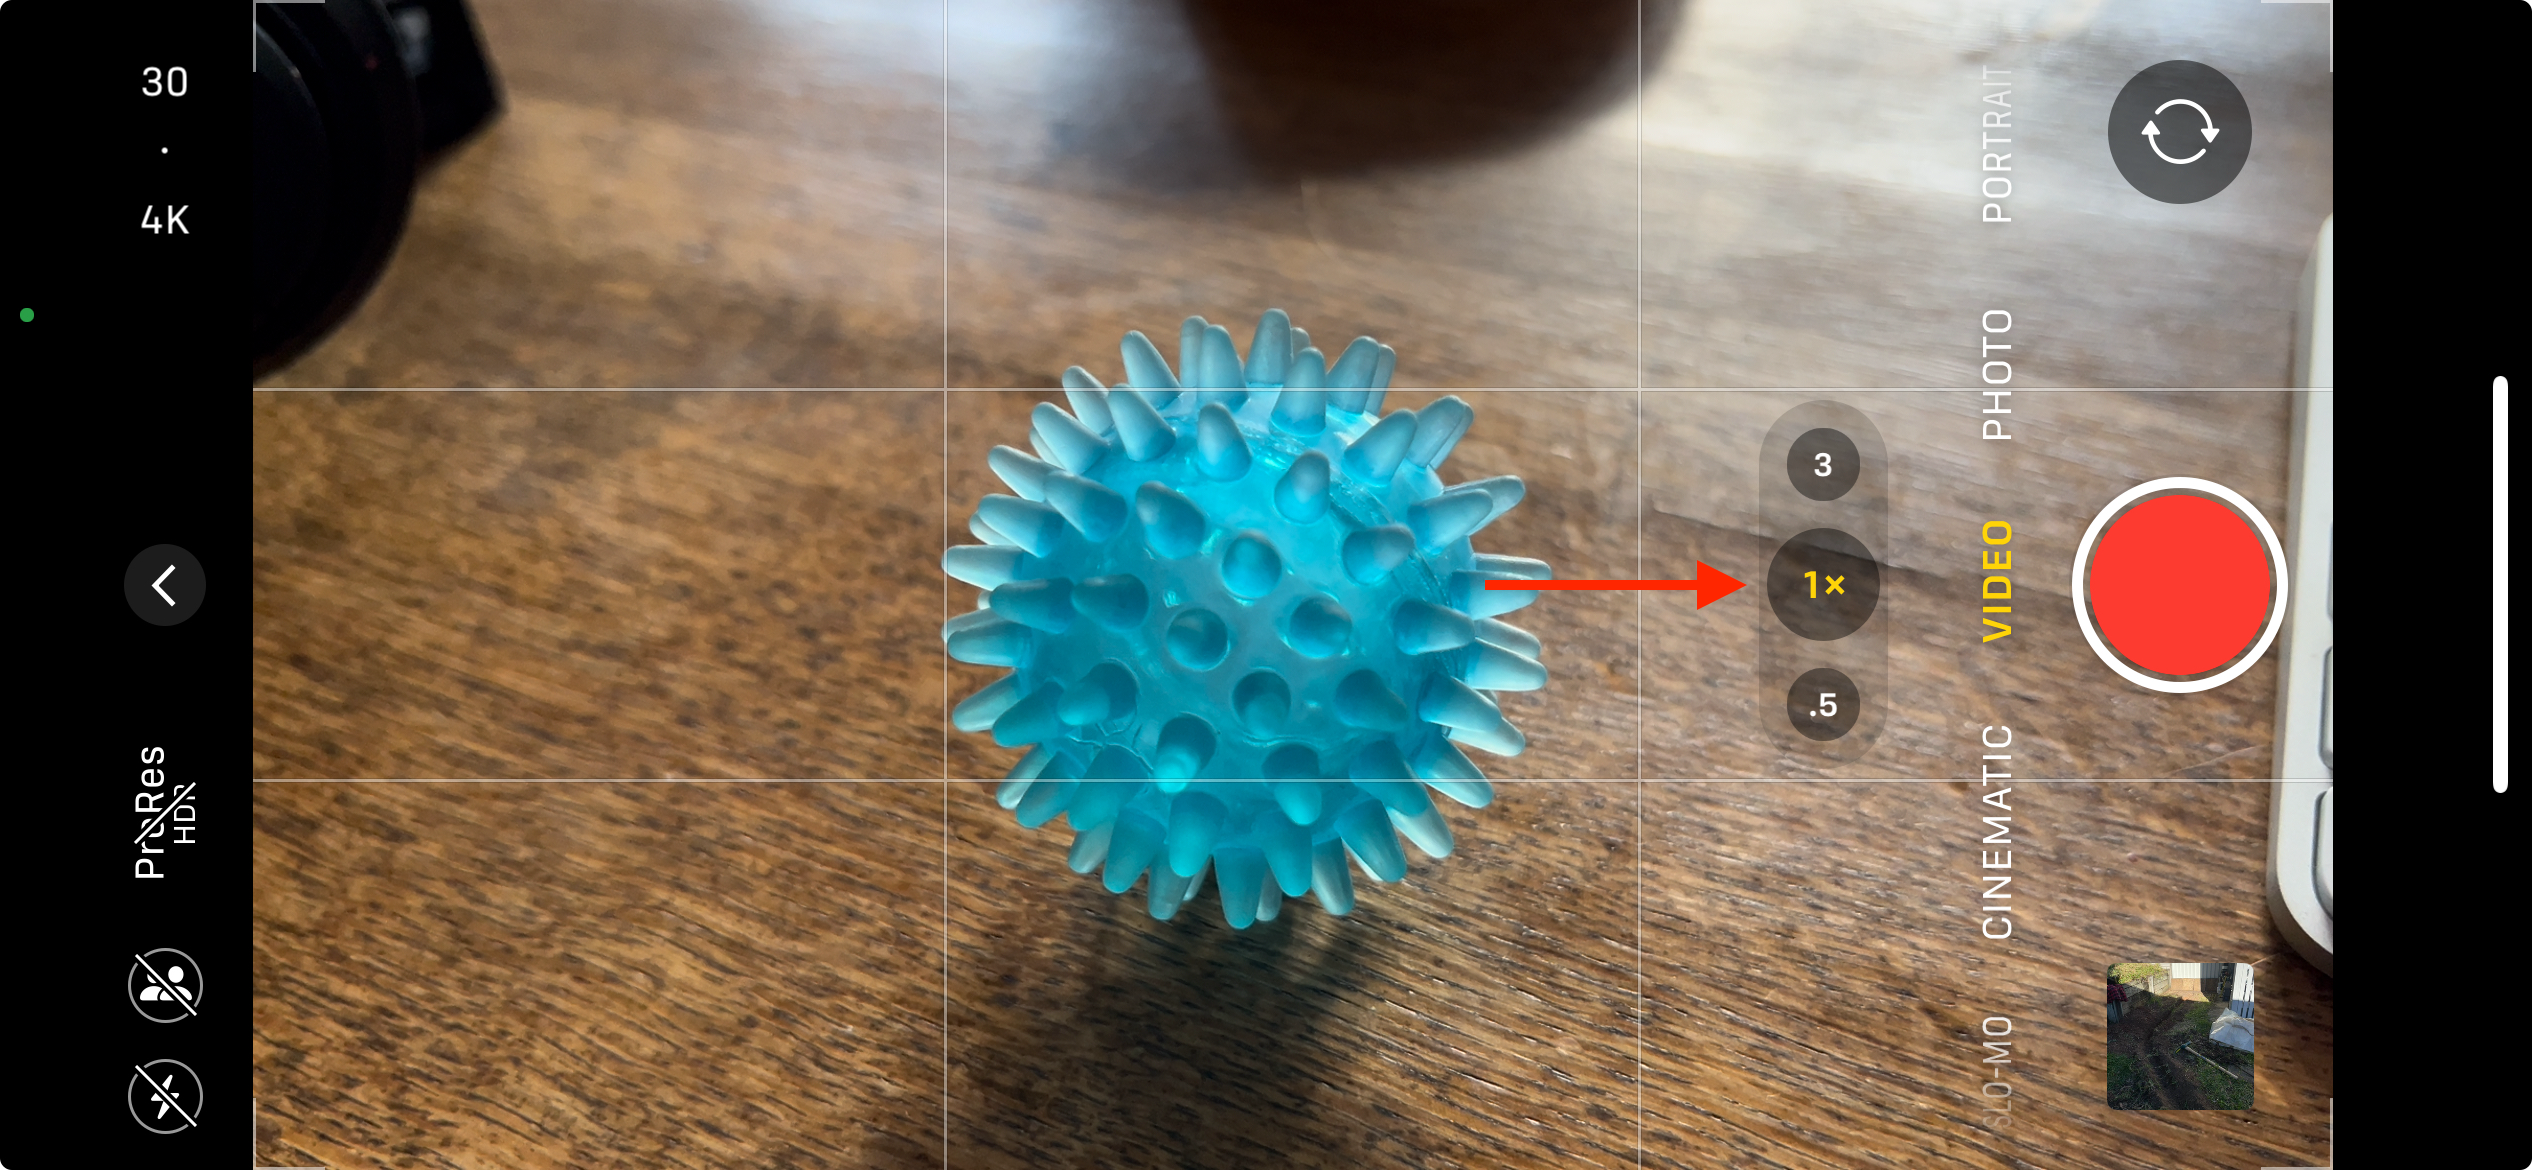
Your iPhone probably has at least two lenses on the back, three if you have an iPhone Pro. The standard “1x” lens in your iPhone is known as the “wide” lens, and it generally has the best quality sensor. It’s the default lens for a reason, and you’ll do well to stick to it where possible.
Take the iPhone 14 Pro, for example. It has a fantastic 48MP "wide" sensor and uses a large aperture of f/1.78, but the ultrawide (0.5x) and telephoto (3x) top out at only 12MP with apertures of f/2.2 and f/2.8 respectively. While the ultrawide can be fun in narrow environments and the telephoto is convenient for getting closer, these come at the cost of image quality.

I frequently encounter this issue with my iPhone 13 Pro. The telephoto sensor is visibly worse than the wide, managing an aperture of only f/2.8 compared to f/1.5 on my main wide camera. Low light shots in particular look noticeably worse on the telephoto. You’re better off zooming with your feet (by moving closer or further away) and sticking to the main “1x” wide camera where possible.
5 Stable Footage Looks Best
Even older iPhone models have some form of image stabilization, which should be enabled automatically when shooting. You can enable “Enhanced Stabilization” on iPhone 14 and later which zooms in slightly to improve image stabilization.
The iPhone 14 and later also feature Action Mode, which you can enable by tapping the “Running person” icon at the top of the screen when in video mode on compatible models.

This mode will crop your footage to HD (1080p) or 2.8K, so it should be used only when the resolution hit (down from 4K) is justified. It does a tremendous job of stabilizing very shaky footage, like when you’re shooting handheld while running or have your iPhone mounted to a bike's handlebars.
Otherwise, use a quality tripod or handheld gimbal like the Insta360 Flow to stabilize your footage manually.
6 Shoot in Cinematic Mode
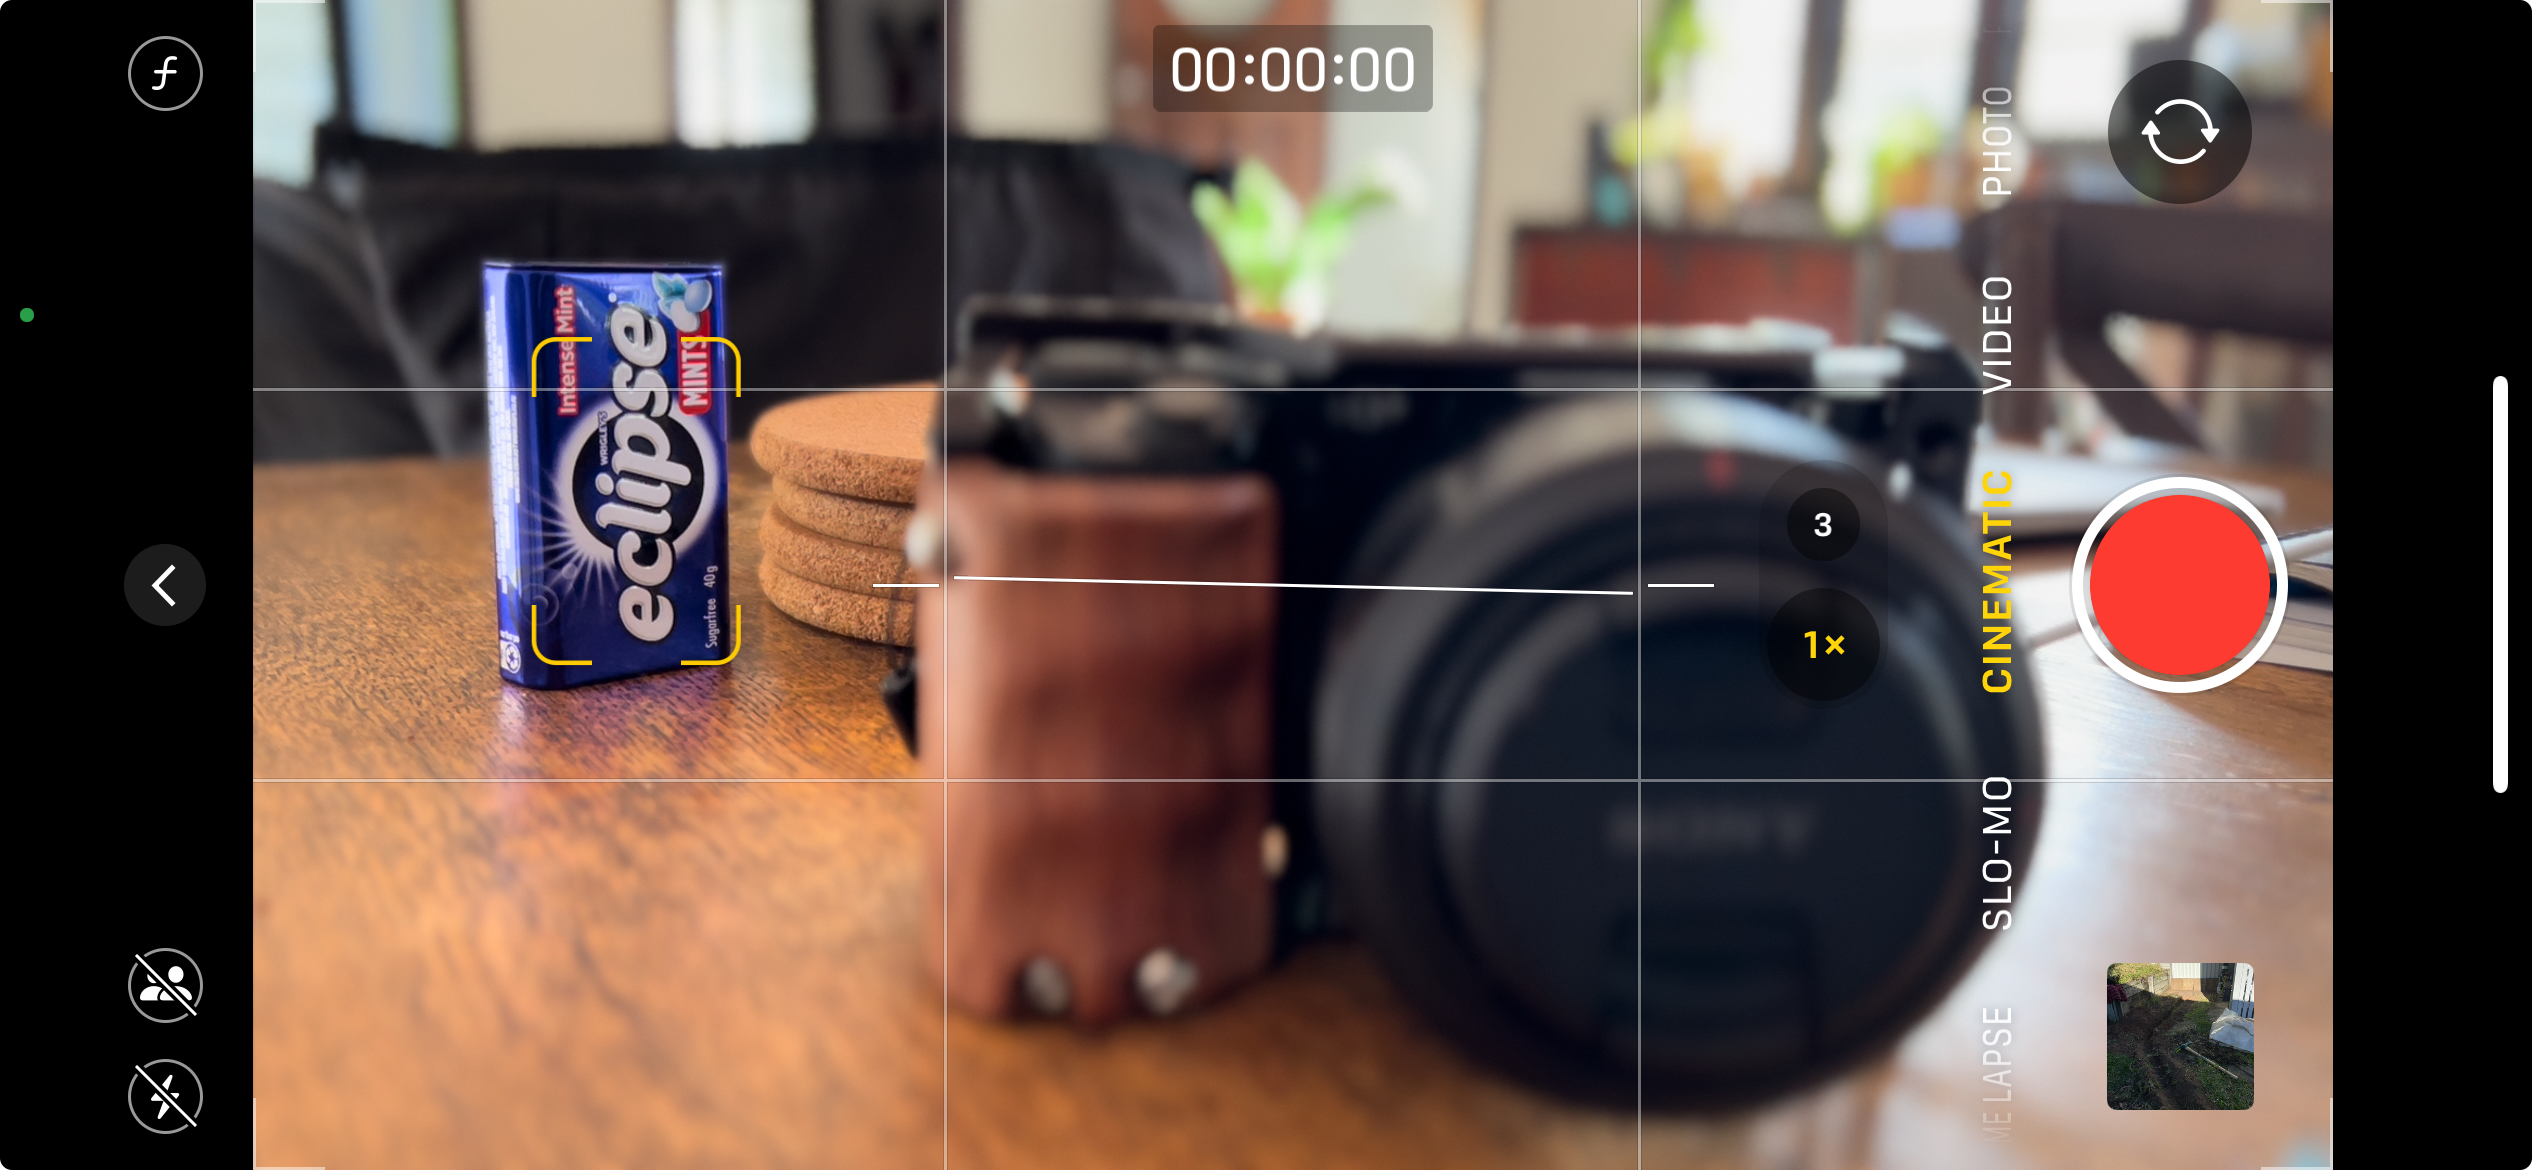
Cinematic mode was introduced to the iPhone 13 family, then improved in the iPhone 14 and later to support 4K resolution in HDR at up to 30 fps. The feature lets you shoot with a shallow depth of field, use smooth focus transitions, and can automatically detect objects within your shot to pull and hold focus.
You also get more options when editing your footage, allowing you to select a desired (simulated) depth of field, and choose different points of focus within the frame. You can even time these transitions to pull focus at opportune times, which is great for drawing attention to subjects and pretending you’re a serious filmmaker.

Cinematic Mode isn’t perfect for all occasions, and some may find the faux depth effect a little over the top. It’s fun to experiment with, just switch to it in the Camera app (it’s a separate mode, next to Video).
7 Don’t Forget About Time Lapse Mode
The iPhone Camera app can shoot great Time Lapse videos with zero input from you. You don’t get to customize things like image intervals, but the iPhone will work everything out for you and condense minutes or hours into seconds, perfect for creating small movies of the setting sun, a backyard project, or even a car journey.
This under-appreciated feature can be found as a separate mode in the Camera app. Select it, frame your shot, make sure your iPhone isn’t going to move (if you want a stable shot, anyway), and tap the shutter. Your iPhone will record for as long as you allow it to, then stitch your images together into a video.
Remember that you can tap and hold an object to lock focus and exposure, then adjust exposure to your liking before you start your time lapse. This is essential if you want to capture a video where the exposure remains the same to visualize fading light, like during a sunset.
8 Consider Shooting in ProRes
Under Settings > Camera > Formats you’ll find a “ProRes” toggle as long as you have a Pro iPhone (starting with the iPhone 13 Pro). ProRes captures much higher video quality at the expense of file size.
Apple describes ProRes as “one of the most popular video formats in professional video production and post-production.” The format attempts to capture as much data from the sensor as possible to preserve image quality and enhance color grading possibilities, and Apple has built ProRes support into many of its modern Apple Silicon chips to make editing more performant.
Once you’ve enabled ProRes in Settings, you’ll need to tap the “ProRes” button in the top-left corner of the viewfinder to turn it on. Depending on your iPhone capacity, you’ll be limited to 1080p resolution at 30 fps (128GB) or up to 4K at up to 60 fps (256GB or 128GB models with external storage).

ProRes is just a toggle, your other preferences (resolution, frame rate, and HDR or SDR) will also need to be set accordingly. You can export your video to a computer for editing, or edit on the same device that you shoot on. You’ll need to use a ProRes capable editor for editing like free app DaVinci Resolve or Apple’s Final Cut Pro.
9 Use a Third-Party App for More Control
Cinema P3 Pro Camera provides professional-level control over iPhone video production. Pretty much every setting that’s hidden in Apple’s Camera app is exposed for you to tweak here including white balance, shutter speed, ISO, and focus.
There are three different exposure modes, presets for storing custom settings, and support for HDR modes like hybrid log gamma (HLG), logarithmic video modes including C-Log and D-Log, Dolby Vision in BT.2020, and 8-bit Rec 709 and P3 wide color modes.
There’s a lot more to this app than first meets the eye. You can sample it all with a free trial and then purchase the app outright for a one-off fee of $12.95. Previously I would have recommended FiLMiC Pro here, but the app was sold on and has since moved to a subscription model. FiLMiC Legacy may still be worth a look, if you want a free video app.
10 Don’t Forget About Sound
Patching up bad video footage with some clever processing and editing isn't so hard, but the same can't be said for audio. We’d recommend investing in a proper microphone for your iPhone or using a separate audio recorder to get the best possible sound quality.
Something like the Saramonic Blink500B2 is a great wireless option at around $200 with both USB-C and Lightning connector. For a clip-on shotgun mic, try something like the Movo X1-Mini for less than $100, though older iPhone users will need to provide their own USB-C to Lightning cable (or adapter).
Don't be afraid to use your iPhone for more adventurous video projects. Looking for more creatie tips? Check out our guide to getting the best quality audio recordings on your iPhone.
Your changes have been saved
Email Is sent
Please verify your email address.
Send confirmation emailYou’ve reached your account maximum for followed topics.
Manage Your List Follow Followed Follow with Notifications Follow Unfollow-
 كيفية حذف النسخ الاحتياطية لآلة الوقت؟ كيف تمحو والبدء من جديد؟آلة الوقت: أفضل صديق لك ، وكيفية إدارة نسخها الاحتياطية Time Machine ، حل النسخ الاحتياطي المدمج من Apple ، يوفر نسخًا احتياطية تلقائية تلقائية ، م...برنامج تعليمي نشر في 2025-03-25
 -
 كيف تمنع الناس من سرقة Wi-Fiحماية شبكة Wi-Fi الخاصة بك أمر بالغ الأهمية للأمان والخصوصية عبر الإنترنت. يمكن للوصول غير المصرح به فضح سجل التصفح والملفات المخزنة. لحسن الحظ ، ف...برنامج تعليمي نشر في 2025-03-25
 -
 "العثور على جهازي" لنظام Android الآن يتيح لك تتبع الأشخاصتم تحديث تطبيق Android Find My Accute من خلال واجهة جديدة سهلة الاستخدام. يضم الآن علامات تبويب "أجهزة" و "أشخاص" منفصلة ، فهي تب...برنامج تعليمي نشر في 2025-03-25
 -
 شكل العملة مقابل تنسيق رقم المحاسبة في Excel: ما هو الفرق؟شرح مفصل لعملة Excel وتنسيق رقم المحاسبة: متى تستخدم أي واحد؟ سوف تنقلب هذه المقالة في الفروق الدقيقة في تنسيقات الأرقام في العملة والمحاسبة في Exc...برنامج تعليمي نشر في 2025-03-25
 -
 4 نصائح للاستماع إلى المزيد من المواد الصوتية ، أسرعالحجم الهائل للبودكاست المتاح اليوم ساحق! من العلوم إلى الجريمة الحقيقية ، هناك بودكاست لكل مصلحة. لكن هذه الوفرة يمكن أن تؤدي إلى تراكم متزايد م...برنامج تعليمي نشر في 2025-03-25
 -
 أحب هاتفًا مع عدسات الكاميرا القابلة للتبديل: لماذا لم يحدث ذلك؟بقدر ما أصبحت كاميرات الهاتف ، يمكن أن توفر لقطات أفضل بكثير باستخدام العدسات القابلة للفصل ، تمامًا مثل الكاميرات المخصصة. أحب أن يكون هذا شيئًا. ...برنامج تعليمي نشر في 2025-03-25
 -
 كيفية دفق ألعاب الكمبيوتر الخاص بك إلى جميع شاشاتكوراء الموسيقى والأفلام ، يكتسب بث اللعبة شعبية بسرعة. هذا ليس فقط عن الألعاب القائمة على السحابة ؛ يمكنك أيضًا دفق الألعاب من جهاز إلى آخر داخل م...برنامج تعليمي نشر في 2025-03-24
 -
 كيفية إعادة تشغيل جهاز كمبيوتر بعيد في الوضع الآمن مع الشبكاتاقرأ صفحة الإفصاح الخاصة بنا لمعرفة كيف يمكنك مساعدة Mspoweruser في الحفاظ على فريق التحرير قراءة المزيد ...برنامج تعليمي نشر في 2025-03-24
 -
 Samsung Galaxy S25+ vs. Galaxy S24+: يستحق الترقية؟Samsung Galaxy S25 مقابل S24: هل ترقية تستحق ذلك؟ يضم Samsung Galaxy S25 معالجًا أكثر قوة وبرنامج كاميرا محسّن ، لكن هل يبرر ذلك ترقية من S24؟ دعنا...برنامج تعليمي نشر في 2025-03-24
 -
 ما هو Apple Carplay ، وهل هو أفضل من مجرد استخدام هاتف في سيارتك؟Apple CarPlay:驾车更安全、更便捷的iPhone体验 Apple CarPlay 为您提供了一种比在车内使用手机更安全的方式,让您轻松访问应用程序和Siri功能。虽然无线CarPlay更加方便,无需连接手机,但有线CarPlay更为常见且运行良好。您可以通过更改壁纸、添加、删除和重新排列...برنامج تعليمي نشر في 2025-03-24
 -
 أفضل صفقات تقنية: Pixel 9 Pro XL و Samsung Portable SSD و Video Doorbell والمزيدمن الجيد جدًا تفويت صفقات التكنولوجيا لهذا الأسبوع ، سواء كنت تبحث عن صفقات يوم الرؤساء أو مفاجأة عيد الحب! لقد اكتشفنا خصومات رائعة على التقنية الع...برنامج تعليمي نشر في 2025-03-23
 -
 يمكن أن يحضر Android 16 أخيرًا الأمر إلى فوضى الإخطاريجوز لـ Android 16 تشغيل وظيفة "الإخطار المجمعة" لحل مشكلة التحميل الزائد للإخطار! في مواجهة العدد المتزايد من إشعارات الهاتف المحمول ، يب...برنامج تعليمي نشر في 2025-03-23
 -
 5 طرق لجلب صورك الرقمية إلى العالم الحقيقي将珍藏的数码照片带入现实生活,让回忆更加生动!本文介绍五种方法,让您不再让照片沉睡在电子设备中,而是以更持久、更令人愉悦的方式展示它们。 本文已更新,最初发表于2018年3月1日 手机拍照如此便捷,照片却常常被遗忘?别让照片蒙尘!以下五种方法,让您轻松将心爱的照片变为可触可感的现实存在。 使用专业照...برنامج تعليمي نشر في 2025-03-23
 -
 لماذا لا يعمل Mousepad لجهاز الكمبيوتر المحمول بشكل صحيح عند توصيله بالشاحن؟أسباب عدم عمل Mousepad لجهاز الكمبيوتر المحمول عند توصيله قبل أن نبدأ في استكشاف أخطاء هذه المشكلة ، دعنا ندرس بعض الأسباب المحتملة لموسيباد جهاز ا...برنامج تعليمي نشر في 2025-03-23
 -
 أفضل 5 طرق فعالة لخطأ عميل مكافحة الشغب لم يتم العثور عليهاتخيل عندما تريد أن يكون لديك راحة من خلال لعب لعبة ، لا تعمل أعمال الشغب الخاصة بك وتظهر لك رسالة خطأ غير موجودة. كيف سيكون هذا الاكتئاب! لذلك ، لتحر...برنامج تعليمي نشر في 2025-03-23
دراسة اللغة الصينية
- 1 كيف تقول "المشي" باللغة الصينية؟ 走路 نطق الصينية، 走路 تعلم اللغة الصينية
- 2 كيف تقول "استقل طائرة" بالصينية؟ 坐飞机 نطق الصينية، 坐飞机 تعلم اللغة الصينية
- 3 كيف تقول "استقل القطار" بالصينية؟ 坐火车 نطق الصينية، 坐火车 تعلم اللغة الصينية
- 4 كيف تقول "استقل الحافلة" باللغة الصينية؟ 坐车 نطق الصينية، 坐车 تعلم اللغة الصينية
- 5 كيف أقول القيادة باللغة الصينية؟ 开车 نطق الصينية، 开车 تعلم اللغة الصينية
- 6 كيف تقول السباحة باللغة الصينية؟ 游泳 نطق الصينية، 游泳 تعلم اللغة الصينية
- 7 كيف يمكنك أن تقول ركوب الدراجة باللغة الصينية؟ 骑自行车 نطق الصينية، 骑自行车 تعلم اللغة الصينية
- 8 كيف تقول مرحبا باللغة الصينية؟ # نطق اللغة الصينية، # تعلّم اللغة الصينية
- 9 كيف تقول شكرا باللغة الصينية؟ # نطق اللغة الصينية، # تعلّم اللغة الصينية
- 10 How to say goodbye in Chinese? 再见Chinese pronunciation, 再见Chinese learning


