
Spring MVC 面试问问题
 浏览:800
1. What is Model 1 architecture?
Model 1 Architecture is an early design pattern for developing web applications. In this architecture, JSP (JavaServer Pages) plays a central role, handling both the presentation and the business logic.
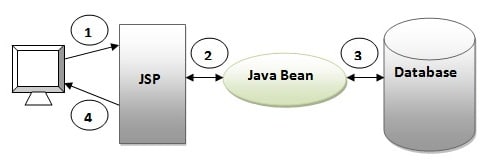
As you can see in the above figure, there is picture which show the flow of the Model1 architecture.
- Browser sends request for the JSP page
- JSP accesses Java Bean and invokes business logic
- Java Bean connects to the database and get/save data
- Response is sent to the browser which is generated by JSP
-
Flow:
- Client requests are directly sent to JSP pages.
- JSP pages process the request, interact with the model (data), and generate a response.
-
Characteristics:
- Simple and straightforward for small applications.
- JSP pages mix presentation logic (HTML) with business logic (Java code).
- Limited separation of concerns.
-
Disadvantages:
- Difficult to maintain and scale.
- Mixing of presentation and business logic can lead to spaghetti code.
2. What is Model 2 Architecture?
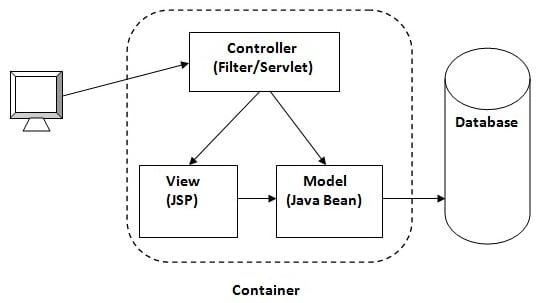
Model 2 Architecture is an advanced design pattern for developing web applications, commonly known as MVC (Model-View-Controller) architecture. It separates the application logic into three main components: Model, View, and Controller.
-
Flow:
- Client requests are sent to a controller.
- The controller processes the request, interacts with the model, and forwards the response to a view.
- The view renders the response to the client.
-
Components:
- Model: Represents the application's data and business logic.
- View: Represents the presentation layer (typically JSP or other templating engines).
- Controller: Handles user requests and controls the flow of the application.
-
Characteristics:
- Clear separation of concerns.
- Easier to maintain and extend.
- More scalable for larger applications.
3. What is Model 2 Front Controller Architecture?
Model 2 Front Controller Architecture is a refinement of the Model 2 (MVC) architecture where a single controller, known as the Front Controller, handles all incoming requests. This pattern further decouples the request handling logic from the business logic and view rendering.
-
Flow:
- Client requests are sent to a single front controller.
- The front controller delegates the request to specific handlers or controllers.
- These handlers interact with the model and forward the response to the appropriate view.
-
Components:
- Front Controller: A central controller that handles all incoming requests and routes them to appropriate handlers.
- Handlers/Controllers: Specific controllers that handle individual requests and business logic.
- Model: Represents the application's data and business logic.
- View: Represents the presentation layer (typically JSP or other templating engines).
-
Characteristics:
- Centralized control of request handling.
- Simplified configuration and management of application flow.
- Enhanced security and preprocessing capabilities (e.g., authentication, logging).
- Easier to implement common functionalities like authentication, logging, and exception handling.
Can you show an example controller method in Spring MVC?
@Controller
public class MyController {

    @RequestMapping("/hello")
    public String sayHello(Model model) {
        model.addAttribute("message", "Hello, World!");
        return "helloView";
    }
}
Summary: The above example demonstrates a simple controller method in Spring MVC that maps a /hello request to the sayHello method. The method adds a message to the model and returns a view name (helloView).
Can you explain a simple flow in Spring MVC?
- Client Request: A user sends an HTTP request to a URL mapped to a Spring MVC controller.
- DispatcherServlet: The request is received by the DispatcherServlet, the front controller in Spring MVC.
- Handler Mapping: The DispatcherServlet consults the HandlerMapping to determine the appropriate controller to handle the request.
- Controller: The controller processes the request. In the example above, MyController's sayHello method handles the request.
- Model: The controller interacts with the model to retrieve or update data. It adds data to the model to be used in the view.
- View Name: The controller returns the view name (e.g., helloView).
- ViewResolver: The ViewResolver resolves the logical view name to a physical view (e.g., helloView.jsp).
- Render View: The view (e.g., JSP, Thymeleaf) is rendered and returned to the client.
Summary: A Spring MVC request flow starts with a client request and goes through the DispatcherServlet, HandlerMapping, and controller. The controller interacts with the model, returns a view name, and the ViewResolver resolves it to a physical view which is then rendered and returned to the client.
What is a ViewResolver?
A ViewResolver is a component in Spring MVC that resolves view names to actual view files. It maps the logical view name returned by the controller to a specific view implementation (e.g., JSP file, Thymeleaf template).
Example:
@Bean
public InternalResourceViewResolver viewResolver() {
    InternalResourceViewResolver resolver = new InternalResourceViewResolver();
    resolver.setPrefix("/WEB-INF/views/");
    resolver.setSuffix(".jsp");
    return resolver;
}
Summary: A ViewResolver in Spring MVC maps logical view names to physical view files, enabling the separation of view names in controllers from the actual view files.
What is a Model?
A Model in Spring MVC is an interface that provides a way to pass attributes to the view for rendering. It acts as a container for the data to be displayed in the view.
Example:
@Controller
public class MyController {

    @RequestMapping("/hello")
    public String sayHello(Model model) {
        model.addAttribute("message", "Hello, World!");
        return "helloView";
    }
}
Summary: The Model in Spring MVC is used to pass data from the controller to the view. It allows adding attributes that will be available in the view for rendering.
What is ModelAndView?
ModelAndView is a holder for both the model and the view in Spring MVC. It encapsulates the data (model) and the view name or view object in one object.
Example:
@Controller
public class MyController {

    @RequestMapping("/greeting")
    public ModelAndView greeting() {
        ModelAndView modelAndView = new ModelAndView();
        modelAndView.setViewName("greetingView");
        modelAndView.addObject("message", "Hello, Spring MVC!");
        return modelAndView;
    }
}
Summary: ModelAndView in Spring MVC combines both the model data and the view name into one object, simplifying the return type from controllers when both model and view need to be specified.
What is a RequestMapping?
@RequestMapping is an annotation used to map HTTP requests to handler methods of MVC and REST controllers. It can map requests based on URL, HTTP method, request parameters, headers, and media types.
Example:
@Controller
@RequestMapping("/home")
public class HomeController {

    @RequestMapping(value = "/welcome", method = RequestMethod.GET)
    public String welcome(Model model) {
        model.addAttribute("message", "Welcome to Spring MVC!");
        return "welcomeView";
    }
}
Summary: @RequestMapping is an annotation in Spring MVC that maps HTTP requests to specific controller methods based on URL patterns, HTTP methods, and other parameters, allowing precise routing of requests.
Summary of All Concepts with Examples
-
Controller Method:
- Handles HTTP requests and returns a view name or ModelAndView.
- Example: @RequestMapping("/hello") public String sayHello(Model model)
-
Flow in Spring MVC:
- Client request → DispatcherServlet → HandlerMapping → Controller → Model → View name → ViewResolver → Render view → Response to client.
- Example: MyController's sayHello method.
-
ViewResolver:
- Maps logical view names to actual view files.
- Example: InternalResourceViewResolver mapping helloView to helloView.jsp.
-
Model:
- Passes data from the controller to the view.
- Example: model.addAttribute("message", "Hello, World!")
-
ModelAndView:
- Encapsulates both model data and view name.
- Example: ModelAndView modelAndView = new ModelAndView("greetingView"); modelAndView.addObject("message", "Hello, Spring MVC!");
-
RequestMapping:
- Maps HTTP requests to controller methods.
- Example: @RequestMapping(value = "/welcome", method = RequestMethod.GET)
What is Dispatcher Servlet?
The DispatcherServlet is the central dispatcher for HTTP request handlers/controllers in a Spring MVC application. It is responsible for routing incoming web requests to appropriate controller methods, handling the lifecycle of a request, and returning the appropriate response.
How do you set up Dispatcher Servlet?
In a traditional Spring MVC application, you set up the DispatcherServlet in the web.xml configuration file or via Java configuration.
Using web.xml:
        dispatcher
        org.springframework.web.servlet.DispatcherServlet

            contextConfigLocation
            /WEB-INF/spring/dispatcher-config.xml

        1


        dispatcher
        /
Using Java Configuration:
import org.springframework.web.servlet.support.AbstractAnnotationConfigDispatcherServletInitializer;

public class MyWebAppInitializer extends AbstractAnnotationConfigDispatcherServletInitializer {

    @Override
    protected Class>[] getRootConfigClasses() {
        return new Class[] { RootConfig.class };
    }

    @Override
    protected Class>[] getServletConfigClasses() {
        return new Class[] { WebConfig.class };
    }

    @Override
    protected String[] getServletMappings() {
        return new String[] { "/" };
    }
}
In this setup, RootConfig and WebConfig are configuration classes annotated with @Configuration.
Do we need to set up Dispatcher Servlet in Spring Boot?
No, in Spring Boot, you do not need to explicitly set up the DispatcherServlet. Spring Boot automatically configures the DispatcherServlet for you. By default, it is mapped to the root URL pattern (/), and Spring Boot will scan your classpath for @Controller and other related annotations.
Spring Boot Application Class:
import org.springframework.boot.SpringApplication;
import org.springframework.boot.autoconfigure.SpringBootApplication;

@SpringBootApplication
public class MySpringBootApplication {
    public static void main(String[] args) {
        SpringApplication.run(MySpringBootApplication.class, args);
    }
}
In this setup, Spring Boot handles the DispatcherServlet setup internally, allowing you to focus on your application's logic without worrying about the boilerplate configuration.
Summary
- DispatcherServlet: The core of Spring MVC that routes requests to appropriate handlers.
- Traditional Setup: Configured via web.xml or Java configuration.
- Spring Boot: Automatically configured, no explicit setup required.
What is a Form Backing Object?
A form backing object in Spring MVC is a Java object that is used to capture form input data. It acts as a data holder for form fields, facilitating the transfer of form data between the view and the controller. The form backing object is typically a POJO (Plain Old Java Object) with properties that correspond to the form fields.
Example:
public class User {
    private String name;
    private String email;
    // Getters and setters
}
How is Validation Done Using Spring MVC?
Validation in Spring MVC is typically done using JSR-303/JSR-380 (Bean Validation API) annotations and a validator implementation. Spring provides support for validating form backing objects using these annotations and the @Valid or @Validated annotation in controller methods.
Example:
-
Form Backing Object with validation annotations:
import javax.validation.constraints.Email; import javax.validation.constraints.NotEmpty; public class User { @NotEmpty(message = "Name is required") private String name; @Email(message = "Email should be valid") @NotEmpty(message = "Email is required") private String email; // Getters and setters } -
Controller method with @Valid:
import org.springframework.stereotype.Controller;
import org.springframework.ui.Model;
import org.springframework.validation.BindingResult;
import org.springframework.web.bind.annotation.GetMapping;
import org.springframework.web.bind.annotation.ModelAttribute;
import org.springframework.web.bind.annotation.PostMapping;

import javax.validation.Valid;

@Controller
public class UserController {

    @GetMapping("/userForm")
    public String showForm(Model model) {
        model.addAttribute("user", new User());
        return "userForm";
    }

    @PostMapping("/userForm")
    public String submitForm(@Valid @ModelAttribute("user") User user, BindingResult result) {
        if (result.hasErrors()) {
            return "userForm";
        }
        // Process the form submission
        return "success";
    }
}
What is BindingResult?
BindingResult is an interface provided by Spring that holds the results of the validation and binding of form backing objects. It contains information about validation errors and can be used to determine whether the form submission is valid.
Example:
@PostMapping("/userForm")
public String submitForm(@Valid @ModelAttribute("user") User user, BindingResult result) {
    if (result.hasErrors()) {
        return "userForm";
    }
    // Process the form submission
    return "success";
}
How Do You Map Validation Results to Your View?
Validation results are automatically mapped to the view using the BindingResult object. The view can then access the error messages through the Spring form tags.
Example (JSP):
What are Spring Form Tags?
Spring form tags are a set of JSP tags provided by the Spring Framework to simplify the development of web forms. These tags bind form fields to form backing objects, making it easier to handle form data and validation errors.
Common Spring Form Tags:
-
: Displays validation errors. -
: Creates a checkbox input. -
: Creates a radio button input. -
: Creates a hidden input field.
Example:
User Form
Summary:
- Form Backing Object: A Java object that holds form data.
- Validation in Spring MVC: Done using JSR-303/JSR-380 annotations and the @Valid annotation in controllers.
- BindingResult: Holds validation and binding results.
- Mapping Validation Results: Done via the BindingResult object and Spring form tags.
- Spring Form Tags: JSP tags for simplifying form handling and validation in views.
What is a Path Variable?
A Path Variable in Spring MVC is used to extract values from the URI of a web request. It allows you to capture dynamic values from the URI and use them in your controller methods.
Example:
import org.springframework.stereotype.Controller;
import org.springframework.web.bind.annotation.PathVariable;
import org.springframework.web.bind.annotation.RequestMapping;
import org.springframework.web.bind.annotation.RequestMethod;
import org.springframework.web.bind.annotation.ResponseBody;

@Controller
public class MyController {

    @RequestMapping(value = "/user/{id}", method = RequestMethod.GET)
    @ResponseBody
    public String getUserById(@PathVariable("id") String userId) {
        return "User ID: "   userId;
    }
}
In this example, if a request is made to /user/123, the method getUserById will capture 123 as the userId parameter.
What is a Model Attribute?
A Model Attribute in Spring MVC is used to bind a method parameter or a return value to a named model attribute, which can be accessed in the view. It is typically used to prepare data for rendering in the view.
Example:
import org.springframework.stereotype.Controller;
import org.springframework.ui.Model;
import org.springframework.web.bind.annotation.ModelAttribute;
import org.springframework.web.bind.annotation.RequestMapping;
import org.springframework.web.bind.annotation.RequestMethod;

@Controller
public class MyController {

    @RequestMapping(value = "/form", method = RequestMethod.GET)
    public String showForm(Model model) {
        model.addAttribute("user", new User());
        return "userForm";
    }

    @RequestMapping(value = "/form", method = RequestMethod.POST)
    public String submitForm(@ModelAttribute User user) {
        // Process form submission
        return "result";
    }
}
In this example, the User object is added to the model and made available to the view (userForm.jsp). When the form is submitted, the User object is populated with the form data and processed in the submitForm method.
What is a Session Attribute?
A Session Attribute in Spring MVC is used to store model attributes in the HTTP session, allowing them to persist across multiple requests. This is useful for maintaining state between requests.
Example:
import org.springframework.stereotype.Controller;
import org.springframework.web.bind.annotation.ModelAttribute;
import org.springframework.web.bind.annotation.RequestMapping;
import org.springframework.web.bind.annotation.RequestMethod;
import org.springframework.web.bind.annotation.SessionAttributes;

@Controller
@SessionAttributes("user")
public class MyController {

    @RequestMapping(value = "/form", method = RequestMethod.GET)
    public String showForm(Model model) {
        model.addAttribute("user", new User());
        return "userForm";
    }

    @RequestMapping(value = "/form", method = RequestMethod.POST)
    public String submitForm(@ModelAttribute User user) {
        // Process form submission
        return "result";
    }

    @RequestMapping(value = "/clearSession", method = RequestMethod.GET)
    public String clearSession(SessionStatus status) {
        status.setComplete();
        return "sessionCleared";
    }
}
In this example, the User object is stored in the session and can be accessed across multiple requests. The clearSession method can be used to clear the session attributes.
Summary:
- Path Variable: Extracts values from the URI to use in controller methods.
- Model Attribute: Binds method parameters or return values to model attributes, making them accessible in views.
- Session Attribute: Stores model attributes in the HTTP session to maintain state across multiple requests.
What is an Init Binder?
An Init Binder in Spring MVC is a mechanism that allows you to customize the way data is bound to the form backing objects. It is used to initialize WebDataBinder, which performs data binding from web request parameters to JavaBean objects. @InitBinder methods are used to register custom editors, formatters, and validators for specific form fields or types.
Key Uses of Init Binder:
- Register Custom Property Editors: To convert form field values to specific types.
- Register Custom Formatters: To format the input/output of date, number, or other complex types.
- Add Validators: To perform custom validation logic.
Example of Init Binder
Scenario: You have a form that includes a date field and you want to use a specific date format.
Step 1: Define a form backing object
public class User {
    private String name;
    private Date birthDate;

    // Getters and setters
}
Step 2: Define a controller with an @InitBinder method
import org.springframework.stereotype.Controller;
import org.springframework.web.bind.WebDataBinder;
import org.springframework.web.bind.annotation.InitBinder;
import org.springframework.web.bind.annotation.ModelAttribute;
import org.springframework.web.bind.annotation.RequestMapping;
import org.springframework.web.bind.annotation.RequestMethod;
import org.springframework.web.bind.annotation.ResponseBody;

import java.text.SimpleDateFormat;
import java.util.Date;

@Controller
public class UserController {

    @InitBinder
    public void initBinder(WebDataBinder binder) {
        SimpleDateFormat dateFormat = new SimpleDateFormat("yyyy-MM-dd");
        dateFormat.setLenient(false);
        binder.registerCustomEditor(Date.class, new CustomDateEditor(dateFormat, false));
    }

    @RequestMapping(value = "/form", method = RequestMethod.GET)
    public String showForm(Model model) {
        model.addAttribute("user", new User());
        return "userForm";
    }

    @RequestMapping(value = "/form", method = RequestMethod.POST)
    @ResponseBody
    public String submitForm(@ModelAttribute User user) {
        // Process form submission
        return "Name: "   user.getName()   ", Birth Date: "   user.getBirthDate();
    }
}
Explanation:
- Form Backing Object: User class with name and birthDate fields.
-
Controller:
- The @InitBinder method initBinder is defined to customize the data binding process.
- WebDataBinder is used to register a custom editor (CustomDateEditor) for Date class.
- CustomDateEditor uses a SimpleDateFormat to parse and format dates in the "yyyy-MM-dd" format.
- The showForm method adds a new User object to the model and returns the view name userForm.
- The submitForm method processes the form submission and returns a response with the user's name and birth date.
Step 3: Define the form view (JSP example)
User Form
Summary:
- Init Binder: A method annotated with @InitBinder in a Spring MVC controller that customizes data binding.
-
Key Uses:
- Register custom property editors.
- Register custom formatters.
- Add validators.
-
Example:
- Custom date formatting using CustomDateEditor.
- Binding form data to a User object with a birthDate field formatted as "yyyy-MM-dd".
This customization allows precise control over how form data is converted and validated before it is bound to the controller's method parameters.
To set a default date format in a Spring application, you typically use an @InitBinder method in your controller to register a custom date editor. This approach allows you to specify the date format that should be used for all date fields in your form backing objects.
Here is a detailed example:
Step-by-Step Guide to Setting a Default Date Format
1. Define the Form Backing Object
Create a simple Java class to represent your form data.
public class User {
    private String name;
    private Date birthDate;

    // Getters and setters
    public String getName() {
        return name;
    }

    public void setName(String name) {
        this.name = name;
    }

    public Date getBirthDate() {
        return birthDate;
    }

    public void setBirthDate(Date birthDate) {
        this.birthDate = birthDate;
    }
}
2. Define the Controller
Create a Spring MVC controller with an @InitBinder method to register the custom date editor.
import org.springframework.beans.propertyeditors.CustomDateEditor;
import org.springframework.stereotype.Controller;
import org.springframework.ui.Model;
import org.springframework.web.bind.WebDataBinder;
import org.springframework.web.bind.annotation.InitBinder;
import org.springframework.web.bind.annotation.ModelAttribute;
import org.springframework.web.bind.annotation.RequestMapping;
import org.springframework.web.bind.annotation.RequestMethod;

import java.text.SimpleDateFormat;
import java.util.Date;

@Controller
public class UserController {

    @InitBinder
    public void initBinder(WebDataBinder binder) {
        SimpleDateFormat dateFormat = new SimpleDateFormat("yyyy-MM-dd");
        dateFormat.setLenient(false);
        binder.registerCustomEditor(Date.class, new CustomDateEditor(dateFormat, false));
    }

    @RequestMapping(value = "/form", method = RequestMethod.GET)
    public String showForm(Model model) {
        model.addAttribute("user", new User());
        return "userForm";
    }

    @RequestMapping(value = "/form", method = RequestMethod.POST)
    public String submitForm(@ModelAttribute User user, Model model) {
        // Process form submission
        model.addAttribute("user", user);
        return "result";
    }
}
3. Define the View (JSP Example)
Create a JSP file for the form (e.g., userForm.jsp).
User Form
Create another JSP file to display the result (e.g., result.jsp).
    Form Submitted
    Name: ${user.name}
    Birth Date: ${user.birthDate}
Summary
- Form Backing Object: Define a class (e.g., User) with a date field.
-
Controller:
- Use @InitBinder to register a CustomDateEditor with a specific date format.
- Handle form display and submission.
- Views: Create JSP files for the form and the result display.
This approach ensures that all date fields in your form backing objects use the specified date format ("yyyy-MM-dd" in this example), simplifying date handling and validation in your Spring application.
Exception Handling in Spring MVC
Exception handling in Spring MVC can be done in various ways, from using traditional try-catch blocks to leveraging Spring's @ExceptionHandler and @ControllerAdvice annotations for a more centralized and sophisticated approach.
1. Using @ExceptionHandler in Controllers
You can handle exceptions locally within a controller by using the @ExceptionHandler annotation. This annotation is used to define a method that will handle exceptions thrown by request handling methods in the same controller.
Example:
import org.springframework.stereotype.Controller;
import org.springframework.web.bind.annotation.ExceptionHandler;
import org.springframework.web.bind.annotation.RequestMapping;
import org.springframework.web.bind.annotation.RequestMethod;
import org.springframework.web.bind.annotation.ResponseBody;

@Controller
public class MyController {

    @RequestMapping(value = "/test", method = RequestMethod.GET)
    public String test() {
        if (true) {
            throw new RuntimeException("Test exception");
        }
        return "test";
    }

    @ExceptionHandler(RuntimeException.class)
    @ResponseBody
    public String handleRuntimeException(RuntimeException ex) {
        return "Handled RuntimeException: "   ex.getMessage();
    }
}
2. Using @ControllerAdvice
For a more global approach to exception handling, you can use @ControllerAdvice. This annotation allows you to define a class that will handle exceptions for all controllers or specific controllers.
Example:
import org.springframework.web.bind.annotation.ControllerAdvice;
import org.springframework.web.bind.annotation.ExceptionHandler;
import org.springframework.web.bind.annotation.ResponseBody;
import org.springframework.web.servlet.ModelAndView;

@ControllerAdvice
public class GlobalExceptionHandler {

    @ExceptionHandler(RuntimeException.class)
    @ResponseBody
    public String handleRuntimeException(RuntimeException ex) {
        return "Handled by GlobalExceptionHandler: "   ex.getMessage();
    }

    @ExceptionHandler(Exception.class)
    public ModelAndView handleException(Exception ex) {
        ModelAndView mav = new ModelAndView("error");
        mav.addObject("message", ex.getMessage());
        return mav;
    }
}
In this example, GlobalExceptionHandler will handle RuntimeException and Exception globally for all controllers in the application.
Summary
-
Local Exception Handling:
- Use @ExceptionHandler in a controller to handle exceptions thrown by methods in the same controller.
-
Global Exception Handling:
- Use @ControllerAdvice to create a global exception handler that applies to multiple controllers.
- @ExceptionHandler methods within @ControllerAdvice can handle specific exceptions or a range of exceptions.
Detailed Example with Controller Advice
Step 1: Create a Controller
import org.springframework.stereotype.Controller;
import org.springframework.web.bind.annotation.GetMapping;
import org.springframework.web.bind.annotation.RequestMapping;
import org.springframework.web.bind.annotation.ResponseBody;

@Controller
@RequestMapping("/api")
public class MyApiController {

    @GetMapping("/test")
    @ResponseBody
    public String test() {
        if (true) {
            throw new RuntimeException("Test exception in API");
        }
        return "test";
    }
}
Step 2: Create a Global Exception Handler with @ControllerAdvice
import org.springframework.web.bind.annotation.ControllerAdvice;
import org.springframework.web.bind.annotation.ExceptionHandler;
import org.springframework.web.bind.annotation.ResponseBody;
import org.springframework.web.servlet.ModelAndView;

@ControllerAdvice
public class GlobalExceptionHandler {

    @ExceptionHandler(RuntimeException.class)
    @ResponseBody
    public String handleRuntimeException(RuntimeException ex) {
        return "Handled by GlobalExceptionHandler: "   ex.getMessage();
    }

    @ExceptionHandler(Exception.class)
    public ModelAndView handleException(Exception ex) {
        ModelAndView mav = new ModelAndView("error");
        mav.addObject("message", ex.getMessage());
        return mav;
    }
}
In this setup:
- Any RuntimeException thrown by any controller will be handled by the handleRuntimeException method in GlobalExceptionHandler.
- Any general Exception will be handled by the handleException method, returning a view named error with an error message.
Summary Points
-
Exception Handling in Controllers:
- @ExceptionHandler methods handle exceptions within the same controller.
-
Global Exception Handling with @ControllerAdvice:
- Centralized exception handling for all controllers.
- Can handle specific exceptions and provide common handling logic across the application.
- Simplifies maintenance by separating exception handling from business logic.
-
Use Cases:
- Local Handling: For specific exception handling needs within a single controller.
- Global Handling: For a consistent and reusable exception handling strategy across the entire application.
Why is Spring MVC so popular?
Spring MVC is popular for several reasons:
Simplicity: Spring MVC provides a simple approach to creating web applications, with minimal configuration required.
Modularity: It allows for a modular approach to design, which makes it easier to maintain and update the code.
Integration: Spring MVC can be easily integrated with other popular Java frameworks like Hibernate, JPA, etc.
Testability: It provides excellent support for testing, which makes it easier to ensure the quality of the application.
Community Support: It has a large and active community, which means that help is readily available.
Versatility: It can be used to develop a wide range of applications, from simple web sites to complex enterprise applications.
Documentation: It has extensive and detailed documentation, which makes it easier to learn and use.
-
 C++20 Consteval函数中模板参数能否依赖于函数参数?[ consteval函数和模板参数依赖于函数参数在C 17中,模板参数不能依赖一个函数参数,因为编译器仍然需要对非contexexpr futcoriations contim at contexpr function进行评估。 compile time。 C 20引入恒定函数,必须在编译时进行...编程 发布于2025-07-02
 -
在细胞编辑后,如何维护自定义的JTable细胞渲染?在JTable中维护jtable单元格渲染后,在JTable中,在JTable中实现自定义单元格渲染和编辑功能可以增强用户体验。但是,至关重要的是要确保即使在编辑操作后也保留所需的格式。在设置用于格式化“价格”列的“价格”列,用户遇到的数字格式丢失的“价格”列的“价格”之后,问题在设置自定义单元格...编程 发布于2025-07-02
-
为什么我的CSS背景图像出现?故障排除:CSS背景图像未出现 ,您的背景图像尽管遵循教程说明,但您的背景图像仍未加载。图像和样式表位于相同的目录中,但背景仍然是空白的白色帆布。而不是不弃用的,您已经使用了CSS样式: bockent {背景:封闭图像文件名:背景图:url(nickcage.jpg); 如果您的html,css...编程 发布于2025-07-02
-
如何使用组在MySQL中旋转数据?在关系数据库中使用mySQL组使用mySQL组进行查询结果,在关系数据库中使用MySQL组,转移数据的数据是指重新排列的行和列的重排以增强数据可视化。在这里,我们面对一个共同的挑战:使用组的组将数据从基于行的基于列的转换为基于列。 Let's consider the following ...编程 发布于2025-07-02
-
对象拟合:IE和Edge中的封面失败,如何修复?To resolve this issue, we employ a clever CSS solution that solves the problem:position: absolute;top: 50%;left: 50%;transform: translate(-50%, -50%)...编程 发布于2025-07-02
-
表单刷新后如何防止重复提交?在Web开发中预防重复提交 在表格提交后刷新页面时,遇到重复提交的问题是常见的。要解决这个问题,请考虑以下方法: 想象一下具有这样的代码段,看起来像这样的代码段:)){ //数据库操作... 回声“操作完成”; 死(); } ?> ...编程 发布于2025-07-02
-
在UTF8 MySQL表中正确将Latin1字符转换为UTF8的方法在UTF8表中将latin1字符转换为utf8 ,您遇到了一个问题,其中含义的字符(例如,“jáuòiñe”)在utf8 table tabled tablesset中被extect(例如,“致电。为了解决此问题,您正在尝试使用“ mb_convert_encoding”和“ iconv”转换受...编程 发布于2025-07-02
-
Java数组中元素位置查找技巧在Java数组中检索元素的位置 利用Java的反射API将数组转换为列表中,允许您使用indexof方法。 (primitives)(链接到Mishax的解决方案) 用于排序阵列的数组此方法此方法返回元素的索引,如果发现了元素的索引,或一个负值,指示应放置元素的插入点。编程 发布于2025-07-02
-
为什么不使用CSS`content'属性显示图像?在Firefox extemers属性为某些图像很大,&& && && &&华倍华倍[华氏华倍华氏度]很少见,却是某些浏览属性很少,尤其是特定于Firefox的某些浏览器未能在使用内容属性引用时未能显示图像的情况。这可以在提供的CSS类中看到:。googlepic { 内容:url(&#...编程 发布于2025-07-02
-
如何将多种用户类型(学生,老师和管理员)重定向到Firebase应用中的各自活动?Red: How to Redirect Multiple User Types to Respective ActivitiesUnderstanding the ProblemIn a Firebase-based voting app with three distinct user type...编程 发布于2025-07-02
-
Async Void vs. Async Task在ASP.NET中:为什么Async Void方法有时会抛出异常?在ASP.NET async void void async void void void void void void void的设计无需返回asynchroncon而无需返回任务对象。他们在执行过程中增加未偿还操作的计数,并在完成后减少。在某些情况下,这种行为可能是有益的,例如未期望或明确...编程 发布于2025-07-02
-
如何避免Go语言切片时的内存泄漏?,a [j:] ...虽然通常有效,但如果使用指针,可能会导致内存泄漏。这是因为原始的备份阵列保持完整,这意味着新切片外部指针引用的任何对象仍然可能占据内存。 copy(a [i:] 对于k,n:= len(a)-j i,len(a); k编程 发布于2025-07-02
-
如何在无序集合中为元组实现通用哈希功能?在未订购的集合中的元素要纠正此问题,一种方法是手动为特定元组类型定义哈希函数,例如: template template template 。 struct std :: hash { size_t operator()(std :: tuple const&tuple)const {...编程 发布于2025-07-02
-
Java的Map.Entry和SimpleEntry如何简化键值对管理?A Comprehensive Collection for Value Pairs: Introducing Java's Map.Entry and SimpleEntryIn Java, when defining a collection where each element com...编程 发布于2025-07-02
-


学习中文
- 1 走路用中文怎么说?走路中文发音,走路中文学习
- 2 坐飞机用中文怎么说?坐飞机中文发音,坐飞机中文学习
- 3 坐火车用中文怎么说?坐火车中文发音,坐火车中文学习
- 4 坐车用中文怎么说?坐车中文发音,坐车中文学习
- 5 开车用中文怎么说?开车中文发音,开车中文学习
- 6 游泳用中文怎么说?游泳中文发音,游泳中文学习
- 7 骑自行车用中文怎么说?骑自行车中文发音,骑自行车中文学习
- 8 你好用中文怎么说?你好中文发音,你好中文学习
- 9 谢谢用中文怎么说?谢谢中文发音,谢谢中文学习
- 10 How to say goodbye in Chinese? 再见Chinese pronunciation, 再见Chinese learning


