React - 服务器操作
React form Actions.
React has introduced new form Actions and related hooks to enhance native forms and streamline client-server communication. These features enable developers to handle form submissions more effectively, improving both user experience and code maintainability. For an in-depth exploration of React form Actions, you can refer to my detailed post on my post about React Form Actions.
Server Actions
With React 18, the Server Components feature was introduced. Server components are not Server-Side Rendering (SSR), Server Components are executed exclusively on the server during both runtime and build time. These components can access server-side resources, such as databases and the file system, but they are not capable of performing client-side actions like event listeners or hooks.
Prerequisites
To demonstrate the capabilities of Server Components and Server Actions, we'll use Next.js and Prisma.
Next.js is a React framework for building full-stack web applications. You use React Components to build user interfaces, and Next.js for additional features and optimizations. Under the hood, Next.js also abstracts and automatically configures tooling needed for React, like bundling, compiling, and more. This allows you to focus on building your application instead of spending time with configuration. learn more
Prisma is an ORM that simplifies database access and operations, allowing you to query and manipulate data without writing SQL. Learn more
Initial Setup
Start by creating a new Next.js application:
yarn create next-app server-example
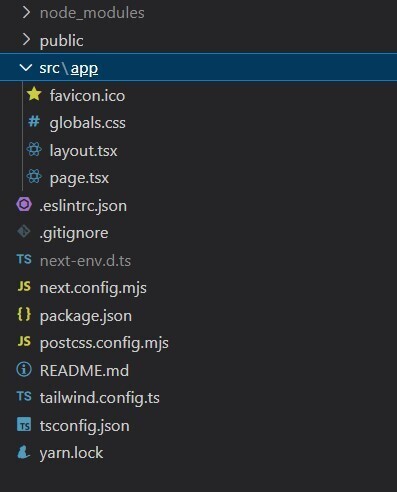
Your initial folder structure will look like this:

Upgrade to the Canary Release to access React 19 features, including Server Actions:
yarn add next@rc react@rc react-dom@rc
install Prisma
yarn add prisma
Prisma Configuration
Create a Prisma schema file at src/lib/prisma/schema.prisma:
generator client {
  provider = "prisma-client-js"
}

datasource db {
  provider = "sqlite"
  url      = "file:./dev.db"
}

model User {
  id    Int     @id @default(autoincrement())
  email String  @unique
  name  String?
  age Int
}
For demonstration purposes, we are using SQLite. For production, you should use a more robust database.
Next, add a Prisma client file at src/lib/prisma/prisma.ts
// ts-ignore 7017 is used to ignore the error that the global object is not
// defined in the global scope. This is because the global object is only
// defined in the global scope in Node.js and not in the browser.

import { PrismaClient } from '@prisma/client'

// PrismaClient is attached to the `global` object in development to prevent
// exhausting your database connection limit.
//
// Learn more:
// https://pris.ly/d/help/next-js-best-practices

const globalForPrisma = global as unknown as { prisma: PrismaClient }

export const prisma = globalForPrisma.prisma || new PrismaClient()

if (process.env.NODE_ENV !== 'production') globalForPrisma.prisma = prisma

export default prisma
Configure Prisma in package.json:
{
  //other settings
  "prisma": {
    "schema": "src/lib/prisma/schema.prisma",
    "seed": "ts-node src/lib/prisma/seed.ts"
  }
}
And update TypeScript settings in tsconfig.json:
{
  //Other settings here...

  "ts-node": {
    // these options are overrides used only by ts-node
    // same as the --compilerOptions flag and the
    // TS_NODE_COMPILER_OPTIONS environment variable
    "compilerOptions": {
      "module": "commonjs"
    }
  }
}
Install ts-node globally:
yarn global add ts-node
Seeding Initial Data
Add a seed file at src/lib/prisma/seed.ts to populate initial data:
import { PrismaClient } from "@prisma/client";
const prisma = new PrismaClient();
async function main() {
  await prisma.user.create({
    email: "[email protected]",
    name: "Anto",
    age: 35,
  });
  await prisma.user.create({
    email: "[email protected]",
    name: "Vinish",
    age: 32,
  });
}
main()
  .then(async () => {
    await prisma.$disconnect();
  })
  .catch(async (e) => {
    console.error(e);
    await prisma.$disconnect();
    process.exit(1);
  });
Install Prisma client
yarn add @prisma/client
Run the migration command:
yarn prisma migrate dev --name init
If the seed data is not reflected, add it manually:
yarn prisma db seed
Great! Since the installations are ready, you can create an actions file that performs database operations.
Creating Server Actions
Server Actions are a powerful feature that enables seamless client-server intercommunication. Let's create a file for database operations at src/actions/user.ts:
"use server";
import prisma from '@/lib/prisma/prisma'
import { revalidatePath } from "next/cache";

// export type for user
export type User = {
  id: number;
  name: string | null;
  email: string;
  age: number;
};


export async function createUser(user: any) {
  const resp = await prisma.user.create({ data: user });
  console.log("server Response");
  revalidatePath("/");
  return resp;
}

export async function getUsers() {
  return await prisma.user.findMany();
}

export async function deleteUser(id: number) {
  await prisma.user.delete({
    where: {
      id: id,
    },
  });
  revalidatePath("/");
}
Implementing Server Components
Let's create a React server component to read and render data from the database. Create src/app/serverexample/page.tsx:
import UserList from "./Users";
import "./App.css"
export default async function ServerPage() {
return (
Add some styling in src/app/serverexample/App.css
.App {
  text-align: center;
}

.App-logo {
  height: 40vmin;
  pointer-events: none;
}

.App-header {
  background-color: #282c34;
  min-height: 100vh;
  display: flex;
  flex-direction: column;
  align-items: center;
  justify-content: center;
  font-size: calc(10px   2vmin);
  color: white;
}

input {
  color: #000;
}

.App-link {
  color: #61dafb;
}
Create components to fetch and render the user list:
src/app/serverexample/UserList.tsx
import { getUsers } from "@/actions/user";
import { UserDetail } from "./UserDetail";
export default async function UserList() {
//Api call to fetch User details
const users = await getUsers();
return (
{users.length ? (
users.map((user) =>
src/app/serverexample/UserDetail.tsx
export function UserDetail({ user }) {
  return (


        {user.name}

          {user.email}


  );
}
Run the development server:
yarn dev
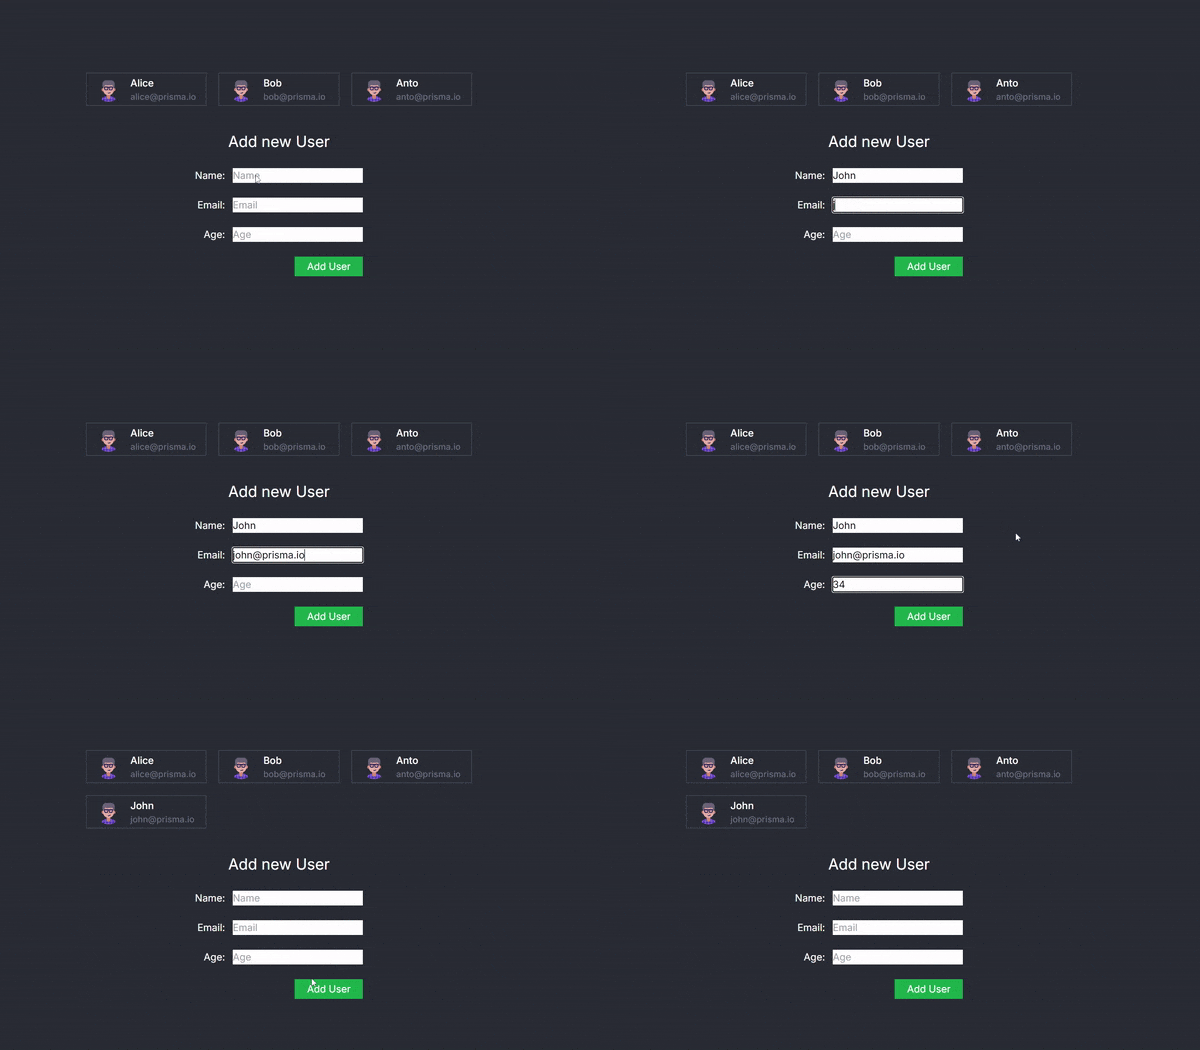
Navigate to http://localhost:3000/serverexample to see the rendered user list:
By default, components in Next.js are server components unless you specify the "use client" directive. Notice two important points:
- Async Component Definition: Server components can be asynchronous as they do not re-render and are only generated once.
- Data Fetching: The line const users = await getUsers(); fetches data from the server and renders it at runtime.
Exploring Server Actions
Server Actions enable seamless client-server intercommunication. Let's add a form to create new users.
Create a new file at src/app/serverexample/AddUser.tsx:
"use client";
import "./app.css";
import { useActionState } from "react";
import { createUser } from "../../actions/user";
const initialState = {
error: undefined,
};
export default function AddUser() {
const submitHandler = async (_previousState: object, formData: FormData) => {
try {
// This is the Server Action method that transfers the control
// Back to the server to do DB operations and get back the result.
const response = await createUser({
name: formData.get("name") as string,
email: formData.get("email") as string,
age: parseInt(formData.get("age") as string),
});
return { response };
} catch (error) {
return { error };
}
};
const [state, submitAction, isPending] = useActionState(
submitHandler,
initialState
);
return (
Add new User
{" "}
);
}
Update src/app/serverexample/page.tsx to include the AddUser component:
import UserList from "./UserList";
// Import new line
import AddUser from "./AddUser";
import "./App.css"
export default async function ServerPage() {
return (
Running the application will now allow you to add new users via the form, with server-side processing handled seamlessly.
The AddUser Component and Seamless Client-Server Interaction
The AddUser component is at the heart of this example, showcasing how React Server Actions can revolutionize the way we handle client-server interactions. This component renders a form for adding new users and leverages the useActionState hook to create a smooth and seamless bridge between the client-side interface and server-side operations.
How It Works
- Form Rendering and Data Handling:
- The AddUser component provides a form where users can input their name, email, and age.
- Upon form submission, the data is captured and prepared to be sent to the server.
- useActionState Hook:
- The useActionState hook is a crucial part of this setup. It simplifies the complexity of managing client-side state and server-side actions by abstracting them into a unified interface.
- This hook accepts an asynchronous handler function, which processes the form data and then calls a Server Action method.
- The brilliance of this approach lies in its abstraction: it feels as though you’re invoking a regular function within the same file, even though it actually triggers a server-side operation.
- Server Action Method:
- The createUser function, defined as a Server Action, executes on the server side. It takes the user data from the form, performs the necessary database operations via Prisma, and returns the result.
- This server-side method is crucial for maintaining a clean separation between the client and server, while still enabling them to communicate effectively.
- Seamless Integration:
From the perspective of a developer working on the client side, it appears as if the form submission is handled locally. However, the heavy lifting such as database manipulation occurs on the server.
The useActionState hook encapsulates this process, managing the state transitions and handling errors, while maintaining an intuitive API for developers.
Server Actions Without Forms
So that's with forms, now lets test an example without forms.
update src/app/serverexample/UserDetail.tsx
"use client";
import { deleteUser } from "@/actions/user";
import { useTransition } from "react";

export function UserDetail({ user }) {
  const [pending, startTransition] = useTransition();

  const handleDelete = () => {
    startTransition(() => {
      deleteUser(user.id);
    });
  };

  return (

      {pending ? (
        Deleting...
      ) : (


            {user.name}

              {user.email}


        >
      )}

  );
}
Key Points:
- Server Action: deleteUser(user.id) is a server action that removes the user from the database. This operation is triggered without any form submission.
- useTransition: This hook allows you to manage the asynchronous state of the deletion process, showing a "Deleting..." message while the operation is in progress.
- User Interface: The component maintains a clean UI, dynamically updating based on the action status.
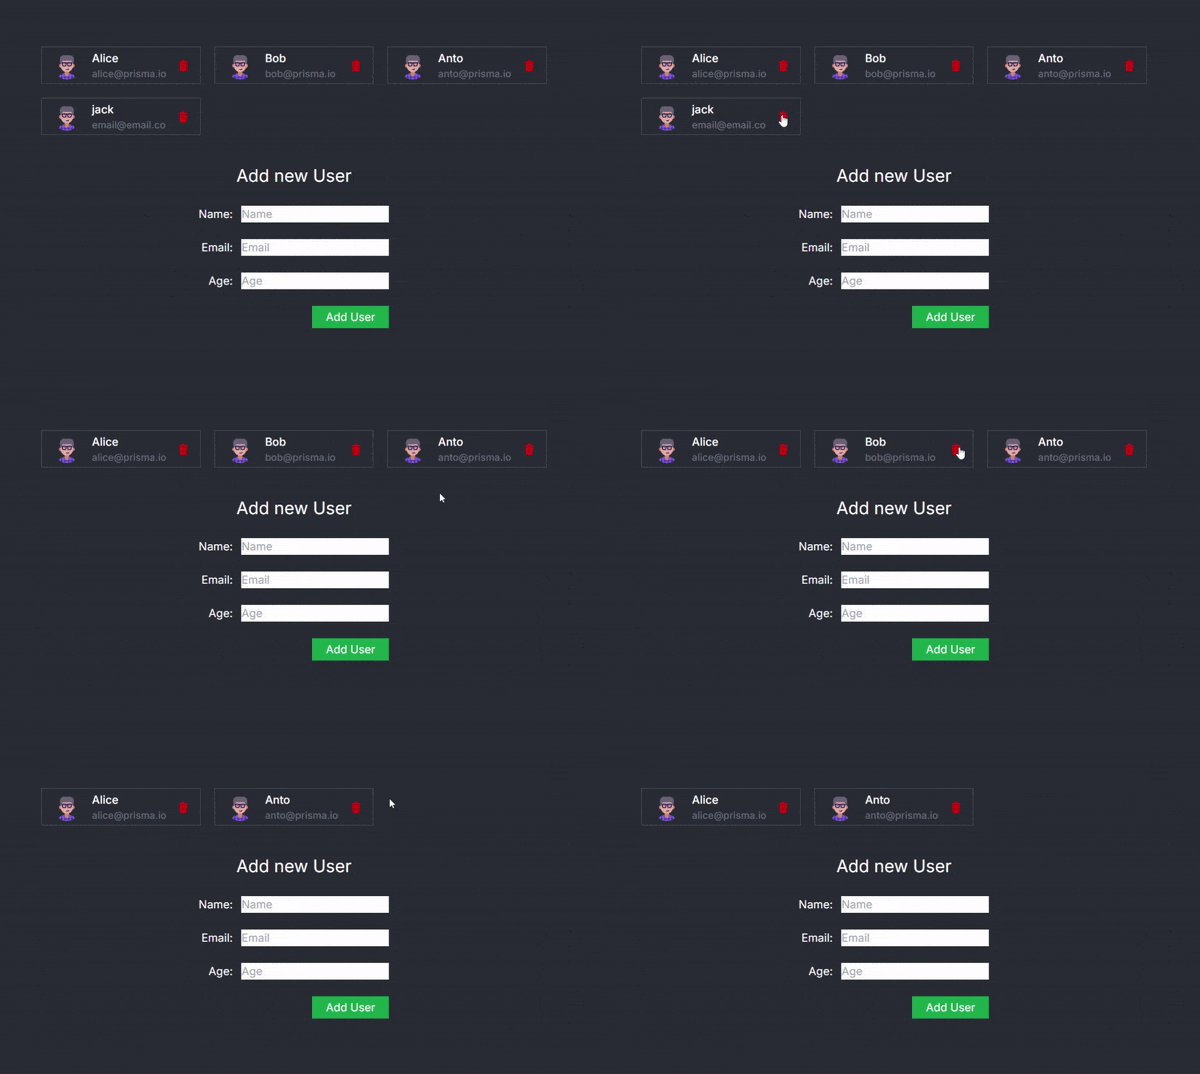
Now, you can seamlessly delete a user within the application:
Conclusion
This approach is transformative because it abstracts away the complexities of client-server communication. Traditionally, such interactions would require handling API endpoints, managing asynchronous requests, and carefully coordinating client-side state with server responses. With React Server Actions and the useActionState hook, this complexity is reduced, allowing developers to focus more on building features rather than worrying about the underlying infrastructure.
By using this pattern, you gain:
- Cleaner Code: The client-side code remains simple and focused, without the need for explicit API calls.
- Improved Developer Experience: Server-side operations are seamlessly integrated, reducing cognitive load and potential for errors.
- Enhanced Performance: Server Actions are optimized for performance, reducing unnecessary client-server round trips and ensuring that server-side resources are used efficiently.
You can find the full code in the repository
-
 项目通过其接口引用对象接口作为引用类型的偏好: 如果存在合适的接口,您应该通过它引用对象而不是具体的类。 这适用于参数、返回值、变量和字段。 使用接口的灵活性: 使用接口允许您更改实现而不影响代码。 示例:从 LinkedHashSet 更改为 HashSet 或 TreeSet,只需更改构造函数即可。 何时不使用接口:...编程 发布于2024-11-06
 -
 如何防止游戏网站页面加载时重复插入?调试页面加载时的重复插入在游戏网页上,观察到用户活动查询在页面刷新时将重复记录插入数据库。$insert_user_activity = mysql_query("INSERT INTO game_activity (user_id,user_full_name,game_id,game_...编程 发布于2024-11-06
 -
 Python 最佳实践:编写干净、高效且可维护的代码Python 因其简单性、可读性和多功能性而成为最流行的编程语言之一。 无论您是经验丰富的开发人员还是初学者,遵循 Python 最佳实践对于编写干净、高效和可维护的代码至关重要。 在这篇博文中,我们将探讨编写 Python 代码时要牢记的一些关键最佳实践。 1 - 遵守 PEP...编程 发布于2024-11-06
 -
 std::lock_guard 与 std::scoped_lock:何时使用哪个锁?std::lock_guard 与 std::scoped_lock:为任务选择正确的锁随着 C 17 的引入,std ::scoped_lock 类与现有的 std::lock_guard 一起出现,引发了关于它们之间的差异以及何时使用它们的问题。虽然 std::scoped_lock 与 std...编程 发布于2024-11-06
 -
 如何在不使用 JavaScript 的情况下使用 CSS 隐藏和显示内容?使用 CSS 隐藏和显示内容:无需 JavaScript 的技巧在进行 Web 开发时,控制内容的可见性通常至关重要。传统上,这是使用 JavaScript 实现的,但 CSS 也可用于创建优雅的隐藏和显示效果。下面描述了一种此类技术,解决了先前方法遇到的特定挑战。隐藏/显示内容切换:可以使用 CS...编程 发布于2024-11-06
 -
 如何创建重复最少的 5 个字符的随机字符串?生成 5 个具有最少重复的随机字符要创建具有最少重复的随机 5 个字符字符串,最有效的方法之一是使用PHP 函数和巧妙技术的结合。让我们深入研究解决方案:使用 md5 和 rand$rand = substr(md5(microtime()),rand(0,26),5);该方法使用md5哈希函数根据...编程 发布于2024-11-06
 -
 如何在 Go 中处理不同包之间相同的方法签名?处理不同包中具有相同方法签名的接口在Go中,当处理具有相同方法签名但定义在不同包中的多个接口时,可能会出现以下情况实现两个接口的类型会导致意外行为。考虑在不同包中定义的这两个接口(Doer)和函数(FuncA 和 FuncB):// Package A type Doer interface { D...编程 发布于2024-11-06
 -
 如何使用 jQuery 填充级联下拉列表以获得更好的兼容性和用户体验?使用 jQuery 填充级联下拉列表在表单开发领域,级联下拉列表经常用于提供更加用户友好和动态体验。为了增强兼容性并解决跨浏览器问题,jQuery 提供了一个强大的解决方案来异步填充这些下拉列表。问题中所示的用于创建级联下拉列表的原始 JavaScript 函数缺乏与 IE 的兼容性。为了解决这个问...编程 发布于2024-11-06
 -
 了解 JavaScript 中的扩展运算符:初学者简单指南介绍 JavaScript 是一种有趣的编程语言,其最令人兴奋的功能之一是扩展运算符。如果您刚刚开始编码,或者即使您是一个对学习 JavaScript 感兴趣的孩子,也不必担心!我将以最简单的方式分解这个概念,并举例来帮助您理解。 什么是价差运算符? 扩展运算符看起...编程 发布于2024-11-06
 -
 在 Python 中使用 OpenSearch 掌握 CRUD 操作:实用指南OpenSearch, an open-source alternative to Elasticsearch, is a powerful search and analytics engine built to handle large datasets with ease. In this b...编程 发布于2024-11-06
 -
 冰沙框架的重要概念||如何精通冰沙要精通 Frappe,有几个关键概念和领域需要关注。以下是最重要的细分: 1. 文档类型 定义:DocTypes是Frappe中的核心数据模型。每个实体或记录都存储在 DocType 中,并且它们可以具有字段、权限和工作流程。 为什么它很重要:了解如何创建和自定义 DocType 至...编程 发布于2024-11-06
 -
 如何解决 JLabel 拖放的鼠标事件冲突?用于拖放的 JLabel 鼠标事件:解决鼠标事件冲突为了在 JLabel 上启用拖放功能,鼠标事件必须被覆盖。然而,当尝试使用 mousePressed 事件实现拖放时,会出现一个常见问题,因为 mouseReleased 事件对该 JLabel 无效。提供的代码在 mousePressed 事件中...编程 发布于2024-11-06
 -
 MySQL 中的数据库分片:综合指南随着数据库变得越来越大、越来越复杂,有效地控制性能和扩展就出现了。数据库分片是用于克服这些障碍的一种方法。称为“分片”的数据库分区将大型数据库划分为更小、更易于管理的段(称为“分片”)。通过将每个分片分布在多个服务器上(每个服务器保存总数据的一小部分),可以提高可扩展性和吞吐量。 在本文中,我们将探...编程 发布于2024-11-06
 -
 如何将 Python 日期时间对象转换为秒?在 Python 中将日期时间对象转换为秒在 Python 中使用日期时间对象时,通常需要将它们转换为秒以适应各种情况分析目的。但是,toordinal() 方法可能无法提供所需的输出,因为它仅区分具有不同日期的日期。要准确地将日期时间对象转换为秒,特别是对于 1970 年 1 月 1 日的特定日期...编程 发布于2024-11-06
学习中文
- 1 走路用中文怎么说?走路中文发音,走路中文学习
- 2 坐飞机用中文怎么说?坐飞机中文发音,坐飞机中文学习
- 3 坐火车用中文怎么说?坐火车中文发音,坐火车中文学习
- 4 坐车用中文怎么说?坐车中文发音,坐车中文学习
- 5 开车用中文怎么说?开车中文发音,开车中文学习
- 6 游泳用中文怎么说?游泳中文发音,游泳中文学习
- 7 骑自行车用中文怎么说?骑自行车中文发音,骑自行车中文学习
- 8 你好用中文怎么说?你好中文发音,你好中文学习
- 9 谢谢用中文怎么说?谢谢中文发音,谢谢中文学习
- 10 How to say goodbye in Chinese? 再见Chinese pronunciation, 再见Chinese learning


