
React登录页面模板源代码
 浏览:959
In today's web development landscape, creating an engaging and user-friendly login page is crucial for any application. This article will guide you through the process of building a feature-rich, swipeable login page using React. We'll create a modern, responsive design that seamlessly transitions between login and signup modes, complete with animated transitions and social media login options.
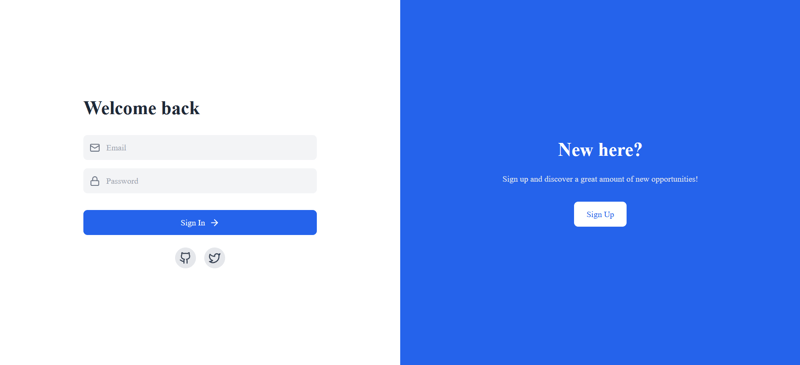
Preview of Login Page
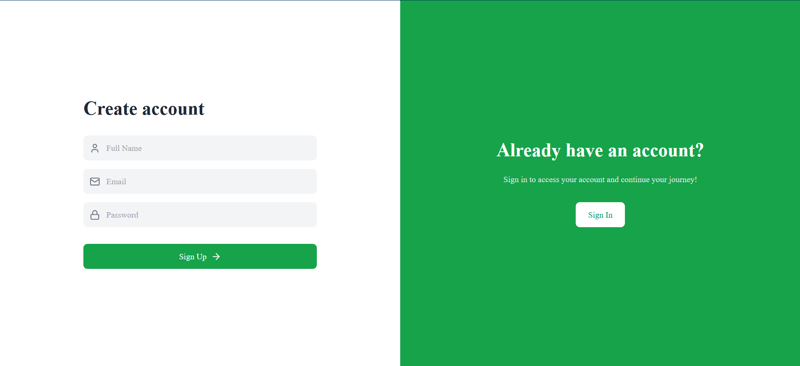
Preview of SignUp Page
Setting Up the Project
First, ensure you have React set up in your project. We'll also be using a few additional libraries:
- Framer Motion for animations
- Lucide React for icons
- Tailwind CSS for styling
You can install these dependencies using npm or yarn:
npm install react framer-motion lucide-react
# or
yarn add react framer-motion lucide-react
Make sure you have Tailwind CSS configured in your project as well.
Creating the Login/Signup Component
Let's start by creating our main component, LoginSignupPage. This component will handle the state and rendering of our login/signup form.
import React, { useState } from 'react';
import { motion, AnimatePresence } from 'framer-motion';
import { Mail, Lock, User, ArrowRight, Github, Twitter } from 'lucide-react';

const LoginSignupPage = () => {
  const [isLogin, setIsLogin] = useState(true);
  const [email, setEmail] = useState('');
  const [password, setPassword] = useState('');
  const [name, setName] = useState('');

  const toggleMode = () => setIsLogin(!isLogin);

  // ... (rest of the component)
};

export default LoginSignupPage;
Here, we're importing the necessary dependencies and setting up our component with state variables for the form fields and a toggle for switching between login and signup modes.
Creating Reusable Input Fields
To keep our code DRY (Don't Repeat Yourself), let's create a reusable InputField component:
const InputField = ({ icon: Icon, placeholder, type, value, onChange }) => (
This component takes an icon, placeholder text, input type, value, and onChange function as props. It renders a styled input field with an icon, making our form look sleek and consistent.
Building the Form
Now, let's create the main structure of our login/signup form:
return ();{/* ... (right side panel) */}{isLogin ? 'Welcome back' : 'Create account'}
{!isLogin && ({/* ... (submit button and social login options) */}setName(e.target.value)} /> )} setEmail(e.target.value)} /> setPassword(e.target.value)} />
This code creates a responsive layout with the form on the left side. We use Framer Motion's AnimatePresence and motion.div to add smooth transitions when switching between login and signup modes.
Adding the Submit Button and Social Login Options
Let's add a submit button and social login options to our form:
{isLogin && ()}
This code adds a submit button that changes color and text based on the current mode (login or signup). For the login mode, we also add social login options for GitHub and Twitter.
Creating the Swipeable Side Panel
To complete our swipeable login page, let's add a side panel that allows users to switch between login and signup modes:
{isLogin ? 'New here?' : 'Already have an account?'}
{isLogin ? 'Sign up and discover a great amount of new opportunities!' : 'Sign in to access your account and continue your journey!'}
This side panel changes its content and color based on the current mode. The button allows users to switch between login and signup modes, triggering the toggleMode function we defined earlier.
Adding Animations
To make our login page more engaging, we've used Framer Motion for animations. Here's how we defined the animation variants:
const formVariants = {
  hidden: { opacity: 0, x: -30 },
  visible: { opacity: 1, x: 0 },
};
These variants are applied to the motion.div wrapping our form, creating a smooth transition effect when switching between login and signup modes.
Conclusion
By following this guide, you've created a feature-rich, swipeable login page using React. This login page includes:
- Responsive design that works on both mobile and desktop
- Smooth animations when switching between login and signup modes
- Reusable input components with icons
- Social login options
- A swipeable side panel for easy mode switching
This modern and engaging login page will provide a great user experience for your application. Remember to add proper form validation and connect the form submission to your backend authentication system to complete the functionality.
Feel free to customize the colors, add more fields, or incorporate additional features to make this login page perfect for your specific project needs!
Frequently Asked Questions (FAQs)
After reading this article, both beginners and senior developers might have some questions. Here are some common FAQs:
For Beginners:
Q: Do I need to know Tailwind CSS to implement this login page?
A: While the example uses Tailwind CSS for styling, you don't necessarily need to use it. You can replace the Tailwind classes with your own CSS styles. However, learning Tailwind CSS can speed up your development process.Q: What is Framer Motion, and is it necessary for this project?
A: Framer Motion is a popular animation library for React. It's used in this project to create smooth transitions between login and signup modes. While not strictly necessary, it greatly enhances the user experience. You can implement the login page without animations if you prefer.Q: How do I handle form submission and validation?
A: This example doesn't include form submission or validation. You'll need to add an onSubmit handler to the form and implement validation logic. Consider using libraries like Formik or react-hook-form for more complex form handling.Q: Can I use this login page with any backend?
A: Yes, this login page is frontend-only and can be integrated with any backend. You'll need to modify the form submission logic to send requests to your specific backend API.Q: How can I add more social login options?
A: To add more social login options, you can create additional buttons similar to the GitHub and Twitter buttons. You'll need to implement the actual authentication logic for each provider separately.
For Senior Developers:
-
Q: How can this component be optimized for performance?
A: Some optimization strategies include:- Memoizing the InputField component with React.memo
- Using the useCallback hook for event handlers
- Implementing code-splitting to load social login components on demand
-
Q: What considerations should be made for accessibility?
A: To improve accessibility:- Add proper aria labels to inputs and buttons
- Ensure correct heading hierarchy
- Implement keyboard navigation for the swipeable interface
- Provide text alternatives for icon-only buttons
-
Q: How can this component be made more reusable across different projects?
A: To increase reusability:- Extract the color scheme and styling into a theme configuration
- Create a higher-order component or custom hook to handle authentication logic
- Use environment variables for API endpoints and client IDs
-
Q: What testing strategies would you recommend for this component?
A: Consider implementing:- Unit tests for individual components using Jest and React Testing Library
- Integration tests for form submission and mode switching
- End-to-end tests using Cypress or Playwright to test the full user flow
-
Q: How would you handle state management for a larger application incorporating this login page?
A: For larger applications, consider:- Using Context API for local state management
- Implementing Redux or MobX for global state management
- Utilizing React Query or SWR for server state management
-
Q: What security considerations should be taken into account?
A: Important security considerations include:- Implementing HTTPS for all communications
- Using secure HTTP-only cookies for storing authentication tokens
- Implementing CSRF protection
- Rate limiting login attempts to prevent brute force attacks
- Considering two-factor authentication options
This article will really helpful for beginners !! Happy Coding❣️.
-
 触发隐藏的jQuery文件输入元素方法尝试使用trigger('click click')使用jquery触发jquery时,使用jquery 触发文件输入键输入trigger(«click'click');方法,用户可能会遇到困难。但是,此问题通常来自安全限制。浏览器可防止单击隐藏的文件输入元素。如果...编程 发布于2025-04-15
 -
解决MySQL插入Emoji时出现的\\"字符串值错误\\"异常Resolving Incorrect String Value Exception When Inserting EmojiWhen attempting to insert a string containing emoji characters into a MySQL database us...编程 发布于2025-04-15
-
SQL Server: 选函数还是存储过程?SQL Server 函数与存储过程:选择指南 在 SQL Server 中,选择函数还是存储过程取决于具体任务的需求。以下分析将帮助您做出明智的决策: 函数 函数专门用于返回标量值的计算,例如计算、字符串操作或条件评估。它们不能对数据库进行永久性更改(例如,INSERT 或 UPDATE 语句)...编程 发布于2025-04-15
-
为什么PHP的DateTime :: Modify('+1个月')会产生意外的结果?使用php dateTime修改月份:发现预期的行为在使用PHP的DateTime类时,添加或减去几个月可能并不总是会产生预期的结果。正如文档所警告的那样,“当心”这些操作的“不像看起来那样直观。 考虑文档中给出的示例:这是内部发生的事情: 现在在3月3日添加另一个月,因为2月在2001年只有2...编程 发布于2025-04-15
-
std::shared_ptr是否能保证对象线程安全?带有std :: shared_ptr 的线程安全考虑,std :: shared_ptr是在多线读取环境中使用的强大智能指针,用于管理对象所有权。它提供线程安全参考计数,并确保只有一个线程在共享对象上执行删除操作。但是,至关重要的是要注意,共享_ptr本身不能保证其保留的对象的线程安全性。 ...编程 发布于2025-04-15
-
寻找优质网页设计灵感[2 我可能只有您的伴侣列表(如果您更感兴趣,我已经编译了我用作Web开发人员 /设计师的50多个网站 - 所有分类): 一对一 - https://herezone.com/@bing/webdev https://saaslandingpage.com/ ...编程 发布于2025-04-15
-
在C#中如何安全地将变量转换为动态类型?Casting a Variable to a Dynamic TypeCasting a variable of type object to a variable of type T, where T is defined in a Type variable, is possible in C...编程 发布于2025-04-15
-
在WinForms应用中如何高效处理命令行参数?在 WinForms 应用程序中处理命令行参数 WinForms 应用程序经常需要在不同应用程序之间传递命令行参数。本文介绍几种有效处理命令行参数的方法。 使用 Environment.GetCommandLineArgs() 方法 在 WinForms 应用程序中访问命令行参数的推荐方法是使用 ...编程 发布于2025-04-15
-
如何实时捕获和流媒体以进行聊天机器人命令执行?在开发能够执行命令的chatbots的领域中,实时从命令执行实时捕获Stdout,一个常见的需求是能够检索和显示标准输出(stdout)在cath cath cant cant cant cant cant cant cant cant interfaces in Chate cant inter...编程 发布于2025-04-15
-
如何为PostgreSQL中的每个唯一标识符有效地检索最后一行?postgresql:为每个唯一标识符提取最后一行,在Postgresql中,您可能需要遇到与在数据库中的每个不同标识相关的信息中提取信息的情况。考虑以下数据:[ 1 2014-02-01 kjkj 在数据集中的每个唯一ID中检索最后一行的信息,您可以在操作员上使用Postgres的有效效率: ...编程 发布于2025-04-15
-
10款jQuery、Mootools、Prototype轻量级弹窗脚本这篇文章展示了使用各种JavaScript库构建的Lightbox脚本和插件的集合,包括JQuery,Mootools和Prototype。这些优雅的Lightbox解决方案可以为您的网站上的单个图像,图像画廊,视频以及其他媒体或内容类型的时尚弹出式展示(模式窗口,叠加层)创建。 相关文章: 比较j...编程 发布于2025-04-15
-
使用iTextSharp将HTML转换为PDF的详细教程[2 [2 本指南提供了使用ItextSharp库将HTML内容转换为PDF文档的全面演练。 我们将探讨HTML和PDF(HTML在ItextSharp中解析的机制)之间的关键差异,并提供了一个实用的编码示例。 [2 在潜入代码之前,了解HTML和PDF之间的核心区别至关重要。 HTML(超文本标...编程 发布于2025-04-15
-
如何备份与恢复单个MySQL表?备份和还原单个mysql table table_name.sql 从远程数据库导出: mysqldump -u db_username -h db_host -p db_host -p db_name table_name> tabet_name> tabet_name> table_nam...编程 发布于2025-04-15
-
如何在Java字符串中有效替换多个子字符串?在java 中有效地替换多个substring,需要在需要替换一个字符串中的多个substring的情况下,很容易求助于重复应用字符串的刺激力量。但是,对于大字符串或使用许多字符串时,这可能是降低的。 利用正则表达式Example UsageConsider a scenario where y...编程 发布于2025-04-15
-


学习中文
- 1 走路用中文怎么说?走路中文发音,走路中文学习
- 2 坐飞机用中文怎么说?坐飞机中文发音,坐飞机中文学习
- 3 坐火车用中文怎么说?坐火车中文发音,坐火车中文学习
- 4 坐车用中文怎么说?坐车中文发音,坐车中文学习
- 5 开车用中文怎么说?开车中文发音,开车中文学习
- 6 游泳用中文怎么说?游泳中文发音,游泳中文学习
- 7 骑自行车用中文怎么说?骑自行车中文发音,骑自行车中文学习
- 8 你好用中文怎么说?你好中文发音,你好中文学习
- 9 谢谢用中文怎么说?谢谢中文发音,谢谢中文学习
- 10 How to say goodbye in Chinese? 再见Chinese pronunciation, 再见Chinese learning


