如何在 Next.js 中实现 Axios 请求拦截器
Axios is a widely used JavaScript library that makes it easier to send HTTP requests to servers. One of its standout features is the interceptor, which allows our app to catch requests and responses. Axios interceptors let us set up functions that run for each request or response before they reach the application. This is helpful for tasks like adding authentication tokens, logging, and handling errors globally, making our code cleaner and easier to manage.
In this blog post, we’ll learn how to implement Axios request interceptors in a Next.js application. We’ll start by setting up Axios, and then we’ll see how to create and use request and response interceptors. By the end, you’ll know how to use interceptors to improve your application and keep your code organized.
Setup the Project
Before diving into how to implement Axios request interceptors in a Next.js application, make sure you have the following:
Node.js and npm/yarn Installed: Ensure you have Node.js and npm (or yarn) installed on your machine. You can download Node.js from here.
A Next.js Project Setup: You should have a Next.js project setup. If you don’t have one, you can create a new Next.js project using Create Next App:
npx create-next-app my-axios-app
cd my-axios-app
npm install axios
or
yarn add axios
Implementing Request Interceptors
Request interceptors in Axios let you modify requests before they reach the server. They’re useful for adding authentication tokens, setting custom headers, or logging requests. Here’s how to implement Axios request interceptors in a Next.js application.
Step 1: Create an Axios Instance
Create a new file axiosInstance.js in the lib folder (or any preferred location in your project). You can add a request interceptor to the Axios instance you created earlier. This interceptor will be executed before every request is sent out.
Creating an Axios instance allows you to set default configurations, such as the base URL and headers, that will be applied to all requests made with that instance. This helps in keeping your code DRY (Don’t Repeat Yourself).
Create a new file named axiosInstance.js in your lib folder and set up your Axios instance:
// lib/axiosInstance.js
import axios from 'axios';

const axiosInstance = axios.create({
  baseURL: 'https://dummyjson.com', // Replace with your API base URL
  timeout: 1000,
  headers: { 'Content-Type': 'application/json' }
});

// Add a request interceptor
axiosInstance.interceptors.request.use(
  function (config) {
    // Do something before the request is sent
    // For example, add an authentication token to the headers
    const token = localStorage.getItem('authToken'); // Retrieve auth token from localStorage
    if (token) {
      config.headers.Authorization = `Bearer ${token}`;
    }
    return config;
  },
  function (error) {
    // Handle the error
    return Promise.reject(error);
  }
);

export default axiosInstance;
Here’s a summary of what we’ve done:
- Created an Axios instance using axios.create().
- Set the baseURL to the base URL of your API. You can adjust this to match your API’s configuration.
- Used interceptors.request.use() to intercept and modify outgoing requests. This allows us to add headers, authentication tokens, or make other changes to the request configuration.
Step 2: Use the Axios Instance in Next.js Pages or Components
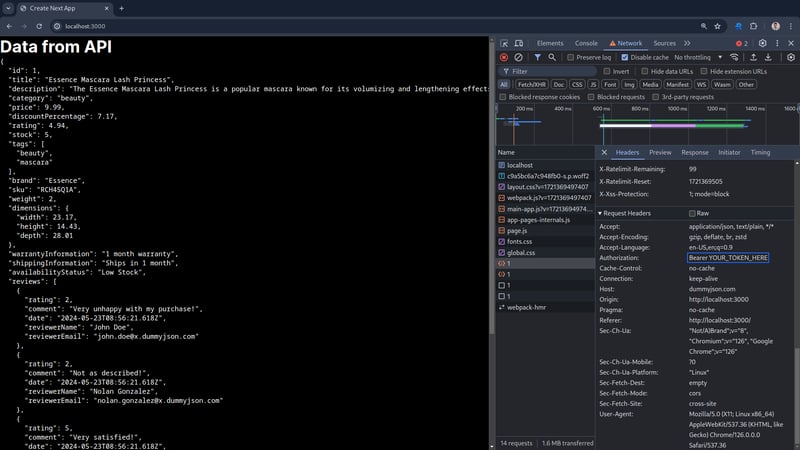
With the request interceptor set up, you can use the Axios instance in your Next.js pages or components as usual. The interceptor will automatically add the token (or perform any other configured actions) before each request is sent.
// pages/index.js
import React, { useEffect, useState } from 'react';
import axiosInstance from '../lib/axiosInstance';

export default function Home() {
  const [data, setData] = useState(null);

  useEffect(() => {
    axiosInstance.get('/products/1') // Replace with your API endpoint
      .then(response => {
        setData(response.data);
      })
      .catch(error => {
        console.error('Error fetching data:', error);
      });
  }, []);

  return (

      Data from API
      {data ? (
        {JSON.stringify(data, null, 2)}) : (Loading... )} );
}

Step 3: Customizing the Interceptor
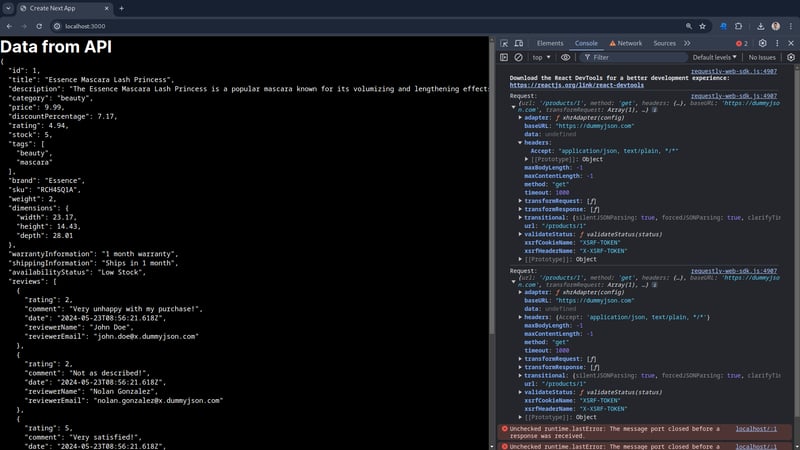
You can customize the request interceptor to perform other actions as needed. For example, you might want to log the details of each request:
axiosInstance.interceptors.request.use(
  function (config) {
    // Log the request details
    console.log('Request:', config);
    return config;
  },
  function (error) {
    // Handle the error
    return Promise.reject(error);
  }
);
This setup will log the details of each request to the console, which can be helpful for debugging purposes.

By implementing request interceptors in your Next.js application, you can ensure that all requests are consistently modified or enhanced before they are sent, improving the maintainability and functionality of your code.
Implementing Response Interceptors
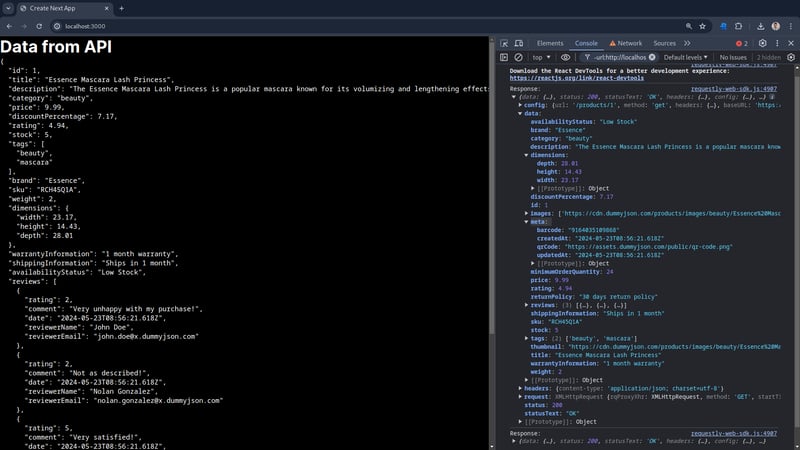
Similar to how request interceptors allow you to modify outgoing requests, response interceptors in Axios enable you to manage responses globally before they reach your application code. This is especially helpful for tasks such as error handling, response transformation, and logging. Let’s explore how to implement response interceptors in a Next.js application using Axios.
Step 1: Create the Response Interceptor
In your axiosInstance.js file, you can add a response interceptor to the Axios instance you created. This interceptor will be executed after every response is received.
// lib/axiosInstance.js
import axios from 'axios';

const axiosInstance = axios.create({
  baseURL: 'https://dummyjson.com', // Replace with your API base URL
  timeout: 1000,
  headers: { 'Content-Type': 'application/json' }
});

// Add a request interceptor
axiosInstance.interceptors.request.use(
  function (config) {
    // Do something before the request is sent
    const token = localStorage.getItem('authToken'); // Retrieve auth token from localStorage
    if (token) {
      config.headers.Authorization = `Bearer ${token}`;
    }
    return config;
  },
  function (error) {
    // Handle the error
    return Promise.reject(error);
  }
);

// Add a response interceptor
axiosInstance.interceptors.response.use(
  function (response) {
    // Do something with the response data
    console.log('Response:', response);
    return response;
  },
  function (error) {
    // Handle the response error
    if (error.response && error.response.status === 401) {
      // Handle unauthorized error
      console.error('Unauthorized, logging out...');
      // Perform any logout actions or redirect to login page
    }
    return Promise.reject(error);
  }
);

export default axiosInstance;
Step 2: Use the Axios Instance in Next.js Pages or Components
With the response interceptor set up, you can use the Axios instance in your Next.js pages or components as usual. The interceptor will automatically handle responses and errors based on your configuration.
// pages/index.js
import { useEffect, useState } from 'react';
import axiosInstance from '../lib/axiosInstance';

export default function Home() {
  const [data, setData] = useState(null);

  useEffect(() => {
    axiosInstance.get('/products/1') // Replace with your API endpoint
      .then(response => {
        setData(response.data);
      })
      .catch(error => {
        console.error('Error fetching data:', error);
      });
  }, []);

  return (

      Data from API
      {data ? (
        {JSON.stringify(data, null, 2)}) : (Loading... )} );
}

By implementing response interceptors in your Next.js application, you can centralize response handling, improving code maintainability and application robustness. Whether it’s logging, transforming data, or managing errors, response interceptors provide a powerful way to manage HTTP responses efficiently.
Framework-Independent Alternative: Using Requestly
While Axios has powerful tools for processing HTTP requests within applications, integrating and managing interceptors directly within your codebase can be difficult and demand changes to your application’s architecture. Instead of depending on framework-specific solutions such as Axios interceptors, developers can use Requestly, a browser extension that modifies network requests and responses without requiring any changes to the application’s code. This method has various advantages over standard interceptors:
Simplifying Modifications with Requestly
- No Code Changes Required: Unlike implementing interceptors in your application code, which requires understanding and modifying the codebase, Requestly operates entirely from the browser. This means developers can modify requests and responses dynamically without touching the application’s source code.
- Flexibility Across Technologies: Requestly’s framework-independent nature allows it to work seamlessly across different projects and technologies. Whether you’re working with React, Angular, Vue.js, or any other framework, Requestly provides a consistent interface for managing network traffic.
Advantages of Using Requestly
- Ease of Use: Requestly simplifies the process of modifying network requests and responses through an intuitive browser extension interface. This accessibility makes it ideal for developers of all skill levels, from beginners to advanced users.
- Immediate Testing and Debugging: With Requestly, developers can instantly test and debug different scenarios by altering headers, URLs, or response content. This capability speeds up development cycles and enhances troubleshooting efficiency.
- Enhanced Privacy and Security: Requestly empowers developers to block or modify requests to enhance privacy, security, and compliance with data protection regulations. For instance, blocking tracking scripts or adding secure headers can be done effortlessly.
Example Use Cases
- Modify Server Response: Modify response content to simulate various server behaviors without backend changes.
- Testing Different API Requests: Dynamically alter request to test different API endpoints or data payloads.
- Blocking Network Request: Test your website under scenarios where certain external resources are unavailable
- Adding Custom Headers: Add authentication tokens or custom CORS headers for testing APIs that require specific headers. ### How to use Requestly Interceptor
Modify API Response
Requestly allows you to modify API responses. It provides a user-friendly interface for overriding the response body of API requests, allowing you to mimic different data scenarios that your frontend might encounter.
Insert/Inject Script
Insert/Inject Script Rule allows you to inject JavaScript and CSS into web pages as they load. This means you can modify the DOM, change styles, or even add new functionality without altering the source code directly. It’s important for testing hypotheses or debugging during the development and quality assurance process. Learn more about it here.
Replace Rule
Replace Rule enables you to replace a String in URL with another String. This feature is particularly useful for developers to swap the API endpoints from one environment to another or change something specific in the URL. Requests are matched with source condition, and find and replace are performed on those requests by redirecting to the resulting URL. Learn more about this rule here.
Conclusion
In this blog post, we’ve explored the powerful concept of intercepting requests with Axios in a Next.js application. This allows developers to have more control over HTTP requests and responses within their applications. Whether it’s adding authentication tokens, logging requests for debugging purposes, or handling errors globally, Axios interceptors provide a flexible solution to meet diverse development needs.
If you like this blog check out our other blog on How to implement Axios interceptor in React
-
 PHP 设计模式:适配器适配器设计模式是一种结构模式,允许具有不兼容接口的对象一起工作。它充当两个对象之间的中介(或适配器),将一个对象的接口转换为另一个对象期望的接口。这允许那些因为具有不同接口而不兼容的类在不修改其原始代码的情况下进行协作。 适配器结构 适配器模式一般由三个主要元素组成: 客户端:期望与特定接口的对象一...编程 发布于2024-11-06
 -
 了解 PHP 中的 WebSocketWebSockets 通过单个 TCP 连接提供实时、全双工通信通道。与 HTTP 不同,HTTP 中客户端向服务器发送请求并等待响应,WebSocket 允许客户端和服务器之间进行连续通信,而无需多次请求。这非常适合需要实时更新的应用程序,例如聊天应用程序、实时通知和在线游戏。 在本指南中,我们将...编程 发布于2024-11-06
 -
 Visual Studio 2012 支持哪些 C++11 功能?Visual Studio 2012 中的 C 11 功能随着最近发布的 Visual Studio 2012 预览版,许多开发人员对 C 11 功能的支持感到好奇。虽然 Visual Studio 2010 已提供部分 C 11 支持,但新版本提供了扩展的功能。Visual Studio 2012...编程 发布于2024-11-06
 -
 如何在Windows启动时自动运行Python脚本?在 Windows 启动时运行 Python 脚本每次 Windows 启动时执行 Python 脚本对于自动化任务或启动基本程序至关重要。多种方法提供不同级别的自定义和用户控制。自动执行脚本的选项:1。打包为服务:创建 Windows 服务并安装它。此方法在计算机上运行脚本,无论用户是否登录。需要...编程 发布于2024-11-06
 -
 探索 Astral.CSS:彻底改变网页设计的 CSS 框架。在快节奏的 Web 开发世界中,框架在帮助开发人员高效创建具有视觉吸引力和功能性的网站方面发挥着关键作用。在当今可用的各种框架中,Astral CSS 因其独特的设计理念和易用性而脱颖而出。本文深入探讨了 Astral CSS 的功能、优点和总体影响。 什么是星界? Astral 是一个现代 CSS...编程 发布于2024-11-06
 -
 ESnd 箭头函数综合指南ES6简介 ECMAScript 2015,也称为 ES6 (ECMAScript 6),是对 JavaScript 的重大更新,引入了新的语法和功能,使编码更高效、更易于管理。 JavaScript 是用于 Web 开发的最流行的编程语言之一,ES6 的改进大大增强了其功能。 本...编程 发布于2024-11-06
 -
 揭示算法和数据结构:高效编程的基础在这一系列文章中,我将分享我的学习历程,涉及在学术环境和大型科技公司中广泛讨论的两个主题:算法和数据结构。尽管这些主题乍一看似乎令人畏惧,特别是对于像我这样由于其他职业挑战而在整个职业生涯中没有机会深入研究这些主题的人,但我的目标是让它们易于理解。 我将从最基本的概念开始,然后转向更高级的主题,创建...编程 发布于2024-11-06
 -
 如何使用 pprof 来分析 Go 程序中的 goroutine 数量?使用 pprof 分析 Goroutine 数量检测 Go 程序中潜在的 Goroutine 泄漏需要监控一段时间内活动的 Goroutine 数量。虽然标准 go 工具 pprof 命令提供了对阻塞的深入了解,但它并不直接解决 goroutine 计数问题。要有效地分析 goroutine 数量,...编程 发布于2024-11-06
 -
 如何将类方法作为回调传递:了解机制和技术如何将类方法作为回调传递后台在某些场景下,您可能需要将类方法作为回调传递给其他函数以提高效率具体任务的执行。本文将指导您完成实现此目的的各种机制。使用可调用语法要将函数作为回调传递,您可以直接将其名称作为字符串提供。但是,此方法不适用于类方法。传递实例方法类实例方法可以使用数组作为回调传递,该数组以...编程 发布于2024-11-06
 -
 网页抓取 - 有趣!一个很酷的术语: CRON = 按指定时间间隔自动安排任务的编程技术 网络什么? 在研究项目等时,我们通常会从各个网站编写信息 - 无论是日记/Excel/文档等。 我们正在抓取网络并手动提取数据。 网络抓取正在自动化这一过程。 例子 当在网上搜索运动鞋时,它会显示包...编程 发布于2024-11-06
 -
 为什么 REGISTER_GLOBALS 被认为是 PHP 中的主要安全风险?REGISTER_GLOBALS 的危险REGISTER_GLOBALS 是一个 PHP 设置,它允许所有 GET 和 POST 变量在 PHP 脚本中用作全局变量。此功能可能看起来很方便,但由于潜在的安全漏洞和编码实践,强烈建议不要使用它。为什么 REGISTER_GLOBALS 不好?REGIS...编程 发布于2024-11-06
 -
 Nodemailer 概述:在 Node.js 中轻松发送电子邮件Nodemailer 是一个用于发送电子邮件的 Node.js 模块。以下是快速概述: Transporter:定义电子邮件的发送方式(通过 Gmail、自定义 SMTP 等)。 const transporter = nodemailer.createTransport({ ... }); ...编程 发布于2024-11-06
 -
 JavaScript 中的轻松错误处理:安全赋值运算符如何简化您的代码JavaScript 中的错误处理可能很混乱。将大块代码包装在 try/catch 语句中是可行的,但随着项目的增长,调试就变成了一场噩梦。幸运的是,有更好的方法。输入 安全赋值运算符 (?=) - 一种更干净、更有效的错误处理方法,使代码保持可读性并简化调试。 什么是安全赋值运算符...编程 发布于2024-11-06
 -
 Javascript 很难(有悲伤)这将是一个很长的阅读,但让我再说一遍。 JAVASCRIPT很难。上次我们见面时,我正在踏入 Javascript 的世界,一个眼睛明亮、充满希望的程序员踏入野生丛林,说“这能有多难?”。我错得有多离谱??事情变得更难了,我(勉强)活了下来,这是关于我的旅程的一个小混乱的故事。 变量:疯狂的开始 ...编程 发布于2024-11-06
学习中文
- 1 走路用中文怎么说?走路中文发音,走路中文学习
- 2 坐飞机用中文怎么说?坐飞机中文发音,坐飞机中文学习
- 3 坐火车用中文怎么说?坐火车中文发音,坐火车中文学习
- 4 坐车用中文怎么说?坐车中文发音,坐车中文学习
- 5 开车用中文怎么说?开车中文发音,开车中文学习
- 6 游泳用中文怎么说?游泳中文发音,游泳中文学习
- 7 骑自行车用中文怎么说?骑自行车中文发音,骑自行车中文学习
- 8 你好用中文怎么说?你好中文发音,你好中文学习
- 9 谢谢用中文怎么说?谢谢中文发音,谢谢中文学习
- 10 How to say goodbye in Chinese? 再见Chinese pronunciation, 再见Chinese learning


