
将 PHP (Laravel) 应用程序部署到 Amazon ECS 部分
 浏览:795
In this first part of our tutorial series, we'll walk through the steps to deploy a PHP (Laravel) application to Amazon ECS. We'll start by creating a Docker image, pushing it to Amazon ECR, creating an ECS Task Definition, an ECS Cluster, an ECS Service and connecting a domain name to the service.
Working with Docker and ECR
Create a Dockerfile, and nginx config
In the root of your git repo, create a Dockerfile with the following contents:
# Use the official PHP-FPM image as the base
FROM public.ecr.aws/docker/library/php:fpm

# Define a user variable
ARG user=www-data

# Install system dependencies and PHP extensions
RUN apt-get update && apt-get install -y \
    git curl \
    libpng-dev \
    libonig-dev \
    libxml2-dev \
    zip unzip libzip-dev \
    nginx \
    && apt-get clean \
    && rm -rf /var/lib/apt/lists/* \
    && docker-php-ext-install \
        pdo_mysql \
        mbstring \
        exif \
        pcntl \
        bcmath \
        gd \
        zip

# Install Composer
COPY --from=public.ecr.aws/composer/composer:latest-bin /usr/bin/composer /usr/bin/composer

# Create a system user for running Composer and Artisan commands
RUN mkdir -p /home/$user/.composer && \
    chown -R $user:$user /home/$user

# Copy Nginx configuration and entrypoint script
COPY ./docker/default.conf /etc/nginx/sites-enabled/default
COPY ./docker/entrypoint.sh /etc/entrypoint.sh

# Make the entrypoint script executable
RUN chmod  x /etc/entrypoint.sh

# Set the working directory
WORKDIR /var/www

# Copy the application code
COPY --chown=www-data:www-data . /var/www

# Install PHP dependencies
RUN composer install

# Expose port 80
EXPOSE 80

# Define the entrypoint
ENTRYPOINT ["/etc/entrypoint.sh"]
Create a new folder named docker and place the following two files inside.
- docker/entrypoint.sh
#!/usr/bin/env bash

# Start Nginx service
service nginx start

# Run Laravel migrations
php artisan migrate --force

# Create symbolic link for storage
php artisan storage:link

# Clear and optimize the application cache
php artisan optimize:clear
php artisan optimize

# Start PHP-FPM
php-fpm
- docker/default.conf
server {
    listen 80 default_server;
    index index.php index.html;
    server_name localhost;
    error_log  /var/log/nginx/error.log;
    access_log /var/log/nginx/access.log;
    root /var/www/public;

    location ~ \.php$ {
        fastcgi_split_path_info ^(. \.php)(/. )$;
        fastcgi_pass 127.0.0.1:9000;
        fastcgi_index index.php;

        include fastcgi_params;
        fastcgi_param SCRIPT_FILENAME $document_root$fastcgi_script_name;
        fastcgi_param PATH_INFO $fastcgi_path_info;
        fastcgi_hide_header X-Powered-By;

        # Tells PHP we're using a reverse proxy with TLS termination
        fastcgi_param HTTPS on;
        fastcgi_param HTTP_X_FORWARDED_PROTO $scheme;
        fastcgi_param HTTP_X_FORWARDED_SSL on;
        add_header Content-Security-Policy "upgrade-insecure-requests" always;
    }

    location / {
        try_files $uri $uri/ /index.php?$query_string;
    }
}
And make entrypoint.sh executable by running chmod x docker/entrypoint.sh.
Pushing the image to Amazon ECR
The first step is to push the image to ECR. You need to perform this step manually first, before you can go ahead and deploy the application to ECS.
Create an ECR repository
Create an ECR repository by heading over to the Amazon ECR console, clicking Create repository, and typing in a repository name. For this example, we'll use demo-app.

Once created, copy the URI of the repository. You will need this URI later.
Push the image to ECR
Select the repository you just created, click on View push commands, and run the commands in your terminal. The commands will look like this (make sure to select the correct region and use the correct Account ID):
aws ecr get-login-password --region us-east-1 | docker login --username AWS --password-stdin 123456789012.dkr.ecr.us-east-1.amazonaws.com
docker build -t demo-app .
docker tag demo-app:latest 123456789012.dkr.ecr.us-east-1.amazonaws.com/demo-app:latest
docker push 123456789012.dkr.ecr.us-east-1.amazonaws.com/demo-app:latest
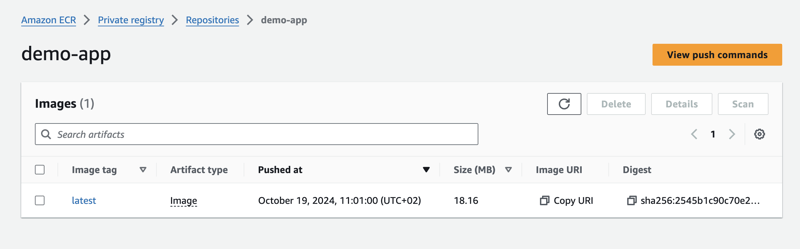
Once the commands are successfully run, go back to the Amazon ECR console, enter the repository, and confirm that the image has been pushed successfully with the tag latest.
Working with Amazon ECS
Create an ECS Task Definition
The next step is to create an ECS Task Definition with the Docker image we just pushed to ECR.
Start by heading over to the Amazon ECS console, under Task Definitions, click Create new task definition.
Chose a unique name for the task definition (we'll use demo-app), and make sure Fargate is selected as the launch type. Don't change anything else in this section for now.
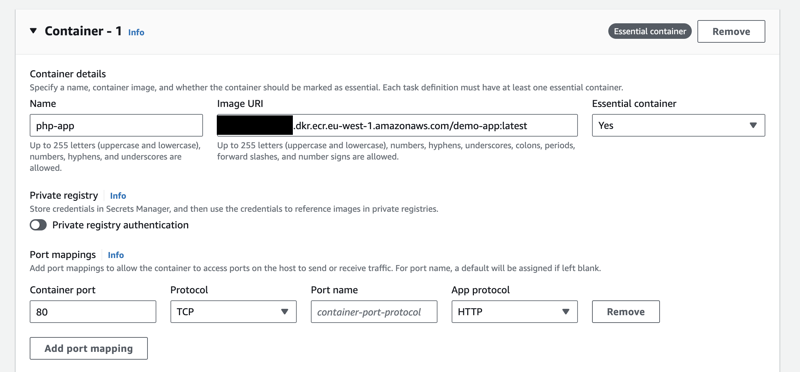
Scroll down to the Container - 1 section, and type in the following values:
- Name: demo-app
- Image: 123456789012.dkr.ecr.us-east-1.amazonaws.com/demo-app:latest (replace with your own ECR URI we copied earlier)
Later, you'll probably want to adjust the memory and CPU settings depending on your application. You can also add Environment Variables and EFS Volumes here, if you need to. We'll cover it in a separate tutorial.
Don't change anything else in this section for now. Scroll down to the bottom and click Create.
Create an ECS Cluster
We now need to create an ECS Cluster. The cluster is where we'll run the service defined in the task definition we just created.
Head over to the Amazon ECS console, under Clusters, click Create cluster, type a cluster name, and make sure to select AWS Fargate (serverless) as infrastructure:

The cluster will take a couple of minutes to create. The cluster creation can occasionally fail, especially on new accounts; just wait a few minutes and try again, choosing a different cluster name.
Create an ECS Service
Open the cluster you just created, scroll down to the Services table, click Create, and type in the following values:
- Family: demo-app
- Revision: 1 (leave this as is)
- Service name: demo-app
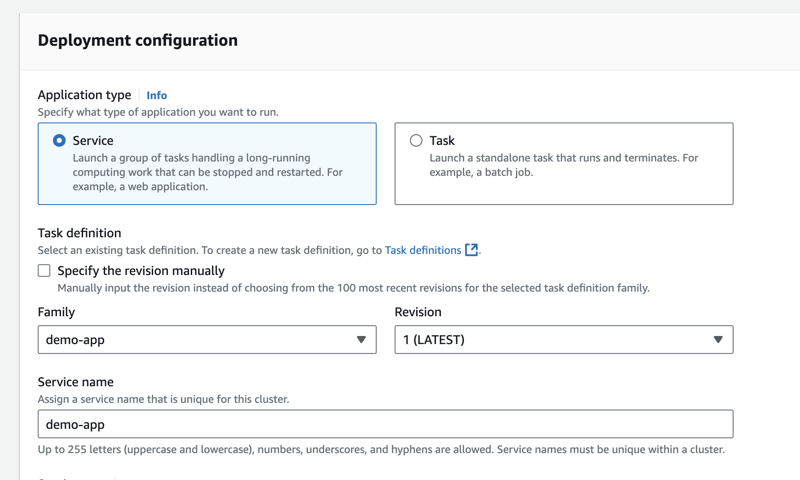
Do not click Create yet.
Add a Load Balancer
Since we're probably serving the application over HTTPS, we'll want to add a load balancer. You cannot do this later.
Scroll down to the Networking section, and select a VPC you want to deploy the service to. Make sure the VPC has a Public Subnet with an Internet Gateway attached to it. If you don't have a VPC, you can create one by clicking Create a new VPC and following the wizard.
Once you have selected a VPC, continue reading.
Scroll down to the Load balancing section, select Application Load Balancer, and select the option Create a new load balancer.
If this option is not available, you probably didn't select a VPC in the previous step.
Adjust the following values:
- Load balancer name: demo-app-alb
- Health check grace period: 300 (I recommend setting this to 300 seconds, which is 5 minutes, to allow your app to start and stabilize)
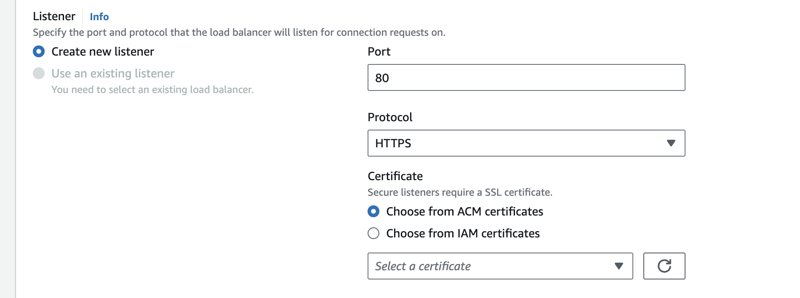
Under the Listener section, keep the Create a new listener option selected, but adjust the values to use port 443, and the HTTPS protocol. To confirm this selection, you'll need an ACM certificate for the domain you want to use; see the AWS documentation for more information on how to obtain one.
Under the Target group section, adjust the following values:
- Protocol: HTTP (it's the default, make sure to keep it since our nginx container is listening on port 80)
- Deregistration delay: 60 (I recommend to set this to 60 seconds instead of the default 5 minutes to make deployments a bit faster)
- Health check path: / (I recommend to set this to a route, such as /healthcheck, you specifically create in your app; you can leave it as default for now)
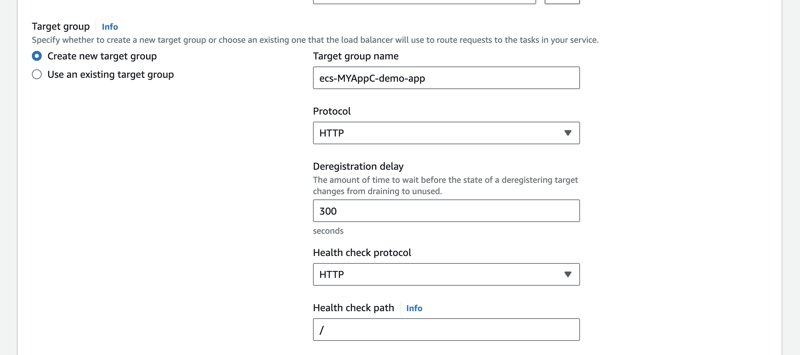
Click Create.
Check the Service Status
Services may take a few minutes to show up in the Services table. Just wait a bit and refresh the page if you don't see the new service right away.
If everything went well, you should see the service listed in the Services table, with a status of Active and Deployments and tasks showing 1/1 running task.
Deployment errors are shown like this:
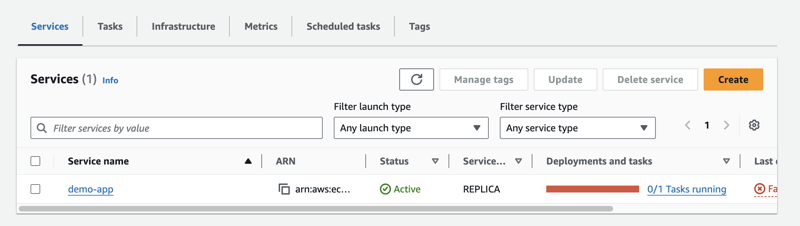
To debug deployment errors, open the service, then click on the Deployments tab; scroll down to the Events section, and click on the most recently started task's Id. The Logs section of the task execution will show you more details about what went wrong.
Laravel usually complains about an incomplete storage folder structure (e.g., missing one of framework, cache, sessions). We'll see how to attach an EFS volume to the task definition to fix this in a separate tutorial.
Connect a domain name to the service
You probably want to connect a domain name to the service we just deployed. In the previous steps, we already created an Application Load Balancer, which is the AWS component responsible for routing internet traffic to the service.
We also already provisioned an ACM certificate, which is used to encrypt traffic between the end-users and the load balancer.
To complete the process and make your application accessible over HTTPS from the public internet, you need to create a DNS record that points your domain name to the load balancer. This process is different depending on which DNS provider you're using; please refer to their documentation for more information.
Start by obtaining the Application Load Balancer's DNS name. Navigate to the Search bar in the AWS Console (Option S on macOS), type Load Balancer, and select Load Balancers (EC2 Feature). You'll see a table with the Load Balancer we need to connect our domain name to:
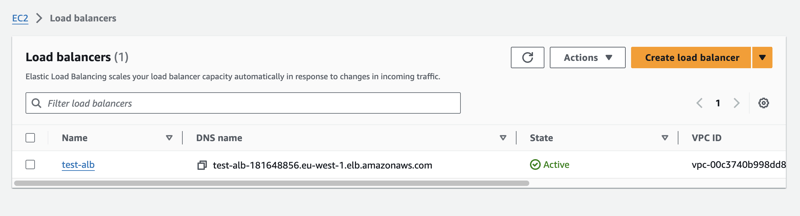
Copy the DNS name of the load balancer.
If you're using Route 53, follow these instructions:
- Navigate to the Route 53 console, click on Hosted zones, and select your domain name.
- Click on the Create record button.
- Set the record type to A.
- Check the Alias option.
- In the Route traffic to field, select Alias to Application and Classic Load Balancer, and choose the region of the load balancer.
- From the Choose load balancer dropdown, select the load balancer we need to connect our domain name to. If you have multiple load balancers, check the one you select from the dropdown must match the DNS name of the load balancer we copied earlier.
- Turn off Evaluate Target Health.
- Click on Create records.
If you're not using Route 53:
Please refer to your DNS provider's documentation for more information. You probably need to create a CNAME record having the DNS name of the load balancer as its target/value.
Congratulations
Once you have created the DNS record, wait a few minutes for it to propagate, and then try to access your application through the domain name.
Congratulations! You have now successfully deployed a PHP (Laravel) application to AWS ECS.
Coming soon in this tutorial series
- Attaching an EFS volume to the task definition to fix Laravel's storage folder structure issue
- Using AWS CodePipeline to automatically deploy new code to the service
- Automating infrastructure provisioning with AWS CDK
-
 如何解决AppEngine中“无法猜测文件类型,使用application/octet-stream...”错误?appEngine静态文件mime type override ,静态文件处理程序有时可以覆盖正确的mime类型,在错误消息中导致错误消息:“无法猜测mimeType for for file for file for [File]。 application/application/octet...编程 发布于2025-04-28
 -
如何使用Regex在PHP中有效地提取括号内的文本php:在括号内提取文本在处理括号内的文本时,找到最有效的解决方案是必不可少的。一种方法是利用PHP的字符串操作函数,如下所示: 作为替代 $ text ='忽略除此之外的一切(text)'; preg_match('#((。 &&& [Regex使用模式来搜索特...编程 发布于2025-04-28
-
可以在纯CS中将多个粘性元素彼此堆叠在一起吗?[2这里: https://webthemez.com/demo/sticky-multi-header-scroll/index.html </main> <section> { display:grid; grid-template-...编程 发布于2025-04-28
-
如何从PHP中的Unicode字符串中有效地产生对URL友好的sl。为有效的slug生成首先,该函数用指定的分隔符替换所有非字母或数字字符。此步骤可确保slug遵守URL惯例。随后,它采用ICONV函数将文本简化为us-ascii兼容格式,从而允许更广泛的字符集合兼容性。接下来,该函数使用正则表达式删除了不需要的字符,例如特殊字符和空格。此步骤可确保slug仅包含...编程 发布于2025-04-28
-
如何使用Java.net.urlConnection和Multipart/form-data编码使用其他参数上传文件?使用http request 上传文件上传到http server,同时也提交其他参数,java.net.net.urlconnection and Multipart/form-data Encoding是普遍的。 Here's a breakdown of the process:Mu...编程 发布于2025-04-28
-
如何将来自三个MySQL表的数据组合到新表中?mysql:从三个表和列的新表创建新表 答案:为了实现这一目标,您可以利用一个3-way Join。 选择p。*,d.content作为年龄 来自人为p的人 加入d.person_id = p.id上的d的详细信息 加入T.Id = d.detail_id的分类法 其中t.taxonomy =...编程 发布于2025-04-28
-
版本5.6.5之前,使用current_timestamp与时间戳列的current_timestamp与时间戳列有什么限制?在时间戳列上使用current_timestamp或MySQL版本中的current_timestamp或在5.6.5 此限制源于遗留实现的关注,这些限制需要对当前的_timestamp功能进行特定的实现。 创建表`foo`( `Productid` int(10)unsigned not n...编程 发布于2025-04-28
-
如何检查对象是否具有Python中的特定属性?方法来确定对象属性存在寻求一种方法来验证对象中特定属性的存在。考虑以下示例,其中尝试访问不确定属性会引起错误: >>> a = someClass() >>> A.property Trackback(最近的最新电话): 文件“ ”,第1行, attributeError:SomeClass实...编程 发布于2025-04-28
-
如何从Python中的字符串中删除表情符号:固定常见错误的初学者指南?从python import codecs import codecs import codecs 导入 text = codecs.decode('这狗\ u0001f602'.encode('utf-8'),'utf-8') 印刷(文字)#带有...编程 发布于2025-04-28
-
在PHP中如何高效检测空数组?在PHP 中检查一个空数组可以通过各种方法在PHP中确定一个空数组。如果需要验证任何数组元素的存在,则PHP的松散键入允许对数组本身进行直接评估:一种更严格的方法涉及使用count()函数: if(count(count($ playerList)=== 0){ //列表为空。 } 对...编程 发布于2025-04-28
-
如何从2D数组中提取元素?使用另一数组的索引Using NumPy Array as Indices for the 2nd Dimension of Another ArrayTo extract specific elements from a 2D array based on indices provided by a second ...编程 发布于2025-04-28
-
eval()vs. ast.literal_eval():对于用户输入,哪个Python函数更安全?称量()和ast.literal_eval()中的Python Security 在使用用户输入时,必须优先确保安全性。强大的Python功能Eval()通常是作为潜在解决方案而出现的,但担心其潜在风险。 This article delves into the differences betwee...编程 发布于2025-04-28
-
如何在鼠标单击时编程选择DIV中的所有文本?在鼠标上选择div文本单击单击单个鼠标单击单击单击?这允许用户轻松拖放所选的文本或直接复制它。 在单个鼠标上单击的div元素中选择文本,您可以使用以下Javascript函数: function selecttext(canduterid){ if(document.Selection){...编程 发布于2025-04-28
-
如何使用PHP将斑点(图像)正确插入MySQL?essue VALUES('$this->image_id','file_get_contents($tmp_image)')";This code builds a string in PHP, but the function call ...编程 发布于2025-04-28
-
在UTF8 MySQL表中正确将Latin1字符转换为UTF8的方法在UTF8表中将latin1字符转换为utf8 ,您遇到了一个问题,其中含义的字符(例如,“jáuòiñe”)在utf8 table tabled tablesset中被extect(例如,“致电。为了解决此问题,您正在尝试使用“ mb_convert_encoding”和“ iconv”转换受...编程 发布于2025-04-28


学习中文
- 1 走路用中文怎么说?走路中文发音,走路中文学习
- 2 坐飞机用中文怎么说?坐飞机中文发音,坐飞机中文学习
- 3 坐火车用中文怎么说?坐火车中文发音,坐火车中文学习
- 4 坐车用中文怎么说?坐车中文发音,坐车中文学习
- 5 开车用中文怎么说?开车中文发音,开车中文学习
- 6 游泳用中文怎么说?游泳中文发音,游泳中文学习
- 7 骑自行车用中文怎么说?骑自行车中文发音,骑自行车中文学习
- 8 你好用中文怎么说?你好中文发音,你好中文学习
- 9 谢谢用中文怎么说?谢谢中文发音,谢谢中文学习
- 10 How to say goodbye in Chinese? 再见Chinese pronunciation, 再见Chinese learning


