
如何使用 Docker 部署 Go 应用程序
 浏览:385
Docker is a containerization platform that simplifies applications’ packaging, distribution, and deployment. You can harness the benefits of Go and Docker to enhance your applications’ efficiency, portability, and security.
This tutorial is invested in teaching you how you can build and deploy your Go applications with Docker. You’ll learn by building a RESTful API with the Gorilla Mux and GORM packages that you’ll containerize and deploy.
Step 1: Setting Up Your Development Environment
You’d need to have Go and Docker installed on your computer to build and containerize your Go apps with Docker.
Ensure that you have Go and Docker installed on your system. You can download Go from the official Go downloads website and Docker from Docker Hub. Visit the webpage if you haven’t, and follow the installation instructions for your specific operating system.
This article teaches how to deploy Go apps with Docker and teaches you more about installing and setting up Docker and a Postgres database, including containerizing your Go applications.
After installation, configure your Go development environment by setting environment variables and paths as needed. Ensure that you have a working Go workspace with the required directory structure.
Additionally, you can familiarize yourself with Docker's command-line interface (CLI) and basic Docker concepts.
Create a new directory for this project and run the go mod init command to initialize the directory as a Go project.
go mod init
After initializing the Go project, run this command to add the GORM and Gorilla Mux packages as dependencies to your project.
go get github.com/gorilla/mux

go get gorm.io/gorm
go get gorm.io/driver/postgres
You’ll use the Gorilla Mux package for routing. The GORM package provides an interface for you to use Go types for SQL database operations along with the driver package you installed (in this case, Postgres).
Step 2: Building the Go Application
In this tutorial, you’ll use a popular Go layered architecture style and use interfaces to interact with the various components of our app.
Here’s the directory structure of the application.
.
├── Dockerfile
├── cmd
│   └── server
│       └── main.go
└── internal
    ├── http
    │   ├── handlers.go
    │   └── users.go
    ├── models
    │   ├── database.go
    │   ├── migrations.go
    │   └── users.go
    └── users
        └── user.go

6 directories, 11 files
- Dockerfile: The Dockerfile is the configuration file for building the Docker image. You’ll write the contents of this file based on the API.
- cmd: The cmd directory usually contains the entry point of your application. The server sub-directory suggests that the API server is the main component of your project. The main.go file in the cmd/server contains the application's entry point.
-
internal: The internal directory helps organize the internal packages of your application. The internal packages shouldn’t be exported, making them an excellent place to hide implementation details.
-
http: This subdirectory will contain HTTP-related code, including route handlers and possibly middleware for your API.
- handlers.go: You’ll include your HTTP request handlers in this file.
- users.go: You’ll specify HTTP handlers related to user management here.
- models: This directory will contain database-related code and data models.
- database.go: This file will contain code for initializing and connecting to the database.
- migrations.go: This file handles database schema migrations, ensuring that your database schema matches your application's requirements.
- users.go: This file will have data models or struct definitions related to users interacting with the database.
-
users: This directory will contain user-specific logic.
- user.go: This file includes functions and structures related to user management that interact with the database implementation. The HTTP implementation interacts with the functions here.
-
http: This subdirectory will contain HTTP-related code, including route handlers and possibly middleware for your API.
This project structure appears well-organized, clearly separating concerns between different components. This organization makes it easier to maintain and scale your Go API as it grows.
This isn’t a Go standard. However, many Go developers and open-source projects use this structure for your applications.
Step 2a: Writing the Database Implementation
You’ll set up database functionality for your application. You’ll have to define the models using structs, connect to the database, and set up migrations for your insertion operations on your database.
Here’s the list of imports you’ll need for the database implementation.
package models

import (
    // imports from the user implementation
    "BetterApp/internal/users"

    "context"
    "gorm.io/gorm"
    "fmt"
    "gorm.io/driver/postgres"
    "gorm.io/gorm/schema"
    "os"
)
The first task is defining a strut that matches your database schema for your app. GORM provides tags for specifying additional options and constraints on fields.
// internal/models/users.go

type User struct {
    gorm.Model
    Username string `gorm:"unique;not null"`
    Email    string `gorm:"unique;not null"`
    IsActive bool   `gorm:"not null"`
}
The User struct represents the model for working with user data in a database.
In your database.go file, declare a struct to encapsulate the database connection instance. You’ll use the struct to connect to your database from other parts of the database implementation package.
// internal/models/database.go

type Database struct {
    Client *gorm.DB
}
Next, create a database connection function that connects the database implementation to the database program to the database:
// internal/models/database.go

func NewDatabase() (*Database, error) {

    // Construct a connection string using environment variables for database configuration.
    configurations := fmt.Sprintf("host=%v port=%v user=%v password=%v dbname=%v sslmode=%v",
        os.Getenv("DB_HOST"), os.Getenv("DB_PORT"), os.Getenv("DB_USERNAME"),
        os.Getenv("DB_PASSWORD"), os.Getenv("DB_NAME"), os.Getenv("SSL_MODE"))

    // Open a connection to the database using GORM and PostgreSQL driver.
    db, err := gorm.Open(postgres.New(postgres.Config{
        DSN:                  configurations,
        PreferSimpleProtocol: true,
    }), &gorm.Config{NamingStrategy: schema.NamingStrategy{
        SingularTable: true,
    }})
    if err != nil {
        return nil, err
    }

    // Enable connection pooling by configuring maximum idle and open connections.
    sqlDB, err := db.DB()
    if err != nil {
        return nil, err
    }
    sqlDB.SetMaxIdleConns(10)
    sqlDB.SetMaxOpenConns(100)

    // Return the Database instance with the established database connection.
    return &Database{
        Client: db,
    }, nil
}
The NewDatabase function creates a new Database instance and establishes a connection to the database. It returns a pointer to the Database instance, and an error, if any, occurs during the process.
After a successful database connection, you can set up migration functionality for your database implementation with the function as thus:
// internal/models/migrations.go

func (d *Database) MigrateDB() error {
    log.Println("Database Migration in Process...")

    // Use GORM AutoMigrate to migrate all the database schemas.
    err := d.Client.AutoMigrate(&User{})
    if err != nil {
        return err
    }

    log.Println("Database Migration Complete!")
    return nil
}
The MgrateDB function sets up automatic migrations for the User struct with the database client AutoMigrate function and returns an error if there’s any encountered during the process.
Step 2b: Defining Functions for the Database Implementation
In the users.go file where you defined the struct for your database schema, you can proceed to define the functions for the database implementation.
Here are the CreateUser, GetUserByID, UpdateUser, and DeleteUser functions responsible for CRUD operations on the database.
// internal/models/users.go

func (d *Database) CreateUser(ctx context.Context, user *users.User) error {
    newUser := &User{
        Username: user.Username,
        Email:    user.Email,
        IsActive: false,
    }

    if err := d.Client.WithContext(ctx).Create(newUser).Error; err != nil {
        return err
    }

    return nil
}

// GetUserByID returns the user with a specified id
func (d *Database) GetUserByID(ctx context.Context, id int64) (users.User, error) {
    user := users.User{}
    if err := d.Client.WithContext(ctx).Where("id = ?", id).First(&user).Error; err != nil {
        return users.User(User{}), err
    }
    return users.User(User{
        Username: user.Username,
        Email:    user.Email,
        IsActive: user.IsActive,
    }), nil
}

// UpdateUser updates an existing user in the database
func (d *Database) UpdateUser(ctx context.Context, updatedUser users.User, id uint) error {
    // Check if the user with the specified ID exists
    var existingUser User
    if err := d.Client.WithContext(ctx).Where("id = ?", id).First(&existingUser).Error; err != nil {
        return err
    }

    // Update the fields of the existing user with the new values
    existingUser.Username = updatedUser.Username
    existingUser.Email = updatedUser.Email
    existingUser.IsActive = updatedUser.IsActive

    // Save the updated user back to the database
    if err := d.Client.WithContext(ctx).Save(&existingUser).Error; err != nil {
        return err
    }

    return nil
}

// DeleteUser deletes a user from the database by their ID

func (d *Database) DeleteUser(ctx context.Context, id uint) error {
    // Check if the user with the specified ID exists
    var existingUser User
    if err := d.Client.WithContext(ctx).Where("id = ?", id).First(&existingUser).Error; err != nil {
        return err
    }

    // Delete the user from the database
    if err := d.Client.WithContext(ctx).Delete(&existingUser).Error; err != nil {
        return err
    }

    return nil
}
Your user implementation will call these functions to access the database functionality.
Step 2c: Writing the User Implementation
Your user implementation plays a significant role in relaying data from the database to the HTTP implementation.
You’ll define a struct that matches the struct in the database implementation and add JSON tags to the fields for usage; then, you’ll define functions that call the database functions with the data from the HTTP implementation.
Here are the imports you’ll need for your user implementation:
package users

import (
    "context"
    "gorm.io/gorm"
    "log"
)
Here’s the structure with JSON tags. The json:"-" in the gorm.Model field specifies that you want to exclude the field from the JSON operations.
// User -  a representation of the users of the wallet engine
type User struct {
    gorm.Model `json:"-"`
    Username   string `json:"username"`
    Email      string `json:"email"`
    IsActive   bool   `json:"is_active"`
}
Next, you’ll declare an interface with methods for the user implementation functions, a service struct for the user implementation, and a function that initializes the service implementation.
type UserStore interface {
    CreateUser(context.Context, *User) error
    GetUserByID(context.Context, int64) (User, error)
    UpdateUser(context.Context, User, uint) error
    DeleteUser(context.Context, uint) error
}

// The UserService struct manages user-related operations outside the user implementation.
type UserService struct {
    Store UserStore // UserStore is an interface that abstracts the database operations.
}

// NewService creates a new service
func NewService(store UserStore) UserService {
    return UserService{
        Store: store,
    }
}
The interface and service will help manage user-related operations outside the user implementation.
Next, you can define methods of the UserService struct implementation that call the database implementation.
// CreateUser creates a new user by calling the CreateUser method on the associated UserStore.
func (u *UserService) CreateUser(ctx context.Context, user *User) error {
    if err := u.Store.CreateUser(ctx, user); err != nil {
        log.Printf("Error creating user: %v", err)
        return err
    }
    return nil
}

// GetUserByID retrieves a user by their ID using the GetUserByID method on the associated UserStore.
func (u *UserService) GetUserByID(ctx context.Context, id int64) (User, error) {
    user, err := u.Store.GetUserByID(ctx, id)
    if err != nil {
        log.Printf("Error fetching user with ID %v: %v", id, err)
        return user, err
    }
    return user, nil
}

// UpdateUser updates an existing user by calling the UpdateUser method on the associated UserStore.
func (u *UserService) UpdateUser(ctx context.Context, user User, id uint) error {
    if err := u.Store.UpdateUser(ctx, user, id); err != nil {
        log.Printf("Error updating user: %v", err)
        return err
    }

    return nil
}

// DeleteUser deletes a user by their ID using the DeleteUser method on the associated UserStore.
func (u *UserService) DeleteUser(ctx context.Context, id uint) error {
    if err := u.Store.DeleteUser(ctx, id); err != nil {
        log.Printf("Error deleting user: %v", err)
        return err
    }

    return nil
}
The CreateUser, GetUserByID, UpdateUser, and DeleteUser functions are responsible for calling the CRUD operations on the database implementation. The HTTP implementation will call these functions to access the database.
Step 2c: Writing the HTTP Implementation
The HTTP implementation is part of your application that receives and interacts with incoming requests.
Here’s the list of imports you’ll need across your HTTP implementation:
package http

import (
    "BetterApp/internal/users"
    "context"
    "github.com/gorilla/mux"
    "log"
    "net/http"
    "os"
    "os/signal"
    "syscall"
    "time"
    "encoding/json"
    "strconv"
)
First, declare a struct and include a Router instance, a HTTP instance, and an instance of the user service.
// internal/http/handler.go

type Handler struct {
    Router *mux.Router
    Users  users.UserService
    Server *http.Server
}
Then create a function that returns a pointer to the Handler struct, where you can configure the server and handlers.
// internal/http/handler.go

// NewHandler - returns a pointer to a Handler
func NewHandler(users users.UserService) *Handler {
    // Print a log message to indicate that we are setting up our handler
    log.Println("setting up our handler")

    // Create a new Handler instance and initialize it
    h := &Handler{
        Users: users, // Assign the provided users service to the handler's Users field
    }

    // Create a new HTTP router using the mux package
    h.Router = mux.NewRouter()

    // Map the routes for this handler (assuming this method exists and sets up routes)
    h.mapRoutes()

    // Create an HTTP server instance with specified settings
    h.Server = &http.Server{
        Addr:         "0.0.0.0:8080", // Set the server address to listen on
        WriteTimeout: time.Second * 15, // Set the maximum time to write the response
        ReadTimeout:  time.Second * 15, // Set the maximum time to read the request
        IdleTimeout:  time.Second * 60, // Set the maximum idle time
        Handler:      h.Router, // Set the router as the handler for incoming requests
    }

    // Return the initialized handler
    return h
}
The NewHandler function sets up and configures an HTTP request handler, making it ready to handle incoming HTTP requests for a specific service while also defining server settings and routes.
The mapRoutes function you called in the NewHandler function sets up routes by mapping them to their respective handler functions.
// internal/http/handler.go

// mapRoutes - sets up all the routes for our application
func (h *Handler) mapRoutes() {
    h.Router.HandleFunc("/api/v1/user/create", h.CreateUser).Methods("POST")
    h.Router.HandleFunc("/api/v1/users/{id}", h.GetUserByID).Methods("GET")
    h.Router.HandleFunc("/api/v1/users/{id}", h.UpdateUser).Methods("PUT")
    h.Router.HandleFunc("/api/v1/users/{id}", h.DeleteUser).Methods("DELETE")
}
Next, define the handler functions and their functionalities. Here are the CreateUser, GetUserByID, UpdateUser and DeleteUser functions that are responsible for intercepting HTTP requests and responding based on the operation.
// internal/http/users.go

// CreateUser decodes a User object from the HTTP request body and then tries to create a new user in the database using the CreateUser method of the UserService interface.
// If the user is successfully created, it encodes and sends the created user as a response.
func (h *Handler) CreateUser(writer http.ResponseWriter, request *http.Request) {
    // Decode the incoming JSON request body into a User struct
    var u users.User
    if err := json.NewDecoder(request.Body).Decode(&u); err != nil {
        // If decoding fails, respond with a Bad Request status and log the error
        http.Error(writer, "Failed to decode request body", http.StatusBadRequest)
        log.Println("Failed to decode request body:", err)
        return
    }

    // Try to create the user using the CreateUser method of UserService
    err := h.Users.CreateUser(request.Context(), &u)
    if err != nil {
        // If user creation fails, respond with an Internal Server Error status and log the error
        http.Error(writer, "Failed to create user", http.StatusInternalServerError)
        log.Println("Failed to create user:", err)
        return
    }

    // Set the response content type to JSON, set the status to Created, and encode and send the created user as the response
    writer.Header().Set("Content-Type", "application/json")
    writer.WriteHeader(http.StatusCreated)

    if err := json.NewEncoder(writer).Encode(u); err != nil {
        // If encoding the response fails, log the error (Panicln is used for critical errors)
        log.Panicln("Failed to encode response:", err)
    }
}

// GetUserByID extracts the id from the URL parameters and then fetches the user with that id from the database using the GetUserByID method of the UserService interface.
// If the user is found, it encodes and sends the user as a response.
func (h *Handler) GetUserByID(writer http.ResponseWriter, request *http.Request) {
    // Extract the 'id' parameter from the URL and convert it to an integer
    vars := mux.Vars(request)
    id, err := strconv.ParseInt(vars["id"], 10, 64)
    if err != nil {
        // If parsing the 'id' fails, respond with a Bad Request status and the error message
        http.Error(writer, err.Error(), http.StatusBadRequest)
        return
    }

    // Fetch the user with the given 'id' using the GetUserByID method of UserService
    u, err := h.Users.GetUserByID(request.Context(), id)
    if err != nil {
        // If fetching the user fails, log the error
        log.Println(err)
        return
    }

    // Encode and send the fetched user as the response
    if err := json.NewEncoder(writer).Encode(u); err != nil {
        // If encoding the response fails, log the error (Panicln is used for critical errors)
        log.Panicln(err)
    }
}

// UpdateUser updates a user by ID.
func (h *Handler) UpdateUser(writer http.ResponseWriter, request *http.Request) {
    // Extract the 'id' parameter from the URL and convert it to an integer
    vars := mux.Vars(request)
    id, err := strconv.ParseInt(vars["id"], 10, 64)
    if err != nil {
        // If parsing the 'id' fails, respond with a Bad Request status and the error message
        http.Error(writer, err.Error(), http.StatusBadRequest)
        return
    }

    // Decode the request body to get the updated user information
    var u users.User
    if err := json.NewDecoder(request.Body).Decode(&u); err != nil {
        // If decoding the request body fails, respond with a Bad Request status
        http.Error(writer, "Invalid request body", http.StatusBadRequest)
        return
    }

    // Update the user using the UpdateUser method of UserService
    err = h.Users.UpdateUser(request.Context(), u, uint(id))
    if err != nil {
        // If updating the user fails, respond with an Internal Server Error status and log the error
        http.Error(writer, "Failed to update user", http.StatusInternalServerError)
        log.Println(err)
        return
    }

    // Encode and send the updated user as the response
    if err := json.NewEncoder(writer).Encode(u); err != nil {
        // If encoding the response fails, respond with an Internal Server Error status and log the error (Panicln is used for critical errors)
        http.Error(writer, "Failed to encode response", http.StatusInternalServerError)
        log.Panicln(err)
    }
}

// DeleteUser deletes a user by ID.
func (h *Handler) DeleteUser(writer http.ResponseWriter, request *http.Request) {
    // Extract the 'id' parameter from the URL and convert it to an integer
    vars := mux.Vars(request)
    id, err := strconv.ParseInt(vars["id"], 10, 64)
    if err != nil {
        // If parsing the 'id' fails, respond with a Bad Request status and the error message
        http.Error(writer, err.Error(), http.StatusBadRequest)
        return
    }

    // Delete the user using the DeleteUser method of UserService
    err = h.Users.DeleteUser(request.Context(), uint(id))
    if err != nil {
        // If deleting the user fails, respond with an Internal Server Error status and log the error
        http.Error(writer, "Failed to delete user", http.StatusInternalServerError)
        log.Println(err)
        return
    }

    // Send a success response with a No Content status (204)
    writer.WriteHeader(http.StatusNoContent)
}
Now, you can write the functionality for starting the server.
// internal/http/handler.go

// Serve - gracefully serves our newly set up handler function
func (h *Handler) Serve() error {
        if err := h.Server.ListenAndServe(); err != nil {
            log.Println(err)
        }
}
The Serve function starts the server on the specified port and returns an error if there’s any during the process.
Step 2d: Coupling the Implementations and Running the Application
Import the implementations in your main.go file to couple the implementations and run your app.
package main

import (
    "BetterApp/internal/http"
    "BetterApp/internal/models"
    "BetterApp/internal/users"
    "fmt"
    "log"
)
You can declare a Run function that instantiates the startup of your app in the main.go file and then call the function in the main function.
//cmd/server/main.go

// Run - is going to be responsible for / the instantiation and startup of our / go application
func Run() error {
    fmt.Println("starting up the application...")

    // create a database instance variable
    store, err := models.NewDatabase()
    if err != nil {
        log.Println("Database Connection Failure")
        return err
    }

    // initialize the migrations functionality on the new database
    if err := store.MigrateDB(); err != nil {
        log.Println("failed to setup store migrations")
        return err
    }

    // set the database instance as the store for the user service implementation
    userService := users.NewService(store)

    // initialize a new handler with the user service
    handler := http.NewHandler(userService)

    // call the serve function to start the server
    if err := handler.Serve(); err != nil {
        log.Println("failed to gracefully serve our application")
        return err
    }

    return nil

}
The Run function creates a database instance, initializes migrations functionality, initializes the HTTP and User implementations and starts the server.
You can call the Run function in the main function to launch your application.
//cmd/server/main.go

func main() {
    fmt.Println("Go REST API Tutorial")
    if err := Run(); err != nil {
        log.Println(err)
    }

}
The application should run fine before you consider containerizing it with Docker.
Step3: Writing the Dockerfile
Now that you’ve successfully built and ran the program, you can proceed to containerize it with Docker.
Your Dockerfile will have two stages, the build and final stage. This approach reduces image size, minimizes security risks by reducing the attack surface, ensures efficient runtime performance, and facilitates reproducibility across different development and deployment stages.
You’ll also use Alpine Linux as the base image of your Docker images since they’re more efficient and secure with minimalist design results in smaller image sizes, faster builds, and reduced attack surfaces.
Step 3a: The Build Stage
Using the build and final stages in a Dockerfile allows for the efficient creation of Docker images. The build stage starts with a base image containing build tools and dependencies, compiles application artifacts, and generates a potentially large intermediate image.
Here’s the contents of the Dockerfile for the Build Stage:
# Build stage
FROM golang:1.20-alpine AS build

# Set the working directory inside the container
WORKDIR /app

# Copy the Go application source code into the container
COPY . .

# Build the Go application
RUN go build -o server ./cmd/server
- FROM golang:1.20-alpine AS build: This line specifies the base image for the build stage. It starts with the official Golang Docker image tagged with version 1.20 and is based on Alpine Linux. The AS build part gives this stage a name, "build" that you can reference later.
- WORKDIR /app: This line sets the working directory inside the container to /app. Docker will execute subsequent commands in this directory.
- COPY . .: This command copies the contents of the current directory (presumably your Go application source code and other necessary files) into the /app directory inside the container.
- RUN go build -o server ./cmd/server: This is the command that builds the Go application. It uses the go build command to compile the Go code in the current directory and output the binary as server. The ./cmd/server argument is the location of the application code relative to the /app directory.
Step 3b: The Final Stage
The final stage employs a smaller base image, copies only necessary runtime components, and results in a compact image optimized for production.
Here are the contents of your Dockerfile for the final stage:
# Final stage
FROM alpine:latest

# Set the working directory inside the final container
WORKDIR /app

# Copy the binary built in the previous stage
COPY --from=build /app/server .

# Expose the port your application will listen on (adjust as needed)
EXPOSE 8080

# Run your Go application
CMD ["./server"]
- FROM alpine:latest: In the final stage, you can start with an Alpine Linux base image, The latest tag specifies the latest available version of Alpine Linux.
- WORKDIR /app: This line sets the working directory inside the container to /app. Docker will execute subsequent commands in this directory.
- COPY --from=build /app/server .: This command copies the binary file named server from the previous "build stage" into the /app directory inside the final container. This binary is the compiled Go application that you built in the build stage.
- EXPOSE 8080: Here, you specify that your application will listen on port 8080. This is a declaration and does not actually open the port; it's a way to document which port your application expects to use.
- CMD ["./server"]: This command will be executed when you run a container based on the image. It specifies running the server binary, which is your Go application. This command starts your application inside the container.
Step 4: Building and Running the Docker Image
After Writing the Dockerfile, you can proceed to build and run the file.
Run this command to build the Docker image from the file with the build command.
docker build -t betterapp .
The -t flag specifies the tag for the Docker image as betterapp and the following dot (.) specifies that you want to build the Dockerfile in the current directory.
You can run the image with the run command and specify a port mapping from the container to your host machine with the -p flag.
docker run -p 8080:8080 \
  -e DB_HOST=ep-silent-dew-52667493-pooler.us-east-2.aws.neon.tech \
  -e DB_PORT=5432 \
  -e DB_USERNAME=Goodnessuc \
  -e DB_PASSWORD=foOEky9F2reG \
  -e DB_NAME=neondb \
  -e SSL_MODE=require \
  betterapp
The subsequent -e flags are for specifying environment variables since for your application.
Step 5: Deploying Go Applications with Docker
Docker Compose is a container orchestration tool that simplifies working with multiple Docker containers. You can use Docker compose to orchestrate your Go apps and their components.
You’ll use a YAML file to specify the instruction and Docker compose will setup your applications to save you time and complexity.
First, create a Docker Compose YAML file with the command below and open the file in your editor:
touch docker-compose.yml
After creating the Dockerfile, you can start writing the commands and directives for deploying your app:
version: "3.8"

services:
  db:
    image: postgres:12.2-alpine
    container_name: "betterapp"
    ports:
      - "5433:5432"
    environment:
      - POSTGRES_DB=postgres
      - POSTGRES_USER=postgres
      - POSTGRES_PASSWORD=postgres
    networks:
      - fullstack
    volumes:
      - database_postgres:/var/lib/postgresql/data

  api:
    build: .
    container_name: "betterapp-rest-api"
    environment:
      DB_USERNAME: "postgres"
      DB_PASSWORD: "postgres"
      DB_DB: "postgres"
      DB_HOST: "db"
      DB_TABLE: "postgres"
      DB_PORT: "5432"
      SSL_MODE: "disable"
    ports:
      - "8080:8080"
    depends_on:
      - db
    networks:
      - fullstack

volumes:
  database_postgres:

networks:
  fullstack:
    driver: bridge
The YAML file defines two services: my-postgres which is the database container instance and the web service, which is your Go application before configuring their environment variables, ports, and dependencies.
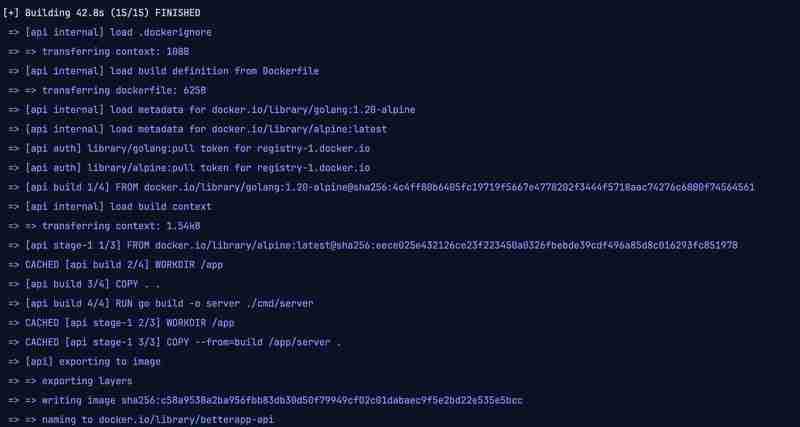
Now, you can proceed to build the images with the docker-compose build command.
docker-compose build
Your output should be similar to this:
Finally, you can run your containers with the docker-compose up command.
docker-compose up -d
The -d flag runs the containers in detached mode which makes it agnostic of the terminal session.
Here’s the result of running the command:
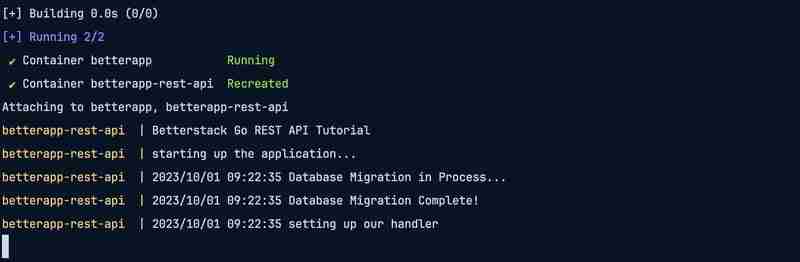
You can close your terminal, and the container should continue running.
You can run the CURL requests to test your API once the containers are up:
# Create a new user
# POST /api/v1/user/create
curl -X POST \
     -H "Content-Type: application/json" \
     -d '{"username": "alice_smith", "email": "[email protected]", "is_active": true}' \
     http://localhost:8080/api/v1/user/create

# Get user by ID
# Assuming the user ID of Alice Smith is 2
# GET /api/v1/users/{id}
curl -X GET http://localhost:8080/api/v1/users/1

# Update user by ID
# Let's update Alice Smith's username and email address
# PUT /api/v1/users/{id}
curl -X PUT \
     -H "Content-Type: application/json" \
     -d '{"username": "alice_wonder", "email": "[email protected]", "is_active": true}' \
     http://localhost:8080/api/v1/users/1

# Delete user by ID
# DELETE /api/v1/users/{id}
curl -X DELETE http://localhost:8080/api/v1/users/1
Congratulations, you’ve successfully deployed and run a working Go app with Docker and Docker Compose.
Conclusion
You’ve learned how to build and simplify your Go app’s deployment with Docker and Docker Compose. As you continue on your development journey, the skills and understanding you've gained here will prove to be essential assets in ensuring smooth deployments and operational excellence.
Consider exploring advanced Docker features like optimizing Dockerfile builds or implementing Docker Swarm for larger applications.
-
 如何在全高布局中有效地将Flexbox和垂直滚动结合在一起?在全高布局中集成flexbox和垂直滚动传统flexbox方法(旧属性)使用新的FlexBox properties 试图将全新的FlexBox属性应用于全高和可滚动的设计引入限制。使用高度的解决方法:0px; on a wrapper element is unreliable and crea...编程 发布于2025-03-22
 -
如何将Python 3.4.0连接到MySQL数据库?Connecting Python 3.4.0 to MySQL DatabasePython 3.4.0 lacks support for the popular MySQLdb driver for connecting to MySQL databases.这可能对需要MySQL集成的项目构...编程 发布于2025-03-22
-
如何在扩展的PHP类中从静态方法中检索类名?在PHP世界中从静态php class class Action { 函数n(){/ *某些实现 */} } 类MyAction在这种情况下将操作扩展了{/ *进一步实现 */} 晚期静态绑定(php 5.3):替代方法(pre-php 5.3):请记住,此方法仅适用于非静态方法,因为g...编程 发布于2025-03-22
-
在Python中输出输出时,如何保留编码?在Python 通过管道的标准输出进行python程序的标准输出时,解释时,解释器可能会错误地假设none of none of to unicode surrors yrorors yrors。要解决此问题,必须明确指定编码。与脚本中的执行不同,在脚本中,python会自动调整终端编码,管道需要...编程 发布于2025-03-22
-
如何从PHP中的数组中提取随机元素?从阵列中的随机选择,可以轻松从数组中获取随机项目。考虑以下数组:; 从此数组中检索一个随机项目,利用array_rand( array_rand()函数从数组返回一个随机键。通过将$项目数组索引使用此键,我们可以从数组中访问一个随机元素。这种方法为选择随机项目提供了一种直接且可靠的方法。编程 发布于2025-03-22
-
为什么使用固定定位时,为什么具有100%网格板柱的网格超越身体?网格超过身体,用100%grid-template-columns 为什么在grid-template-colms中具有100%的显示器,当位置设置为设置的位置时,grid-template-colly修复了?问题: 考虑以下CSS和html: class =“ snippet-code”> g...编程 发布于2025-03-22
-
如何使用Depimal.parse()中的指数表示法中的数字?在尝试使用Decimal.parse(“ 1.2345e-02”中的指数符号表示法表示的字符串时,您可能会遇到错误。这是因为默认解析方法无法识别指数符号。 成功解析这样的字符串,您需要明确指定它代表浮点数。您可以使用numbersTyles.Float样式进行此操作,如下所示:[&& && && ...编程 发布于2025-03-22
-
如何使用替换指令在GO MOD中解析模块路径差异?在使用GO MOD时,在GO MOD 中克服模块路径差异时,可能会遇到冲突,其中3个Party Package将另一个PAXPANCE带有导入式套件之间的另一个软件包,并在导入式套件之间导入另一个软件包。如回声消息所证明的那样: go.etcd.io/bbolt [&&&&&&&&&&&&&&&&...编程 发布于2025-03-22
-
哪种方法更有效地用于点 - 填点检测:射线跟踪或matplotlib \的路径contains_points?在Python Matplotlib's path.contains_points FunctionMatplotlib's path.contains_points function employs a path object to represent the polygon.它...编程 发布于2025-03-22
-
您什么时候应该使用python命名的元组?在python 命名命名命名型单元类型是可轻松的方法)是提供相关数据相关的轻度对象。与常规元素不同,命名元素命名为属性,允许直观对象样引用。何时使用命名型元组何时使用命名的元素,何时何时使用: readisoind your py py py news new nature tation。 to ...编程 发布于2025-03-22
-
如何在GO中初始化嵌入式结构:两次诉讼指南在GO String } 来访问并设置嵌入式http.request struct。另外,我们还可以使用以下种句使用以下种句来初始化嵌入式struct: 在这里,我们创建了一个带有必需字段的匿名结构。重要的是要以“&”的形式将嵌入式结构名称前缀以适当的初始化很重要。这会导致具有所需值的myRe...编程 发布于2025-03-22
-
如何在Java字符串中有效替换多个子字符串?在java 中有效地替换多个substring,需要在需要替换一个字符串中的多个substring的情况下,很容易求助于重复应用字符串的刺激力量。 However, this can be inefficient for large strings or when working with nu...编程 发布于2025-03-22
-
如何在没有插件的情况下执行jQuery ajax文件上传?jQuery Ajax File Upload Without Using a PluginFile upload using jQuery's AJAX requires the use of XHR2, supported by modern browsers. If you want ...编程 发布于2025-03-22
-
我可以使用哪些技术合并关联数组并添加具有默认值的缺失列?合并关联数组,并将缺少的列与默认值Method 1: Using array_merge and RecursiveIterationIterator$a = array('a' => 'some value', 'b' => 'some v...编程 发布于2025-03-22
-
如何为PostgreSQL中的每个唯一标识符有效地检索最后一行?postgresql:为每个唯一标识符在postgresql中提取最后一行,您可能需要遇到与数据集合中每个不同标识的信息相关的信息。考虑以下数据:[ 1 2014-02-01 kjkj 在数据集中的每个唯一ID中检索最后一行的信息,您可以在操作员上使用Postgres的有效效率: id dat...编程 发布于2025-03-22


学习中文
- 1 走路用中文怎么说?走路中文发音,走路中文学习
- 2 坐飞机用中文怎么说?坐飞机中文发音,坐飞机中文学习
- 3 坐火车用中文怎么说?坐火车中文发音,坐火车中文学习
- 4 坐车用中文怎么说?坐车中文发音,坐车中文学习
- 5 开车用中文怎么说?开车中文发音,开车中文学习
- 6 游泳用中文怎么说?游泳中文发音,游泳中文学习
- 7 骑自行车用中文怎么说?骑自行车中文发音,骑自行车中文学习
- 8 你好用中文怎么说?你好中文发音,你好中文学习
- 9 谢谢用中文怎么说?谢谢中文发音,谢谢中文学习
- 10 How to say goodbye in Chinese? 再见Chinese pronunciation, 再见Chinese learning


