这简化了数据获取,但是如果您有大量都需要身份验证的 API 怎么办? 向每个调用添加标头很快就会变得乏味。
输入拦截器。
为了添加全局拦截器,我们将围绕 $fetch 构建一个自定义的可组合包装器。当您的 API 调用始终需要授权标头时,这尤其有价值。
作为基础,让我们使用我之前关于 Nuxt 3 中的身份验证的博客文章中的相同项目。
让我们首先在可组合文件夹 composables/useAuthFetch.ts 下创建一个新的可组合项
import type { UseFetchOptions } from \\'nuxt/app\\';const useAuthFetch = (url: string | (() => string), options: UseFetchOptions = {}) => { const customFetch = $fetch.create({ baseURL: \\'https://dummyjson.com\\', onRequest({ options }) { const token = useCookie(\\'token\\'); if (token?.value) { console.log(\\'[fetch request] Authorization header created\\'); options.headers = options.headers || {}; options.headers.Authorization = `Bearer ${token.value}`; } }, onResponse({ response }) { console.info(\\'onResponse \\', { endpoint: response.url, status: response?.status, }); }, onResponseError({ response }) { const statusMessage = response?.status === 401 ? \\'Unauthorized\\' : \\'Response failed\\'; console.error(\\'onResponseError \\', { endpoint: response.url, status: response?.status, statusMessage, }); throw showError({ statusCode: response?.status, statusMessage, fatal: true, }); }, }); return useFetch(url, { ...options, $fetch: customFetch, });};export default useAuthFetch; 解释:
您可以在此处找到有关拦截器的更多信息
现在,每当您需要从经过身份验证的 API 获取数据时,只需使用 useAuthFetch 而不是 useFetch,授权将得到无缝处理。
Welcome back {{ user.email }}loading...

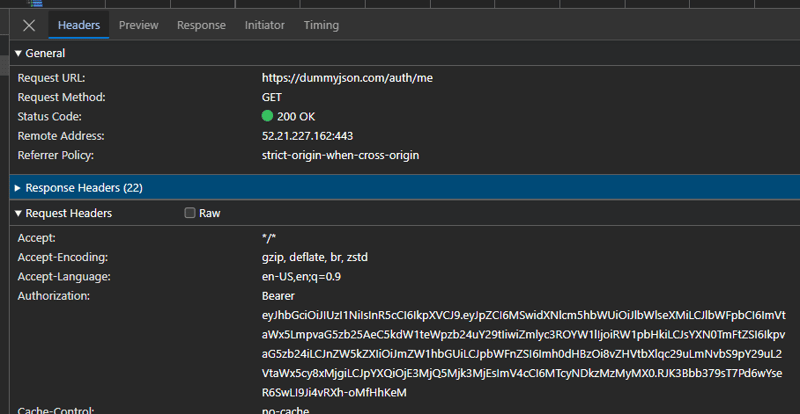
当您检查网络调用时,您可以看到 baseUrl 是正确的并且存在 Authorization 标头
在我的拦截器中,我添加了一些日志,如果您的应用程序中有像 Sentry 这样的工具,这些日志会很有用。
如何将Sentry添加到Nuxt:https://www.lichter.io/articles/nuxt3-sentry-recipe/
在 onRequest 拦截器中,您可以向哨兵添加面包屑
import * as Sentry from \\'@sentry/vue\\';Sentry.addBreadcrumb({ type: \\'http\\', category: \\'xhr\\', message: ``, data: { url: `${options.baseURL}${request}`, }, level: \\'info\\',});如果您的后端返回跟踪Id,您还可以使用哨兵添加标签和上下文,以将错误与端点链接起来
onResponseError 您可以添加上下文面包屑和标签
import * as Sentry from \\'@sentry/vue\\';Sentry.setContext(\\'http-error\\', { endpoint: response?.url, tracingId: 123, status: response?.status,});Sentry.addBreadcrumb({ type: \\'http\\', category: \\'xhr\\', message: ``, data: { url: response?.url, status_code: response?.status, }, level: \\'error\\',});Sentry.setTag(\\'tracingId\\', \\'123\\');将tracingId替换为后端返回的任何自定义跟踪日志
","image":"http://www.luping.net/uploads/20241003/172795752666fe8a16368ef.png","datePublished":"2024-11-08T14:15:37+08:00","dateModified":"2024-11-08T14:15:37+08:00","author":{"@type":"Person","name":"luping.net","url":"https://www.luping.net/articlelist/0_1.html"}}如果您使用过 Nuxt,您可能遇到过方便的 useFetch 可组合项:
这简化了数据获取,但是如果您有大量都需要身份验证的 API 怎么办? 向每个调用添加标头很快就会变得乏味。
输入拦截器。
为了添加全局拦截器,我们将围绕 $fetch 构建一个自定义的可组合包装器。当您的 API 调用始终需要授权标头时,这尤其有价值。
作为基础,让我们使用我之前关于 Nuxt 3 中的身份验证的博客文章中的相同项目。
让我们首先在可组合文件夹 composables/useAuthFetch.ts 下创建一个新的可组合项
import type { UseFetchOptions } from 'nuxt/app';

const useAuthFetch = (url: string | (() => string), options: UseFetchOptions = {}) => {
  const customFetch = $fetch.create({
    baseURL: 'https://dummyjson.com',
    onRequest({ options }) {
      const token = useCookie('token');
      if (token?.value) {
        console.log('[fetch request] Authorization header created');
        options.headers = options.headers || {};
        options.headers.Authorization = `Bearer ${token.value}`;
      }
    },
    onResponse({ response }) {
      console.info('onResponse ', {
        endpoint: response.url,
        status: response?.status,
      });
    },
    onResponseError({ response }) {
      const statusMessage = response?.status === 401 ? 'Unauthorized' : 'Response failed';
      console.error('onResponseError ', {
        endpoint: response.url,
        status: response?.status,
        statusMessage,
      });
      throw showError({
        statusCode: response?.status,
        statusMessage,
        fatal: true,
      });
    },
  });

  return useFetch(url, {
    ...options,
    $fetch: customFetch,
  });
};

export default useAuthFetch;
解释:
您可以在此处找到有关拦截器的更多信息
现在,每当您需要从经过身份验证的 API 获取数据时,只需使用 useAuthFetch 而不是 useFetch,授权将得到无缝处理。
Welcome back {{ user.email }}loading...

当您检查网络调用时,您可以看到 baseUrl 是正确的并且存在 Authorization 标头
在我的拦截器中,我添加了一些日志,如果您的应用程序中有像 Sentry 这样的工具,这些日志会很有用。
如何将Sentry添加到Nuxt:https://www.lichter.io/articles/nuxt3-sentry-recipe/
在 onRequest 拦截器中,您可以向哨兵添加面包屑
import * as Sentry from '@sentry/vue';

Sentry.addBreadcrumb({
        type: 'http',
        category: 'xhr',
        message: ``,
        data: {
          url: `${options.baseURL}${request}`,
        },
        level: 'info',
});
如果您的后端返回跟踪Id,您还可以使用哨兵添加标签和上下文,以将错误与端点链接起来
onResponseError 您可以添加上下文面包屑和标签
import * as Sentry from '@sentry/vue';

Sentry.setContext('http-error', {
   endpoint: response?.url,
   tracingId: 123,
   status: response?.status,
});
Sentry.addBreadcrumb({
 type: 'http',
 category: 'xhr',
 message: ``,
 data: {
  url: response?.url,
  status_code: response?.status,
 },
 level: 'error',
});
Sentry.setTag('tracingId', '123');
将tracingId替换为后端返回的任何自定义跟踪日志


免责声明: 提供的所有资源部分来自互联网,如果有侵犯您的版权或其他权益,请说明详细缘由并提供版权或权益证明然后发到邮箱:[email protected] 我们会第一时间内为您处理。
Copyright© 2022 湘ICP备2022001581号-3