
使用 Flet 和 python 构建计算器
 浏览:265
Introduction
Hello there, Arsey here, a Python speaker, this is my first blog and I'll guide you to build this simple calculator app using Flet. I'm so excited to share this with you and here we go.
In today’s digital era, creating cross-platform applications is a necessity. With a plethora of frameworks available, selecting the right one can be challenging. One such framework is Flet, a Python library that enables developers to effortlessly build web, desktop, and mobile apps using Flutter, but for Python.
In this blog, we’ll explore how to create a basic calculator app using Flet, illustrating how simple and efficient this framework can be.
WHY FLET?
When I started programming, my goal was to build mobile applications. Without a clear guide, I chose Python as my first language. It was fun to learn but as I gained more experience, I realized that Python is traditionally not suitable for app development, it’s more commonly used for data analysis and related tasks.
Now learning Android development with Kotlin for native development and Dart with Flutter for cross-platform, my goal comes a step closer thanks to this library flet.
This realization was disheartening until I discovered frameworks like Kivy, Tkinter, Flet, etc., that allow Python to be used for building apps. Unlike Kivy or Tkinter, these frameworks are good but need a lot of customization to develop a good-looking mobile application that works well for Android and iOS. And that’s where flet shines.
Flet is a Python framework inspired by Flutter, a popular UI toolkit by Google. The results you can achieve with flet are impressive, and I’m excited to share more.
WHAT is flet?
Flet is a python package that allows developers to build user interfaces directly using Flutter’s UI toolkit.
Flet’s primary advantage is that it combines Python’s simplicity and Flutter’s rich UI capabilities, enabling rapid development of cross-platform application without requiring extensive front-end experience.
Flet is a batteries-included library, so no need for SDKs and can be easily extended with Flutter’s SDK.
Note: It's beneficial to have a basic understanding of some front-end concepts, such as the box model, layout structures like Flexbox and Grid, and positioning. While you can still follow along without this knowledge, I highly recommend familiarizing yourself with these concepts.
Now, with that out of the way, let’s dive into building our calculator!
SETTING UP THE ENVIRONMENT
Before diving into coding, ensure you have Python installed on your machine. Then, follow these steps to set up your environment for Flet.
- Install Flet: You can install Flet using pip. You can just open your terminal or command prompt, type in this command, and run it.
pip install flet
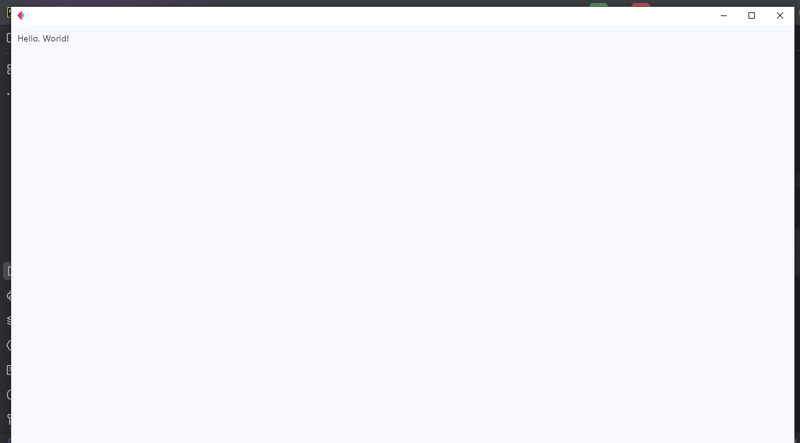
- Create a new Python file: after a successful install, open up your favorite code editor like VS-Code, Pycharm, etc.) and create a new Python file, name it main.py or what you best prefer. Feeling excited? I bet you are! Let’s first test our installation worked with the most beloved phrase in the developer community, “Hello World!”
In our Python file, type in this code
import flet as ft

def main(page: ft.Page):
    page.add(ft.Text(value="Hello, World!"))

ft.app(target=main)
Run the code to see if everything works. If you see “Hello, World!” displayed, you’re ready to move on to building our calculator.
output
CREATING THE LAYOUT
In this section, we’ll be focusing on the structure of the calculator; here we’ll use the column widget to stack our display and buttons. The display will show the current input, and the buttons will allow user interaction. That’s odd I never noticed that UI can mean User Interface to User Interaction.
Now write the code below as follows.
from flet import (
    app, Page, Container, Column, Row,
    TextField, colors, border_radius, ElevatedButton, TextAlign, TextStyle
)


def main(page: Page):
    page.title = "Calculator"
    result = TextField(
        hint_text='0', text_size=20,
        color='white', text_align=TextAlign.RIGHT,
        hint_style=TextStyle(
            color=colors.WHITE, size=20
        ),
        read_only=True
    )

    def button_click(e):
        pass

    button_row0 = Row(
        [
            ElevatedButton(text='C',  on_click=button_click),
            ElevatedButton(text='^',  on_click=button_click),
            ElevatedButton(text='%',  on_click=button_click),
            ElevatedButton(text='/',  on_click=button_click),
        ]
    )
    button_row1 = Row(
        [
            ElevatedButton(text='7',  on_click=button_click),
            ElevatedButton(text='8',  on_click=button_click),
            ElevatedButton(text='9',  on_click=button_click),
            ElevatedButton(text='*',  on_click=button_click),
        ]
    )
    button_row2 = Row(
        [
            ElevatedButton(text='4',  on_click=button_click),
            ElevatedButton(text='5',  on_click=button_click),
            ElevatedButton(text='6',  on_click=button_click),
            ElevatedButton(text='-',  on_click=button_click),
        ]
    )
    button_row3 = Row(
        [
            ElevatedButton(text='1',  on_click=button_click),
            ElevatedButton(text='2',  on_click=button_click),
            ElevatedButton(text='3',  on_click=button_click),
            ElevatedButton(text=' ',  on_click=button_click),
        ]
    )
    button_row4 = Row(
        [
            ElevatedButton(text='0',  on_click=button_click),
            ElevatedButton(text='.',  on_click=button_click),
            ElevatedButton(text='=',  on_click=button_click),
        ]
    )
    container = Container(
        width=350, padding=20,
        bgcolor=colors. BLACK,
        content=Column(
            [
                result,
                button_row0, button_row1, button_row2,
                button_row3, button_row4
            ]
        )
    )
    page.add(container)


if __name__ == '__main__':
    app(target=main)
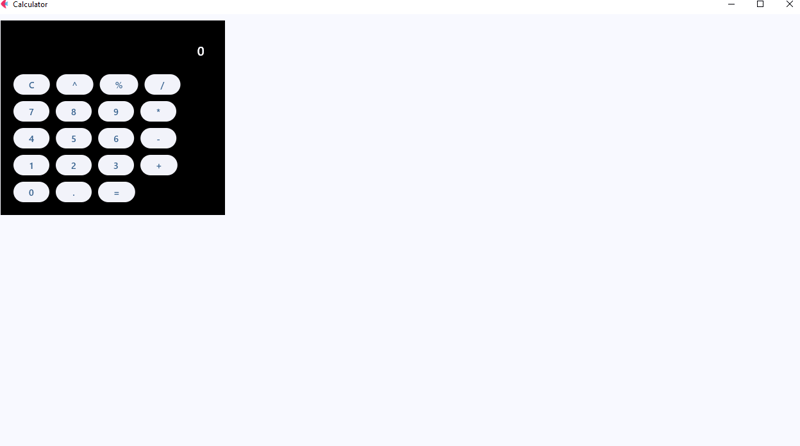
After running the above code, you’ll see the output of the calculator layout, it might not look good but that’s okay! We’ll enhance it by adding some spacing, radius on the container, and theme to make our calculator look more polished.
Output
CODE EXPLANATION
Okay, we have built the layout, right? Well, still I know some of you there didn’t understand what we’ve just done here. Just sit, no questions, and let me explain what the code does.
In the first line, we import our controls. Flet controls are widgets used to lay out our application into a meaningful User Interface. But here we have imported app, Page, Container, Column, Row,
TextField, colors, border_radius, ElevatedButton, TextAlign, TextStyle.
Even though some of them are not entire widgets, like app, colors, border_radius, TextAlign, and TextStyle. These are classes and methods that provide us with extra functionalities of our application, for example
The app, allows us to launch our app in a standalone mode targeting to the main instance of our application.* colors* allow us to style our controls that support the color and bgcolor attribute without us struggling to define their names and border_radius allows us to curve the corners of our containers.
In line 7 we define the main app instance to Page; a page is a container for View Controls. So here I won’t go deep into views since it’s beyond the scope of this tutorial, but you reference here.
We now give the title to our page, with the page.titleattribute, the title on the title bar of our app.
In lines 9-16 is the result control with its required attributes, though it has many, we are gonna use these ones for this project, as you can see we have add a place holder of 0, giving it a size of 20, color to white, align text to right, and the read-only to true so we don’t allow external of soft keyboards to work directly in it.
Line 18 we defined our event handler, button_click this is where we will apply the logic to function our application, eventually making it a working calculator, but for now I just used a pass statement as a placeholder.
From lines 21 – 59, we defined our rows using the Row Widget, the row widget is a control that displays its children in a horizontal array or layout from left to right, similar to the linear layout in Android development, or inline elements in CSS the row controls works in the same way as them, it lays out controls in a horizontal axis or linearly.
Then the ElevatedButton_will represent buttons on the calculator’s UI, but notice we have given it the text and _onclick attributes, the text defines the data that will be displayed on the results when clicked using the onclick attribute that will call for the function button_click to handle events accordingly.
We have the container, the container is a control that will allow us to decorate a control with background color, spacing, applying borders and border radius, and position it with padding, margin, and alignment.
A container follows the box-model concept like the one for CSS as in the figure below,
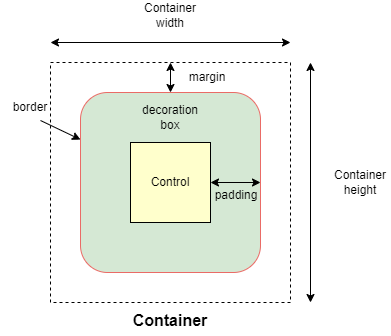
The column control, like the Row control, this one displays its children in a vertical array or layout from top to bottom, this will allow us to vertically lay our buttons in the right order.
Now after defining our UI elements, we need to display them to our application and then call it. We do that by using the page.add() method which allows us to add and build our UI logically.
Then we have to call our app in the stand-alone mode, and that’s what lines 74-75 accomplished.
Adding functionality
Update your button click function to match this code below.
def button_click(e):
        if e.control.text == "=":
            try:
                result.value = str(eval(result.value))
            except Exception:
                result.value = "Error"
        elif e.control.text == "C":
            result.value = ""
        # elif e.control.text == "^":
        # logic for powers
        # pass
        else:
            result.value  = e.control.text
        result.update()
CODE EXPLANATION
Okay, what does this code do under the hood; the button_click function is designed to handle various button click events within our calculator app.
Save to apply our current changes then run the calculator and see the results.
Here is a breakdown of how the code works
- Retrieving the button text: when a button is clicked, the function retrieves the button’s text (e.g., ‘1’, ‘2’, ‘ ’, ‘-‘, ‘C’, ‘=’) through the e.control.text. this tells the functions which button the user has interacted with
- Clearing the display: when the user clicks the ‘C’ button, the calculator’s input is cleared. The result is set to an empty string (“”), and the display is reset to 0. This effectively clears the display making the calculator ready for a new input. Talk but a fresh number meal.
- Evaluating expressions: if the user clicks the “=” button, the calculator needs to evaluate the current mathematical expression, here we used the str() and eval() functions, and the str() function houses the eval() function so that the result is directly converted into a string and theeval() function will compute the result of the expression, then displayed as a string to our calculator’s display. Or else if the expression is invalid, an exception is caught, and the “Error” message will be displayed instead.
- For the rest of the buttons like numbers and operators: the function will append the button’s text to the display (which is initially “0” or when cleared), it replaces “0” with the button value, otherwise it adds button value to the end of the display.
- After processing the button click, the page is updated via page.update() method call to refresh the UI and show the updated input or result on the calculator's display. So every time you click the button and see the value on the display or a result, this is what the page.update() does.
NOTE: The eval() function is a quick way to evaluate expression but it can be risky with un-trusted input because it executes/evaluates any Python code. In a more secure app, you’d use a safer method for evaluating mathematical expressions.
Exercise: test your knowledge, of how would you handle the exponent ‘^’ expression so that if the user clicks the exponent button it returns the required output. For example, if the user inputs 2^2 the output will be 4, 5^5=25, and 3^4=81. You get the idea.
Let me know how you approached to this problem in the comments, okay, all done, let’s continue.
Improving our UI
Previously the user interface did not look that catchy and awesome, so let’s improve it, and update the buttons to match the following code.
button_row0 = Row(
    [
        ElevatedButton(text='C', expand=1, on_click=button_click,
                       bgcolor=colors.RED_ACCENT, color=colors.WHITE),
        ElevatedButton(text='^', expand=1, on_click=button_click,
                       bgcolor=colors.BLUE_ACCENT_100,
                       color=colors.RED_900
                       ),
        ElevatedButton(text='%', expand=1, on_click=button_click,
                       bgcolor=colors.BLUE_ACCENT_100,
                       color=colors.RED_900
                       ),
        ElevatedButton(text='/', expand=1, on_click=button_click,
                       bgcolor=colors.BLUE_ACCENT_100,
                       color=colors.RED_900
                       ),
    ]
)
button_row1 = Row(
    [
        ElevatedButton(text='7', expand=1, on_click=button_click),
        ElevatedButton(text='8', expand=1, on_click=button_click),
        ElevatedButton(text='9', expand=1, on_click=button_click),
        ElevatedButton(text='*', expand=1, on_click=button_click,
                       bgcolor=colors.BLUE_ACCENT_100,
                       color=colors.RED_900
                       ),
    ]
)
button_row2 = Row(
    [
        ElevatedButton(text='4', expand=1, on_click=button_click),
        ElevatedButton(text='5', expand=1, on_click=button_click),
        ElevatedButton(text='6', expand=1, on_click=button_click),
        ElevatedButton(text='-', expand=1, on_click=button_click,
                       bgcolor=colors.BLUE_ACCENT_100
                       ),
    ]
)
button_row3 = Row(
    [
        ElevatedButton(text='1', expand=1, on_click=button_click),
        ElevatedButton(text='2', expand=1, on_click=button_click),
        ElevatedButton(text='3', expand=1, on_click=button_click),
        ElevatedButton(text=' ', expand=1, on_click=button_click,
                       bgcolor=colors.BLUE_ACCENT_100,
                       color=colors.RED_900),
    ]
)
button_row4 = Row(
    [
        ElevatedButton(text='0', expand=1, on_click=button_click),
        ElevatedButton(text='.', expand=1, on_click=button_click),
        ElevatedButton(
            text='=', expand=2, on_click=button_click,
            bgcolor=colors.GREEN_ACCENT, color=colors.AMBER
        ),
    ]
)
What have we changed exactly, hmm!
For the buttons, we could have used the width attribute but that won’t work as we want it would break the UI, feel free to test it.
But we have this expand attribute which allows only a Boolean and an int data type value.
For the normal buttons like the operators, numbers, and the clear button we expanded them to 1, and for the equals button, we expanded it by 2.
Now what does the expand attribute do, the expand attribute allows a control to fill the available space in a given container.
So the buttons with expand 1 will have an equal size of width and for the equals button it will expand 2, or in simple terms span two buttons or will equal two buttons in width.
Notice that we have added colors and background colors to some of our buttons to make them stand out from the numbers buttons.
Understand, great.
In the container add these attributes, just after the padding attribute to make it look more appealing and user friendly.
border_radius=border_radius.all(20),
Output
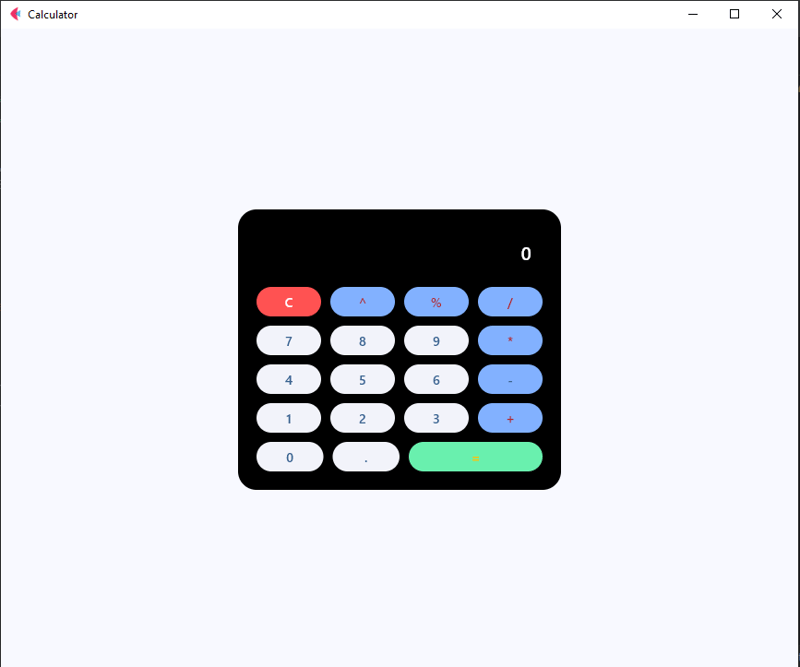
Now, you have a fully functional calculator built with Flet! Feel free to customize it to your liking or add more features. You can even package it as a standalone APK, AAB to launch on Google Play Store or Apple App Store
Here is the full code,
from flet import (
    app, Page, Container, Column, Row,
    TextField, colors, border_radius, ElevatedButton, TextAlign, TextStyle
)
from flet_core import ThemeMode


def main(page: Page):
    page.title = "Calculator"
    page.theme_mode = ThemeMode.DARK
    page.horizontal_alignment = page.vertical_alignment = 'center'
    result = TextField(
        hint_text='0', text_size=20,
        color='white', text_align=TextAlign.RIGHT,
        hint_style=TextStyle(
            color=colors.WHITE, size=20
        ),
        read_only=True
    )

    def button_click(e):
        if e.control.text == "=":
            try:
                result.value = str(eval(result.value))
            except Exception:
                result.value = "Error"
        elif e.control.text == "C":
            result.value = ""
        # elif e.control.text == "^":
        # logic for powers
        # pass
        else:
            result.value  = e.control.text
        result.update()

    button_row0 = Row(
        [
            ElevatedButton(text='C', expand=1, on_click=button_click,
                           bgcolor=colors.RED_ACCENT, color=colors.WHITE),
            ElevatedButton(text='^', expand=1, on_click=button_click,
                           bgcolor=colors.BLUE_ACCENT_100,
                           color=colors.RED_900
                           ),
            ElevatedButton(text='%', expand=1, on_click=button_click,
                           bgcolor=colors.BLUE_ACCENT_100,
                           color=colors.RED_900
                           ),
            ElevatedButton(text='/', expand=1, on_click=button_click,
                           bgcolor=colors.BLUE_ACCENT_100,
                           color=colors.RED_900
                           ),
        ]
    )
    button_row1 = Row(
        [
            ElevatedButton(text='7', expand=1, on_click=button_click),
            ElevatedButton(text='8', expand=1, on_click=button_click),
            ElevatedButton(text='9', expand=1, on_click=button_click),
            ElevatedButton(text='*', expand=1, on_click=button_click,
                           bgcolor=colors.BLUE_ACCENT_100,
                           color=colors.RED_900
                           ),
        ]
    )
    button_row2 = Row(
        [
            ElevatedButton(text='4', expand=1, on_click=button_click),
            ElevatedButton(text='5', expand=1, on_click=button_click),
            ElevatedButton(text='6', expand=1, on_click=button_click),
            ElevatedButton(text='-', expand=1, on_click=button_click,
                           bgcolor=colors.BLUE_ACCENT_100
                           ),
        ]
    )
    button_row3 = Row(
        [
            ElevatedButton(text='1', expand=1, on_click=button_click),
            ElevatedButton(text='2', expand=1, on_click=button_click),
            ElevatedButton(text='3', expand=1, on_click=button_click),
            ElevatedButton(text=' ', expand=1, on_click=button_click,
                           bgcolor=colors.BLUE_ACCENT_100,
                           color=colors.RED_900),
        ]
    )
    button_row4 = Row(
        [
            ElevatedButton(text='0', expand=1, on_click=button_click),
            ElevatedButton(text='.', expand=1, on_click=button_click),
            ElevatedButton(
                text='=', expand=2, on_click=button_click,
                bgcolor=colors.GREEN_ACCENT, color=colors.AMBER
            ),
        ]
    )
    container = Container(
        width=350, padding=20,
        bgcolor=colors.BLACK, border_radius=border_radius.all(20),
        content=Column(
            [
                result,
                button_row0, button_row1, button_row2,
                button_row3, button_row4
            ]
        )
    )
    page.add(container)


if __name__ == '__main__':
    app(target=main)
Conclusion
Building this calculator has been a fun experience for me and a learning experience for you, and I hope you enjoyed it too.
Let me know what kind of project you’d like to build using this framework or any other like PyQt, Kivy, or Tkinter. I’d be glad to make a tutorial on it. Or even web design and development tutorials, also are allowed.
Feel free to ask questions, I’ll do my best to answer them.
If you've read this far, thank you—I appreciate it!
-
 如何高效地在一个事务中插入数据到多个MySQL表?mySQL插入到多个表中,该数据可能会产生意外的结果。虽然似乎有多个查询可以解决问题,但将从用户表的自动信息ID与配置文件表的手动用户ID相关联提出了挑战。使用Transactions和last_insert_id() 插入用户(用户名,密码)值('test','test...编程 发布于2025-07-13
 -
Python中嵌套函数与闭包的区别是什么嵌套函数与python 在python中的嵌套函数不被考虑闭合,因为它们不符合以下要求:不访问局部范围scliables to incling scliables在封装范围外执行范围的局部范围。 make_printer(msg): DEF打印机(): 打印(味精) ...编程 发布于2025-07-13
-
Go web应用何时关闭数据库连接?在GO Web Applications中管理数据库连接很少,考虑以下简化的web应用程序代码:出现的问题:何时应在DB连接上调用Close()方法?,该特定方案将自动关闭程序时,该程序将在EXITS EXITS EXITS出现时自动关闭。但是,其他考虑因素可能保证手动处理。选项1:隐式关闭终止数...编程 发布于2025-07-13
-
如何使用FormData()处理多个文件上传?)处理多个文件输入时,通常需要处理多个文件上传时,通常是必要的。 The fd.append("fileToUpload[]", files[x]); method can be used for this purpose, allowing you to send multi...编程 发布于2025-07-13
-
如何从Python中的字符串中删除表情符号:固定常见错误的初学者指南?从python import codecs import codecs import codecs 导入 text = codecs.decode('这狗\ u0001f602'.encode('utf-8'),'utf-8') 印刷(文字)#带有...编程 发布于2025-07-13
-
如何正确使用与PDO参数的查询一样?在pdo 中使用类似QUERIES在PDO中的Queries时,您可能会遇到类似疑问中描述的问题:此查询也可能不会返回结果,即使$ var1和$ var2包含有效的搜索词。错误在于不正确包含%符号。通过将变量包含在$ params数组中的%符号中,您确保将%字符正确替换到查询中。没有此修改,PDO...编程 发布于2025-07-13
-
如何使用Depimal.parse()中的指数表示法中的数字?在尝试使用Decimal.parse(“ 1.2345e-02”中的指数符号表示法表示的字符串时,您可能会遇到错误。这是因为默认解析方法无法识别指数符号。 成功解析这样的字符串,您需要明确指定它代表浮点数。您可以使用numbersTyles.Float样式进行此操作,如下所示:[&& && && ...编程 发布于2025-07-13
-
为什么尽管有效代码,为什么在PHP中捕获输入?在php ;?>" method="post">The intention is to capture the input from the text box and display it when the submit button is clicked.但是,输出...编程 发布于2025-07-13
-
如何简化PHP中的JSON解析以获取多维阵列?php 试图在PHP中解析JSON数据的JSON可能具有挑战性,尤其是在处理多维数组时。 To simplify the process, it's recommended to parse the JSON as an array rather than an object.To do...编程 发布于2025-07-13
-
Java的Map.Entry和SimpleEntry如何简化键值对管理?A Comprehensive Collection for Value Pairs: Introducing Java's Map.Entry and SimpleEntryIn Java, when defining a collection where each element com...编程 发布于2025-07-13
-
如何限制动态大小的父元素中元素的滚动范围?在交互式接口中实现垂直滚动元素的CSS高度限制问题:考虑一个布局,其中我们具有与用户垂直滚动一起移动的可滚动地图div,同时与固定的固定sidebar保持一致。但是,地图的滚动无限期扩展,超过了视口的高度,阻止用户访问页面页脚。$("#map").css({ marginT...编程 发布于2025-07-13
-
PHP与C++函数重载处理的区别作为经验丰富的C开发人员脱离谜题,您可能会遇到功能超载的概念。这个概念虽然在C中普遍,但在PHP中构成了独特的挑战。让我们深入研究PHP功能过载的复杂性,并探索其提供的可能性。在PHP中理解php的方法在PHP中,函数超载的概念(如C等语言)不存在。函数签名仅由其名称定义,而与他们的参数列表无关。...编程 发布于2025-07-13
-
如何在GO编译器中自定义编译优化?在GO编译器中自定义编译优化 GO中的默认编译过程遵循特定的优化策略。 However, users may need to adjust these optimizations for specific requirements.Optimization Control in Go Compi...编程 发布于2025-07-13
-
如何实时捕获和流媒体以进行聊天机器人命令执行?在开发能够执行命令的chatbots的领域中,实时从命令执行实时捕获Stdout,一个常见的需求是能够检索和显示标准输出(stdout)在cath cath cant cant cant cant cant cant cant cant interfaces in Chate cant inter...编程 发布于2025-07-13
-
如何使用组在MySQL中旋转数据?在关系数据库中使用mySQL组使用mySQL组进行查询结果,在关系数据库中使用MySQL组,转移数据的数据是指重新排列的行和列的重排以增强数据可视化。在这里,我们面对一个共同的挑战:使用组的组将数据从基于行的基于列的转换为基于列。 Let's consider the following ...编程 发布于2025-07-13


学习中文
- 1 走路用中文怎么说?走路中文发音,走路中文学习
- 2 坐飞机用中文怎么说?坐飞机中文发音,坐飞机中文学习
- 3 坐火车用中文怎么说?坐火车中文发音,坐火车中文学习
- 4 坐车用中文怎么说?坐车中文发音,坐车中文学习
- 5 开车用中文怎么说?开车中文发音,开车中文学习
- 6 游泳用中文怎么说?游泳中文发音,游泳中文学习
- 7 骑自行车用中文怎么说?骑自行车中文发音,骑自行车中文学习
- 8 你好用中文怎么说?你好中文发音,你好中文学习
- 9 谢谢用中文怎么说?谢谢中文发音,谢谢中文学习
- 10 How to say goodbye in Chinese? 再见Chinese pronunciation, 再见Chinese learning


