使用 VAKX 构建您的无代码 AI 代理
If you’ve been keeping up with the AI space, you already know that AI agents are becoming a game-changer in the world of automation and customer interaction. These assistants can handle everything from answering basic customer queries to performing complex, context-aware tasks. At VAKX, we’ve made it easier than ever for developers and businesses to build their own AI agents without deep AI expertise. Today, I want to share a personal look at how to go about building your own AI agent using the VAKX platform.
Before diving into the integration process, I recommend exploring VAKX and interacting with our AI chat to gain a comprehensive understanding:
VAKX
Step-by-Step Guide to Building Your Own AI Agent with VAKX
Step 1: Get Started
Log in to VAKStudio
Step 2: Create a Prompt Template
- Go to the “Prompt Playground” tab.
- Click the “Create Prompt” button in the top-right corner to create a new prompt.
- Name the prompt “FoodSprint RAG Prompt” and leave the Description field blank for now.
- Click “Create Prompt” to save it.

Step 3: Add a RAG Prompt
While there are multiple options in the prompt template, we’ll focus on adding RAG context to the prompt for this tutorial.
- Once you create a prompt, you will be automatically redirected to the newly created prompt page, where you can configure its settings.
- To do this, click the “Add Context” button under the “Add RAG Context” section. This will automatically load the preset embedding context prompt.
- If you’d like to modify or review the context prompt, click the “Config” button.
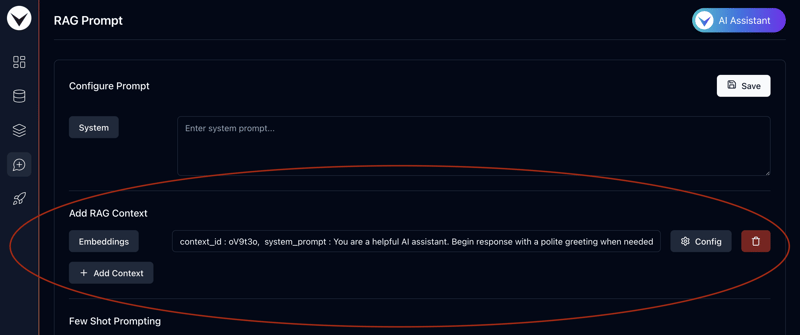
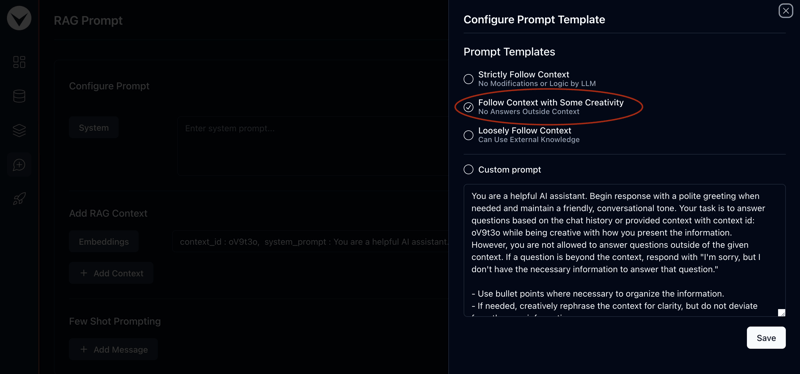
A side panel will open where you can toggle between pre-loaded prompt templates with context IDs or create a custom prompt for embedding context.
For this tutorial, we’ll proceed with the default prompt, “Follow Context With Some Creativity.”
Close the config panel and click “Save” in the top-right corner to apply your changes.
Step 4: Uploading Markdown & CSV files
- To generate embeddings for the prompt context, we’ll first need to upload a Markdown files with custom data to the datastore. For this tutorial, we’ll use a simple dataset to create an AI assistant for FoodSprint.
- Download the files by clicking the following links. We’ll use these Markdown & CSV files to create vector embeddings: Download — FoodSprint.md Download — FoodSprint_menu.md Download — FoodSprint_structured.csv
Next, head over to VAKStudio and navigate to the Datastore tab in the sidebar. Then, click on the “Markdown Files” tab at the top-left corner.
Click the “Create Folder” button, enter “FoodSprint Files” as the name, and then click “Create Folder” to confirm.
Next, click on the folder to open it.
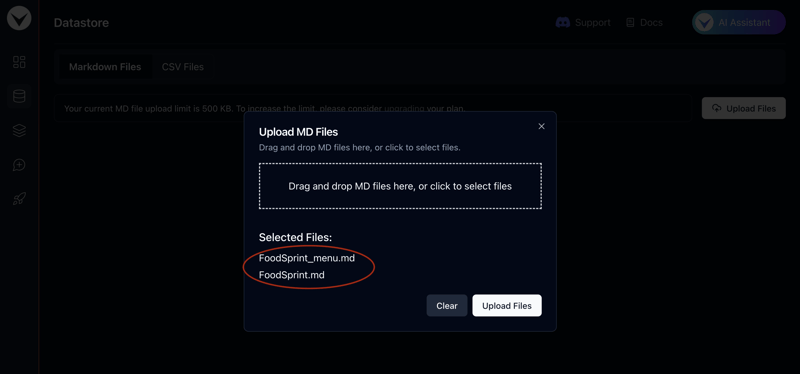
Once inside, click the “Upload Files” button at the top-right corner.
Drag and drop the FoodSprint.md and FoodSprint_menu.md files you just downloaded.
Finally, click “Upload Files” to complete the upload.
Follow these steps to upload your CSV file:
- Go to the Datastore tab in the sidebar.
- In the top-left corner, click on the “CSV Files” tab.
- Click the “Create Folder” button, enter “FoodSprint CSV” as the folder name, and then click “Create Folder” to confirm.
- Open the newly created folder by clicking on it.
- Inside the folder, click the “Upload Files” button located at the top-right corner.
- Drag and drop the FoodSprint_structured.csv file you just downloaded.
- Finally, click “Upload Files” to finish the upload.
Step 5: Creating Vector Embeddings
With the Markdown files uploaded, let’s proceed to create vector embeddings from it.
- Go to VAKStudio and open the Vector Database tab from the sidebar.
- To generate new vector embeddings, click the “New Embeddings” button in the top-right corner.
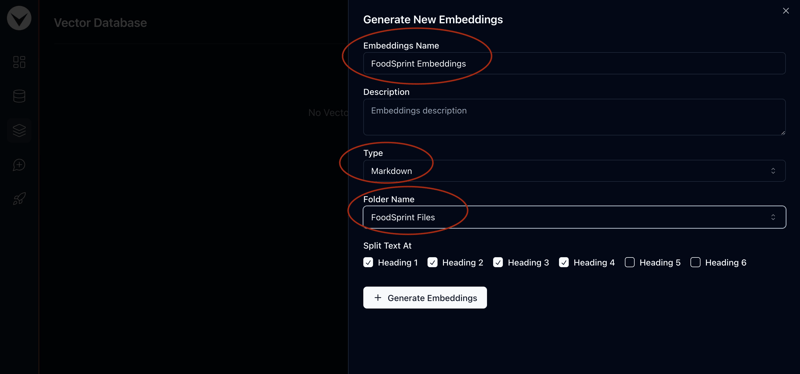
- Name it FoodSprint Embeddings and provide an appropriate description.
- Select Markdown as the type from the dropdown menu and choose FoodSprint Files as the Folder Name. Keep all other settings as default for this tutorial.
- Click “Generate Embeddings” to start the process. The creation may take a few seconds, so please wait while the embeddings are generated.
Now, to create structured vector embeddings, follow these steps:
- Go to VAKStudio and navigate to the Vector Database tab in the sidebar.
- Click the “New Embeddings” button located at the top-right corner.
- Name the embedding “FoodSprint Structured Embeddings” and add an appropriate description.
- From the dropdown menu, select CSV as the file type and choose FoodSprint CSV as the folder name.
- Leave the rest of the settings as default for this tutorial.
- Click “Generate Embeddings” to begin the process. Please wait a few moments while the embeddings are being generated.
Step 6: Creating a VAKFlow
With everything set, it’s time to create your VAKFlow.
- Go to the VAKFlow Playground from the sidebar.
- Click the “Create VAKFlow” button in the top-right corner to start a new flow.
- Name it “FoodSprint RAG VAKFlow” and add a suitable description.
- Click “Create VAKFlow” to complete the setup.
Step 7: Building a RAG Chatbot
Now that everything is ready, let’s create the RAG Chatbot.
- Open the newly created VAKFlow by selecting “Create VAKFlow” from the list. This will take you to the drag-and-drop LLM orchestration playground.
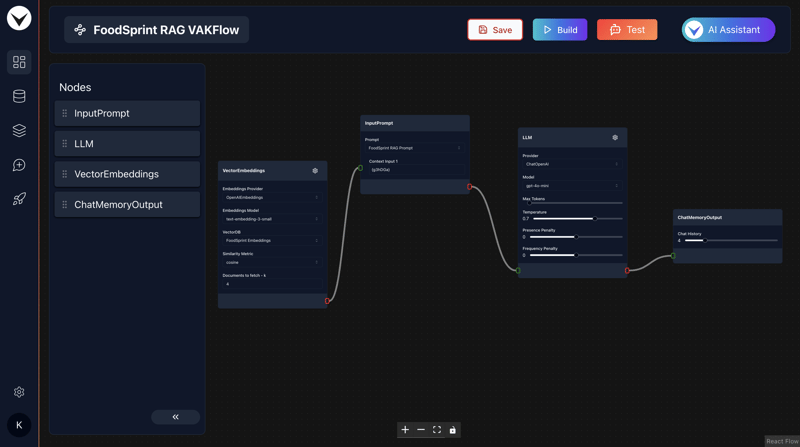
- Drag and drop four nodes from left to right: VectorEmbeddings, InputPrompt, LLM, and ChatMemoryOutput.
- In the VectorEmbeddings node, select FoodSprint Embeddings from the VectorDB dropdown.
- In the InputPrompt node, choose the “FoodSprint RAG Prompt” template from the dropdown to use the prompt created in Step 3.
- Connect the output (red edge) of the VectorEmbeddings node to the Context input 1 (green edge) of the InputPrompt node.
- Connect the output (red edge) of the InputPrompt node to the input (green edge) of the LLM node.
- Then, connect the output (red edge) of the LLM node to the input (green edge) of the ChatMemoryOutput node.
- Finally, click “Save” in the top-right corner to save your VAKFlow.
Step 8: Adding VAKSearch For Rich Results
To enable rich results in your chatbot, follow these steps to add the VAKSearch node:
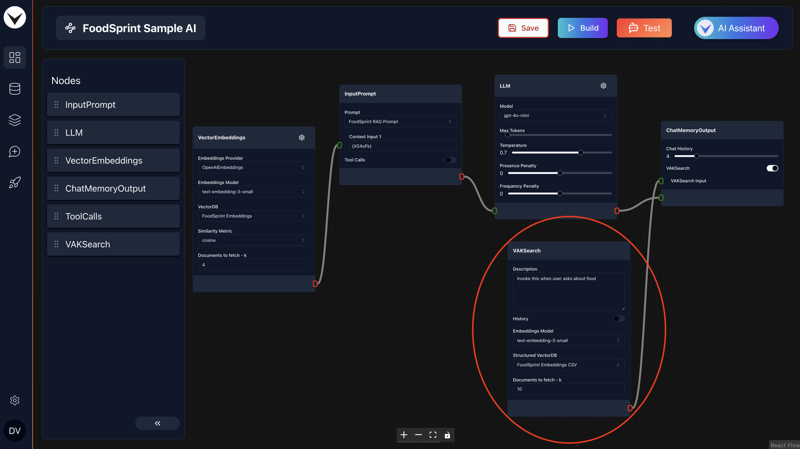
- Drag and drop the VAKSearch node into your workflow.
- Enable the VAKSearch toggle on the ChatMemoryOutput node, and connect the VAKSearch node to it.
- In the VAKSearch node, select FoodSprint Embeddings CSV from the Structured VectorDB dropdown.
- Add the following line to the Description field of the VAKSearch node:
- Invoke this when user asks about food and the message does not contain the phrase "Order Now".
Step 9: Transforming the Chatbot into an AI Agent
An AI agent is a software entity that autonomously performs tasks, makes decisions, and interacts with its environment using artificial intelligence. It processes inputs, applies reasoning, and takes action to meet specific objectives in dynamic settings.
Here’s how to build a simple AI agent by adding tool calls to your chatbot:
To add tool calls, enable the Tool Calls toggle in the InputPrompt node.
Drag and drop the ToolCalls node, and connect its red edge to the ToolCalls Input on the InputPrompt node.
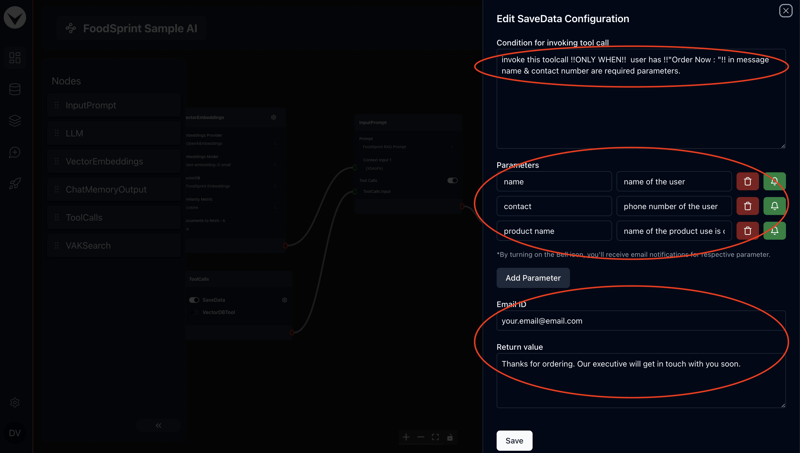
Enable the SaveData tool call, then click on the settings icon to configure it.
In the Condition for invoking tool call, enter:
invoke this toolcall !!ONLY WHEN!! user has !!"Order Now : "!! in message, name & contact number are required parameters.
Click Add Parameter three times to add three parameters:
- First parameter: set key as name and description as name of the user.
- Second parameter: set key as contact and description as phone number of the user.
- Third parameter: set key as product name and description as name of the product user is ordering. For each parameter, click the bell icon and add an email address in the field below to receive notifications when an order is placed. In the Return value field, enter: Thanks for ordering. Our executive will get in touch with you soon.
Finally, click Save to apply the changes.
Step 10: Build & Testing
Now let’s build the VAKFlow by clicking on “Build” button at the top-right corner, and you are ready to test the AI Chatbot.
To test the AI Chatbot, click on “Test” button at the top right of the screen. This will open up a chat popup to interact with AI Chatbot.
Try chatting with AI Chatbot. Few sample queries are :
- What are the starter options available?
- Give me Mexican dessert options
- How much time it will take to get delivery?
- I want refund

And that’s it! Your Chatbot is now ready to use!
What Next?
- Have fun playing & experimenting with it!
- Experiment with prompt templates to build unique & interesting LLM applications.
- Experiment with different tunable paramters of nodes.
- Deploying VAKFlows
To deploy a VAKFlow, follow these steps:
Go to the Deployment Dashboard.
Click on the New Deployment button at the top-right corner. This will open up a popup.
A list of VAKFlows ready for deployment will be displayed. Ensure the VAKFlow you want to deploy has already been built.
Select the VAKFlow from the list and click on the Deploy button.
You can configure the AI parameters like AI image, Name, Or allowed domains.
If you want to share this AI with your friends you can also enable the App and share the link (or QR code).
Integration Options
Vanilla Js
You can copy the vanilla js integration code directly from the vanillajs option from integration options. There you’ll have all the variables configured by default.
Otherwise following is the code snippet:
`
`
Make sure to replace the VAKFlowID with your own VAKFlowID.
ReactJS
For react integration visit this link.
Make sure to replace the VAKFlowID with your own VAKFlowID.
About the Author:
Ganesh is the founder of VAKX, a platform designed to make building AI-powered assistants accessible to everyone. With a background in AI solutions, he’s passionate about helping businesses automate tasks and scale operations through intelligent assistants.
Reach me at [email protected]
Thank you!
-
 Android如何向PHP服务器发送POST数据?在android apache httpclient(已弃用) httpclient httpclient = new defaulthttpclient(); httppost httppost = new httppost(“ http://www.yoursite.com/script.p...编程 发布于2025-04-05
 -
 在GO中构造SQL查询时,如何安全地加入文本和值?在go中构造文本sql查询时,在go sql queries 中,在使用conting and contement和contement consem per时,尤其是在使用integer per当per当per时,per per per当per. [&&&&&&&&&&&&&&&&默元组方法在...编程 发布于2025-04-05
 -
 如何有效地转换PHP中的时区?在PHP 利用dateTime对象和functions DateTime对象及其相应的功能别名为时区转换提供方便的方法。例如: //定义用户的时区 date_default_timezone_set('欧洲/伦敦'); //创建DateTime对象 $ dateTime = ne...编程 发布于2025-04-05
 -
 如何将来自三个MySQL表的数据组合到新表中?mysql:从三个表和列的新表创建新表 答案:为了实现这一目标,您可以利用一个3-way Join。 选择p。*,d.content作为年龄 来自人为p的人 加入d.person_id = p.id上的d的详细信息 加入T.Id = d.detail_id的分类法 其中t.taxonomy =...编程 发布于2025-04-05
 -
 eval()vs. ast.literal_eval():对于用户输入,哪个Python函数更安全?称量()和ast.literal_eval()中的Python Security 在使用用户输入时,必须优先确保安全性。强大的python功能eval()通常是作为潜在解决方案而出现的,但担心其潜在风险。本文深入研究了eval()和ast.literal_eval()之间的差异,突出显示其安全性含义...编程 发布于2025-04-05
 -
 如何使用PHP从XML文件中有效地检索属性值?从php $xml = simplexml_load_file($file); foreach ($xml->Var[0]->attributes() as $attributeName => $attributeValue) { echo $attributeName,...编程 发布于2025-04-05
 -
 如何从PHP中的Unicode字符串中有效地产生对URL友好的sl。为有效的slug生成首先,该函数用指定的分隔符替换所有非字母或数字字符。此步骤可确保slug遵守URL惯例。随后,它采用ICONV函数将文本简化为us-ascii兼容格式,从而允许更广泛的字符集合兼容性。接下来,该函数使用正则表达式删除了不需要的字符,例如特殊字符和空格。此步骤可确保slug仅包含...编程 发布于2025-04-05
 -
 如何简化PHP中的JSON解析以获取多维阵列?php 试图在PHP中解析JSON数据的JSON可能具有挑战性,尤其是在处理多维数组时。 To simplify the process, it's recommended to parse the JSON as an array rather than an object.To do...编程 发布于2025-04-05
 -
 如何使用node-mysql在单个查询中执行多个SQL语句?在node-mysql node-mysql文档最初出于安全原因最初禁用多个语句支持,因为它可能导致SQL注入攻击。要启用此功能,您需要在创建连接时将倍增设置设置为true: var connection = mysql.createconnection({{multipleStatement:...编程 发布于2025-04-05
 -
 PHP阵列键值异常:了解07和08的好奇情况PHP数组键值问题,使用07&08 在给定数月的数组中,键值07和08呈现令人困惑的行为时,就会出现一个不寻常的问题。运行print_r($月份)返回意外结果:键“ 07”丢失,而键“ 08”分配给了9月的值。此问题源于PHP对领先零的解释。当一个数字带有0(例如07或08)的前缀时,PHP将...编程 发布于2025-04-05
 -
 如何将MySQL数据库添加到Visual Studio 2012中的数据源对话框中?在Visual Studio 2012 尽管已安装了MySQL Connector v.6.5.4,但无法将MySQL数据库添加到实体框架的“ DataSource对话框”中。为了解决这一问题,至关重要的是要了解MySQL连接器v.6.5.5及以后的6.6.x版本将提供MySQL的官方Visual...编程 发布于2025-04-05
 -
 如何从PHP中的数组中提取随机元素?从阵列中的随机选择,可以轻松从数组中获取随机项目。考虑以下数组:; 从此数组中检索一个随机项目,利用array_rand( array_rand()函数从数组返回一个随机键。通过将$项目数组索引使用此键,我们可以从数组中访问一个随机元素。这种方法为选择随机项目提供了一种直接且可靠的方法。编程 发布于2025-04-05
 -
 在细胞编辑后,如何维护自定义的JTable细胞渲染?在JTable中维护jtable单元格渲染后,在JTable中,在JTable中实现自定义单元格渲染和编辑功能可以增强用户体验。但是,至关重要的是要确保即使在编辑操作后也保留所需的格式。在设置用于格式化“价格”列的“价格”列,用户遇到的数字格式丢失的“价格”列的“价格”之后,问题在设置自定义单元格...编程 发布于2025-04-05
 -
 为什么我在Silverlight Linq查询中获得“无法找到查询模式的实现”错误?查询模式实现缺失:解决“无法找到”错误在Silverlight应用程序中,尝试使用LINQ建立LINQ连接以错误而实现的数据库”,无法找到查询模式的实现。”当省略LINQ名称空间或查询类型缺少IEnumerable 实现时,通常会发生此错误。 解决问题来验证该类型的质量是至关重要的。在此特定实例中...编程 发布于2025-04-05
学习中文
- 1 走路用中文怎么说?走路中文发音,走路中文学习
- 2 坐飞机用中文怎么说?坐飞机中文发音,坐飞机中文学习
- 3 坐火车用中文怎么说?坐火车中文发音,坐火车中文学习
- 4 坐车用中文怎么说?坐车中文发音,坐车中文学习
- 5 开车用中文怎么说?开车中文发音,开车中文学习
- 6 游泳用中文怎么说?游泳中文发音,游泳中文学习
- 7 骑自行车用中文怎么说?骑自行车中文发音,骑自行车中文学习
- 8 你好用中文怎么说?你好中文发音,你好中文学习
- 9 谢谢用中文怎么说?谢谢中文发音,谢谢中文学习
- 10 How to say goodbye in Chinese? 再见Chinese pronunciation, 再见Chinese learning


