
{blog.title}
{new Date(blog.publishedAt).toDateString()}
{blog.metadata.slice(0, 140)}...
 浏览:513
A blog without a CMS can lead to endless frustration and wasted time. Sanity.io simplifies the entire process, allowing you to focus on your content.
In today's article, you will learn how to build a blog with Sanity CMS and Next.js 14.
By the end of this guide, you'll have a fully functional and easily manageable blog up and running.
To follow along with this article you have to have the following skills:
Sanity is a headless CMS that makes content management straightforward and efficient. With Sanity Studio's intuitive dashboard, you can easily create, edit, and organize your content the way you want.
Sanity also offers a flexible API and webhook support, giving you full control over how and where your content is delivered. Whether it's a website, mobile app, or any other platform, Sanity ensures your content is always up-to-date and accessible.
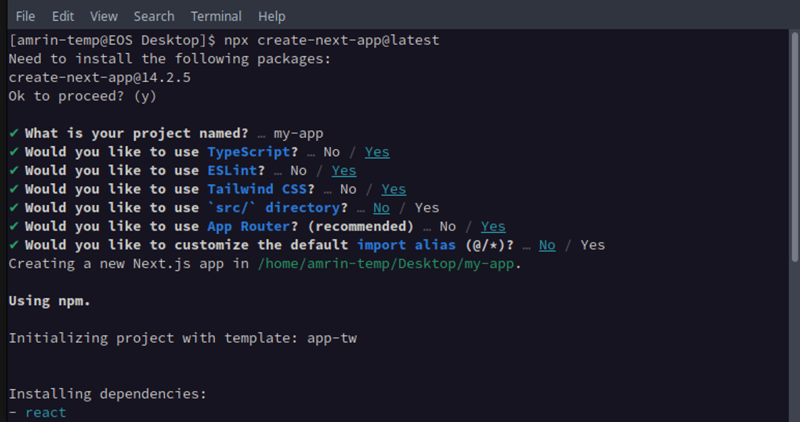
We are integrating Sanity into a Next.js project. So, we need to set up a next.js project first.
To create a next.js project run this command below:
npx create-next-app@latest
Follow the instructions on the terminal and choose the name, after that, you can go with the default suggestion.
This will generate a bare-bone Next.js project.
Now, let’s open the project on our code editor.
cd sanity-blog
code .
Now run the dev command to open up the project on Localhost:3000
npm run dev
Sanity Studio is the dashboard where you manage your content.
You can build the Studio and deploy it independently. But we will embed the Studio inside our Next.js project. It’s easy to maintain and use.
So, we will create a Sanity project and then integrate it within our Next.js project.
Run this command to initialize a Sanity project.
npm create sanity@latest
When you run this command you will be asked to login to Sanity. If you already have an account then choose a provider and login to your account.
If you don’t have an account go ahead and create an account and run the installation command once again.
Once you run this command it will ask you a bunch of questions to configure your project.
You can go with the default options.
We only need the name of the project and the rest is not that important.
Looks like you already have a Sanity-account. Sweet!

✔ Fetching existing projects
? Select project to use Create new project
? Your project name: sanity-blog
Your content will be stored in a dataset that can be public or private, depending on
whether you want to query your content with or without authentication.
The default dataset configuration has a public dataset named "production".
? Use the default dataset configuration? Yes
✔ Creating dataset
? Project output path: /home/amrin/Desktop/writing/sanity-blog
? Select project template Clean project with no predefined schema types
? Do you want to use TypeScript? Yes
✔ Bootstrapping files from template
✔ Resolving latest module versions
✔ Creating default project files
? Package manager to use for installing dependencies? npm
Running 'npm install --legacy-peer-deps'
Before we integrate sanity studio into our Next.js blog we need to install these dependencies.
npm install sanity next-sanity --save
To integrate Sanity into Next.js we need the projectName and the projectID. We can get that from the Sanity dashboard.
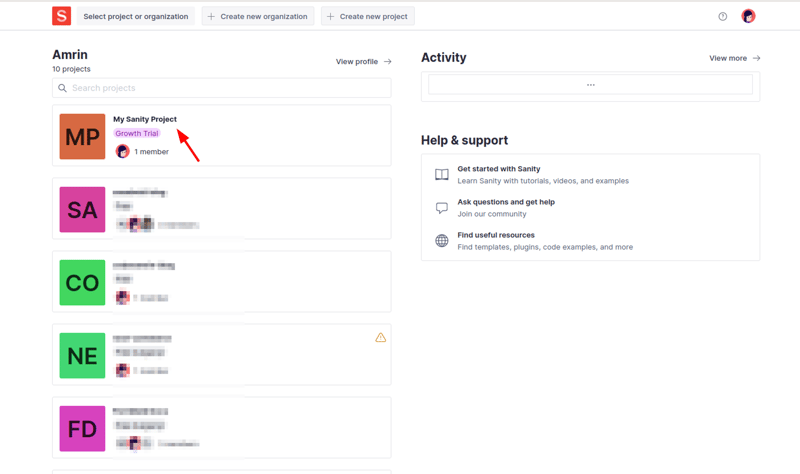
Go to sanity.io/manage you will see all the projects there.
Click on the project title to see the details.
You will see something like this:
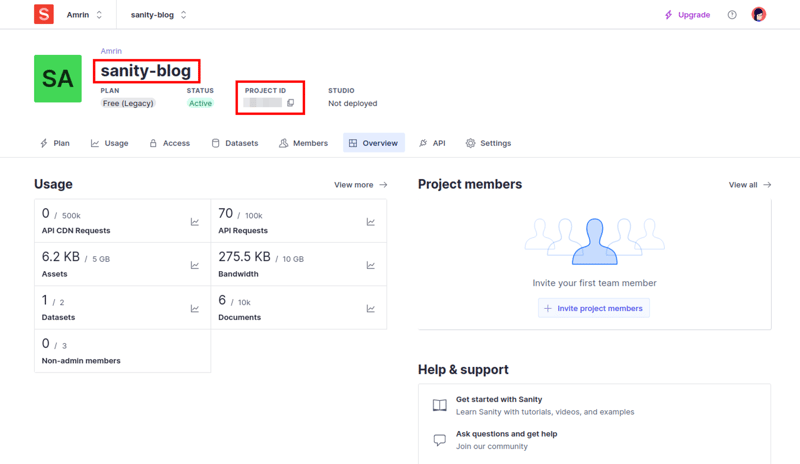
Go ahead and copy the project name and the ProjectID and add those to your .env file
NEXT_PUBLIC_SANITY_PROJECT_TITLE = "";
NEXT_PUBLIC_SANITY_PROJECT_ID = "";
Now create the config file on the root of your project folder. And name it sanity.config.ts
import { defineConfig } from "sanity";
import {structureTool} from "sanity/structure";
import schemas from "@/sanity/schemas";

const config = defineConfig({
  projectId: process.env.NEXT_PUBLIC_SANITY_PROJECT_ID as string,
  title: process.env.NEXT_PUBLIC_SANITY_PROJECT_TITLE as string,
  dataset: "production",
  apiVersion: "2023-06-18",
  basePath: "/admin",
  plugins: [structureTool()],
  schema: { types: schemas },
});

export default config;
Here’s a quick overview of what’s in the config file:
First import the required functions and files. Then define the Config. The config comes with many options:
projectId: It is the Sanity project ID you created earlier.
title: Your Sanity project title.
dataset: Defining dataset for the Studio.
basePath: The path for the Studio. We are using the /admin route to access the Studio. You can choose any route you want.
schema: These are the schemas for the content. A schema defines how a document will look like, and what fields it will have. We will have Schema for Posts and Authors, Categories, and others.
We don’t have the schema yet, we will create it in a while.
To set up the studio first we need a route. Navigate to src/app then create a route group and name it studio. We are grouping this to separate the site from the studio route.
Inside the studio create an admin folder and inside that add a catch-all route.
└── (studio)
    ├── admin
        └── [[...index]]
            └── page.tsx
Include this code in the admin route. We are getting the sanity.config we created earlier and NextStudio from sanity Studio to initialize the Studio.
"use client";
import config from "../../../../../sanity.config";
import { NextStudio } from "next-sanity/studio";
export default function AdminPage() {
return
We are almost done setting up the studio.
Lastly, we need to write the schemas for the content. After that, we can take a look into the studio.
A Schema defines the structure of a document in the Studio. We define schema with properties.
Some of the properties are required and some are not.
The common properties are:
name: Name of the Schema. We will use this name to fetch the data.
title: Human readable title for the Schema. It will be visible in the Studio.
type: A valid document type.
fields: An array of all the properties of the document. If it’s a post schema the fields will have properties like Title, slug, body, meta description, etc. These properties will show up as input fields on the Studio.
Since we are building a blog we will have multiple Schemas such as:
To learn more about Sanity Schema Visit the documentation.
Create a folder named sanity inside the src directory.
Inside that create another folder named schemas and create index.ts and post.ts file
Here’s what the post Schema looks like.
const post = {
  name: "post",
  title: "Post",
  type: "document",
  fields: [
    {
      name: "title",
      title: "Title",
      type: "string",
      validation: (Rule: any) => Rule.required(),
    },
    {
      name: "metadata",
      title: "Metadata",
      type: "string",
      validation: (Rule: any) => Rule.required(),
    },
    {
      name: "slug",
      title: "Slug",
      type: "slug",
      options: {
        source: "title",
        unique: true,
        slugify: (input: any) => {
          return input
            .toLowerCase()
            .replace(/\s /g, "-")
            .replace(/[^\w-] /g, "");
        },
      },
      validation: (Rule: any) =>
        Rule.required().custom((fields: any) => {
          if (
            fields?.current !== fields?.current?.toLowerCase() ||
            fields?.current.split(" ").includes("")
          ) {
            return "Slug must be lowercase and not be included space";
          }
          return true;
        }),
    },
    {
      name: "tags",
      title: "Tags",
      type: "array",
      validation: (Rule: any) => Rule.required(),
      of: [
        {
          type: "string",
          validation: (Rule: any) =>
            Rule.custom((fields: any) => {
              if (
                fields !== fields.toLowerCase() ||
                fields.split(" ").includes("")
              ) {
                return "Tags must be lowercase and not be included space";
              }
              return true;
            }),
        },
      ],
    },
    {
      name: "author",
      title: "Author",
      type: "reference",
      to: { type: "author" },
      validation: (Rule: any) => Rule.required(),
    },
    {
      name: "mainImage",
      title: "Main image",
      type: "image",
      options: {
        hotspot: true,
      },
      // validation: (Rule: any) => Rule.required(),
    },
    {
      name: "publishedAt",
      title: "Published at",
      type: "datetime",
      validation: (Rule: any) => Rule.required(),
    },
    {
      name: "body",
      title: "Body",
      type: "blockContent",
      validation: (Rule: any) => Rule.required(),
    },
  ],

  preview: {
    select: {
      title: "title",
      author: "author.name",
      media: "mainImage",
    },
    prepare(selection: any) {
      const { author } = selection;
      return Object.assign({}, selection, {
        subtitle: author && `by ${author}`,
      });
    },
  },
};
export default post;
Copy the schema over to the post.ts file.
To save time we are not going to see the other schemas, you can get them from the repository.
Open up the index.ts file and add this code snippet.
import author from "./author";
import blockContent from "./blockContent";
import category from "./category";
import post from "./post";

const schemas = [post, author, category, blockContent];

export default schemas;
We are importing all the schema in this file and creating an array to load the schema on the studio.
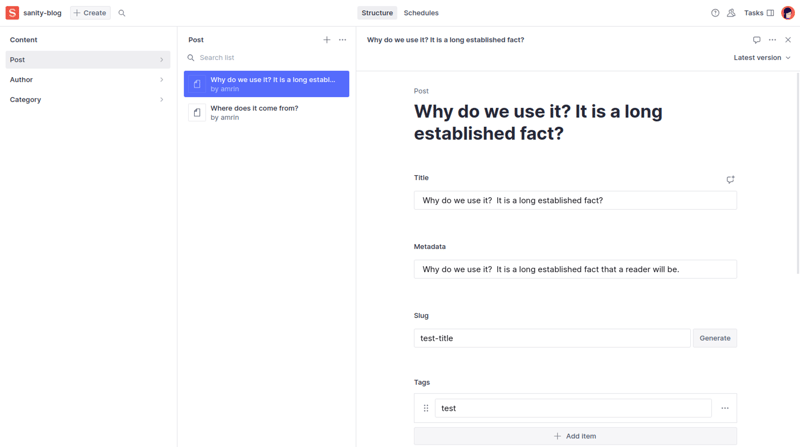
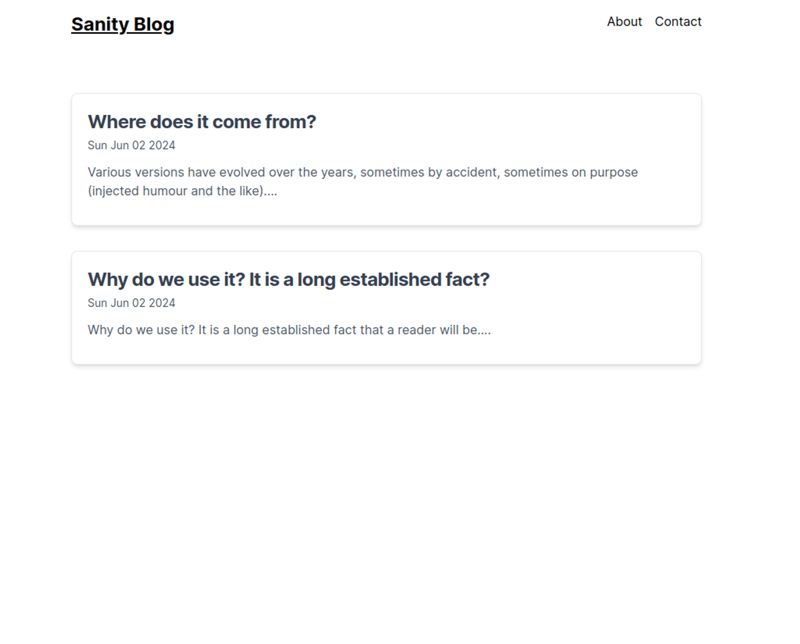
Now you can add posts from the studio.
To create a new post, go to localhost:3000/admin you will see all the schemas there. Go ahead and create a few posts.
We integrated the Studio and created a few posts. Now we need a way to fetch those posts and render them on the home page.
We will use GROQ to do exactly that. GROQ is a query language designed to query large schema-less JSON data collection. With GROQ expressive filtering we can fetch data the way we want to use it. It can join and fetch from multiple documents.
To start using GROQ we need to create the config file and the queries.
Go ahead and create these files inside the sanity folder.
└── sanity
    ├── config
    │   └── client-config.ts
    ├── sanity-query.ts
    ├── sanity-utils.ts
Paste this code into the client-config.ts file.
import { ClientPerspective } from "next-sanity";

const config = {
    projectId: process.env.NEXT_PUBLIC_SANITY_PROJECT_ID as string,
    dataset: "production",
    apiVersion: "2023-03-09",
    useCdn: false,
    token: process.env.SANITY_API_KEY as string,
    perspective: 'published' as ClientPerspective,
};

export default config;
This is the config for fetching the data with the GROQ query.
Here’s a quick break-down of the config options:
apiVersion: It’s the Sanity API version. You can use the current date.
useCDN: Used to disable edge cache. We are setting it to false as we will integrate webhook. It will deliver updated data.
token: Sanity API key. Required for webhook integration. (We will integrate webhook in the next section)
perspective: To determine the document status. If it’s set to published it will only query the published documents otherwise it will fetch all the document drafts and published.
Now we will write the queries. We are going to keep the Queries and the Fetch functions in separate files.
Here are the queries, copy these into the sanity-query.ts file.
import { groq } from "next-sanity";
const postData = `{
  title,
  metadata,
  slug,
  tags,
  author->{
    _id,
    name,
    slug,
    image,
    bio
  },
  mainImage,
  publishedAt,
  body
}`;

export const postQuery = groq`*[_type == "post"] ${postData}`;

export const postQueryBySlug = groq`*[_type == "post" && slug.current == $slug][0] ${postData}`;

export const postQueryByTag = groq`*[_type == "post" && $slug in tags[]->slug.current] ${postData}`;

export const postQueryByAuthor = groq`*[_type == "post" && author->slug.current == $slug] ${postData}`;

export const postQueryByCategory = groq`*[_type == "post" && category->slug.current == $slug] ${postData}`;
At the top, is the postData object, which defines all the properties we want to fetch.
Then the actual queries. Each query has the query first then the postData object.
These queries are self-descriptive, but for clarity here’s a quick explanation for the postQueryBySlug:
_type: The name of the document.
slug.current: Checking the slug of each of the documents if it matches with $slug (We will pass $slug with the fetch function).
postData: Filtering out the data we want to get i.e. the title, mainImage, and description.
We will use these queries to fetch the data from Sanity Studio.
Copy these codes into the sanity-utils.ts file.
import ImageUrlBuilder from "@sanity/image-url";
import { createClient, type QueryParams } from "next-sanity";
import clientConfig from "./config/client-config";
import { postQuery, postQueryBySlug } from "./sanity-query";
import { Blog } from "@/types/blog";

export const client = createClient(clientConfig);
export function imageBuilder(source: string) {
  return ImageUrlBuilder(clientConfig).image(source);
}

export async function sanityFetch({
  query,
  qParams,
  tags,
}: {
  query: string,
  qParams: QueryParams,
  tags: string[],
}): Promise {
  return (
    client.fetch
    (query,
    qParams,
    {
      cache: "force-cache",
      next: { tags },
    })
  );
}

export const getPosts = async () => {
  const data: Blog[] = await sanityFetch({
    query: postQuery,
    qParams: {},
    tags: ["post", "author", "category"],
  });
  return data;
};

export const getPostBySlug = async (slug: string) => {
  const data: Blog = await sanityFetch({
    query: postQueryBySlug,
    qParams: { slug },
    tags: ["post", "author", "category"],
  });

  return data;
};
Here’s a quick overview of what’s going on here:
client: creating a Sanity client with the config we created earlier. It will be used to fetch the data with GROQ.
imageBuilder: To use the post image. The images are provided from sanity cdn and it requires all these configs.
sanityFetch: It’s the function to fetch data with cache. ( We could just use fetch too but we are configuring this now so that we can just add the webhook and we are good to go. )
Since we are using typescript we need to write the Type for the post. You can see we are using Blog type on the query functions.
Create a blog.ts file inside the types folder and copy this type:
import { PortableTextBlock } from "sanity";

export type Author = {
  name: string,
  image: string,
  bio?: string,
  slug: {
    current: string,
  },
  _id?: number | string,
  _ref?: number | string,
};

export type Blog = {
  _id: number,
  title: string,
  slug: any,
  metadata: string,
  body: PortableTextBlock[],
  mainImage: any,
  author: Author,
  tags: string[],
  publishedAt: string,
};
All the types are normal, the PortableTextBlock is from sanity. It defines the type of the post body.
All the setup is done!
Let’s fetch the posts and render them on our Next.js project.
First, we will fetch all the posts and create the blog page. Then we will fetch the post by slug for the single post page.
Create the Blog component app/components/Blog/index.ts and add this code.
import { Blog } from "@/types/blog";
import Link from "next/link";
import React from "react";

const BlogItem = ({ blog }: { blog: Blog }) => {
  return (


          {blog.title}


          {new Date(blog.publishedAt).toDateString()}


          {blog.metadata.slice(0, 140)}...


  );
};

export default BlogItem;
Remove all the styles and code from globals.css (keep the tailwind utils) file and page.tsx file
Now add this to the page.tsx file inside (site)
import { getPosts } from "@/sanity/sanity-utils";
import BlogItem from "@/components/Blog";
export default async function Home() {
const posts = await getPosts();
return (
{posts?.length > 0 ? (
posts.map((post: any) => No posts found
)}
);
}
First import the getPosts function and BlogItem. Inside the Home component fetch the posts and render them.
We need a navbar to navigate between pages.
To save time I already created the Header file and loaded it inside the layout.tsx file.
Check out the source code and copy the Header component from there.
import Header from "@/components/Header";

export default function RootLayout({
  children,
}: Readonly) {
  return (


      {children}
    >
  );
}
This is how it looks:
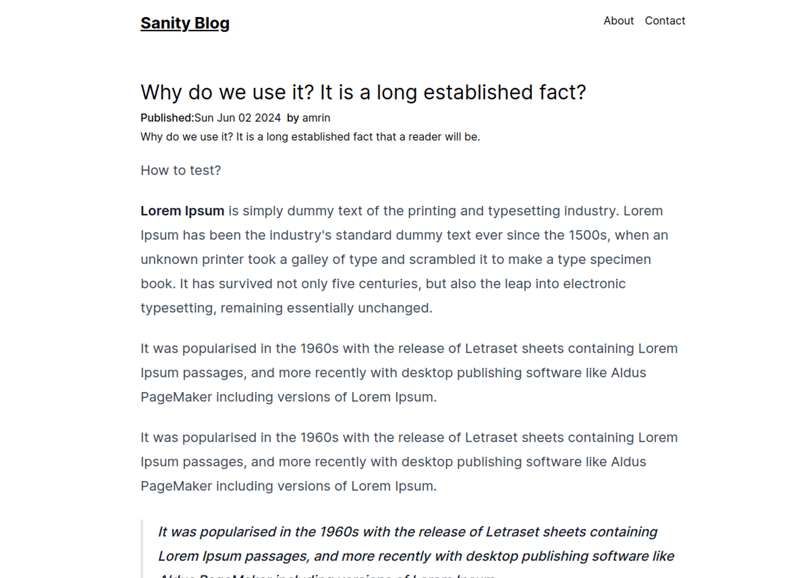
Now we need to create a single post page so that we can read the post.
Create the single post page inside blog/[slug]/page.tsx and paste this code snippet.
import React from "react";
import { getPostBySlug } from "@/sanity/sanity-utils";
import RenderBodyContent from "@/components/Blog/RenderBodyContent";

const SingleBlogPage = async ({ params }: { params: any }) => {
  const post = await getPostBySlug(params.slug);

  return (


        {post.title}

          Published:
          {new Date(post.publishedAt).toDateString()}
          by
          {post.author.name}


        {post.metadata}


  );
};

export default SingleBlogPage;
First import getPostBySlug and RenderBodyContent (we will create it in a while).
Fetch the post by slug and render the post with RenderBodyContent.
It’s a custom component to render the post body.
Create RenderBodyContent.tsx file inside the components/Blog folder*.*
import config from "@/sanity/config/client-config";
import { Blog } from "@/types/blog";
import { PortableText } from "@portabletext/react";
import { getImageDimensions } from "@sanity/asset-utils";
import urlBuilder from "@sanity/image-url";
import Image from "next/image";
// lazy-loaded image component
const ImageComponent = ({ value, isInline }: any) => {
const { width, height } = getImageDimensions(value);
return (
This component will handle special types differently. We are only handling Images here.
You can include code blocks, embeds, and many more. You can find more information on Sanity plugins on Sanity.
Here’s what it looks like.
To make the post look like this install the tailwind/typography plugin and load that inside the tailwind.config.ts file.
npm install @tailwindcss/typography
We will integrate Sanity webhook to fetch the data on time. Otherwise, you will have to deploy the site every time you write a post.
We already added revalidation on the fetch functions. Right now we need to generate the Keys and create the Webhook endpoint.
Generate the API key
Go to sanity.io/manage and navigate to API→Tokens then click on the Add API token button.
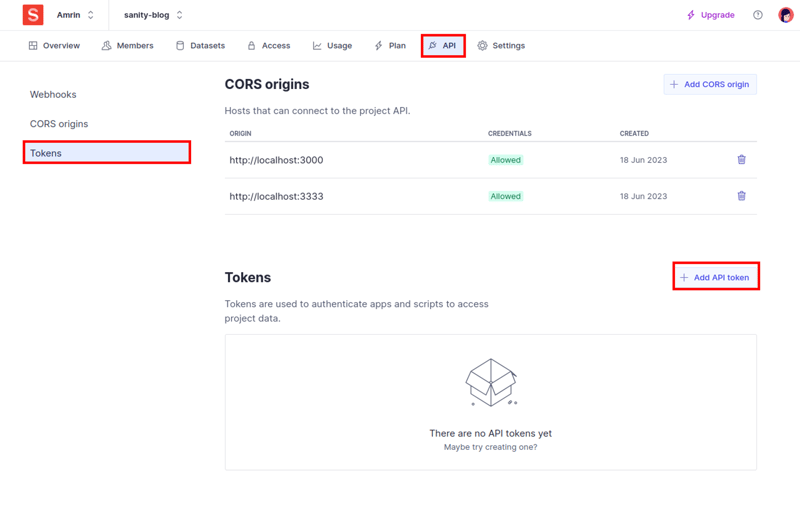
Give your API a name then choose Editor and save.
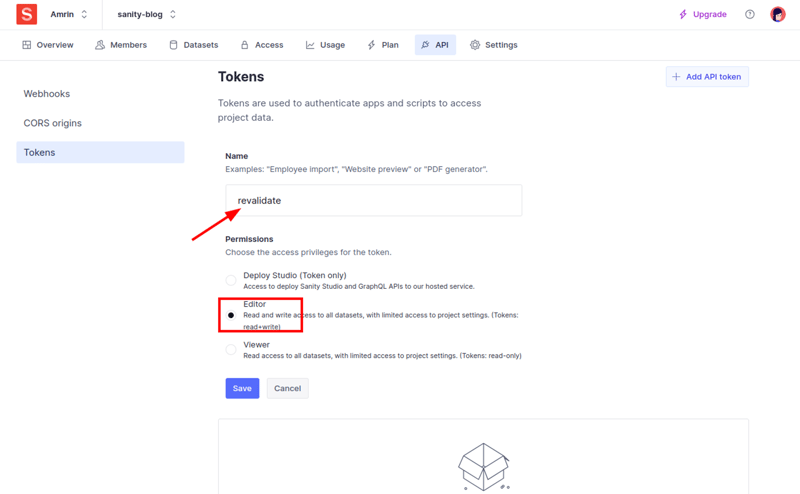
You will get an API key and save it on the env file
SANITY_API_KEY = "YOUR_API_KEY";
Create the Webhook endpoint
First, create the webhook endpoint app/api/revalidate/route.ts and add this code snippet.
import { revalidateTag } from "next/cache";
import { type NextRequest, NextResponse } from "next/server";
import { parseBody } from "next-sanity/webhook";

export async function POST(req: NextRequest) {
  try {
    const { body, isValidSignature } = await parseBody(req, process.env.NEXT_PUBLIC_SANITY_HOOK_SECRET);

    if (!isValidSignature) {
      return new Response("Invalid Signature", { status: 401 });
    }

    if (!body?._type) {
      return new Response("Bad Request", { status: 400 });
    }

    revalidateTag(body._type);
    return NextResponse.json({
      status: 200,
      revalidated: true,
      now: Date.now(),
      body,
    });
  } catch (error: any) {
    console.error(error);
    return new Response(error.message, { status: 500 });
  }
}
We are using tag-based revalidation in this webhook.
This endpoint will be called by the webhook every time you create, delete, or update a document from Sanity Studio.
Generate the Webhook Secret
Navigate to sanity.io/manage API→Webhooks. Click on the Create Webhook button.
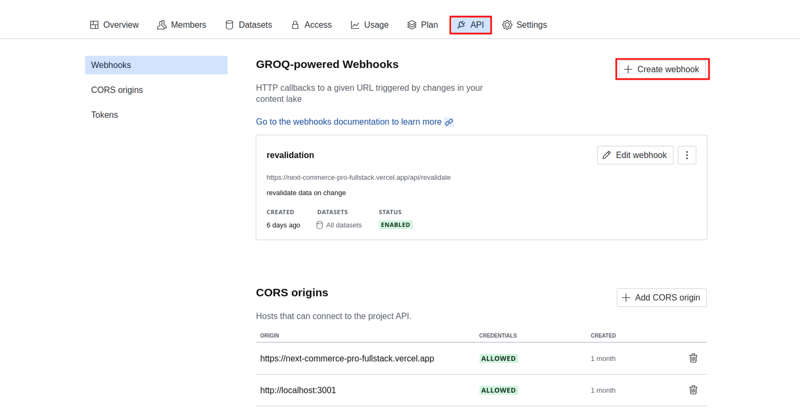
You will get a modal with a form. Fill in the form with the following pieces of information:
Name: Name of the Webhook
Description: Short description of what the webhook does (This is an optional field).
URL: Set the URL to https://YOUR_SITE_URL/api/revalidate
Dataset: Choose your desired dataset or leave the default value.
Trigger on: Set the hook to trigger on "Create", "Update", and "Delete".
Filter: Leave this field blank.
Projections: Set the projections to {_type, "slug": slug.current}
Status: Check the enable webhook box.
HTTP Method: POST.
Leave HTTP headers, API version, and Draft as default.
Secret: Give your webhook a unique secret and copy it.
Hit save to create your webhook.
Save your webhook in the .env file under this variable name.
SANITY_HOOK_SECRET=YOUR_SECRET
Testing the webhook: Go ahead and change the content of an Article and publish it. After that hard reload your website you should see the changes in real time.
Note: You can test webhook from the live site or you can choose tools like ngrok to expose the localhost URL and use that to test it.
That’s it you built a blog with Sanity CMS. Congrats! ?
Even though this guide looks so long, it’s just the beginning. Sanity has more features and options, you can build cool things.
It’s impossible to cover everything in a single article.
I will suggest you to checkout these resources to learn more and improve your blog
Sanity Plugins
Source Code
Connect With Me
I hope you enjoyed the post, if you want to stay conntected with me checkout my socials.
Would love to talk to you!
Twitter/x
Github
Happy Coding.


免责声明: 提供的所有资源部分来自互联网,如果有侵犯您的版权或其他权益,请说明详细缘由并提供版权或权益证明然后发到邮箱:[email protected] 我们会第一时间内为您处理。
Copyright© 2022 湘ICP备2022001581号-3


