使用 Golang 和 AWS Cognito 进行身份验证
What is cognito?
The authentication of an application is something very important in the system, but also very sensitive, there are various implementations, security, validation to be considered.
I decided to make a post demonstrating a about Cognito, a very nice tool from AWS that can help you in the authentication and validation of the user for Web and mobile applications that many people do not know.
Cognito is an AWS platform responsible for creating and validating user access data, as well as being able to register users and store their information, in addition to generating OAuth tokens, and Cognito can also provide all user validation.
We can create some user data such as: email, name, phone, birthdate, nickname, gender, website and many others, we can also place custom fields.
Cognito still allows us to work with "federated providers", known as social logins, such as Google, Facebook and GitHub, we are not going to address this post, but it is possible to do it with cognito.
What are we going to do?
We are going to make some endpoints to show how cognito works, we are going to create a user, confirm email, login, search for a user using the token provided by cognito, update information.
Setting up the project
We are going to do something very simple, we are not going to worry about the project father, we want to address only the use of knowledge.
To create the endpoints we are going to use gin.
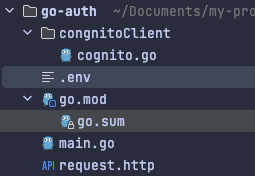
Let's create the following files:
The entrypoint of our application main.go at the root of the project
.env To save cognitive credentials
A paste called cognitoClient and inside a file called cognito.go
There is a file called request.http, to complete your requests.
The structure will be as follows:
Setting up Cognito on AWS
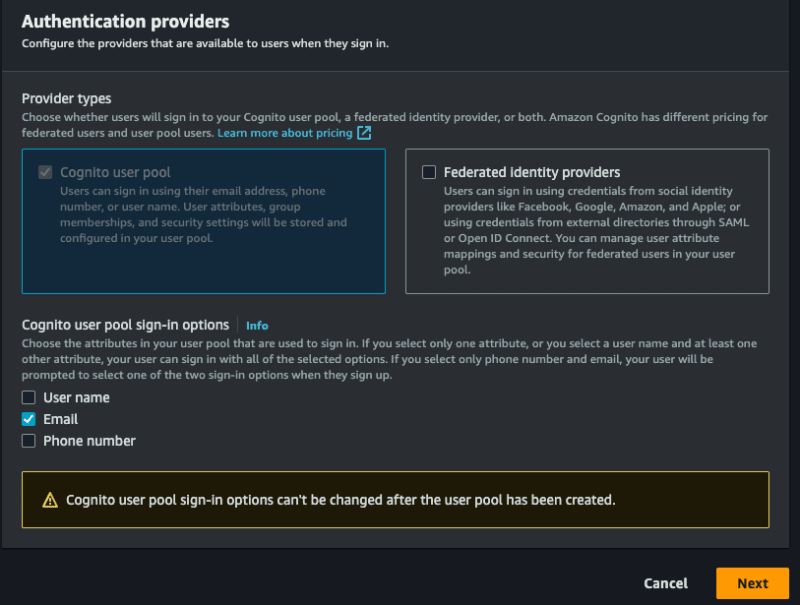
Before starting the code, we will configure the cognito in AWS, to access the panel and search by cognito, after we will create our pool, select the option Add user directories to your app.
For Provider types, select the Cognito user pool option, you can choose to allow login using email, user name and phone, you can only opt for email, select what you prefer, select assim to first stage:
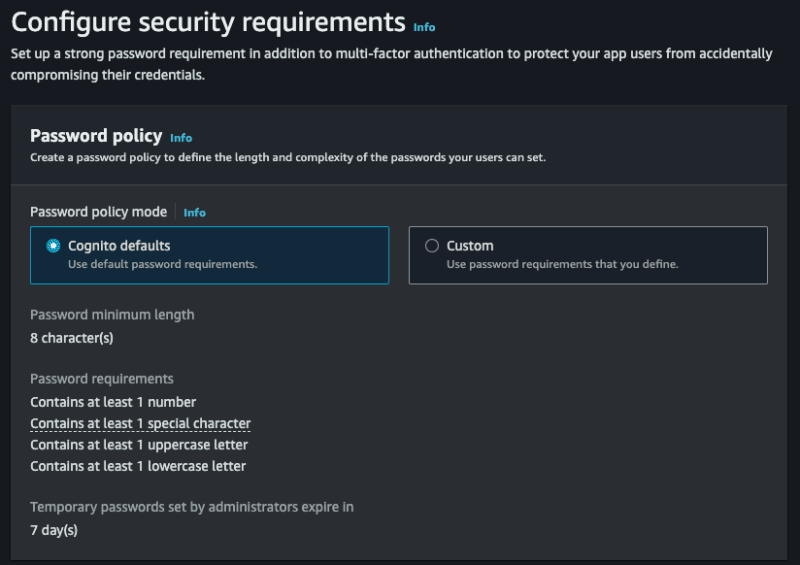
I need to configure some more things, let's go!
- Password policy mode allows you to select a specific policy, let's deixar the Cognito defaults.
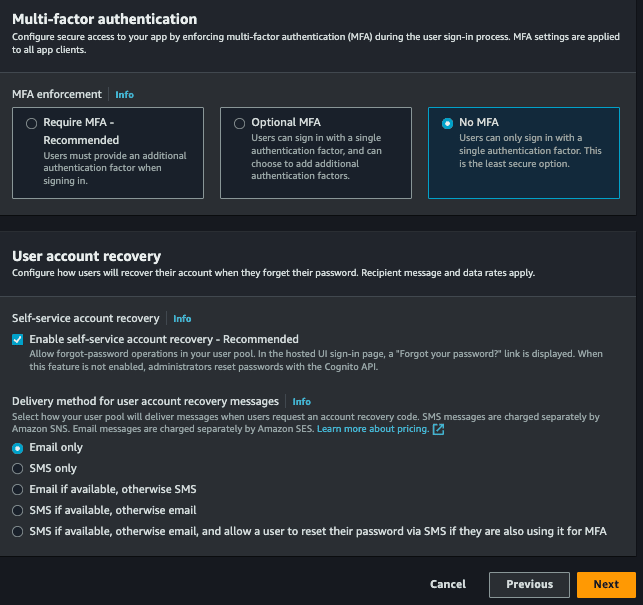
- Multi-factor authentication allows our login to have two-factor authentication, let's go without, but you can implement it if desired, you can opt for No MFA.
- Finally, or User account recovery, you can choose ways to recover your account, you can just choose email.
Next step:
- Self-service sign-up, we will allow any person to do so, leave selected.
- Cognito-assisted verification and confirmation, allow cognito to be responsible for confirming the user's identity, check it, and also select the option Send email message, verify email address.
- Verifying attribute changes, check this option, so that updating the user's email needs to be validated again.
- Required attributes, select the fields that you want to make mandatory to create a new user, you will select the options, email (and the name) and the name will also be required by your father.
- Custom attributes, it is optional, but you can add custom fields, for example, you will create a field called custom_id which will be any uuid.
This stage also occurred:
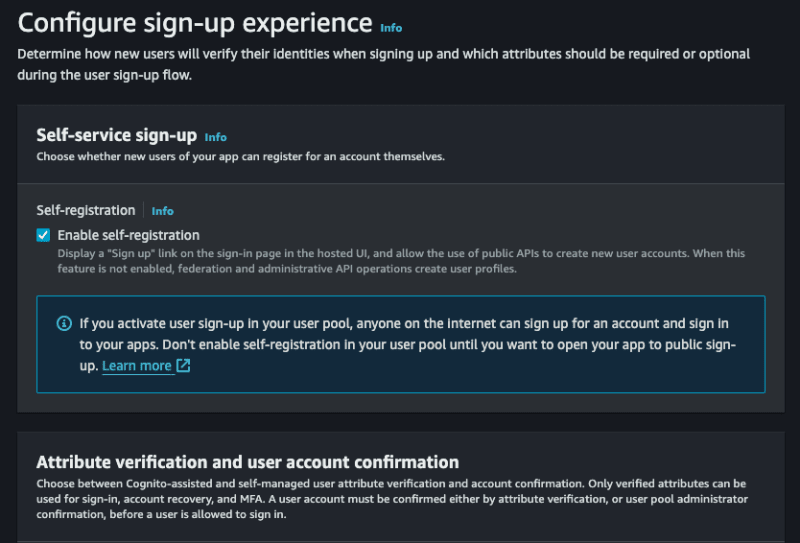
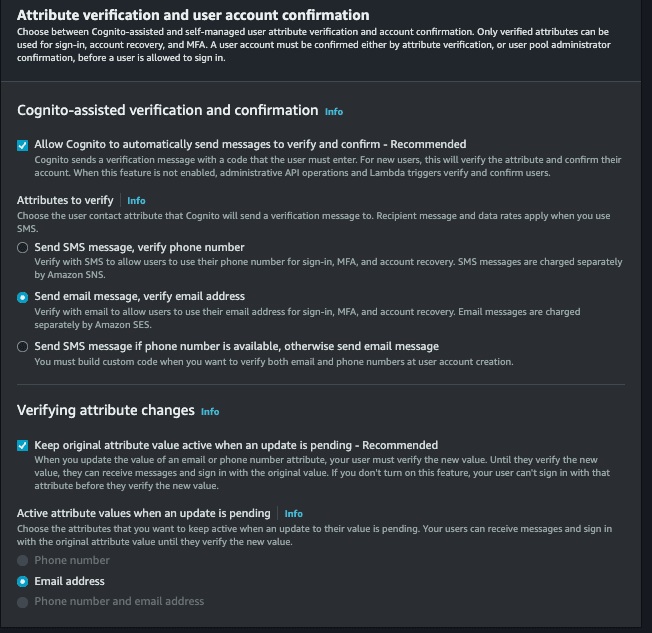
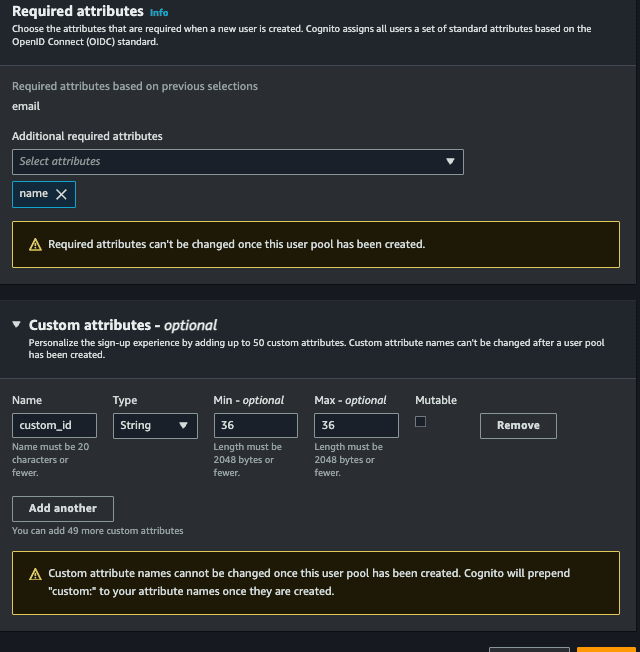
Next, select the Send email with Cognito option, so we do not need to configure anything to trigger the emails.
In the next step, in User pool name put the name you want in App client name, also put the name you want and continue.
In the last stage we will not need to alter anything, just finish and create the user pool.
With everything, access or cognito > User pools, select the pool that you just created, this part will list all the users of your application, and it is possible to revoke the user's token, deactivate, verify among other functionalities.
We are going to specify the id of the pool, to be able to use the Go sdk for aws, for access to the created pool App integration > App client list and see our Client ID:

Let's save this id in our .env file:
COGNITO_CLIENT_ID=client_id
Remembering that you still need to have the AWS credentials, usually located in the /Users/your-user/.aws directory, if you haven't configured it yet, see here how to do it.
Implementing cognito
Let's separate the cognito part into another file.
Registering the user
Inside the cognito.go file, we will initialize our cognito and create our interface:
  package congnitoClient

  import (
    "github.com/aws/aws-sdk-go/aws"
    "github.com/aws/aws-sdk-go/aws/session"
    cognito "github.com/aws/aws-sdk-go/service/cognitoidentityprovider"
    "github.com/google/uuid"
  )

  type User struct {
    Name     string `json:"name" binding:"required"`
    Email    string `json:"email" binding:"required,email"`
    Password string `json:"password" binding:"required"`
  }

  type CognitoInterface interface {
    SignUp(user *User) error
  }

  type cognitoClient struct {
    cognitoClient *cognito.CognitoIdentityProvider
    appClientID   string
  }

  func NewCognitoClient(appClientId string) CognitoInterface {
    config := &aws.Config{Region: aws.String("us-east-1")}
    sess, err := session.NewSession(config)
    if err != nil {
      panic(err)
    }
    client := cognito.New(sess)

    return &cognitoClient{
      cognitoClient: client,
      appClientID:   appClientId,
    }
  }

  func (c *cognitoClient) SignUp(user *User) error {
    return nil
  }
First we create a struct called User, this struct will have the user fields that we need to save in cognito.
Then we create an interface called CognitoInterface, we will have the methods that we will use, first we will only have SignUp which will receive a pointer to the User struct.
Then we will have another struct called cognitoClient that will contain our instance for NewCognitoClient that will be our constructor.
As mentioned, NewCognitoClient will be like our constructor, it is where we will create the session with AWS and return this connection. This connection could be a global variable, in our case we will not do this, it is up to you to check which is the best approach for your use case.
Now let's implement SignUp:
  func (c *cognitoClient) SignUp(user *User) error {
    userCognito := &cognito.SignUpInput{
      ClientId: aws.String(c.appClientID),
      Username: aws.String(user.Email),
      Password: aws.String(user.Password),
      UserAttributes: []*cognito.AttributeType{
        {
          Name:  aws.String("name"),
          Value: aws.String(user.Name),
        },
        {
          Name:  aws.String("email"),
          Value: aws.String(user.Email),
        },
        {
          Name:  aws.String("custom:custom_id"),
          Value: aws.String(uuid.NewString()),
        },
      },
    }
    _, err := c.cognitoClient.SignUp(userCognito)
    if err != nil {
      return err
    }
    return nil
  }
We will use the AttributeType from Cognito to assemble the parameters that we will send to the SignUp of the AWS SDK, note that the custom_id which is our custom field, needs to be placed custom before, without this it will not be accepted, we just created a uuid with the Google package, this field is just to show how to use custom attributes.
The ClientId field refers to the COGNITO_CLIENT_ID of our env, we will pass it on when starting main.go.
This is what we need to save the user, simple isn't it?
Don't forget to start the project with:
go mod init
And install the necessary packages:
go mod tidy
Confirming the account
Let's create another function to verify the user's account via email. To verify the account, the user will need to enter the code sent by email. Let's create a new struct and add the new ConfirmAccount method to the interface:
  type UserConfirmation struct {
    Email string `json:"email" binding:"required,email"`
    Code  string `json:"code" binding:"required"`
  }
  type CognitoInterface interface {
    SignUp(user *User) error
    ConfirmAccount(user *UserConfirmation) error
  }
Now let's implement:
  func (c *cognitoClient) ConfirmAccount(user *UserConfirmation) error {
    confirmationInput := &cognito.ConfirmSignUpInput{
      Username:         aws.String(user.Email),
      ConfirmationCode: aws.String(user.Code),
      ClientId:         aws.String(c.appClientID),
    }
    _, err := c.cognitoClient.ConfirmSignUp(confirmationInput)
    if err != nil {
      return err
    }
    return nil
  }
It's very simple, we will use the ConfirmSignUpInput from the cognito package to assemble the parameters, remembering that the Username is the user's email. Finally, we will call ConfirmSignUp passing the confirmationInput.
Remembering that we only returned the error, you could improve and check the types of error messages.
Login
This should be the functionality that will be used the most, let's create a method called SignIn and a struct:
  type UserLogin struct {
    Email    string `json:"email" binding:"required,email"`
    Password string `json:"password" binding:"required"`
  }
  type CognitoInterface interface {
    SignUp(user *User) error
    ConfirmAccount(user *UserConfirmation) error
    SignIn(user *UserLogin) (string, error)
  }
Our SignIn will receive a UserLogin.
Let's implement:
  func (c *cognitoClient) SignIn(user *UserLogin) (string, error) {
    authInput := &cognito.InitiateAuthInput{
      AuthFlow: aws.String("USER_PASSWORD_AUTH"),
      AuthParameters: aws.StringMap(map[string]string{
        "USERNAME": user.Email,
        "PASSWORD": user.Password,
      }),
      ClientId: aws.String(c.appClientID),
    }
    result, err := c.cognitoClient.InitiateAuth(authInput)
    if err != nil {
      return "", err
    }
    return *result.AuthenticationResult.AccessToken, nil
  }
We will use the InitiateAuth function from the aws cognito package, we need to pass the username (user's email), password and the AuthFlow, this field refers to the type of access that we will allow, in our case USER_PASSWORD_AUTH.
If you receive an error like this:
You trusted all proxies, this is NOT safe. We recommend you to set a value
It will be necessary to enable the ALLOW_USER_PASSWORD_AUTH flow, to configure it access cognito on the aws panel, go to:
User pools > Selecione seu pool > App integration > App client list > Selecione um client, will open this screen:
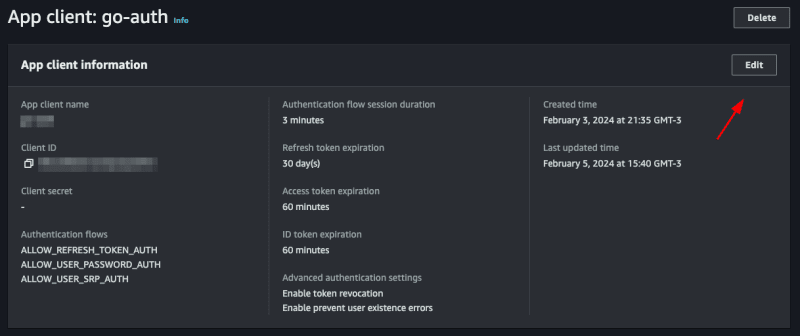
Click on edit and in Authentication flows select the option ALLOW_USER_PASSWORD_AUTH then save, with this you can now log in with the user's password and email.
Listando um usuário
Para mostrar como utilizar o token jwt fornecido pelo cognito vamos criar um endpoint que mostra os dados do usuário salvos no cognito apenas com o token.
Let's create another function called GetUserByToken that will receive a token and return a struct of type GetUserOutput that we will get from the cognito package.
  type CognitoInterface interface {
    SignUp(user *User) error
    ConfirmAccount(user *UserConfirmation) error
    SignIn(user *UserLogin) (string, error)
    GetUserByToken(token string) (*cognito.GetUserOutput, error)
  }
If you click on GetUserOutput you will see what is inside this struct
  type GetUserOutput struct {
    _ struct{} `type:"structure"`
    MFAOptions []*MFAOptionType `type:"list"`
    PreferredMfaSetting *string `type:"string"`
    UserAttributes []*AttributeType `type:"list" required:"true"`
    UserMFASettingList []*string `type:"list"`
    Username *string `min:"1" type:"string" required:"true" sensitive:"true"`
  }
inside the _ struct{} there are custom attributes that we created for our user, in our case the custom_id.
Let's implement:
  func (c *cognitoClient) GetUserByToken(token string) (*cognito.GetUserOutput, error) {
    input := &cognito.GetUserInput{
      AccessToken: aws.String(token),
    }
    result, err := c.cognitoClient.GetUser(input)
    if err != nil {
      return nil, err
    }
    return result, nil
  }
We use GetUser from the cognito package, it only needs an AccessToken which is the token provided by cognito itself.
Updating password
Finally, we will update the user's password. To do this, we will need the email address and the new password. We already have the UserLogin struct with the fields we need. We will reuse it. If you wish, create a new one just for this function. Let's create the UpdatePassword function:
  type CognitoInterface interface {
    SignUp(user *User) error
    ConfirmAccount(user *UserConfirmation) error
    SignIn(user *UserLogin) (string, error)
    GetUserByToken(token string) (*cognito.GetUserOutput, error)
    UpdatePassword(user *UserLogin) error
  }
Let's implement:
  func (c *cognitoClient) UpdatePassword(user *UserLogin) error {
    input := &cognito.AdminSetUserPasswordInput{
      UserPoolId: aws.String(os.Getenv("COGNITO_USER_POOL_ID")),
      Username:   aws.String(user.Email),
      Password:   aws.String(user.Password),
      Permanent:  aws.Bool(true),
    }
    _, err := c.cognitoClient.AdminSetUserPassword(input)
    if err != nil {
      return err
    }
    return nil
  }
We will use the AdminSetUserPassword function from the cognito package, we need to pass the user's email and the new password, in addition we have to pass the UserPoolId, we will put the COGNITO_USER_POOL_ID in the .env file, to search in aws just access your pool and copy the User pool ID

We will also pass Permanent, informing that it is a permanent password, you could pass false, so Cognito would create a temporary password for the user, this will depend on the strategy you will use in your application.
Creating the main
Let's create our main.go, this will be the file where we will start cognito and create our routes.
  func main() {
    err := godotenv.Load()
    if err != nil {
      panic(err)
    }
    cognitoClient := congnitoClient.NewCognitoClient(os.Getenv("COGNITO_CLIENT_ID"))
    r := gin.Default()

    fmt.Println("Server is running on port 8080")
    err = r.Run(":8080")
    if err != nil {
      panic(err)
    }
  }
First we will load our envs with the godotenv package, then we start our cognito client, passing the COGNITO_CLIENT_ID, which we got earlier, then we start gin and create a server, that's enough.
Creating the endpoints
Creating a user
Let's create a function inside the main.go file itself, let's call it CreateUser:
  func CreateUser(c *gin.Context, cognito congnitoClient.CognitoInterface) error {
    var user congnitoClient.User
    if err := c.ShouldBindJSON(&user); err != nil {
      return errors.New("invalid json")
    }
    err := cognito.SignUp(&user)
    if err != nil {
      return errors.New("could not create use")
    }
    return nil
  }
Something simple, we just convert what we receive in the body to our struct using gin's ShouldBindJSON, then we call the SignUp that we created in cognito.go.
Now let's create the endpoint inside the main.go function:
  r.POST("user", func(context *gin.Context) {
        err := CreateUser(context, cognitoClient)
        if err != nil {
            context.JSON(http.StatusBadRequest, gin.H{"error": err.Error()})
            return
        }
        context.JSON(http.StatusCreated, gin.H{"message": "user created"})
    })
We call the function we just created CreateUser, if there is an error we throw a StatusBadRequest, if it is successful a StatusCreated, let's test.
Let's do a go mod tidy downloading all the packages, then we'll run the application with go run main.go
Now we can create a call in the request.http file and execute:
POST http://localhost:8080/user HTTP/1.1
content-type: application/json

{
  "Name": "John Doe",
  "email": "[email protected]",
  "password": "Pass@1234"
}
If everything is correct we will receive the message:
{
  "message": "user created"
}
Now entering the Cognito panel on AWS, and accessing the pool then the users, we will have our user there:

Confirming a user
Note that the user we created above is not confirmed, let's confirm it!
Create a function called ConfirmAccount in the main.go file:
  func ConfirmAccount(c *gin.Context, cognito congnitoClient.CognitoInterface) error {
    var user congnitoClient.UserConfirmation
    if err := c.ShouldBindJSON(&user); err != nil {
      return errors.New("invalid json")
    }
    err := cognito.ConfirmAccount(&user)
    if err != nil {
      return errors.New("could not confirm user")
    }
    return nil
  }
Same concept we used before, let's convert the body to the UserConfirmation struct and pass it to ConfirmAccount in cognito.go.
Let's create the endpoint:
  r.POST("user/confirmation", func(context *gin.Context) {
        err := ConfirmAccount(context, cognitoClient)
        if err != nil {
            context.JSON(http.StatusBadRequest, gin.H{"error": err.Error()})
            return
        }
        context.JSON(http.StatusCreated, gin.H{"message": "user confirmed"})
    })
It's also simple, we just handle the error and return a message, let's create our call and test it:
POST http://localhost:8080/user/confirmation HTTP/1.1
content-type: application/json

{
  "email": "[email protected]",
  "code": "363284"
}
We will receive the message:
{
  "message": "user confirmed"
}
Now accessing Cognito again on the AWS panel, notice that the user is confirmed, remembering that you need to enter a valid email, you can use a temporary email to play around, but it needs to be valid, as Cognito will send the confirmation code and it needs to be a valid code to confirm successfully.

Login
Now let's create our token, to do this in the main.go file create a function called SignIn, this function will return an error and a token.
  func SignIn(c *gin.Context, cognito congnitoClient.CognitoInterface) (string, error) {
    var user congnitoClient.UserLogin
    if err := c.ShouldBindJSON(&user); err != nil {
      return "", errors.New("invalid json")
    }
    token, err := cognito.SignIn(&user)
    if err != nil {
      return "", errors.New("could not sign in")
    }
    return token, nil
  }
Same pattern as the other functions, we convert the body to the UserLogin struct and pass it to SignIn of cognito.go.
Let's create the endpoint:
  r.POST("user/login", func(context *gin.Context) {
        token, err := SignIn(context, cognitoClient)
        if err != nil {
            context.JSON(http.StatusBadRequest, gin.H{"error": err.Error()})
            return
        }
        context.JSON(http.StatusCreated, gin.H{"token": token})
    })
Now we return a token to the user, let's create the call and test:
POST http://localhost:8080/user/login HTTP/1.1
content-type: application/json

{
  "email": "[email protected]",
  "password": "Pass@1234"
}
When making the call we will receive our jwt token:
{
  "token": "token_here"
}
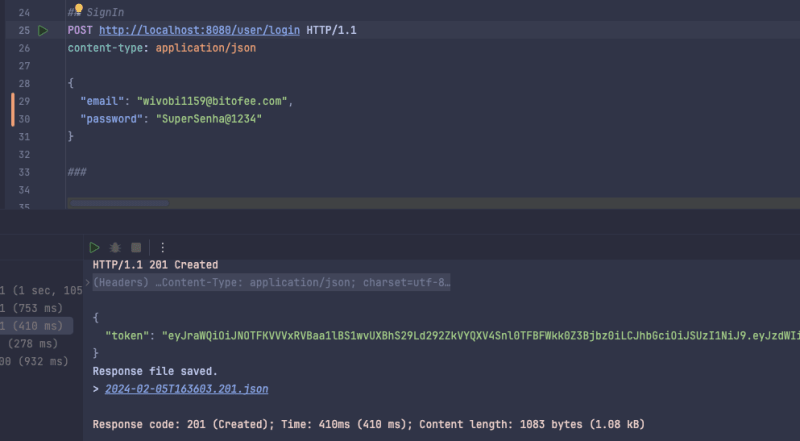
If we get the jwt token we can see what's inside, using the website jwt.io.
Listing a user
Now we will list the user data saved in cognito using only the token, to do this create a function called GetUserByToken in main.go and we will need a struct to represent the response that we will return to the user, we will create it in main as well:
  type UserResponse struct {
    ID            string `json:"id"`
    Name          string `json:"name"`
    Email         string `json:"email"`
    CustomID      string `json:"custom_id"`
    EmailVerified bool   `json:"email_verified"`
  }

  func main() {}
Now the function:
  func GetUserByToken(c *gin.Context, cognito congnitoClient.CognitoInterface) (*UserResponse, error) {
    token := strings.TrimPrefix(c.GetHeader("Authorization"), "Bearer ")
    if token == "" {
      return nil, errors.New("token not found")
    }
    cognitoUser, err := cognito.GetUserByToken(token)
    if err != nil {
      return nil, errors.New("could not get user")
    }
    user := &UserResponse{}
    for _, attribute := range cognitoUser.UserAttributes {
      switch *attribute.Name {
      case "sub":
        user.ID = *attribute.Value
      case "name":
        user.Name = *attribute.Value
      case "email":
        user.Email = *attribute.Value
      case "custom:custom_id":
        user.CustomID = *attribute.Value
      case "email_verified":
        emailVerified, err := strconv.ParseBool(*attribute.Value)
        if err == nil {
          user.EmailVerified = emailVerified
        }
      }
    }
    return user, nil
  }
This will be the biggest function, we need to map what we receive from Cognito to our UserResponse struct, we do this with a for and a switch, of course we could improve it, but for the sake of example we will keep it like this. Also to map custom attributes we need to put custom before, like custom:custom_id.
We also check if the user passed the token in the header, if not we return an error.
Let's create the endpoint:
  r.GET("user", func(context *gin.Context) {
        user, err := GetUserByToken(context, cognitoClient)
        if err != nil {
            if err.Error() == "token not found" {
                context.JSON(http.StatusUnauthorized, gin.H{"error": "token not found"})
                return
            }
            context.JSON(http.StatusBadRequest, gin.H{"error": err.Error()})
            return
        }
        context.JSON(http.StatusOK, gin.H{"user": user})
    })
We perform the same validation as the other endpoints, but now we check the error type and if it is of the token not found type we return a StatusUnauthorized.
Let's test:
GET http://localhost:8080/user HTTP/1.1
content-type: application/json
Authorization: Bearer token_jwt
Let's receive the user:
{
  "user": {
    "id": "50601dc9-7234-419a-8427-2a4bda92d33f",
    "name": "John Doe",
    "email": "[email protected]",
    "custom_id": "cb748d09-40de-457a-af23-ed9483d69f8d",
    "email_verified": true
  }
}
Updating password
Finally, let's create the UpdatePassword function that will update the user's password:
  func UpdatePassword(c *gin.Context, cognito congnitoClient.CognitoInterface) error {
    token := strings.TrimPrefix(c.GetHeader("Authorization"), "Bearer ")
    if token == "" {
      return errors.New("token not found")
    }
    var user congnitoClient.UserLogin
    if err := c.ShouldBindJSON(&user); err != nil {
      return errors.New("invalid json")
    }
    err := cognito.UpdatePassword(&user)
    if err != nil {
      return errors.New("could not update password")
    }
    return nil
  }
We also make it mandatory to inform the token in the header, the rest of the function is what we have already done previously.
Let's create the last endpoint:
  r.PATCH("user/password", func(context *gin.Context) {
        err := UpdatePassword(context, cognitoClient)
        if err != nil {
            if err.Error() == "token not found" {
                context.JSON(http.StatusUnauthorized, gin.H{"error": "token not found"})
                return
            }
            context.JSON(http.StatusBadRequest, gin.H{"error": err.Error()})
            return
        }
        context.JSON(http.StatusOK, gin.H{"message": "password updated"})
    })
Let's make the call:
PATCH http://localhost:8080/user/password HTTP/1.1
content-type: application/json
Authorization: Bearer token_jwt

{
  "email": "[email protected]",
  "password": "NovaSenha2@2222"
}
Now when you update your password and try to log in you will receive an error, and if you use the new password, everything will work.
Final considerations
In this post we talk a little about Cognito, one of the many AWS services that many people don't know about but that helps a lot in the evolution of your system.
Cognito's practicality goes beyond what I've discussed. Making a basic login is simple, but Cognito stands out for already providing you with an account verification system "ready", a login option with social networks (which can be quite annoying to implement without Coginito), two-factor authentication, among others, and it also has AWS security to protect user data.
Cognito has more functionality, it's worth seeing all of them in the documentation.
Repository link
Project repository
See the post on my blog here
Subscribe and receive notification of new posts, participate
-
 如何在没有图像的 Outlook 电子邮件中创建圆角?在没有图像的 Outlook 中设置圆角样式使用 CSS 在电子邮件客户端中创建圆角可以非常简单。但是,使用 CSS border-radius 属性的传统方法在 Microsoft Outlook 中不起作用。在设计具有圆角元素的电子邮件时,此限制提出了挑战。不用担心,有一种解决方案可以让您在 O...编程 发布于2024-11-06
 -
 如何在Python中高效比较字典中相等的键值对?比较字典是否相等的键值对在Python中,比较字典以检查键值对是否相等是一项常见任务。一种方法是迭代字典并使用 zip 和 iteritems 方法比较每一对字典。然而,还有一些替代方法可以提供更好的代码优雅性。其中一种方法是使用字典理解来创建仅包含共享键值对的新字典。代码如下:shared_ite...编程 发布于2024-11-06
 -
 如何在 PHP 中使用数组函数向左旋转数组元素?在 PHP 中向左旋转数组元素在 PHP 中旋转数组,将第一个元素移动到最后一个元素并重新索引数组,可以使用 PHP 的 array_push() 和 array_shift() 函数组合来实现。PHP 函数:PHP 没有专门用于旋转的内置函数数组。但是,以下代码片段演示了如何模拟所需的旋转行为:$...编程 发布于2024-11-06
 -
 如何解决Java访问文件时出现“系统找不到指定的路径”错误?解决 Java 中遇到“系统找不到指定的路径”时的文件路径问题在 Java 项目中,尝试访问文本时遇到错误来自指定相对路径的文件。此错误是由于 java.io.File 类无法定位指定路径而产生的。要解决此问题,建议从类路径中检索文件,而不是依赖文件系统。通过这样做,您可以消除相对路径的需要,并确保...编程 发布于2024-11-06
 -
 Laravel 中的 defer() 函数如何工作?Taylor Otwell 最近宣布了 Laravel 中的新函数 defer()。这只是对 defer() 函数如何工作以及使用它可能遇到的问题进行非常基本的概述。 找出问题 还记得您曾经需要从 API 获取某些内容,然后在幕后执行一些用户不关心但仍在等待的操作的路由吗?是的,我们都至少经历过一次...编程 发布于2024-11-06
 -
 在 Python Notebook 中探索使用 PySpark、Pandas、DuckDB、Polars 和 DataFusion 的数据操作Apache Iceberg Crash Course: What is a Data Lakehouse and a Table Format? Free Copy of Apache Iceberg the Definitive Guide Free Apache Iceberg Crash ...编程 发布于2024-11-06
 -
 Vue + Tailwind 和动态类我最近在做的一个项目使用了Vite、Vue和Tailwind。 使用自定义颜色一段时间后,我遇到了一些困惑。 在模板中添加和使用自定义颜色不是问题 - 使用 Tailwind 文档使该过程非常清晰 // tailwind.config.js module.exports = { them...编程 发布于2024-11-06
 -
 端到端(E 测试:综合指南端到端测试简介 端到端(E2E)测试是软件开发生命周期的重要组成部分,确保整个应用程序流程从开始到结束都按预期运行。与专注于单个组件或几个模块之间交互的单元或集成测试不同,端到端测试从用户的角度验证整个系统。这种方法有助于识别应用程序不同部分交互时可能出现的任何问题,确保无缝且无错误的用户体验。 ...编程 发布于2024-11-06
 -
 可以在 Go 结构标签中使用变量吗?在 Go 结构体标签中嵌入变量Go 的结构体标签通常用于注释和元数据,通常涉及简单的字符串文字。但是,用户可能会遇到在这些标签中需要动态或计算值的情况。考虑以下结构,其中带有为 JSON 封送注释的“类型”字段:type Shape struct { Type string `json:&q...编程 发布于2024-11-06
 -
 如何增强 Visual Studio 的构建详细程度以实现深入洞察?熟悉 Visual Studio 的构建详细程度需要全面了解 Visual Studio 构建过程背后的复杂细节?别再犹豫了!虽然使用 vcbuild 不会产生所需的详细输出,但 Visual Studio 的设置中隐藏着一个解决方案。采取以下简单步骤即可解锁大量信息:导航至 Visual Stud...编程 发布于2024-11-06
 -
 开发者日记# 谁写的?有一个想法困扰着我。也许,我们无法识别它,但日复一日,我们周围越来越多的人工智能生成的内容。 LinkedIn 或其他平台上的有趣图片、视频或帖子。我对帖子的媒体内容没有疑问(很容易识别它何时生成、从库存中获取或创建),但我对帖子的内容表示怀疑。几乎每次我读一篇文章时,我都会想这是谁写的?是作者分享...编程 发布于2024-11-06
 -
 哪种方法计算数据库行数更快:PDO::rowCount 或 COUNT(*)?为什么?PDO::rowCount 与 COUNT(*) 性能在数据库查询中计算行数时,选择使用 PDO:: rowCount 和 COUNT(*) 会显着影响性能。PDO::rowCountPDO::rowCount 返回受最后一个 SQL 语句影响的行数。但是,对于 SELECT 语句,某些数据库可能会...编程 发布于2024-11-06
 -
 PART# 使用 HTTP 进行大型数据集的高效文件传输系统让我们分解提供的HTML、PHP、JavaScript和CSS代码对于分块文件上传仪表板部分。 HTML 代码: 结构概述: Bootstrap for Layout:代码使用 Bootstrap 4.5.2 创建一个包含两个主要部分的响应式布局: 分块上传部分:用于...编程 发布于2024-11-06
学习中文
- 1 走路用中文怎么说?走路中文发音,走路中文学习
- 2 坐飞机用中文怎么说?坐飞机中文发音,坐飞机中文学习
- 3 坐火车用中文怎么说?坐火车中文发音,坐火车中文学习
- 4 坐车用中文怎么说?坐车中文发音,坐车中文学习
- 5 开车用中文怎么说?开车中文发音,开车中文学习
- 6 游泳用中文怎么说?游泳中文发音,游泳中文学习
- 7 骑自行车用中文怎么说?骑自行车中文发音,骑自行车中文学习
- 8 你好用中文怎么说?你好中文发音,你好中文学习
- 9 谢谢用中文怎么说?谢谢中文发音,谢谢中文学习
- 10 How to say goodbye in Chinese? 再见Chinese pronunciation, 再见Chinese learning


