
AdaBoost - 集成方法,分类:监督机器学习
 浏览:354
Boosting
Definition and Purpose
Boosting is an ensemble learning technique used in machine learning to improve the accuracy of models. It combines multiple weak classifiers (models that perform slightly better than random guessing) to create a strong classifier. The main purpose of boosting is to sequentially apply the weak classifiers to the data, correcting the errors made by the previous classifiers, and thus improve overall performance.
Key Objectives:
- Improve Accuracy: Enhance the prediction accuracy by combining the outputs of several weak classifiers.
- Reduce Bias and Variance: Address issues of bias and variance to achieve a better generalization of the model.
- Handle Complex Data: Effectively model complex relationships in the data.
AdaBoost (Adaptive Boosting)
Definition and Purpose
AdaBoost, short for Adaptive Boosting, is a popular boosting algorithm. It adjusts the weights of incorrectly classified instances so that subsequent classifiers focus more on difficult cases. The main purpose of AdaBoost is to improve the performance of weak classifiers by emphasizing the hard-to-classify examples in each iteration.
Key Objectives:
- Weight Adjustment: Increase the weight of misclassified instances to ensure the next classifier focuses on them.
- Sequential Learning: Build classifiers sequentially, where each new classifier corrects the errors of its predecessor.
- Improved Performance: Combine weak classifiers to form a strong classifier with better predictive power.
How AdaBoost Works
-
Initialize Weights:
- Assign equal weights to all training instances. For a dataset with n instances, each instance has a weight of 1/n.
-
Train Weak Classifier:
- Train a weak classifier using the weighted dataset.
-
Calculate Classifier Error:
- Compute the error of the weak classifier, which is the sum of the weights of misclassified instances.
-
Compute Classifier Weight:
- Calculate the weight of the classifier based on its error. The weight is given by: alpha = 0.5 * log((1 - error) / error)
- A lower error results in a higher classifier weight.
-
Update Weights of Instances:
- Adjust the weights of the instances. Increase the weights of misclassified instances and decrease the weights of correctly classified instances.
- The updated weight for instance i is: weight[i] = weight[i] * exp(alpha * (misclassified ? 1 : -1))
- Normalize the weights to ensure they sum to 1.
-
Combine Weak Classifiers:
- The final strong classifier is a weighted sum of the weak classifiers: Final classifier = sign(sum(alpha * weak_classifier))
- The sign function determines the class label based on the sum.
AdaBoost (Binary Classification) Example
AdaBoost, short for Adaptive Boosting, is an ensemble technique that combines multiple weak classifiers to create a strong classifier. This example demonstrates how to implement AdaBoost for binary classification using synthetic data, evaluate the model's performance, and visualize the decision boundary.
Python Code Example
1. Import Libraries
import numpy as np
import matplotlib.pyplot as plt
from sklearn.model_selection import train_test_split
from sklearn.ensemble import AdaBoostClassifier
from sklearn.tree import DecisionTreeClassifier
from sklearn.metrics import accuracy_score, confusion_matrix, classification_report
This block imports the necessary libraries for data manipulation, plotting, and machine learning.
2. Generate Sample Data
np.random.seed(42)  # For reproducibility

# Generate synthetic data for 2 classes
n_samples = 1000
n_samples_per_class = n_samples // 2

# Class 0: Centered around (-1, -1)
X0 = np.random.randn(n_samples_per_class, 2) * 0.7   [-1, -1]

# Class 1: Centered around (1, 1)
X1 = np.random.randn(n_samples_per_class, 2) * 0.7   [1, 1]

# Combine the data
X = np.vstack([X0, X1])
y = np.hstack([np.zeros(n_samples_per_class), np.ones(n_samples_per_class)])

# Shuffle the dataset
shuffle_idx = np.random.permutation(n_samples)
X, y = X[shuffle_idx], y[shuffle_idx]
This block generates synthetic data with two features, where the target variable y is defined based on the class center, simulating a binary classification scenario.
3. Split the Dataset
X_train, X_test, y_train, y_test = train_test_split(X, y, test_size=0.2, random_state=42)
This block splits the dataset into training and testing sets for model evaluation.
4. Create and Train the AdaBoost Classifier
base_estimator = DecisionTreeClassifier(max_depth=1)  # Decision stump
model = AdaBoostClassifier(estimator=base_estimator, n_estimators=3, random_state=42)
model.fit(X_train, y_train)
This block initializes the AdaBoost model with a decision stump as the base estimator and trains it using the training dataset.
5. Make Predictions
y_pred = model.predict(X_test)
This block uses the trained model to make predictions on the test set.
6. Evaluate the Model
accuracy = accuracy_score(y_test, y_pred)
conf_matrix = confusion_matrix(y_test, y_pred)
class_report = classification_report(y_test, y_pred)

print(f"Accuracy: {accuracy:.4f}")
print("\nConfusion Matrix:")
print(conf_matrix)
print("\nClassification Report:")
print(class_report)
Output:
Accuracy: 0.9400

Confusion Matrix:
[[96  8]
 [ 4 92]]

Classification Report:
              precision    recall  f1-score   support

         0.0       0.96      0.92      0.94       104
         1.0       0.92      0.96      0.94        96

    accuracy                           0.94       200
   macro avg       0.94      0.94      0.94       200
weighted avg       0.94      0.94      0.94       200
This block calculates and prints the accuracy, confusion matrix, and classification report, providing insights into the model's performance.
7. Visualize the Decision Boundary
x_min, x_max = X[:, 0].min() - 1, X[:, 0].max()   1
y_min, y_max = X[:, 1].min() - 1, X[:, 1].max()   1
xx, yy = np.meshgrid(np.arange(x_min, x_max, 0.1),
                     np.arange(y_min, y_max, 0.1))
Z = model.predict(np.c_[xx.ravel(), yy.ravel()])
Z = Z.reshape(xx.shape)

plt.figure(figsize=(10, 8))
plt.contourf(xx, yy, Z, alpha=0.4, cmap='RdYlBu')
scatter = plt.scatter(X[:, 0], X[:, 1], c=y, cmap='RdYlBu', edgecolor='black')
plt.xlabel("Feature 1")
plt.ylabel("Feature 2")
plt.title("AdaBoost Binary Classification")
plt.colorbar(scatter)
plt.show()
This block visualizes the decision boundary created by the AdaBoost model, illustrating how the model separates the two classes in the feature space.
Output:
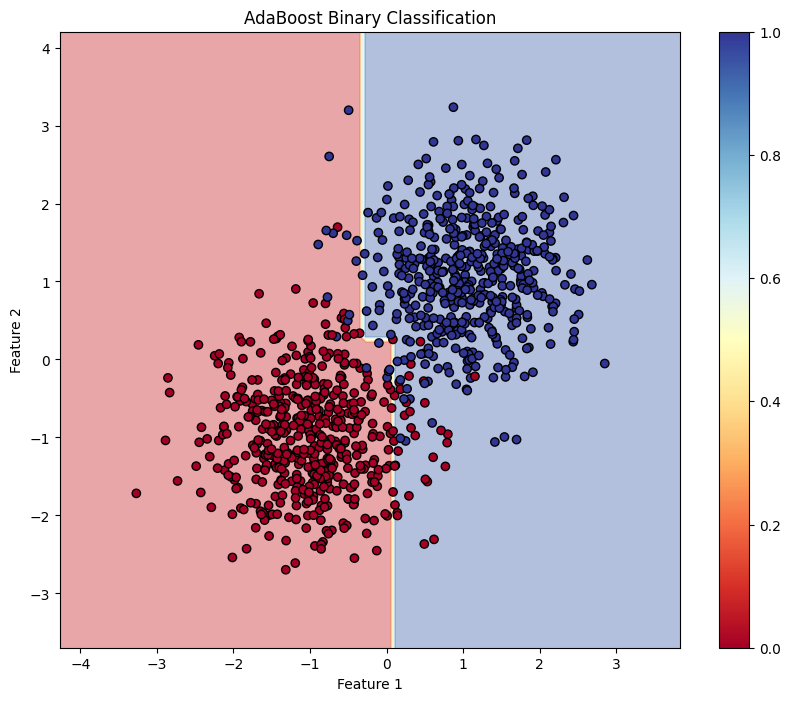
This structured approach demonstrates how to implement and evaluate AdaBoost for binary classification tasks, providing a clear understanding of its capabilities. The visualization of the decision boundary aids in interpreting the model's predictions.
AdaBoost (Multiclass Classification) Example
AdaBoost is an ensemble learning technique that combines multiple weak classifiers to create a strong classifier. This example demonstrates how to implement AdaBoost for multiclass classification using synthetic data, evaluate the model's performance, and visualize the decision boundary for five classes.
Python Code Example
1. Import Libraries
import numpy as np
import matplotlib.pyplot as plt
from sklearn.model_selection import train_test_split
from sklearn.ensemble import AdaBoostClassifier
from sklearn.tree import DecisionTreeClassifier
from sklearn.metrics import accuracy_score, confusion_matrix, classification_report
This block imports the necessary libraries for data manipulation, plotting, and machine learning.
2. Generate Sample Data with 5 Classes
np.random.seed(42)  # For reproducibility
n_samples = 2500  # Total number of samples
n_samples_per_class = n_samples // 5  # Ensure this is exactly n_samples // 5

# Class 0: Centered around (-2, -2)
X0 = np.random.randn(n_samples_per_class, 2) * 0.5   [-2, -2]

# Class 1: Centered around (0, -2)
X1 = np.random.randn(n_samples_per_class, 2) * 0.5   [0, -2]

# Class 2: Centered around (2, -2)
X2 = np.random.randn(n_samples_per_class, 2) * 0.5   [2, -2]

# Class 3: Centered around (-1, 2)
X3 = np.random.randn(n_samples_per_class, 2) * 0.5   [-1, 2]

# Class 4: Centered around (1, 2)
X4 = np.random.randn(n_samples_per_class, 2) * 0.5   [1, 2]

# Combine the data
X = np.vstack([X0, X1, X2, X3, X4])
y = np.hstack([np.zeros(n_samples_per_class),
               np.ones(n_samples_per_class),
               np.full(n_samples_per_class, 2),
               np.full(n_samples_per_class, 3),
               np.full(n_samples_per_class, 4)])

# Shuffle the dataset
shuffle_idx = np.random.permutation(n_samples)
X, y = X[shuffle_idx], y[shuffle_idx]
This block generates synthetic data for five classes located in different regions of the feature space.
3. Split the Dataset
X_train, X_test, y_train, y_test = train_test_split(X, y, test_size=0.2, random_state=42)
This block splits the dataset into training and testing sets for model evaluation.
4. Create and Train the AdaBoost Classifier
base_estimator = DecisionTreeClassifier(max_depth=1)  # Decision stump
model = AdaBoostClassifier(estimator=base_estimator, n_estimators=10, random_state=42)
model.fit(X_train, y_train)
This block initializes the AdaBoost classifier with a weak learner (decision stump) and trains it using the training dataset.
5. Make Predictions
y_pred = model.predict(X_test)
This block uses the trained model to make predictions on the test set.
6. Evaluate the Model
accuracy = accuracy_score(y_test, y_pred)
conf_matrix = confusion_matrix(y_test, y_pred)
class_report = classification_report(y_test, y_pred)

print(f"Accuracy: {accuracy:.4f}")
print("\nConfusion Matrix:")
print(conf_matrix)
print("\nClassification Report:")
print(class_report)
Output:
Accuracy: 0.9540

Confusion Matrix:
[[ 97   2   0   0   0]
 [  0  92   3   0   0]
 [  0   4  92   0   0]
 [  0   0   0  86  14]
 [  0   0   0   0 110]]

Classification Report:
              precision    recall  f1-score   support

         0.0       1.00      0.98      0.99        99
         1.0       0.94      0.97      0.95        95
         2.0       0.97      0.96      0.96        96
         3.0       1.00      0.86      0.92       100
         4.0       0.89      1.00      0.94       110

    accuracy                           0.95       500
   macro avg       0.96      0.95      0.95       500
weighted avg       0.96      0.95      0.95       500
]
Classification Report:
precision recall f1-score support
0.0 1.00 0.98 0.99 99
1.0 0.94 0.97 0.95 95
2.0 0.97 0.96 0.96 96
3.0 1.00 0.86 0.92 100
4.0 0.89 1.00 0.94 110
accuracy 0.95 500
macro avg 0.96 0.95 0.95 500
weighted avg 0.96 0.95 0.95 500
This block calculates and prints the accuracy, confusion matrix, and classification report, providing insights into the model's performance.
x_min, x_max = X[:, 0].min() - 1, X[:, 0].max()   1
y_min, y_max = X[:, 1].min() - 1, X[:, 1].max()   1
xx, yy = np.meshgrid(np.arange(x_min, x_max, 0.1),
                     np.arange(y_min, y_max, 0.1))
Z = model.predict(np.c_[xx.ravel(), yy.ravel()])
Z = Z.reshape(xx.shape)

plt.figure(figsize=(12, 10))
plt.contourf(xx, yy, Z, alpha=0.4, cmap='viridis')
scatter = plt.scatter(X[:, 0], X[:, 1], c=y, cmap='viridis', edgecolor='black')
plt.xlabel("Feature 1")
plt.ylabel("Feature 2")
plt.title("AdaBoost Multiclass Classification (5 Classes)")
plt.colorbar(scatter)
plt.show()
x_min, x_max = X[:, 0].min() - 1, X[:, 0].max() 1 y_min, y_max = X[:, 1].min() - 1, X[:, 1].max() 1 xx, yy = np.meshgrid(np.arange(x_min, x_max, 0.1), np.arange(y_min, y_max, 0.1)) Z = model.predict(np.c_[xx.ravel(), yy.ravel()]) Z = Z.reshape(xx.shape) plt.figure(figsize=(12, 10)) plt.contourf(xx, yy, Z, alpha=0.4, cmap='viridis') scatter = plt.scatter(X[:, 0], X[:, 1], c=y, cmap='viridis', edgecolor='black') plt.xlabel("Feature 1") plt.ylabel("Feature 2") plt.title("AdaBoost Multiclass Classification (5 Classes)") plt.colorbar(scatter) plt.show()
This block visualizes the decision boundaries created by the AdaBoost classifier, illustrating how the model separates the five classes in the feature space.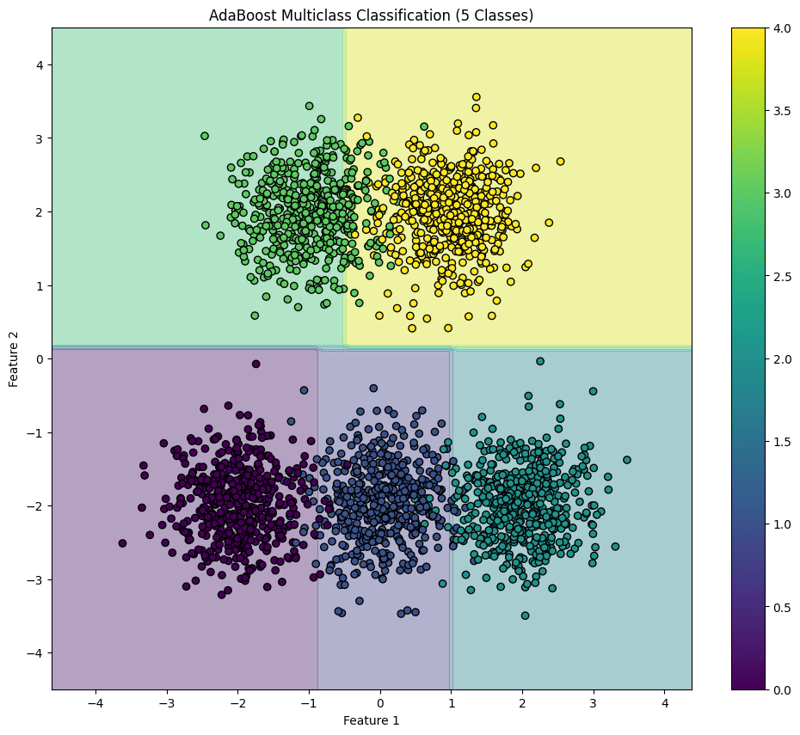
This structured approach demonstrates how to implement and evaluate AdaBoost for multiclass classification tasks, providing a clear understanding of its capabilities and the effectiveness of visualizing decision boundaries.
-
 如何从PHP中的Unicode字符串中有效地产生对URL友好的sl。为有效的slug生成首先,该函数用指定的分隔符替换所有非字母或数字字符。此步骤可确保slug遵守URL惯例。随后,它采用ICONV函数将文本简化为us-ascii兼容格式,从而允许更广泛的字符集合兼容性。接下来,该函数使用正则表达式删除了不需要的字符,例如特殊字符和空格。此步骤可确保slug仅包含...编程 发布于2025-03-25
 -
如何修复\“常规错误:2006 MySQL Server在插入数据时已经消失\”?How to Resolve "General error: 2006 MySQL server has gone away" While Inserting RecordsIntroduction:Inserting data into a MySQL database can...编程 发布于2025-03-25
-
如何使用node-mysql在单个查询中执行多个SQL语句?Multi-Statement Query Support in Node-MySQLIn Node.js, the question arises when executing multiple SQL statements in a single query using the node-mys...编程 发布于2025-03-25
-
如何在Java中执行命令提示命令,包括目录更改,包括目录更改?在java 通过Java通过Java运行命令命令可能很具有挑战性。尽管您可能会找到打开命令提示符的代码段,但他们通常缺乏更改目录并执行其他命令的能力。 solution:使用Java使用Java,使用processBuilder。这种方法允许您:启动一个过程,然后将其标准错误重定向到其标准输出。...编程 发布于2025-03-25
-
如何正确使用与PDO参数的查询一样?在pdo 中使用类似QUERIES在PDO中的Queries时,您可能会遇到类似疑问中描述的问题:此查询也可能不会返回结果,即使$ var1和$ var2包含有效的搜索词。错误在于不正确包含%符号。通过将变量包含在$ params数组中的%符号中,您确保将%字符正确替换到查询中。没有此修改,PDO...编程 发布于2025-03-25
-
如何为PostgreSQL中的每个唯一标识符有效地检索最后一行?postgresql:为每个唯一标识符在postgresql中提取最后一行,您可能需要遇到与数据集合中每个不同标识的信息相关的信息。考虑以下数据:[ 1 2014-02-01 kjkj 在数据集中的每个唯一ID中检索最后一行的信息,您可以在操作员上使用Postgres的有效效率: id dat...编程 发布于2025-03-25
-
为什么不````''{margin:0; }`始终删除CSS中的最高边距?在CSS 问题:不正确的代码: 全球范围将所有余量重置为零,如提供的代码所建议的,可能会导致意外的副作用。解决特定的保证金问题是更建议的。 例如,在提供的示例中,将以下代码添加到CSS中,将解决余量问题: body H1 { 保证金顶:-40px; } 此方法更精确,避免了由全局保证金重置引...编程 发布于2025-03-25
-
PHP阵列键值异常:了解07和08的好奇情况PHP数组键值问题,使用07&08 在给定数月的数组中,键值07和08呈现令人困惑的行为时,就会出现一个不寻常的问题。运行print_r($月)返回意外结果:键“ 07”丢失,而键“ 08”分配给了9月的值。此问题源于PHP对领先零的解释。当一个数字带有0(例如07或08)的前缀时,PHP将其...编程 发布于2025-03-25
-
找到最大计数时,如何解决mySQL中的“组函数\”错误的“无效使用”?如何在mySQL中使用mySql 检索最大计数,您可能会遇到一个问题,您可能会在尝试使用以下命令:理解错误正确找到由名称列分组的值的最大计数,请使用以下修改后的查询: 计数(*)为c 来自EMP1 按名称组 c desc订购 限制1 查询说明 select语句提取名称列和每个名称...编程 发布于2025-03-25
-
\“(1)vs.(;;):编译器优化是否消除了性能差异?\”答案: 在大多数现代编译器中,while(1)和(1)和(;;)之间没有性能差异。编译器: perl: 1 输入 - > 2 2 NextState(Main 2 -E:1)V-> 3 9 Leaveloop VK/2-> A 3 toterloop(next-> 8 last-> 9 ...编程 发布于2025-03-25
-
如何使用Depimal.parse()中的指数表示法中的数字?在尝试使用Decimal.parse(“ 1.2345e-02”中的指数符号表示法表示的字符串时,您可能会遇到错误。这是因为默认解析方法无法识别指数符号。 成功解析这样的字符串,您需要明确指定它代表浮点数。您可以使用numbersTyles.Float样式进行此操作,如下所示:[&& && && ...编程 发布于2025-03-25
-
为什么使用Firefox后退按钮时JavaScript执行停止?导航历史记录问题:JavaScript使用Firefox Back Back 此行为是由浏览器缓存JavaScript资源引起的。要解决此问题并确保在后续页面访问中执行脚本,Firefox用户应设置一个空功能。 警报'); }; alert('inline Alert')...编程 发布于2025-03-25
-
您如何在Laravel Blade模板中定义变量?在Laravel Blade模板中使用Elegance 在blade模板中如何分配变量对于存储以后使用的数据至关重要。在使用“ {{}}”分配变量的同时,它可能并不总是最优雅的解决方案。幸运的是,Blade通过@php Directive提供了更优雅的方法: $ old_section =“...编程 发布于2025-03-25
-
为什么我在Silverlight Linq查询中获得“无法找到查询模式的实现”错误?查询模式实现缺失:解决“无法找到”错误在银光应用程序中,尝试使用LINQ建立错误的数据库连接的尝试,无法找到以查询模式的实现。”当省略LINQ名称空间或查询类型缺少IEnumerable 实现时,通常会发生此错误。 解决问题来验证该类型的质量是至关重要的。在此特定实例中,tblpersoon可能需...编程 发布于2025-03-25
-
版本5.6.5之前,使用current_timestamp与时间戳列的current_timestamp与时间戳列有什么限制?在时间戳列上使用current_timestamp或MySQL版本中的current_timestamp或在5.6.5 此限制源于遗留实现的关注,这些限制需要对当前的_timestamp功能进行特定的实现。 创建表`foo`( `Productid` int(10)unsigned not n...编程 发布于2025-03-25


学习中文
- 1 走路用中文怎么说?走路中文发音,走路中文学习
- 2 坐飞机用中文怎么说?坐飞机中文发音,坐飞机中文学习
- 3 坐火车用中文怎么说?坐火车中文发音,坐火车中文学习
- 4 坐车用中文怎么说?坐车中文发音,坐车中文学习
- 5 开车用中文怎么说?开车中文发音,开车中文学习
- 6 游泳用中文怎么说?游泳中文发音,游泳中文学习
- 7 骑自行车用中文怎么说?骑自行车中文发音,骑自行车中文学习
- 8 你好用中文怎么说?你好中文发音,你好中文学习
- 9 谢谢用中文怎么说?谢谢中文发音,谢谢中文学习
- 10 How to say goodbye in Chinese? 再见Chinese pronunciation, 再见Chinese learning


