
在 � 學習 Three.js
 瀏覽:946
I had the chance to dive into some web development where I wanted to add interactive 3D elements that could move and react to certain triggers. Naturally, this led me to explore Three.js — a super popular library for rendering 3D graphics on the web.
While learning Three.js, I went through a ton of blogs, tutorials, and resources, and I thought, “Why not summarize my journey and share a really cool example?” So, if you’re someone who wants to get started with Three.js, I’ve put together this guide just for you.
As we step into 2024, the need for immersive and interactive 3D experiences is skyrocketing. Whether it’s for e-commerce sites showing 3D models of products, educational platforms using 3D simulations, or even games — 3D technology is transforming the way we engage with digital content. And the best part? With Three.js, creating these experiences is easier than ever!
In this guide, I’ll take you step-by-step through Three.js, and by the end, you’ll have built a 3D scene with a floating astronaut in space. ???
Ready to dive in? Let’s get started!
Why Learn Three.js in 2024? ?
Three.js provides a simple yet powerful way to bring these 3D experiences to the web. Here’s why learning Three.js is a fantastic idea in 2024:
- WebXR and WebGL: Virtual reality (VR) and augmented reality (AR) on the web are growing, and Three.js is WebXR-ready.
- Cross-Browser Support: It works seamlessly across modern browsers, including mobile ones.
- Lightweight 3D Creation: No need to learn complex WebGL. Three.js makes 3D creation as easy as writing JavaScript.
- Growing Community: With more than a decade of active development, the library has an ever-growing collection of plugins and examples.
Setting Up: Your First Three.js Scene
Let’s start with the basics. The magic of Three.js starts with three core concepts: Scene, Camera, and Renderer. If you understand these, you’re already halfway there!
1. The Scene ?️
Think of the scene as your 3D canvas. It contains all the objects, lights, and cameras needed to create the final 3D rendering.
const scene = new THREE.Scene();
2. The Camera ?
The camera is your “viewpoint” into the 3D world. In 2024, most developers use PerspectiveCamera, which simulates how human eyes see the world.
const camera = new THREE.PerspectiveCamera(
  75, // Field of view
  window.innerWidth / window.innerHeight, // Aspect ratio
  0.1, // Near clipping plane
  1000 // Far clipping plane
);
camera.position.z = 5; // Move the camera back so we can see the objects
3. The Renderer ?
The renderer converts the 3D scene and camera into a 2D image for the browser to display. In 2024, we typically use WebGLRenderer, which is optimized for modern browsers.
const renderer = new THREE.WebGLRenderer();
renderer.setSize(window.innerWidth, window.innerHeight);
document.body.appendChild(renderer.domElement);
// Adds the canvas to the webpage
4. Creating a Simple 3D Object: A Cube ?
Let’s create our first 3D object: a cube. We define its geometry, give it a material, and combine them into a mesh.
const geometry = new THREE.BoxGeometry(); // Define the shape (cube)
const material = new THREE.MeshBasicMaterial({ color: 0x00ff00 });
 // Apply a green color to the cube
const cube = new THREE.Mesh(geometry, material);
// Combine the geometry and material into a 3D mesh
scene.add(cube); // Add the cube to the scene
5. Animating the Cube ?
3D is all about movement! Let’s make our cube rotate. To do this, we create an animation loop using requestAnimationFrame, which ensures smooth 60fps rendering.
function animate() {
  requestAnimationFrame(animate); // Keep looping the function for continuous animation

  cube.rotation.x  = 0.01; // Rotate cube on the X axis
  cube.rotation.y  = 0.01; // Rotate cube on the Y axis
renderer.render(scene, camera); // Render the scene from the camera's perspective
}
animate(); // Start the animation loop
Putting It All Together:
const scene = new THREE.Scene();
const camera = new THREE.PerspectiveCamera(75, window.innerWidth / window.innerHeight, 0.1, 1000);
camera.position.z = 5;

const renderer = new THREE.WebGLRenderer();
renderer.setSize(window.innerWidth, window.innerHeight);
document.body.appendChild(renderer.domElement);
const geometry = new THREE.BoxGeometry();
const material = new THREE.MeshBasicMaterial({ color: 0x00ff00 });
const cube = new THREE.Mesh(geometry, material);
scene.add(cube);
function animate() {
  requestAnimationFrame(animate);
  cube.rotation.x  = 0.01;
  cube.rotation.y  = 0.01;
  renderer.render(scene, camera);
}
animate();
Congrats! ? You’ve now set up the basics of a 3D world ! ?
Adding Objects to the Scene ?️
Now that we have a scene, camera, and renderer, it’s time to add some 3D objects! We’ll start with something simple: a rotating cube.
const geometry = new THREE.BoxGeometry(); // Defines the shape
const material = new THREE.MeshBasicMaterial({ color: 0x00ff00 });
// Adds color to the shape
const cube = new THREE.Mesh(geometry, material);
// Combines the shape and color
scene.add(cube); // Adds the cube to the scene
Adding Animation:
Now let’s animate the cube so it spins! Real-time graphics need smooth animations, and we can achieve that with requestAnimationFrame.
function animate() {
  requestAnimationFrame(animate); // Keep looping through this function

  cube.rotation.x  = 0.01; // Rotate the cube around the X axis
  cube.rotation.y  = 0.01; // Rotate the cube around the Y axis

renderer.render(scene, camera); // Render the scene from the perspective of the camera

}
animate(); // Start the animation loop
And boom ? — You’ve just created your first animated 3D object in Three.js!
Taking It Up a Notch
Lights, Materials, and Shadows ?
3D graphics are nothing without light. The more realistic the lighting, the more impressive your 3D world becomes. Let’s explore:
Adding Lights ?
Without light, even the best 3D models will look flat and lifeless. In Three.js, there are several types of lights:
- AmbientLight: Provides soft global lighting that illuminates all objects equally.
- DirectionalLight: Simulates sunlight, casting parallel light rays in a specific direction.
const ambientLight = new THREE.AmbientLight(0x404040, 2);
 // Soft light to brighten the scene
scene.add(ambientLight);

const directionalLight = new THREE.DirectionalLight(0xffffff, 1);
directionalLight.position.set(1, 1, 1).normalize();
// Light from top-right corner
scene.add(directionalLight);
Better Materials for Realism ?
MeshStandardMaterial is the go-to material for creating objects that look realistic.
const material = new THREE.MeshStandardMaterial({ color: 0xff0051, metalness: 0.6, roughness: 0.4 });
Interactivity with OrbitControls ?️
What’s a 3D scene without interactivity? With OrbitControls, you can let users rotate, pan, and zoom in your 3D world.
const controls = new THREE.OrbitControls(camera, renderer.domElement);
controls.update(); // Make sure the controls stay in sync with the camera
Textures and Models: Bringing Realism to Life ?
loading 3D models and textures is key to building immersive experiences. Here’s how to load a 3D model of, say, a floating astronaut (because why not? ?):
Using the GLTFLoader:
const loader = new THREE.GLTFLoader();
loader.load('/path-to-your-model/astronaut.glb', function (gltf) {
  scene.add(gltf.scene); // Add the astronaut to the scene
});
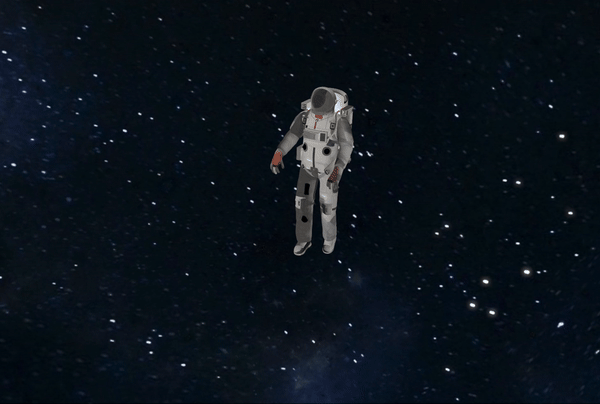
Real-World Example: Floating Astronaut in Space ???
Let’s bring everything together with a complete example — a floating astronaut in space! This example demonstrates everything we’ve covered so far: 3D models, textures, lights, animations, and interactivity.

Key Aspects of the Code:
Astronaut Model:
The astronaut model (astronaut.glb) is loaded using useGLTF().
The model uses several textures (color, roughness, metalness, normal, and ambient occlusion).
Textures:
- Color Texture: Adds base color to the astronaut model.
- Roughness Texture: Determines how rough or smooth the surface of the astronaut is.
- Metalness Texture: Controls how metallic the material looks.
- Normal Texture: Adds surface detail to make the astronaut’s surface look more realistic.
- Ambient Occlusion (AO): Adds shadows in crevices to give the astronaut model more depth.
Lighting:
- Ambient Light: Adds overall brightness to the scene.
- Directional Light: Illuminates the astronaut from one direction, simulating sunlight.
- Spot Light: Adds focused light on the astronaut to emphasize key areas.
Post-Processing:
Bloom: A bloom effect is used to create a subtle glow, enhancing the overall visual appeal.
Controls:
OrbitControls: Allows the user to interact with the scene by zooming and panning around the astronaut.
Final Code for Floating Astronaut:
The code you provided implements a 3D floating astronaut in space using Three.js, React Three Fiber, and various textures. Below is an explanation of the code along with some minor improvements:
import * as THREE from 'three';
import React, { useRef, useEffect } from 'react';
import { Canvas, useFrame, useLoader } from '@react-three/fiber';
import { OrbitControls, useGLTF } from '@react-three/drei';
import { TextureLoader, AnimationMixer, BackSide } from 'three';
import { EffectComposer, Bloom } from '@react-three/postprocessing';
const Astronaut = () => {
const { scene, animations } = useGLTF('/astronaut.glb'); // Load the astronaut model
const mixer = useRef(null);
useEffect(() => {
scene.scale.set(0.3, 0.3, 0.3); // Scale down the astronaut
}, [scene]);
useFrame((state, delta) => {
if (!mixer.current && animations.length) {
mixer.current = new AnimationMixer(scene);
mixer.current.clipAction(animations[0]).play();
}
if (mixer.current) mixer.current.update(delta);
});
return
);
};
const App = () => {
return (
);
};
export default App;
- Astronaut Model: The astronaut model is loaded using GLTFLoader, animated with AnimationMixer.
- Space Background: A large textured sphere acts as the space backdrop.
- Lighting: Ambient and directional lights make the astronaut stand out, while bloom adds a glowing effect.
- Interactivity: Users can pan, zoom, and rotate using OrbitControls. Heres how the result looks like:
Wrapping Up ?
With Three.js, creating stunning 3D experiences has never been easier. Whether you’re interested in building games, interactive websites, or visualizing data in 3D, the possibilities are endless. In 2024, the web is more immersive than ever, and with Three.js, you can be a part of this exciting future.
GitHub Repository ?
You can find the full source code for the floating astronaut in space project on GitHub. Feel free to explore, clone, and modify it to suit your needs.
GitHub Repository: 3D Floating Astronaut Project
Assets and Image Links ?
3D Astronaut Model: The astronaut model used in this project can be found on Sketchfab.
Animated Floating Astronaut in Space Suit (Sketchfab)Background Image: The background space image is provided by Alex Myers from Pixabay.
Image by Alex Myers from Pixabay.
Happy coding, future 3D creator! ?
-
 如何使用不同數量列的聯合數據庫表?合併列數不同的表 當嘗試合併列數不同的數據庫表時,可能會遇到挑戰。一種直接的方法是在列數較少的表中,為缺失的列追加空值。 例如,考慮兩個表,表 A 和表 B,其中表 A 的列數多於表 B。為了合併這些表,同時處理表 B 中缺失的列,請按照以下步驟操作: 確定表 B 中缺失的列,並將它們添加到表的...程式設計 發佈於2025-04-20
 -
如何使用node-mysql在單個查詢中執行多個SQL語句?在node-mysql node-mysql文檔最初出於安全原因最初禁用多個語句支持,因為它可能導致SQL注入攻擊。要啟用此功能,您需要在創建連接時將倍增設置設置為true: var connection = mysql.createconnection({{multipleStatement:...程式設計 發佈於2025-04-20
-
Python中何時用"try"而非"if"檢測變量值?使用“ try“ vs.” if”來測試python 在python中的變量值,在某些情況下,您可能需要在處理之前檢查變量是否具有值。在使用“如果”或“ try”構建體之間決定。 “ if” constructs result = function() 如果結果: 對於結果: ...程式設計 發佈於2025-04-20
-
如何使用FormData()處理多個文件上傳?)處理多個文件輸入時,通常需要處理多個文件上傳時,通常是必要的。 The fd.append("fileToUpload[]", files[x]); method can be used for this purpose, allowing you to send multi...程式設計 發佈於2025-04-20
-
如何在php中使用捲髮發送原始帖子請求?如何使用php 創建請求來發送原始帖子請求,開始使用curl_init()開始初始化curl session。然後,配置以下選項: curlopt_url:請求 [要發送的原始數據指定內容類型,為原始的帖子請求指定身體的內容類型很重要。在這種情況下,它是文本/平原。要執行此操作,請使用包含以下標頭...程式設計 發佈於2025-04-20
-
如何使用Depimal.parse()中的指數表示法中的數字?在嘗試使用Decimal.parse(“ 1.2345e-02”中的指數符號表示法表示的字符串時,您可能會遇到錯誤。這是因為默認解析方法無法識別指數符號。 成功解析這樣的字符串,您需要明確指定它代表浮點數。您可以使用numbersTyles.Float樣式進行此操作,如下所示:[&& && && ...程式設計 發佈於2025-04-20
-
PHP SimpleXML解析帶命名空間冒號的XML方法在php 很少,請使用該限制很大,很少有很高。例如:這種技術可確保可以通過遍歷XML樹和使用兒童()方法()方法的XML樹和切換名稱空間來訪問名稱空間內的元素。程式設計 發佈於2025-04-20
-
為什麼Microsoft Visual C ++無法正確實現兩台模板的實例?The Mystery of "Broken" Two-Phase Template Instantiation in Microsoft Visual C Problem Statement:Users commonly express concerns that Micro...程式設計 發佈於2025-04-20
-
如何使用Regex在PHP中有效地提取括號內的文本php:在括號內提取文本在處理括號內的文本時,找到最有效的解決方案是必不可少的。一種方法是利用PHP的字符串操作函數,如下所示: 作為替代 $ text ='忽略除此之外的一切(text)'; preg_match('#((。 &&& [Regex使用模式來搜索特...程式設計 發佈於2025-04-20
-
在Python中如何創建動態變量?在Python 中,動態創建變量的功能可以是一種強大的工具,尤其是在使用複雜的數據結構或算法時,Dynamic Variable Creation的動態變量創建。 Python提供了幾種創造性的方法來實現這一目標。 利用dictionaries 一種有效的方法是利用字典。字典允許您動態創建密鑰並...程式設計 發佈於2025-04-20
-
為什麼PYTZ最初顯示出意外的時區偏移?與pytz 最初從pytz獲得特定的偏移。例如,亞洲/hong_kong最初顯示一個七個小時37分鐘的偏移: 差異源利用本地化將時區分配給日期,使用了適當的時區名稱和偏移量。但是,直接使用DateTime構造器分配時區不允許進行正確的調整。 example pytz.timezone(&#...程式設計 發佈於2025-04-20
-
為什麼HTML無法打印頁碼及解決方案無法在html頁面上打印頁碼? @page規則在@Media內部和外部都無濟於事。 HTML:Customization:@page { margin: 10%; @top-center { font-family: sans-serif; font-weight: ...程式設計 發佈於2025-04-20
-
在Java中使用for-to-loop和迭代器進行收集遍歷之間是否存在性能差異?For Each Loop vs. Iterator: Efficiency in Collection TraversalIntroductionWhen traversing a collection in Java, the choice arises between using a for-...程式設計 發佈於2025-04-20
-
如何使用Java.net.urlConnection和Multipart/form-data編碼使用其他參數上傳文件?使用http request 上傳文件上傳到http server,同時也提交其他參數,java.net.net.urlconnection and Multipart/form-data Encoding是普遍的。 Here's a breakdown of the process:Mu...程式設計 發佈於2025-04-20
-
如何在Chrome中居中選擇框文本?選擇框的文本對齊:局部chrome-inly-ly-ly-lyly solument 您可能希望將文本中心集中在選擇框中,以獲取優化的原因或提高可訪問性。但是,在CSS中的選擇元素中手動添加一個文本 - 對屬性可能無法正常工作。 初始嘗試 state)</option> < o...程式設計 發佈於2025-04-20


學習中文
- 1 走路用中文怎麼說? 走路中文發音,走路中文學習
- 2 坐飛機用中文怎麼說? 坐飞机中文發音,坐飞机中文學習
- 3 坐火車用中文怎麼說? 坐火车中文發音,坐火车中文學習
- 4 坐車用中文怎麼說? 坐车中文發音,坐车中文學習
- 5 開車用中文怎麼說? 开车中文發音,开车中文學習
- 6 游泳用中文怎麼說? 游泳中文發音,游泳中文學習
- 7 騎自行車用中文怎麼說? 骑自行车中文發音,骑自行车中文學習
- 8 你好用中文怎麼說? 你好中文發音,你好中文學習
- 9 謝謝用中文怎麼說? 谢谢中文發音,谢谢中文學習
- 10 How to say goodbye in Chinese? 再见Chinese pronunciation, 再见Chinese learning


