
如何在 Steam Deck 上安裝 Windows
 瀏覽:644
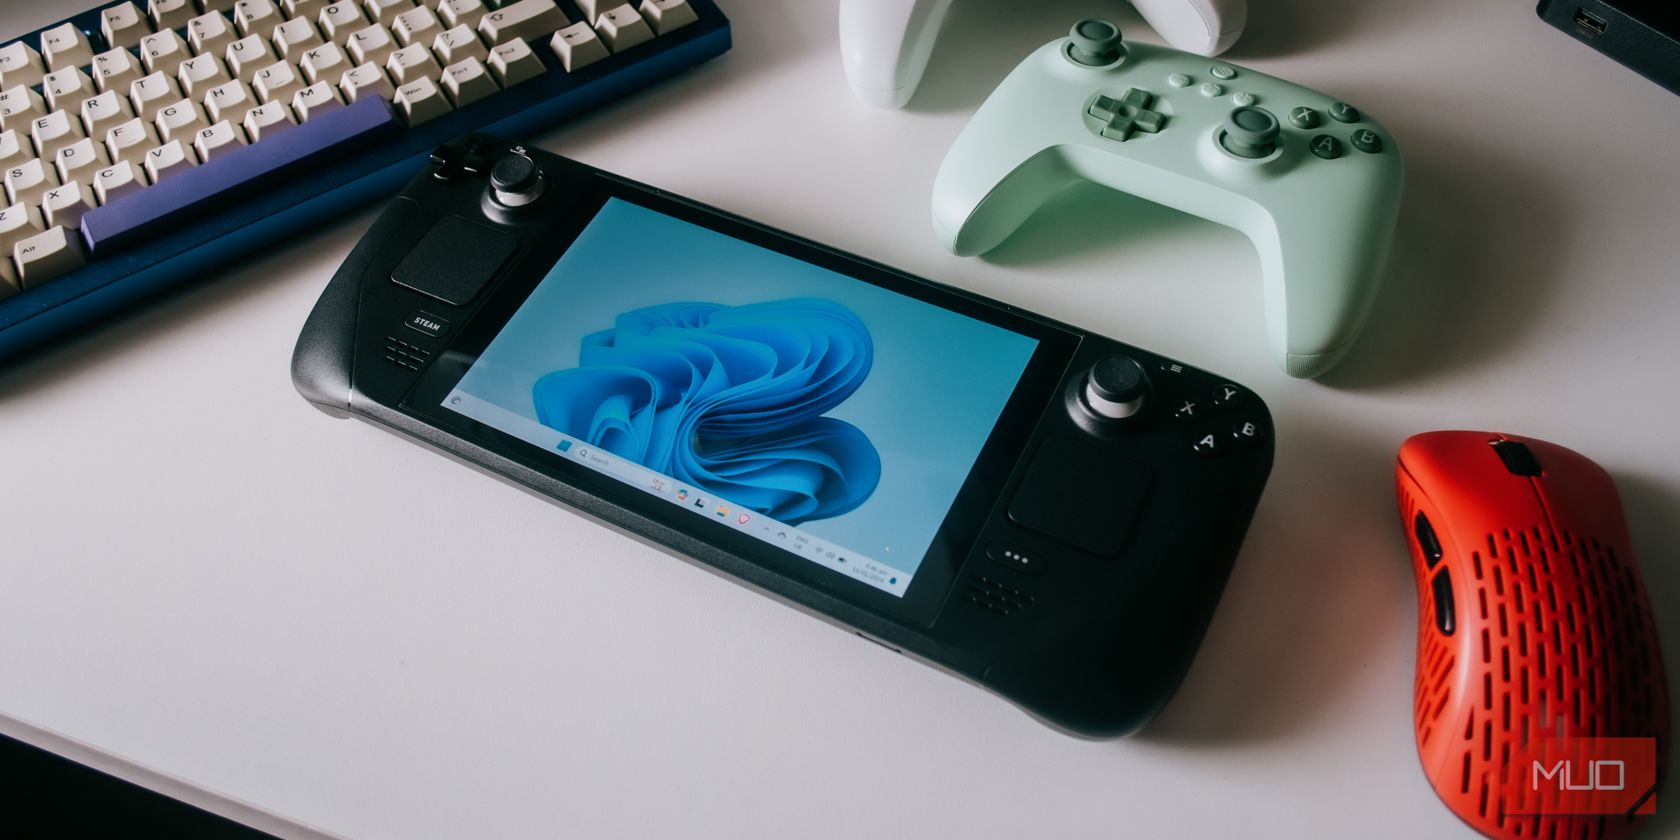
Do you want to have a familiar operating system or Game Pass on your Steam Deck? You can dual-boot SteamOS with Windows on the device. Here’s a thorough guide on installing Windows 11 on your Steam Deck.
Why You Should Install Windows on Your Steam Deck
If you’re someone who owns a PC, the chances are very high that you’re running Windows on it. Windows is familiar to many and is fairly easy to use.
While not having a mouse and keyboard on your Steam Deck will pose some navigation issues, having an operating system that’s familiar to you and that you know how to use might be worth that sacrifice.
Having Windows on your Steam Deck can also make it a work laptop or desktop replacement. You can easily use Photoshop, Microsoft Office apps, Lightroom, and all the usual suspects on Windows—so long as you’re willing to bring around a mouse and keyboard. Thankfully, there are plenty of Steam Deck accessories that can make doing real work on it a breeze.
What You Need to Install Windows on Your Steam Deck
You only need a few things to install Windows on your Steam Deck, most of which are software. But you will need a few hardware accessories as well.
Hardware
For hardware, you really only need a USB flash drive and a USB-C hub to plug it into your Steam Deck. You can also install an SD card on your Steam Deck as long as it's decently fast. A USB 3.0 or higher flash drive or a UHS-I or higher SD card would suffice, but we wouldn’t suggest anything slower.
We also highly suggest using a separate PC as we've done in this guide, but you can also use your Steam Deck and follow similar steps using the Linux version of Ventoy.
Ventoy
The first piece of software is Ventoy, a program that allows you to boot multiple ISOs from one external storage device without needing to format it to add a different ISO. This will avoid the back-and-forth formatting of the storage device used, making it easier to go back in case you make a mistake along the way.
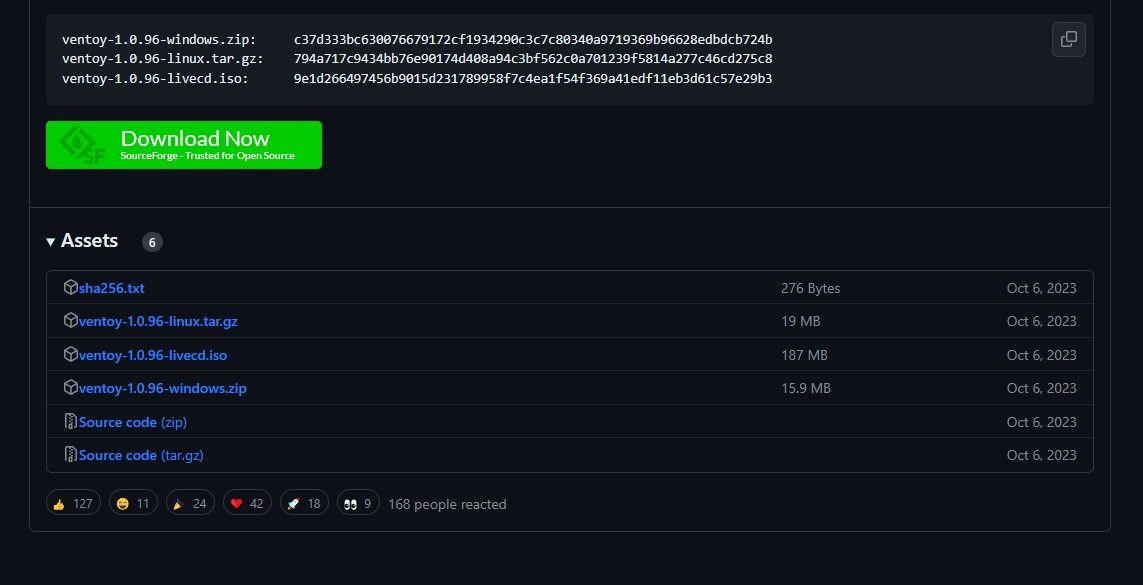
Head to Ventoy’s GitHub page and on the right side, click on Releases. Scroll down to Assets and click on the ZIP folder that says Windows on it. Extract the contents into a folder on your PC.
GNOME Partition Editor (GParted) ISO
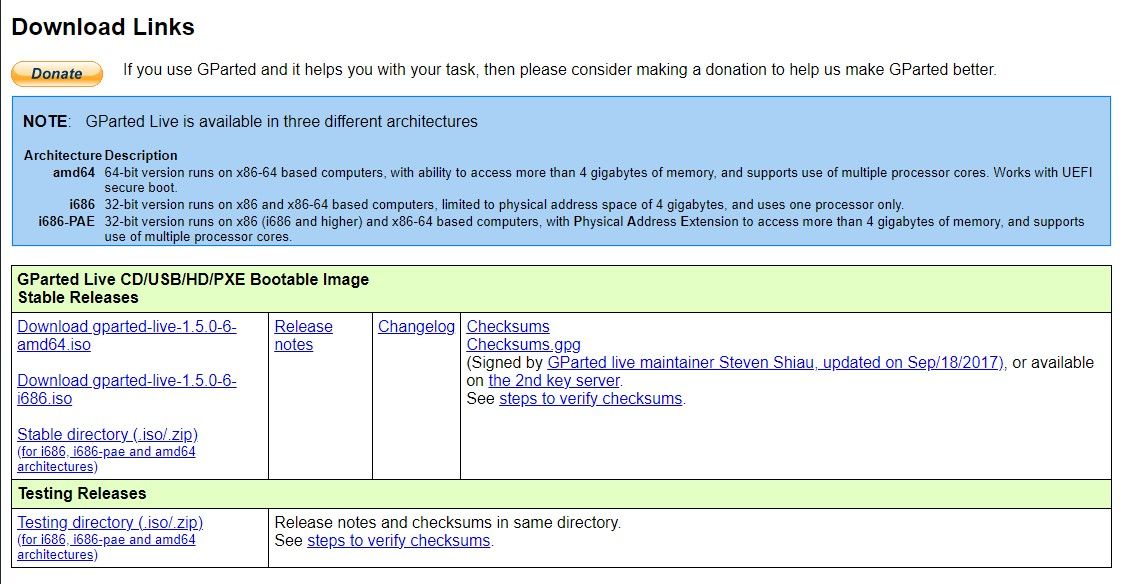
GParted is an ISO used to create partitions on your internal SSD on your Steam Deck. The new partition will be where you’ll place the Windows installation. To download it, head to GParted.org and click on the amd64.iso download file.
Windows 11 ISO
To put Windows onto your Steam Deck, you’ll of course need the installer. You can easily find this on Microsoft’s Windows 11 page.
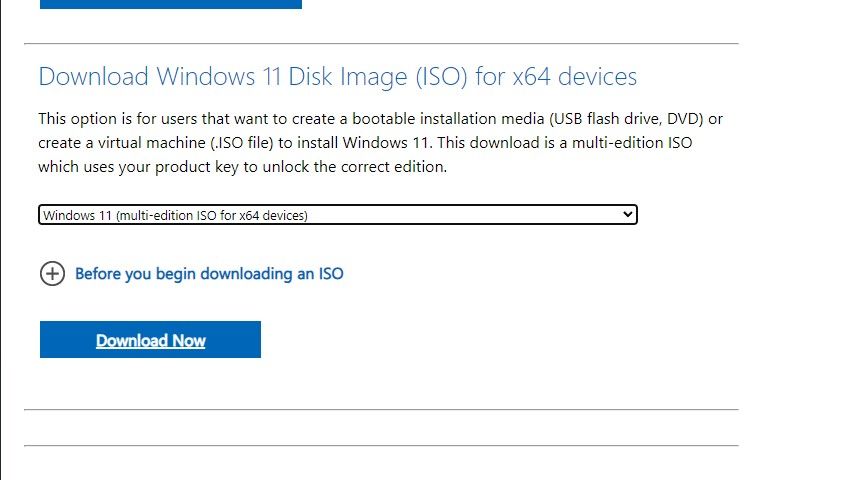
Head to the Download Windows 11 Disk Image (ISO) option and on the dropdown menu, select Windows 11 (multi-edition ISO). Click on Download, then select your language. It should then give you another download button to download the Windows ISO that is about 6GB to 7GB in size.
Windows Drivers for Steam Deck
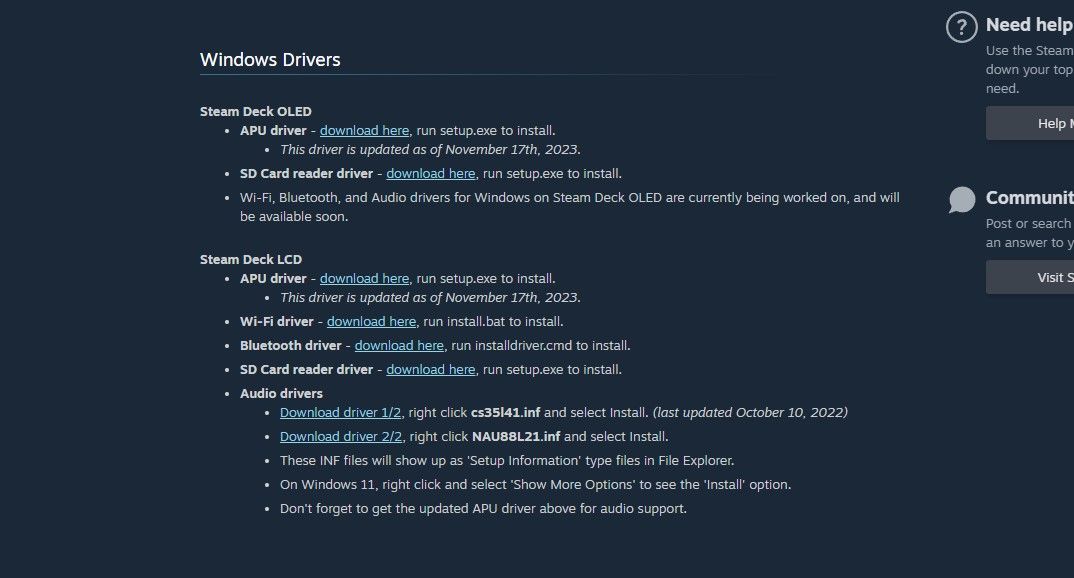
Windows doesn’t support all the Steam Deck’s hardware straight from the get-go. Fortunately, Steam has provided Windows drivers so that your audio, Wi-Fi, Bluetooth, SD card reader, and APU are all working properly.
You can find and download the Windows drivers for your Steam Deck on the Steam Deck Windows Resources support page. Extract all of them into a single folder so that you can paste it onto your SD card or flash drive later.
How to Install Windows on Your Steam Deck
If you’ve got your flash drive or SD card ready with all the software downloaded, you can now start turning your Steam Deck into a Windows experience. In our case, we’ll be using an SD card so that we don’t need to deal with a USB hub or a dock.
1. Install Ventoy on Your Flash Drive or SD Card
To be able to run both the GParted and the Windows 11 ISOs from one SD card without needing to format it multiple times, you’ll need to use Ventoy. This will make things way more convenient.
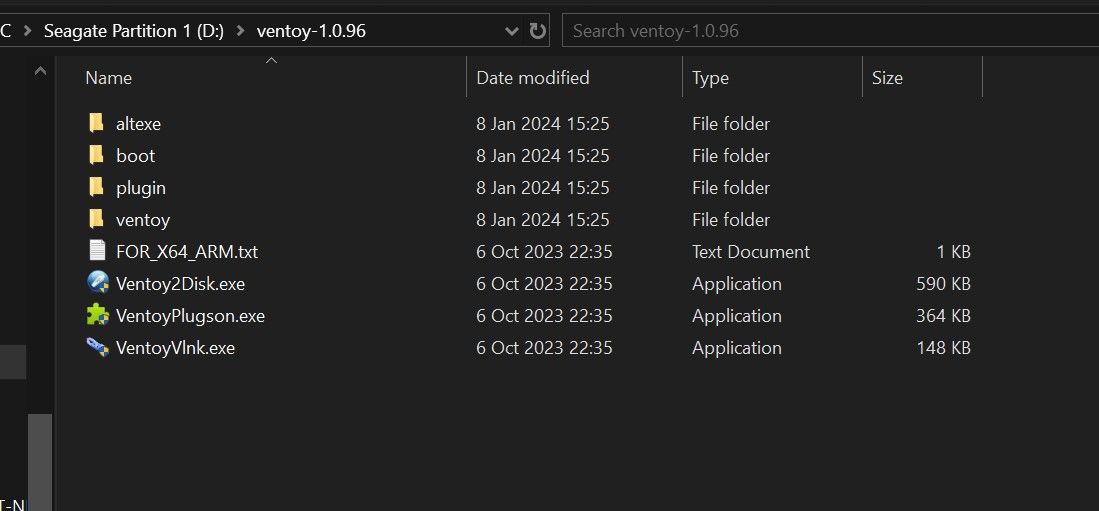
To install Ventoy on your flash drive or SD card, you’ll want to plug it into your PC and open the Ventoy folder you extracted earlier. Then click on Ventoy2Disk.exe.
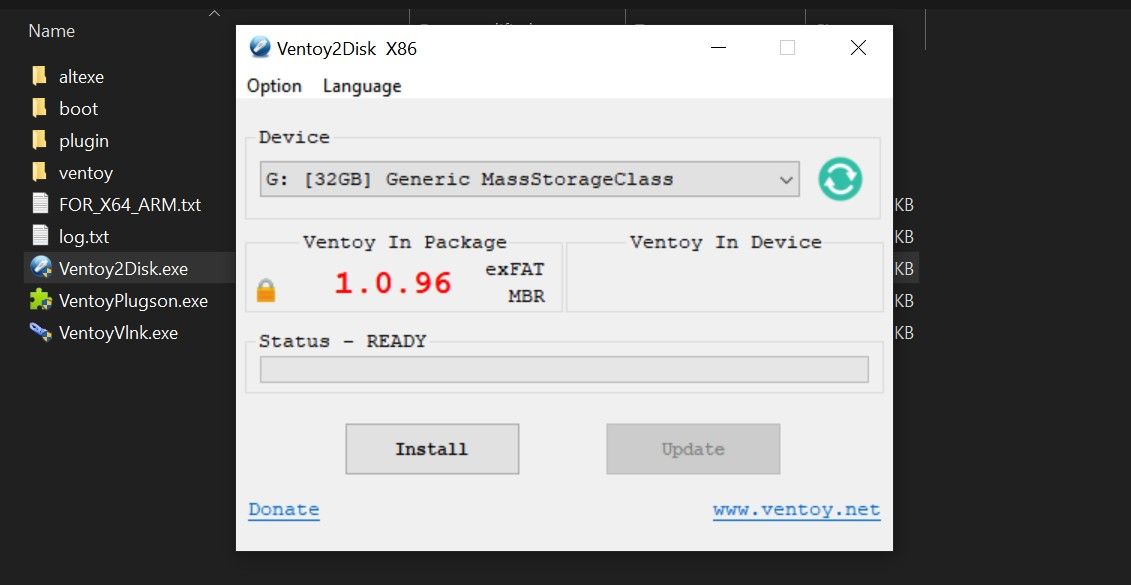
You’ll then select the storage device you want to store Ventoy on. In our case, it’s the 32GB SD card. Click Install.
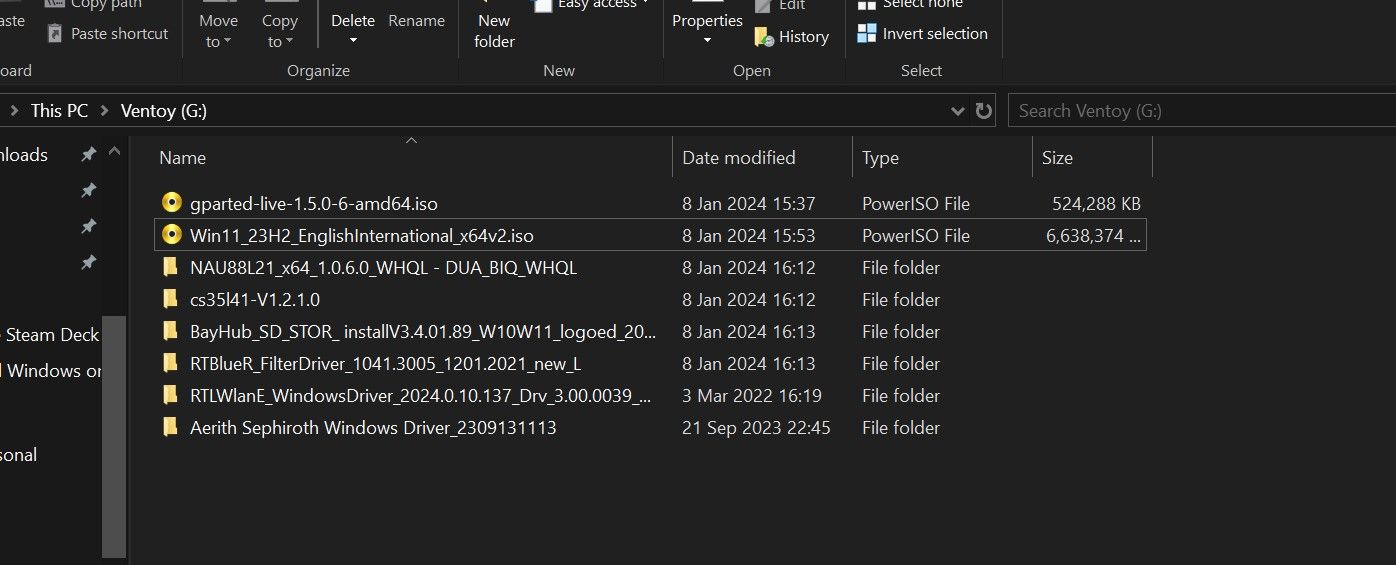
Now that Ventoy is installed, copy over GParted, the Windows 11 ISO, and a folder containing the Windows drivers for the Steam Deck. You can now insert the SD card into the Steam Deck.
2. Enter the Steam Deck Boot Manager
Next, you’ll need to boot from the SD card or flash drive you’ve connected to the Steam Deck using the device's boot manager.
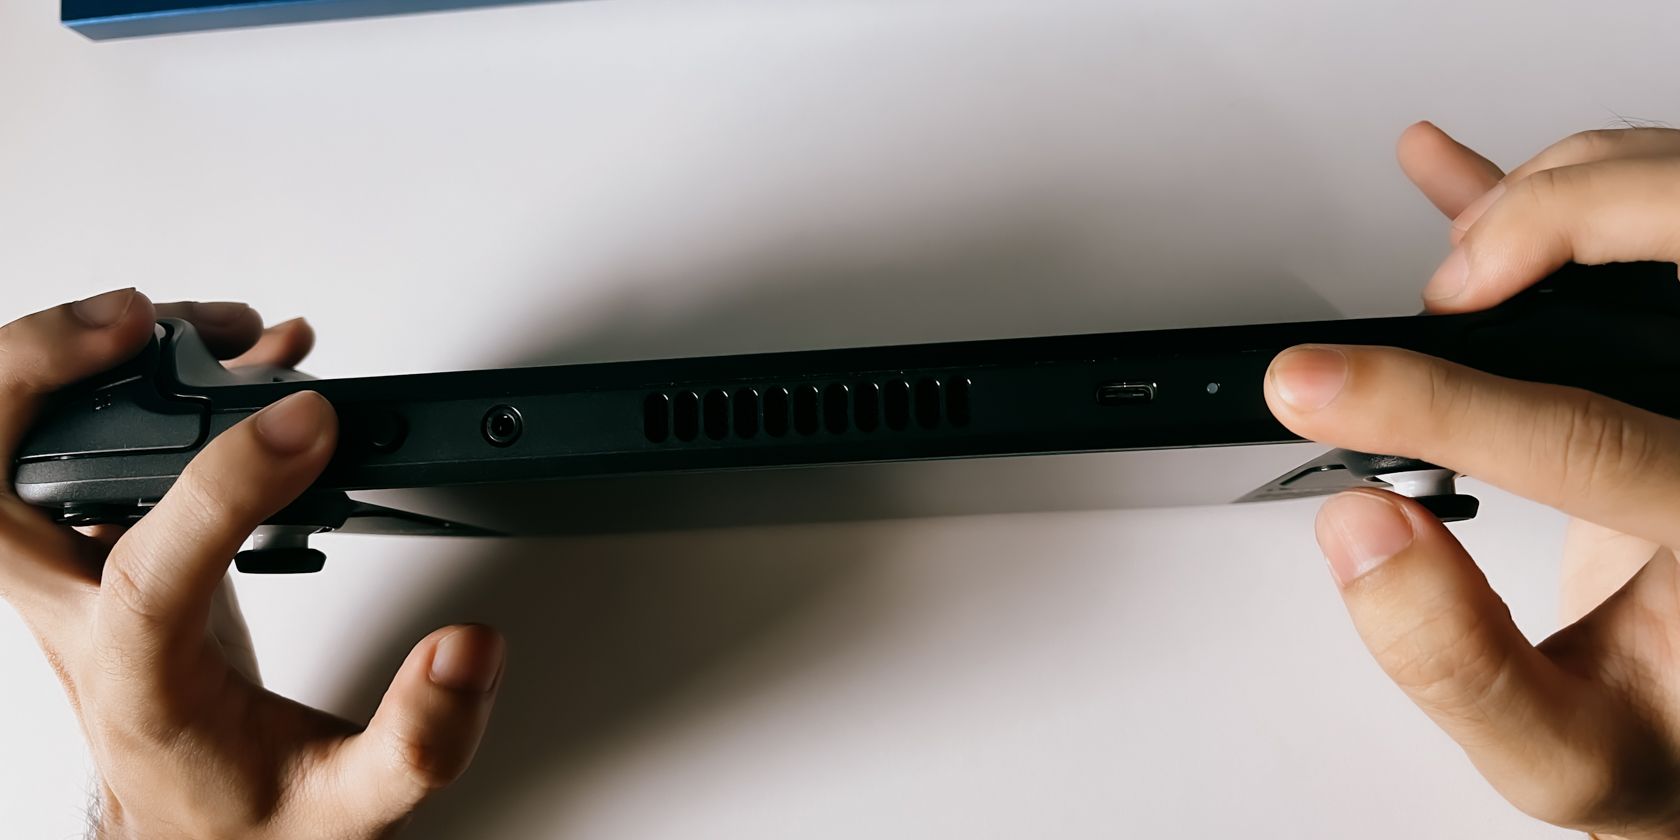
To do this, shut down your Steam Deck first. Once it’s off, hold down the volume down button and power button until you hear a chime. Once you hear the chime, let go of the power button, but keep holding down the volume down button until the boot manager shows, like in the image below.
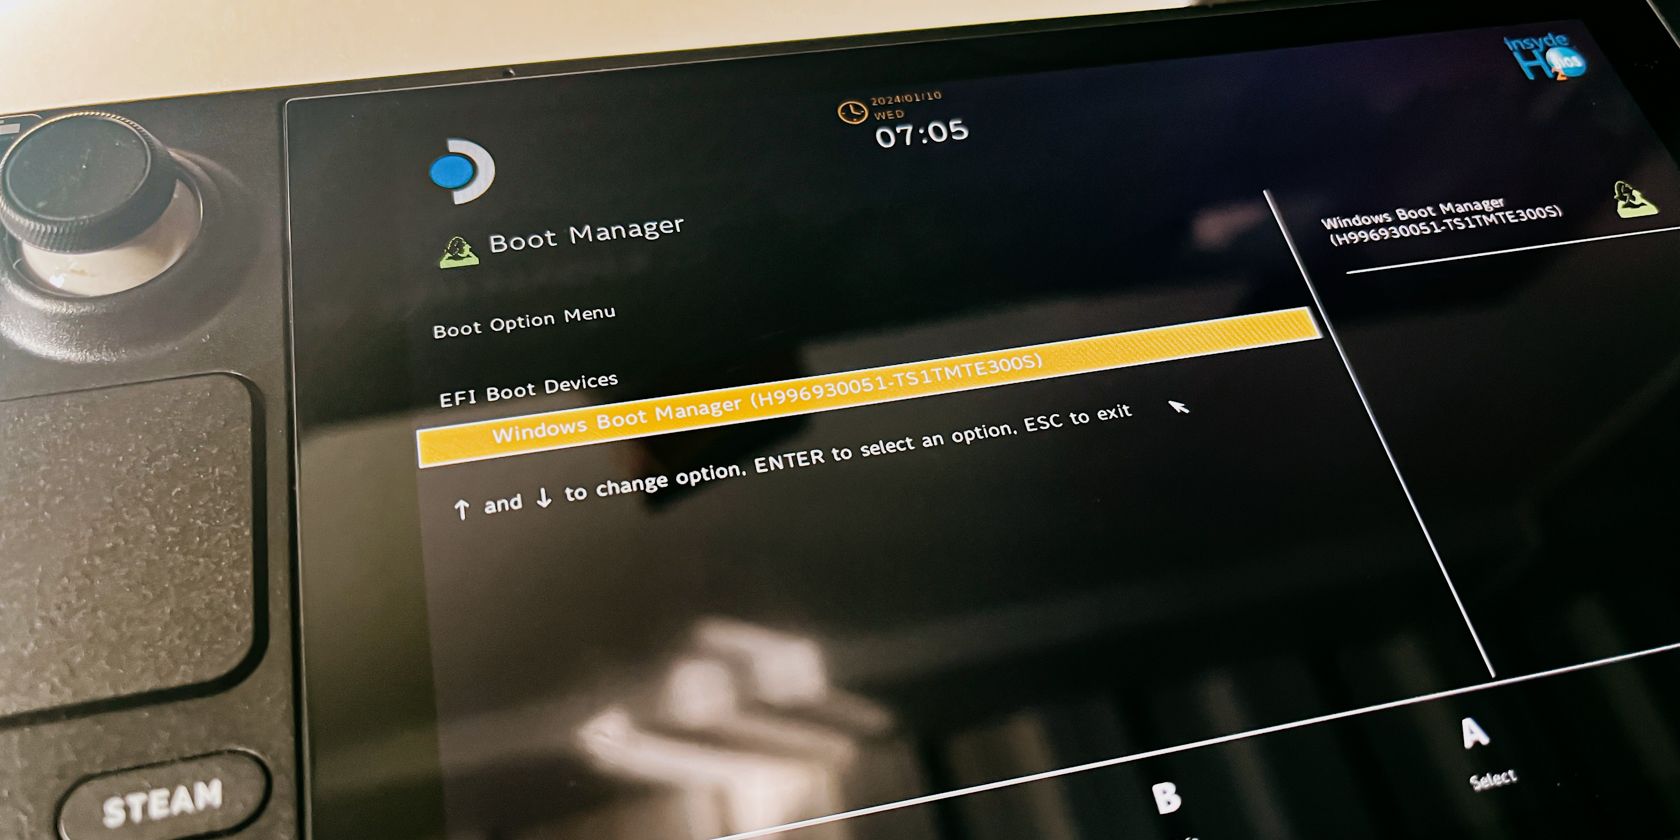
If you hold down the power button after the chime, you’ll most likely end up turning your Steam Deck off again.
Once you’re in the boot manager, select the SD card or flash drive. This should show Ventoy and both the Windows and GParted ISOs.
3. Use GParted to Partition Your Internal SSD
You'll now need to partition your Steam Deck's SSD. If you don't, you most likely won't be able to install Windows 11 on the /home partition, and you'll also end up wiping SteamOS from your drive.
If you want just Windows on your Steam Deck, you can also use Ventoy to wipe all partitions and either leave the combined partition as unallocated or format it as NTFS. We don't suggest this, however, as SteamOS really is the best way to experience the Steam Deck. It's better to have the option to switch between the two than be stuck with just Windows.
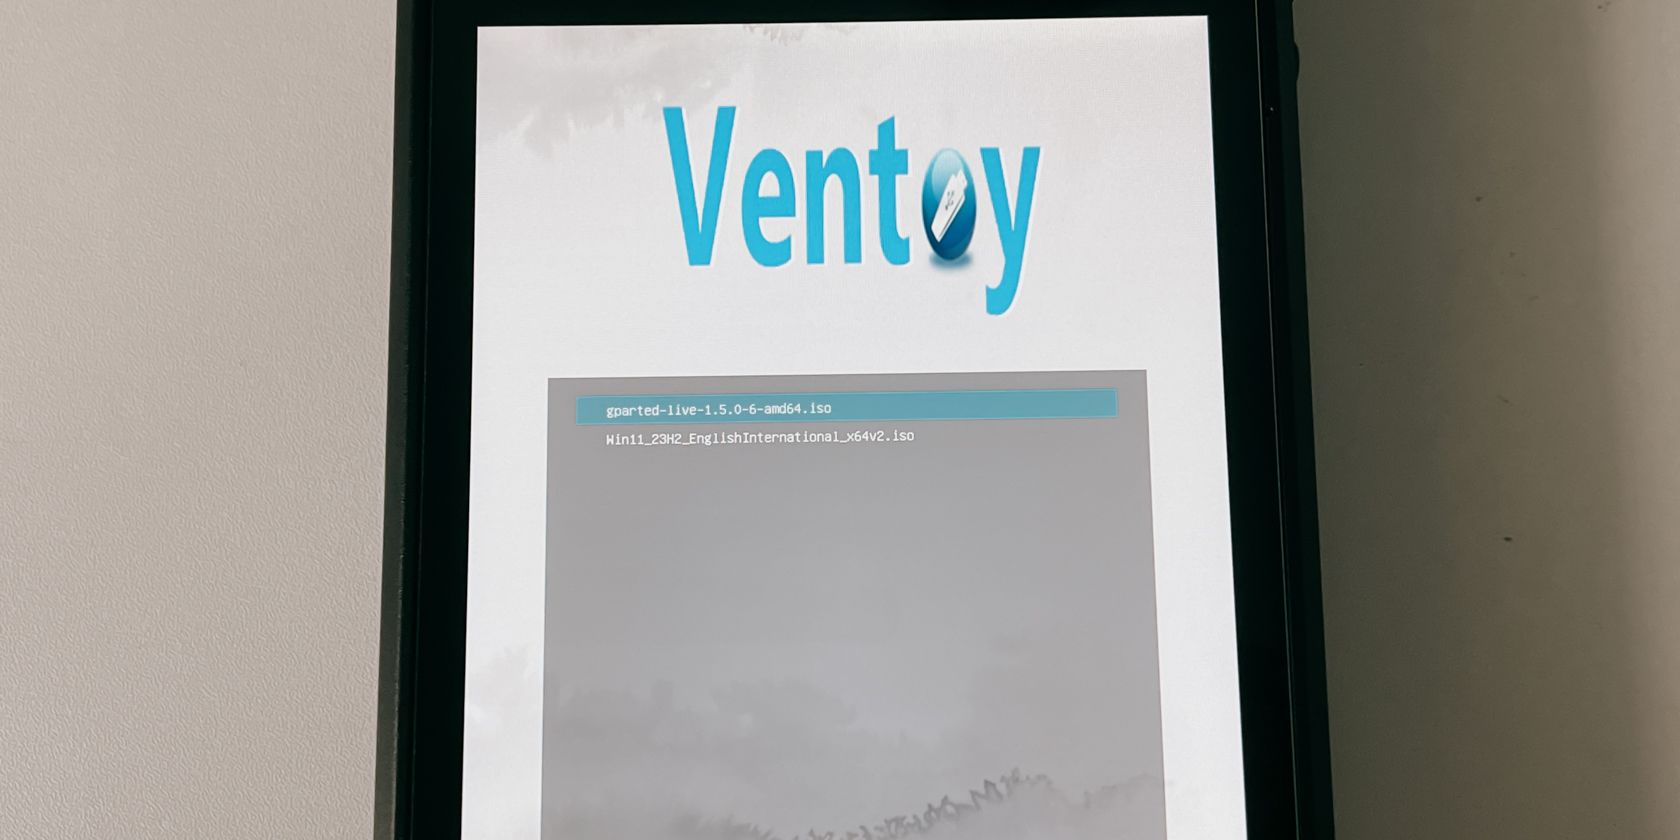
On Ventoy, select GParted to run it. You can run it in normal mode, but if that doesn’t work, grub2 might do it.
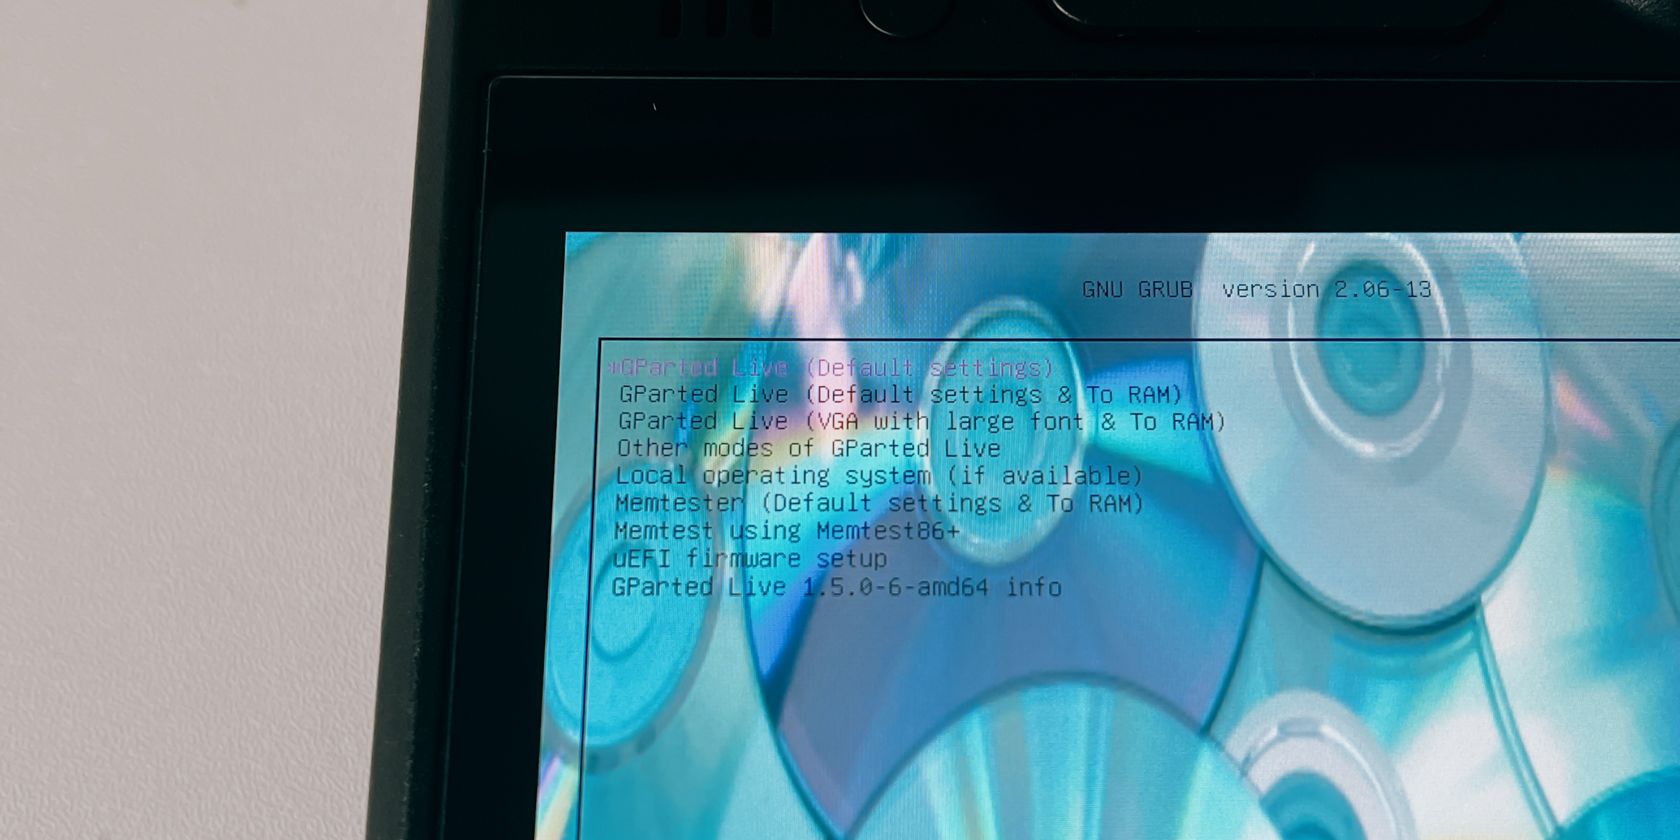
Once GParted is open, you’ll be greeted with a few things before you can get to partitioning. Firstly, you’ll need to select the settings. Pick the first one—GParted Live (Default Settings).
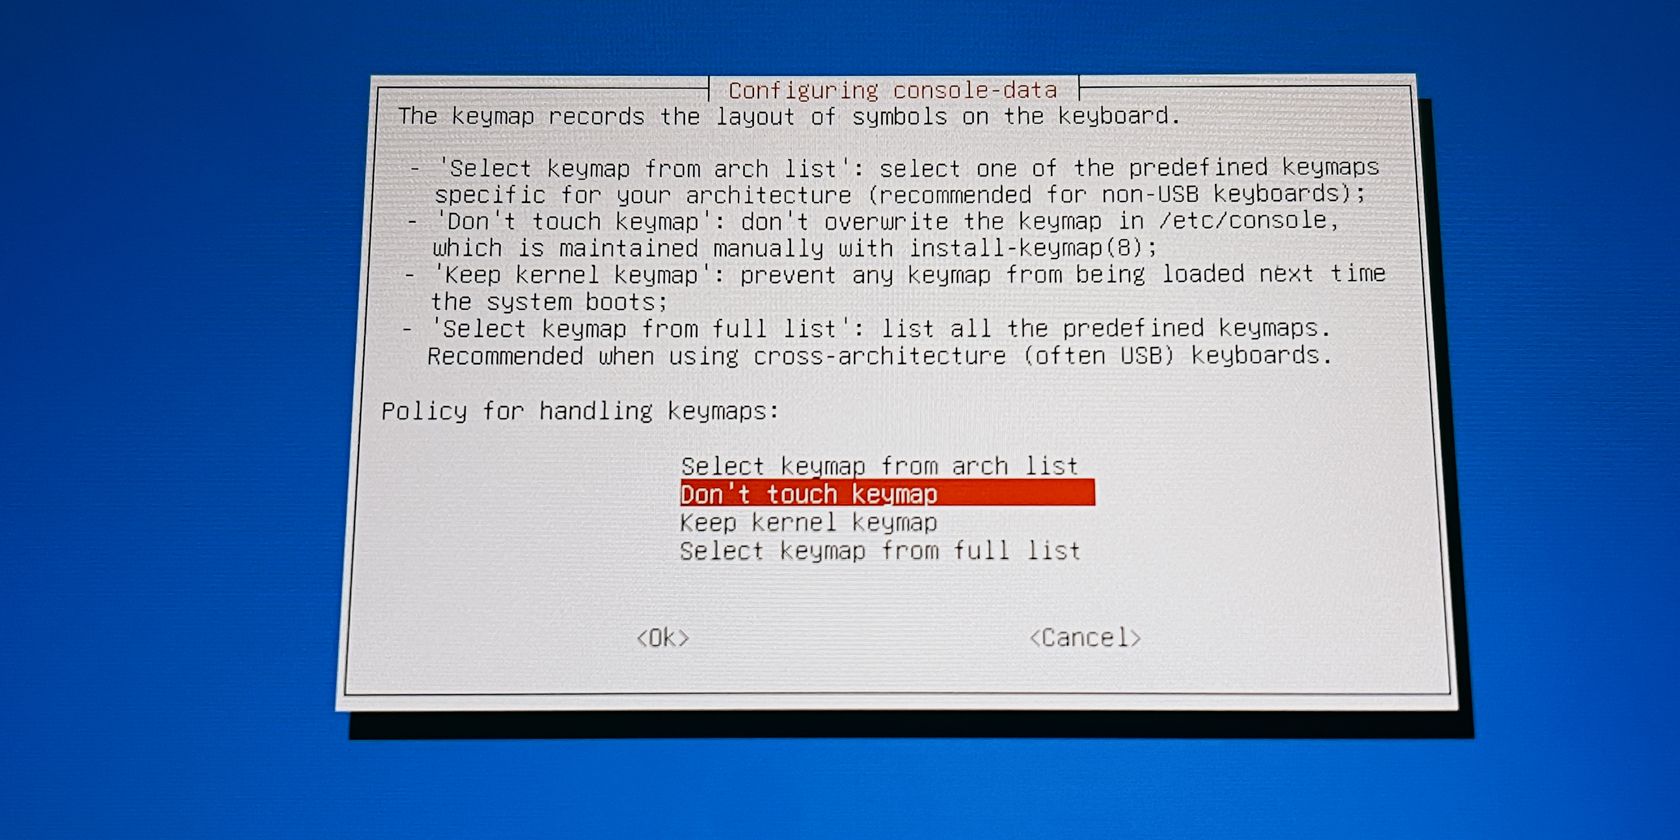
Next, select Don’t touch keymap and then select your language. If you’re just going to use English, we suggest just pressing A on the Steam Deck until you reach the main screen.
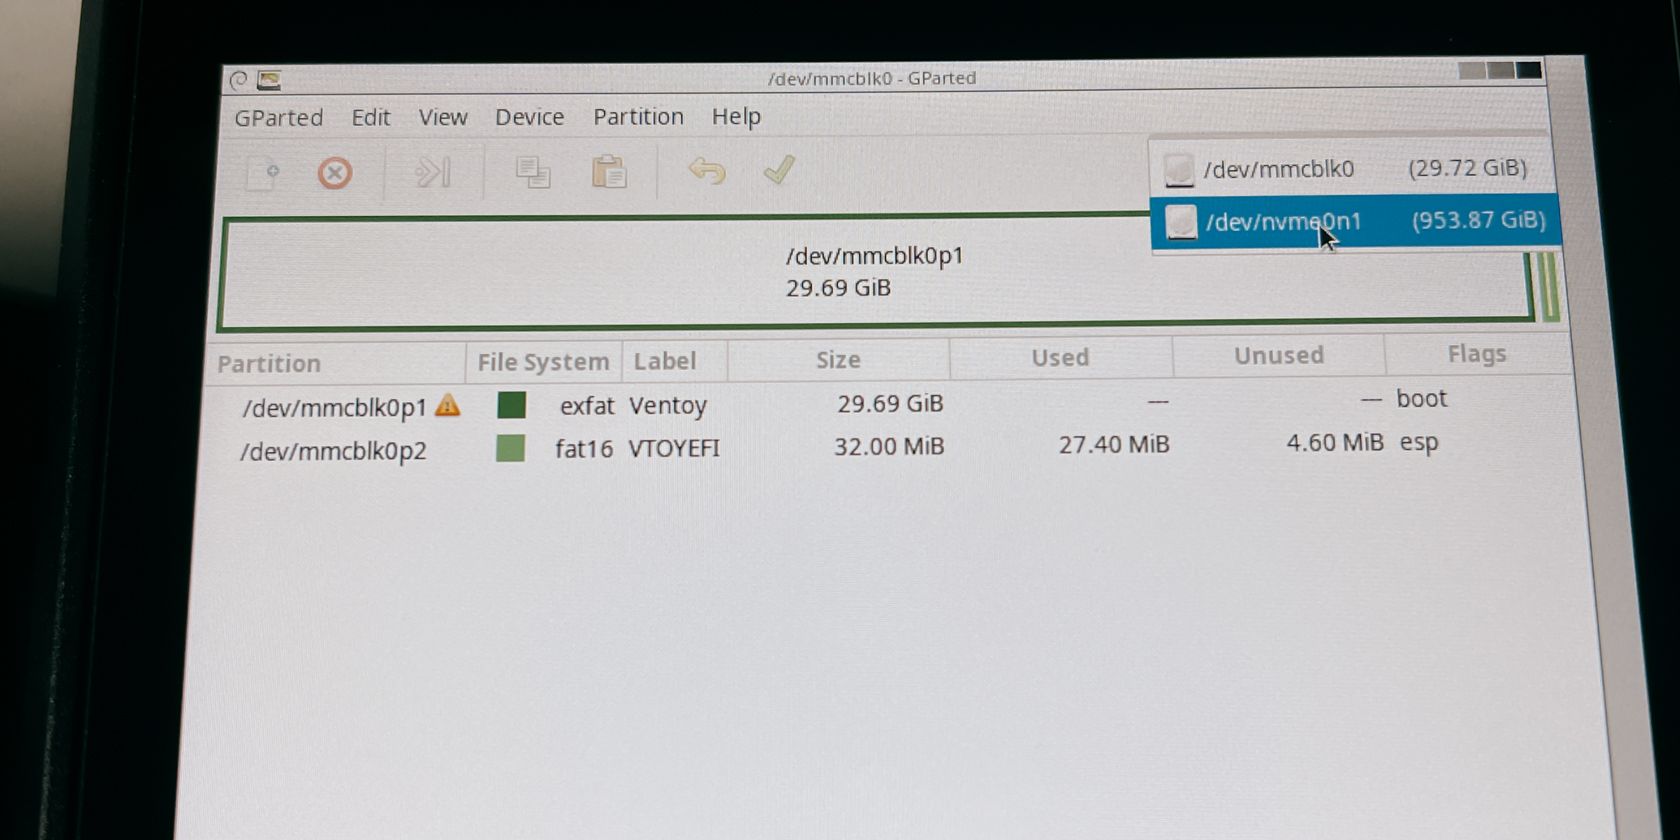
Finally, you’re ready to partition your SSD. By this point, you can plug in your mouse and keyboard to make it easier to navigate. If your SD card or flash drive is the only thing you can see, switch it to your SSD on the upper right drop-down menu.
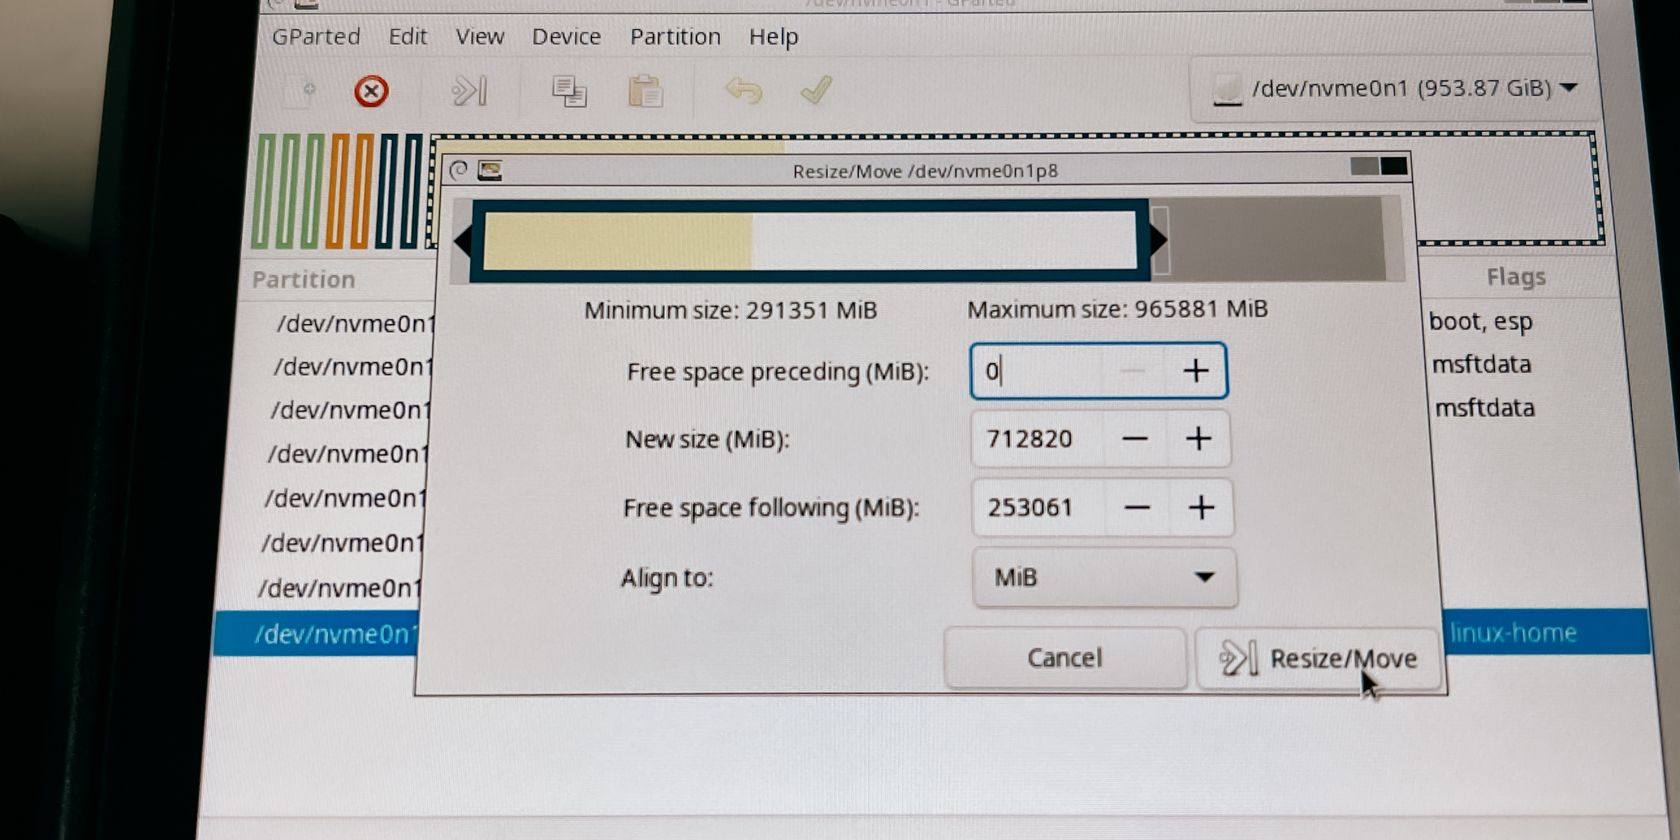
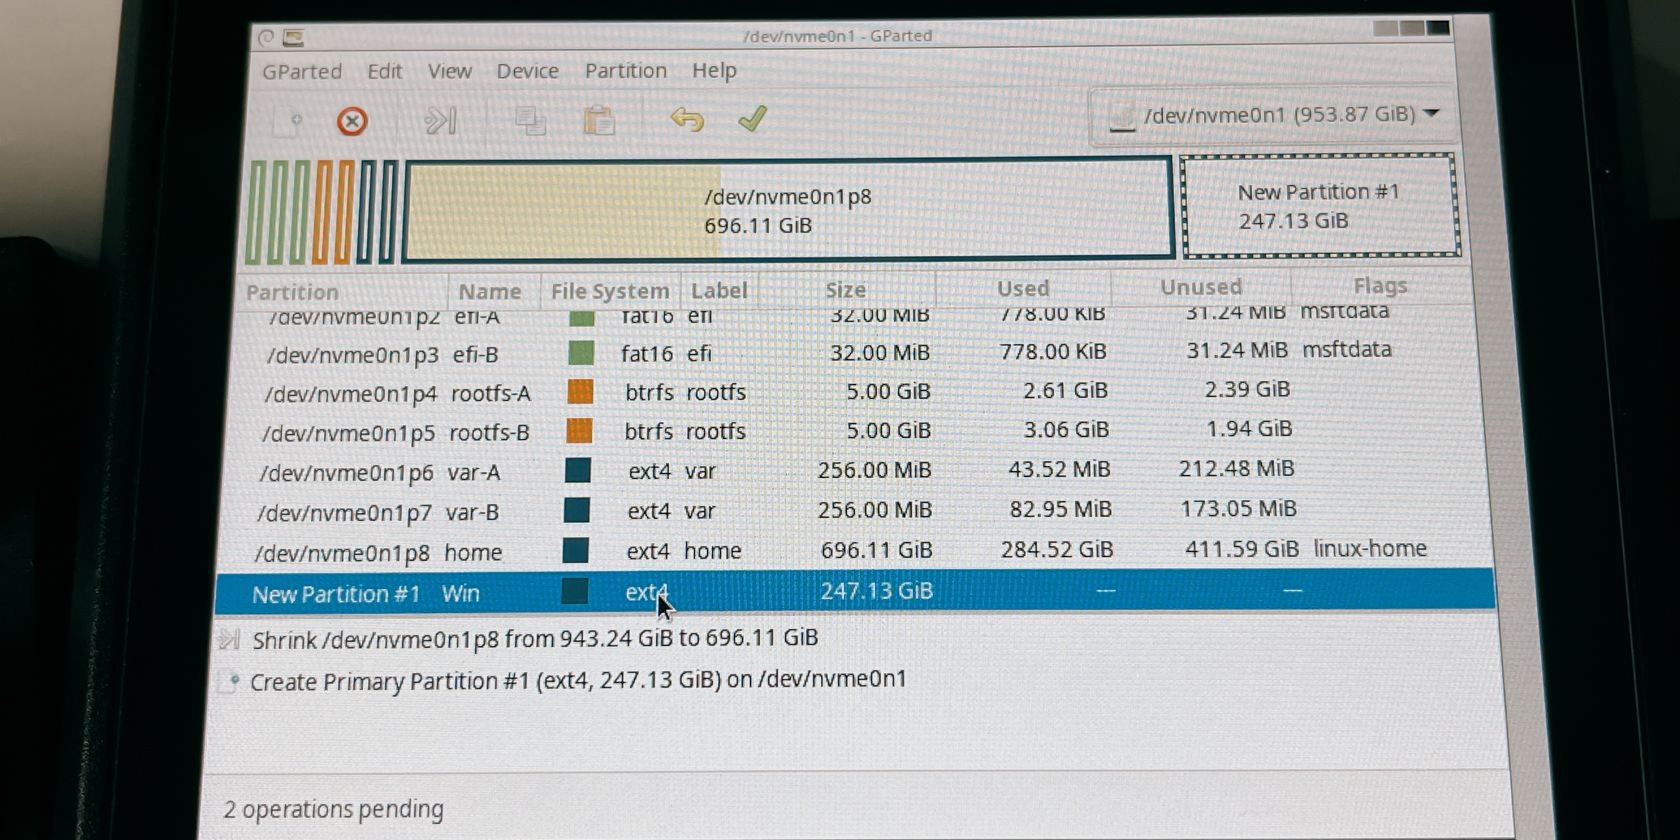
To partition your SSD, right-click (left trigger) on the /home partition or the largest partition on the SSD. Click on Resize/Move and move the right wall to the left, leaving the empty space as a new unallocated partition.
In our case, we’re leaving around 250 GB or about 250,000 MiB for Windows 11. Click on the Resize/Move button on the bottom right to make your changes.
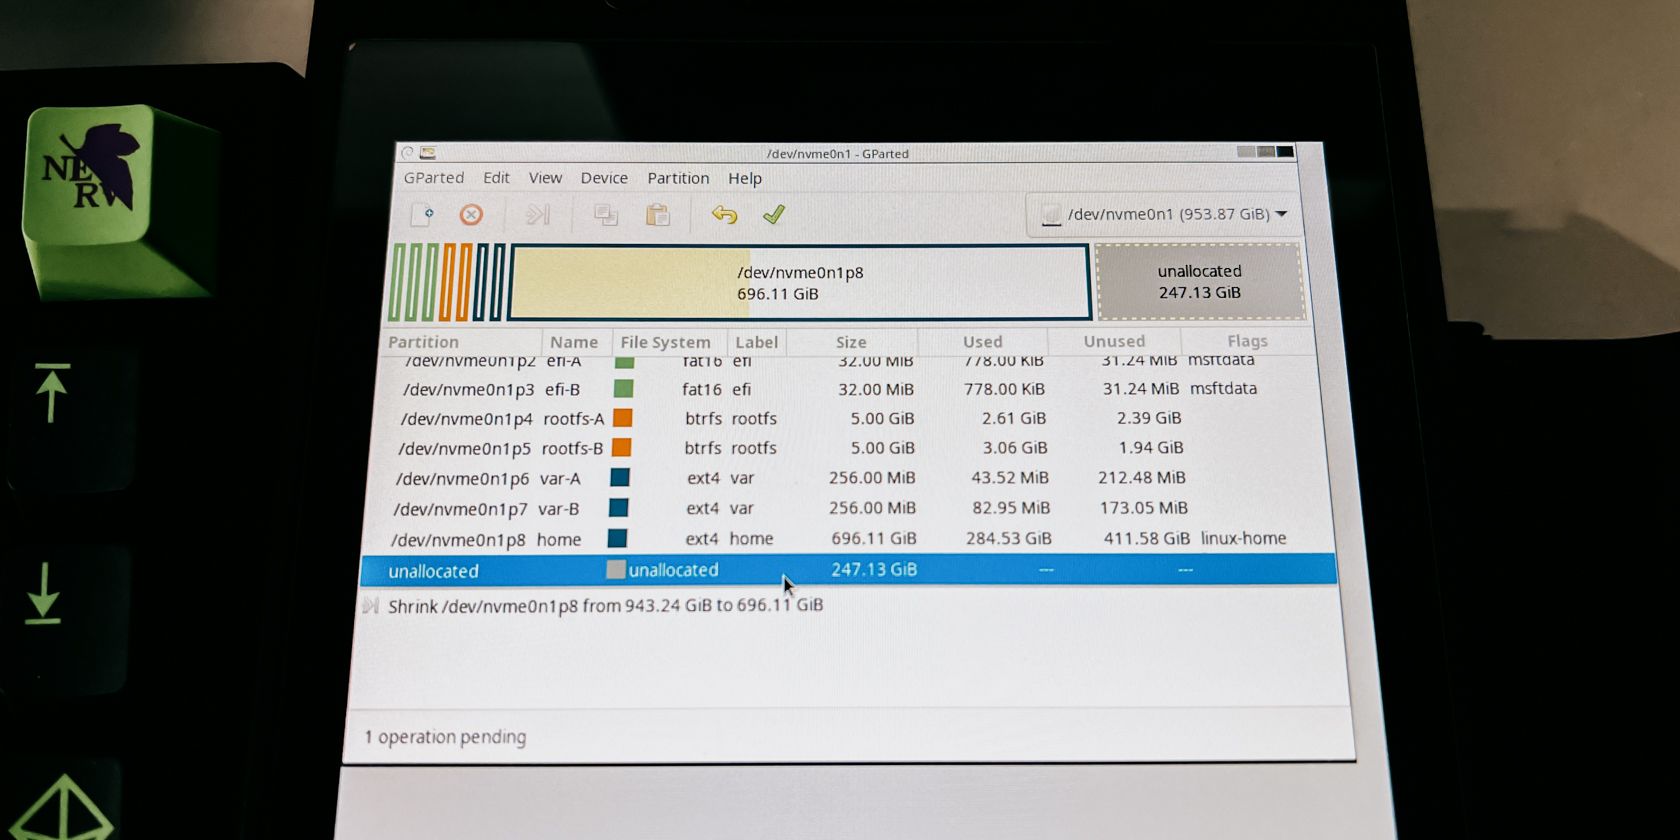
Finally, click on the green check mark in the toolbar. Forgetting to do this will not apply your partition changes.
The software will then process the new partition sizes, which may take a few minutes depending on how big your SSD is. Once it’s done, you can now press the power button to exit GParted and power down.
4. Windows 11 Setup on the Steam Deck
Now you're ready to install Windows on your Steam Deck. Before you go to the boot manager though, unplug any other USB devices you used earlier except the flash drive. This prevents the ISOs or Ventoy from malfunctioning.
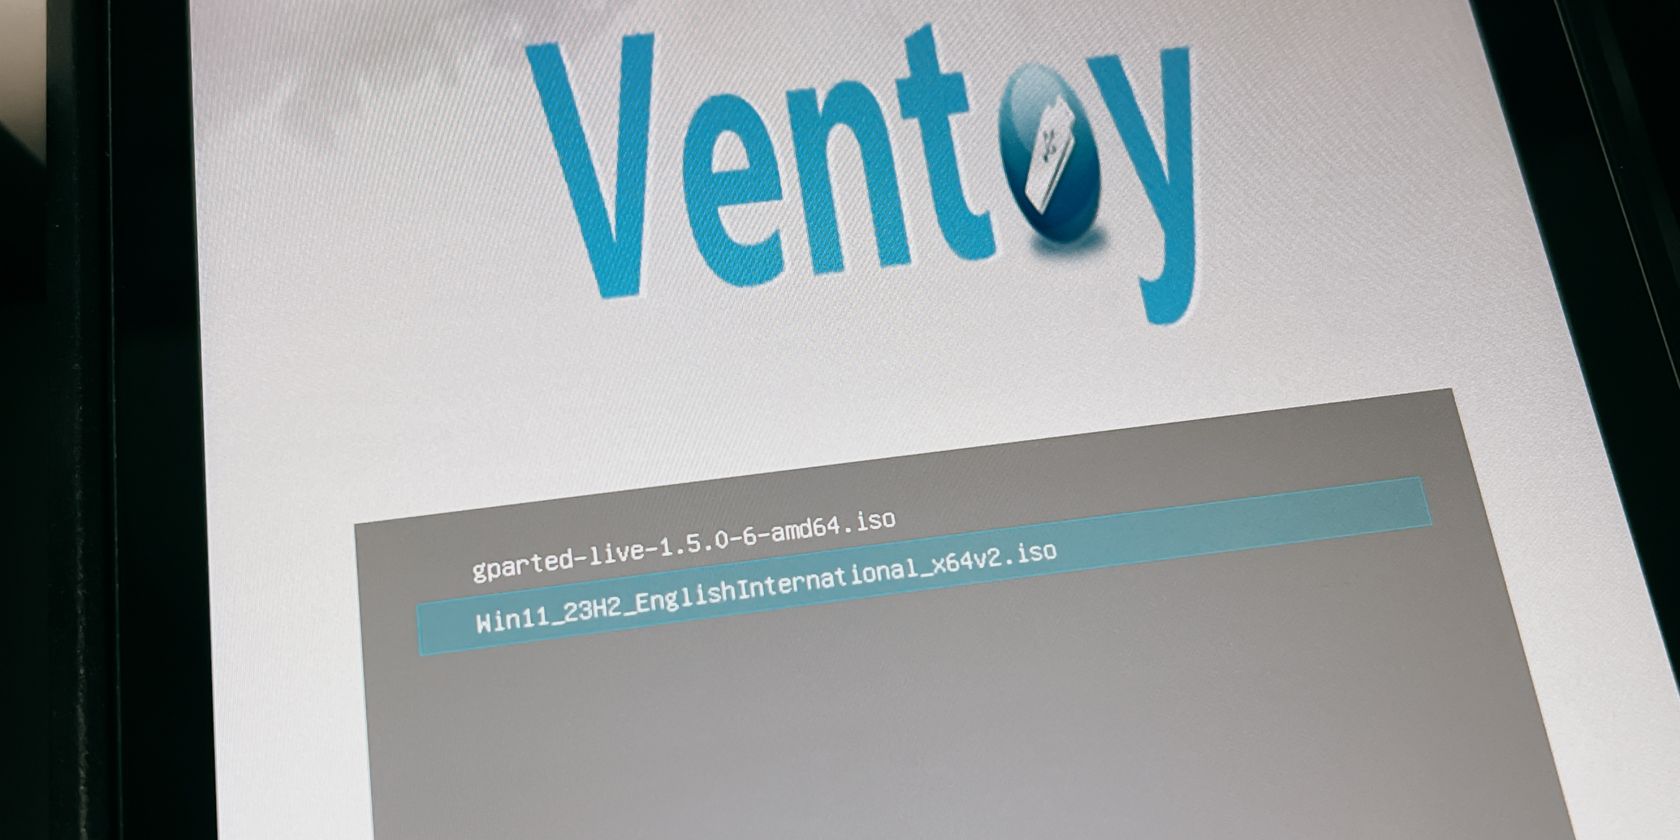
Go back to the boot manager (with the volume down button and the power button) and select the SD card or flash drive once again. With Ventoy open, this time select the Windows 11 ISO.
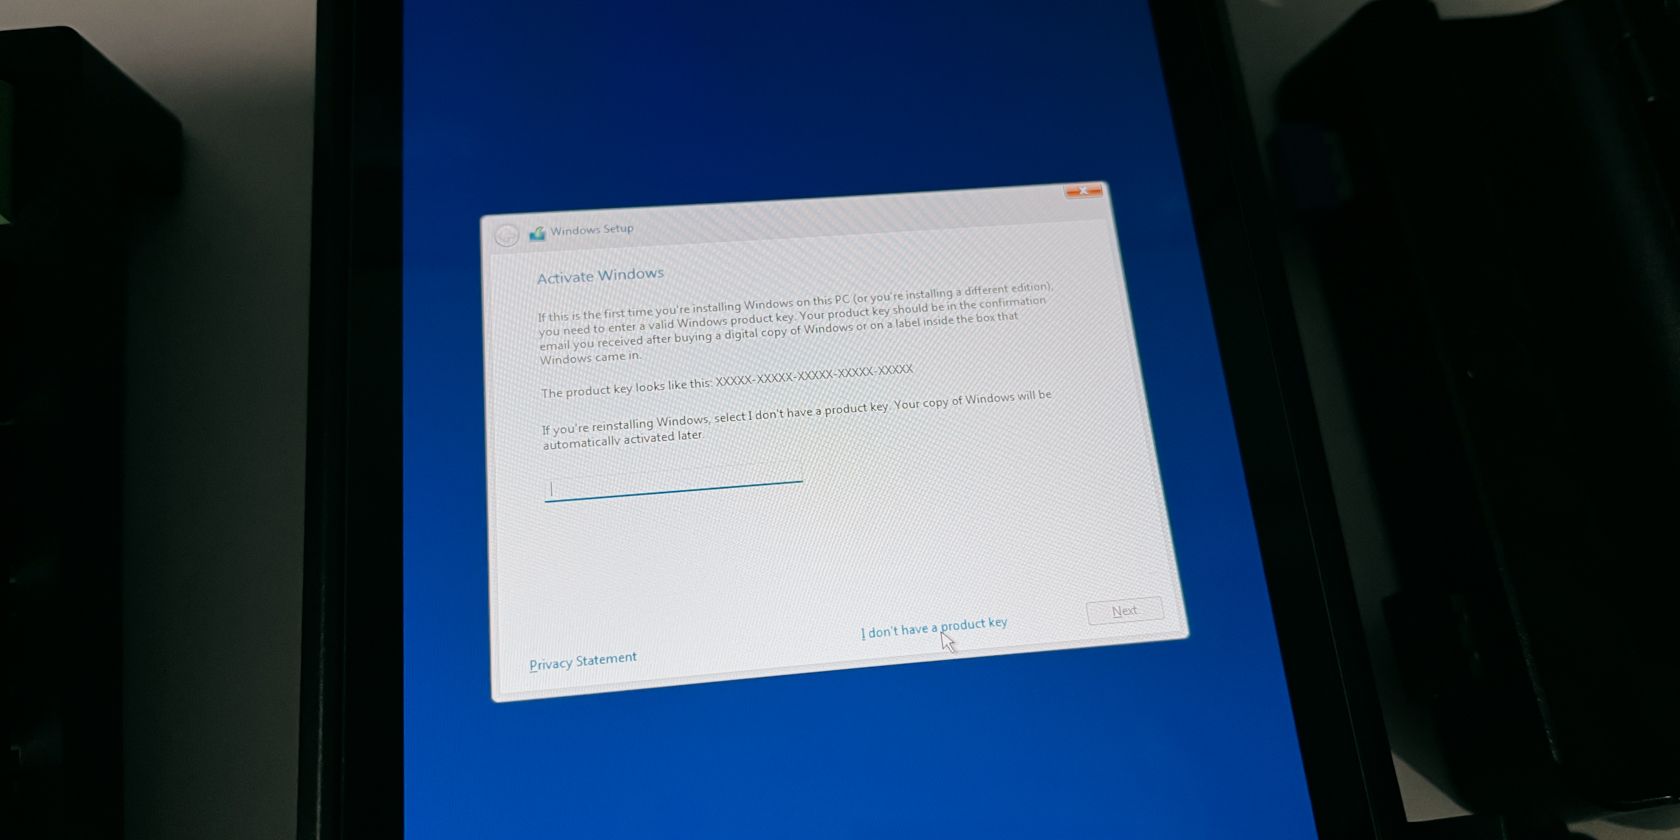
Just follow the setup by choosing the right language and keyboard layout until you reach the Windows key section. There, you can safely choose I don’t have a product key if you don’t have one.
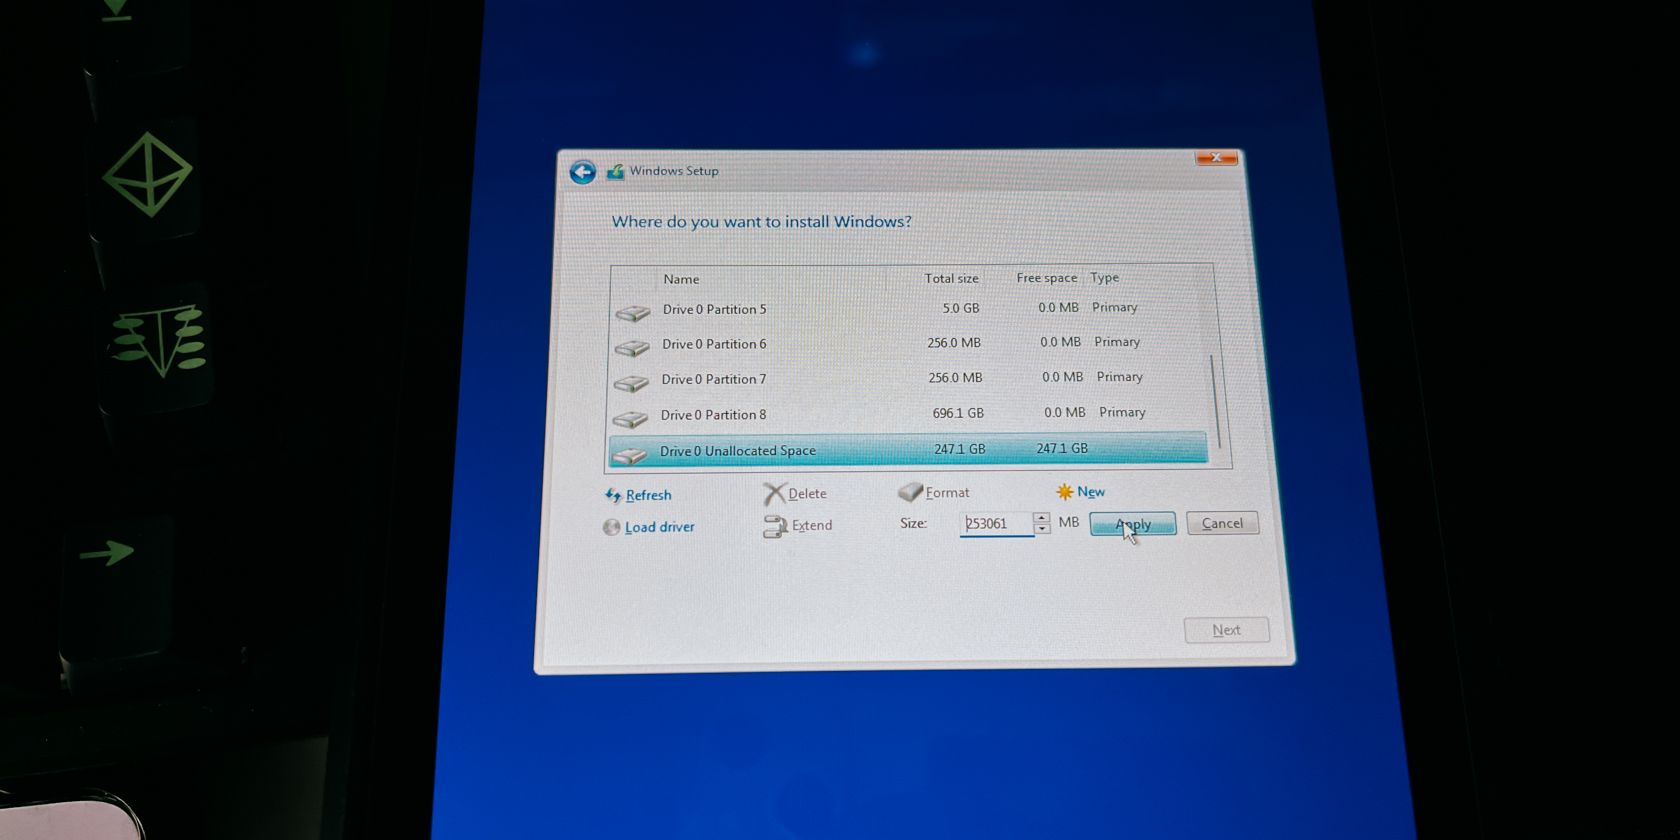
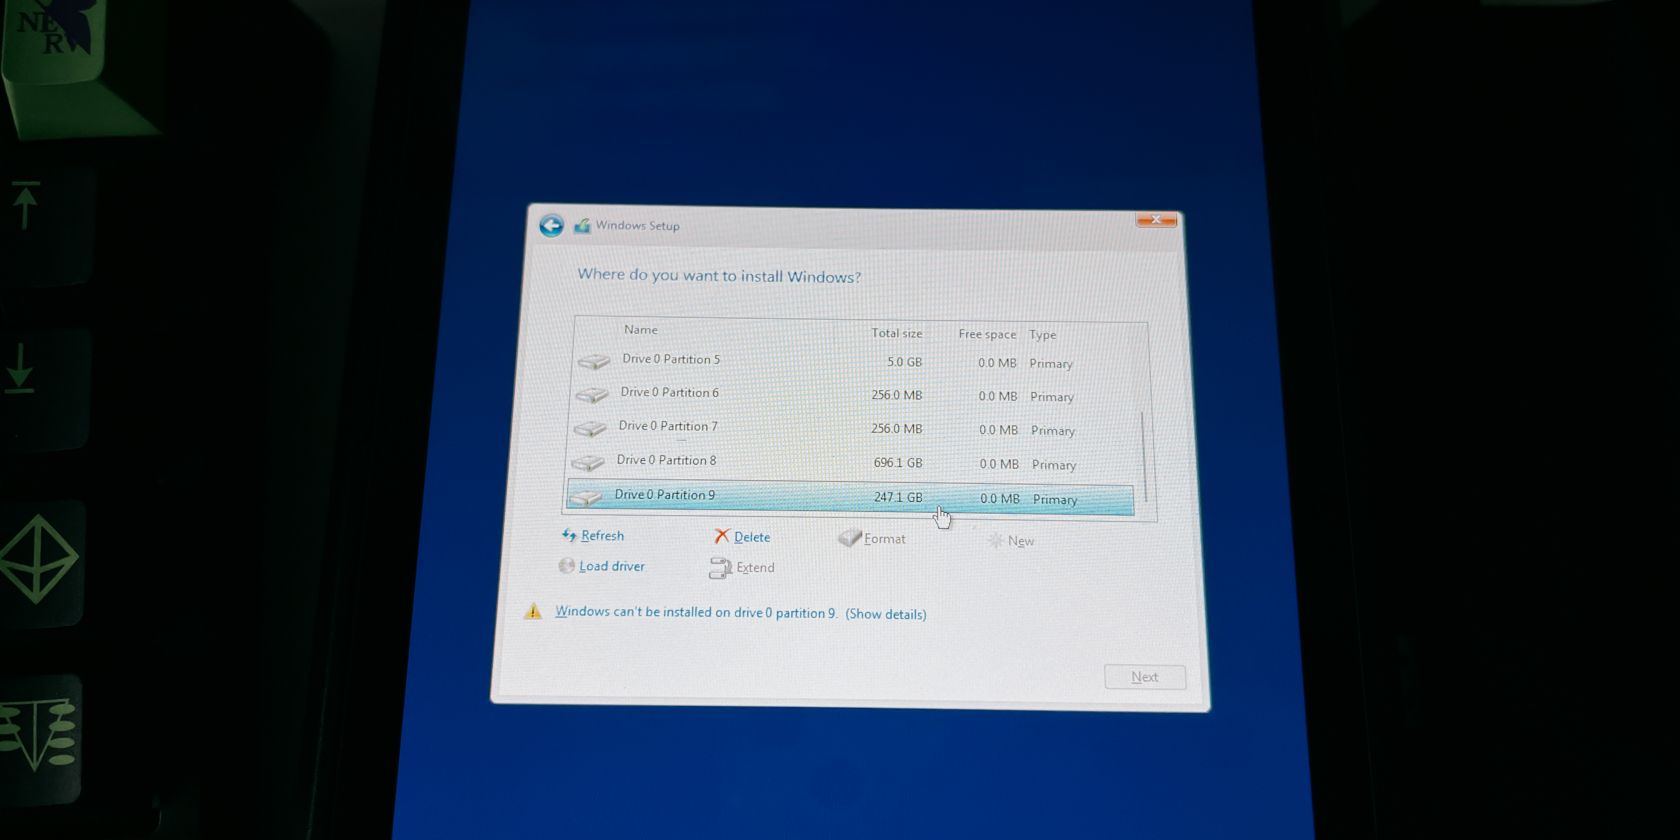
Proceed until you reach the Where do you want to install Windows? screen. You’ll want to scroll to the very bottom and click the drive that says Unallocated space. Next, click New, and it’ll automatically add the right size for you. So just click Apply.
It will then start installing Windows onto that partition. Once Windows 11 is installed, you’ll have to go through another setup process.
5. Install the Windows Drivers for the Steam Deck
Once you’ve installed Windows, you can now install the drivers for your Steam Deck.
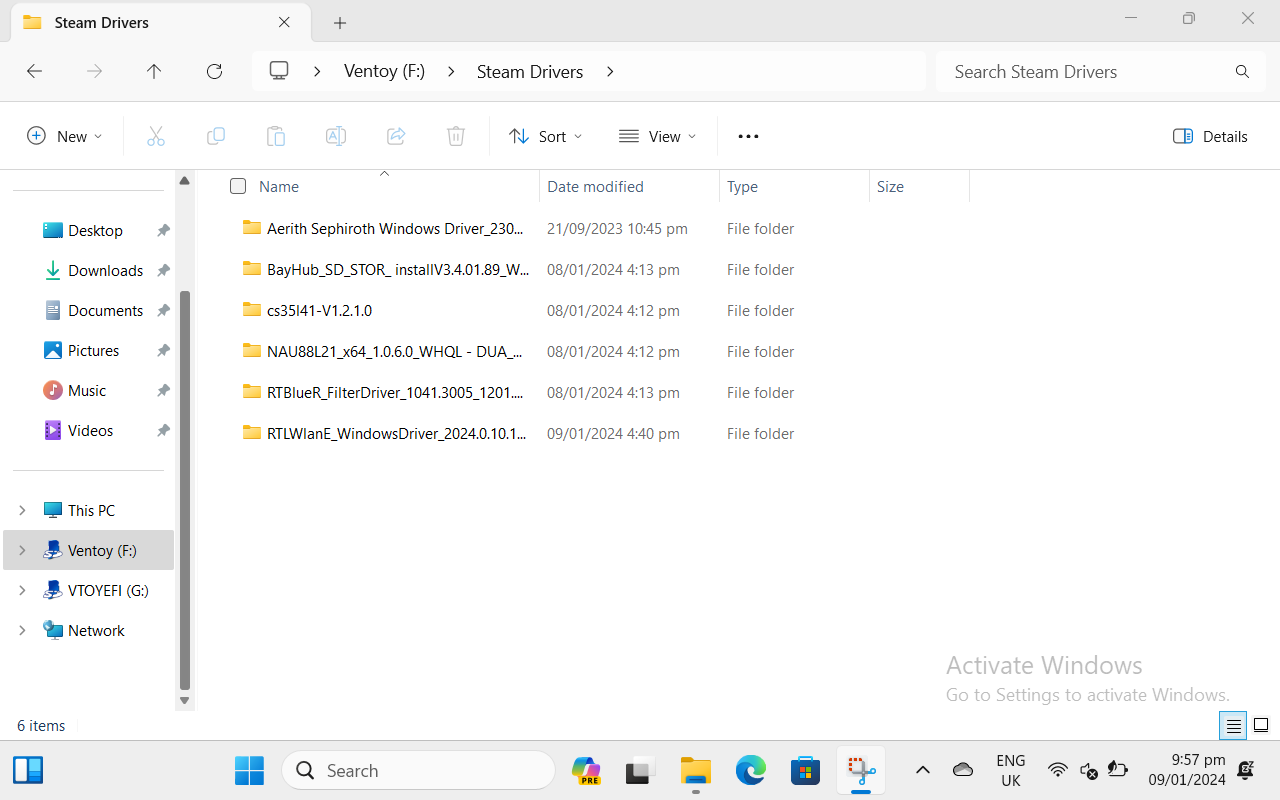
To do this, open up your File Explorer and click on the Ventoy drive. Open the folder we told you to place the Steam Deck drivers inside and start with any one of them.
If you’re prompted to restart, don’t do it yet. You can restart once you’ve installed all the drivers to make it easier.
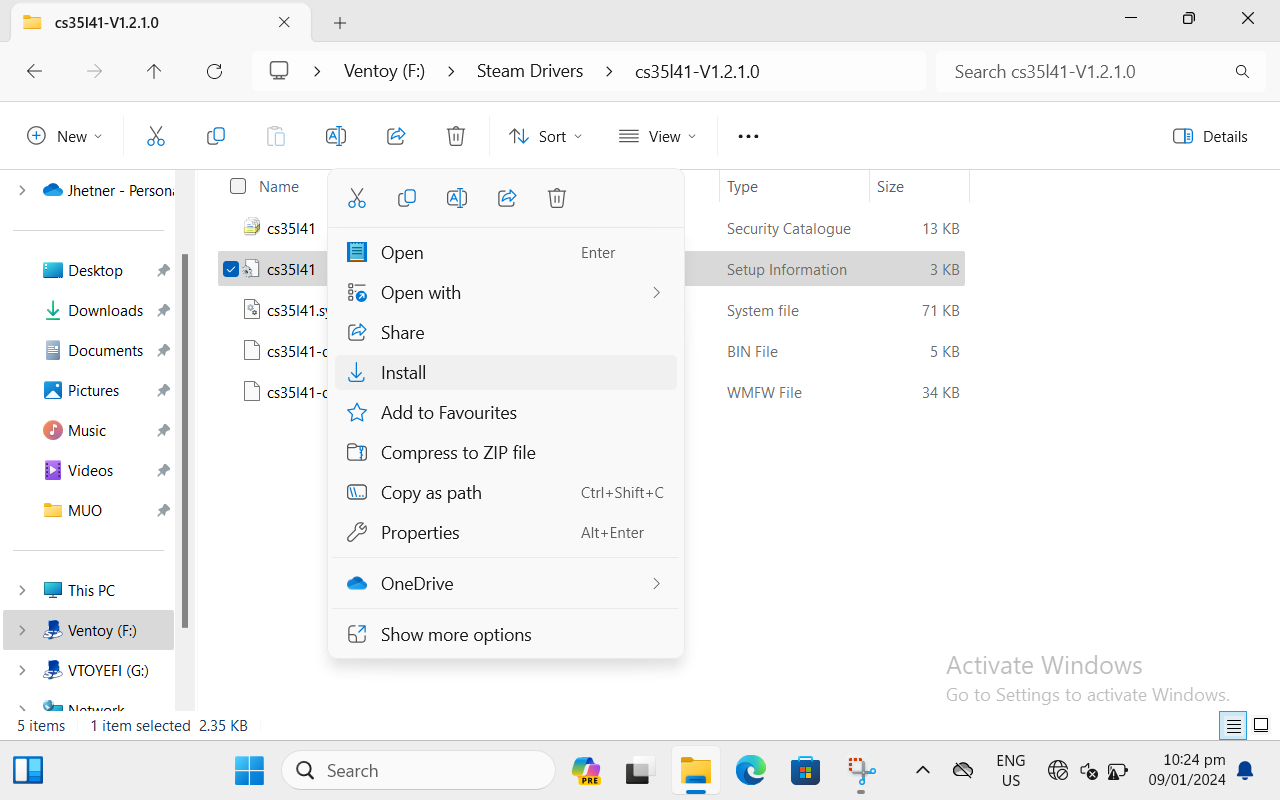
Proceed to click on Install for the other drivers, but you may find that the audio drivers do not have an executable. To install the two audio drivers, simply right-click (left trigger) on the file that says Setup information and click Install.
Once they’re all installed, you can now restart your Steam Deck. If things didn’t go so smoothly, you can refer to the section below to find your issue and the solution for it.
Potential Issues and Solutions While Installing Windows on Your Steam Deck
We’ve compiled a few issues that we came across during our installation and found solutions to them so that you don’t have to scour the internet to find fixes.
ISOs Show a Black Screen or Don't Boot Up
If the ISOs aren’t working properly, just press the power button once to exit and shut down. This is most likely due to other USB devices plugged into your Steam Deck like a keyboard and mouse. This is why we used an SD card in our installation. Remove all USB devices except your flash drive or use a USB-C flash drive if possible.
If this doesn’t work, you may also try to delete the other ISO from the SD card or flash drive. You may also try reinstalling Ventoy as a last resort, but this will format the drive so make sure you have everything in a folder that you can easily paste onto the drive.
The Windows 0x80300001 Error
This error will most likely pop up because the partition you want to install Windows on isn’t in NTFS format or a blank unallocated partition.
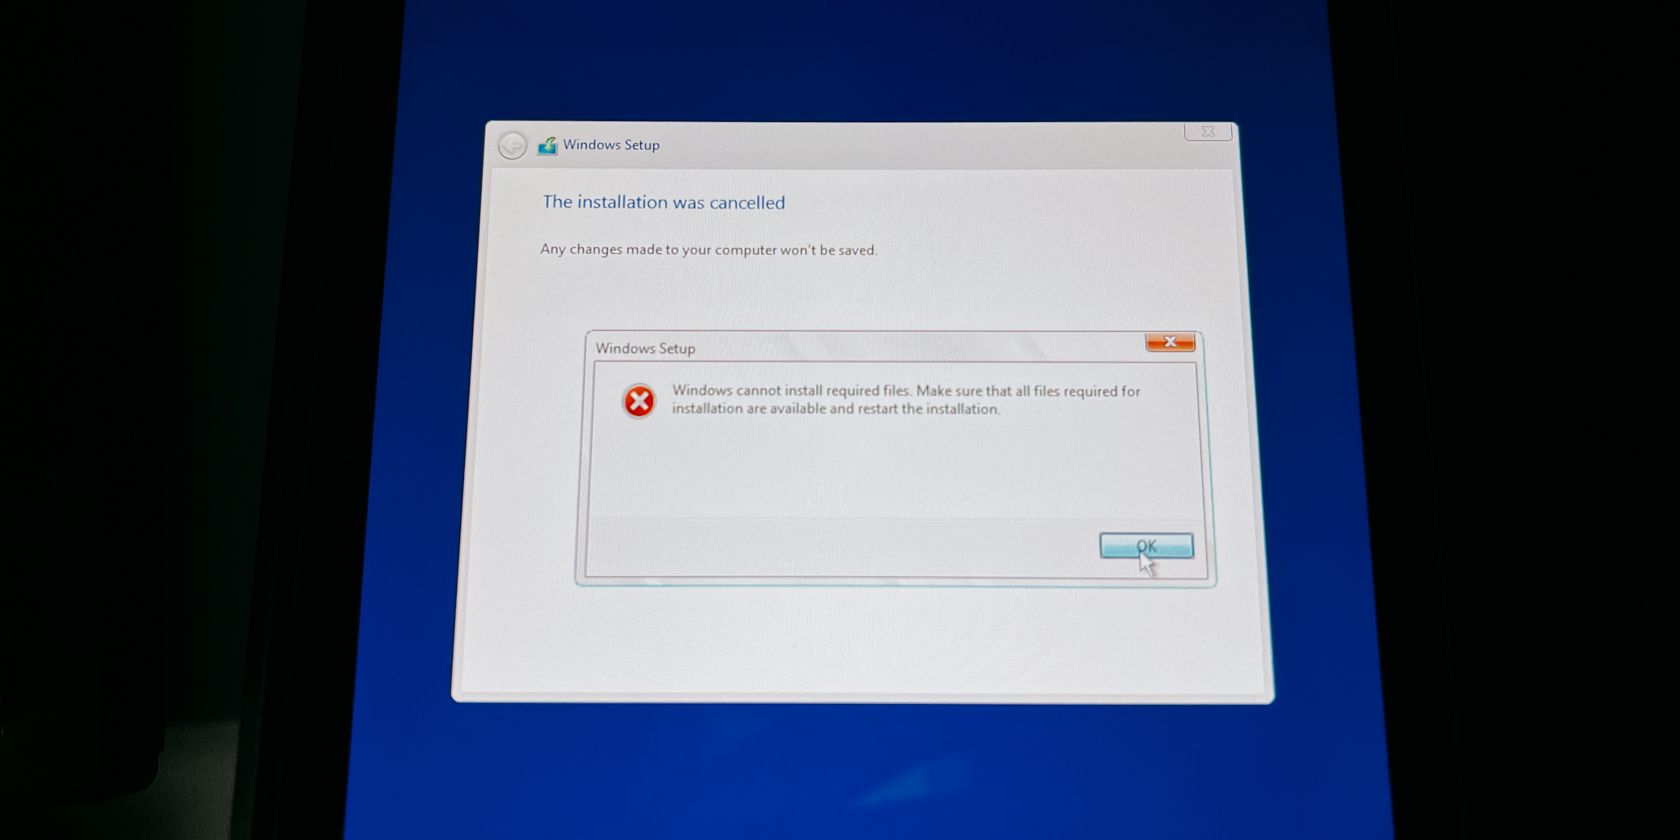
You may have created a new partition as ext4 in GParted instead of leaving the unallocated partition as it is. If you insist on creating a new partition in GParted, make sure it’s in NTFS format and not ext4.
Windows Cannot Install Drivers
If you’re near the end of your Windows installation and it suddenly says it cannot install drivers, other USB devices may be interfering with the installation.
Shut down your Steam Deck by holding down the power button and unplug any USB devices except your flash drive or SD card. Don’t plug in any USB devices during the installation to avoid this issue.
You Can’t Find SteamOS in the Boot Manager
If you want to go back to SteamOS and can’t find it in the boot manager, you should shut down your Steam Deck and go to the BIOS instead.
To enter the BIOS, hold down the volume up button and the power button until you hear the chime. Let go of the power button but hold down the volume up button until you enter the BIOS.

Once you’re in the BIOS, select Boot from file > eps > efi > steamos > steamcl.efi. This should boot you back into SteamOS.
Now that you’re in SteamOS, you can put it back onto the boot manager by entering desktop mode.
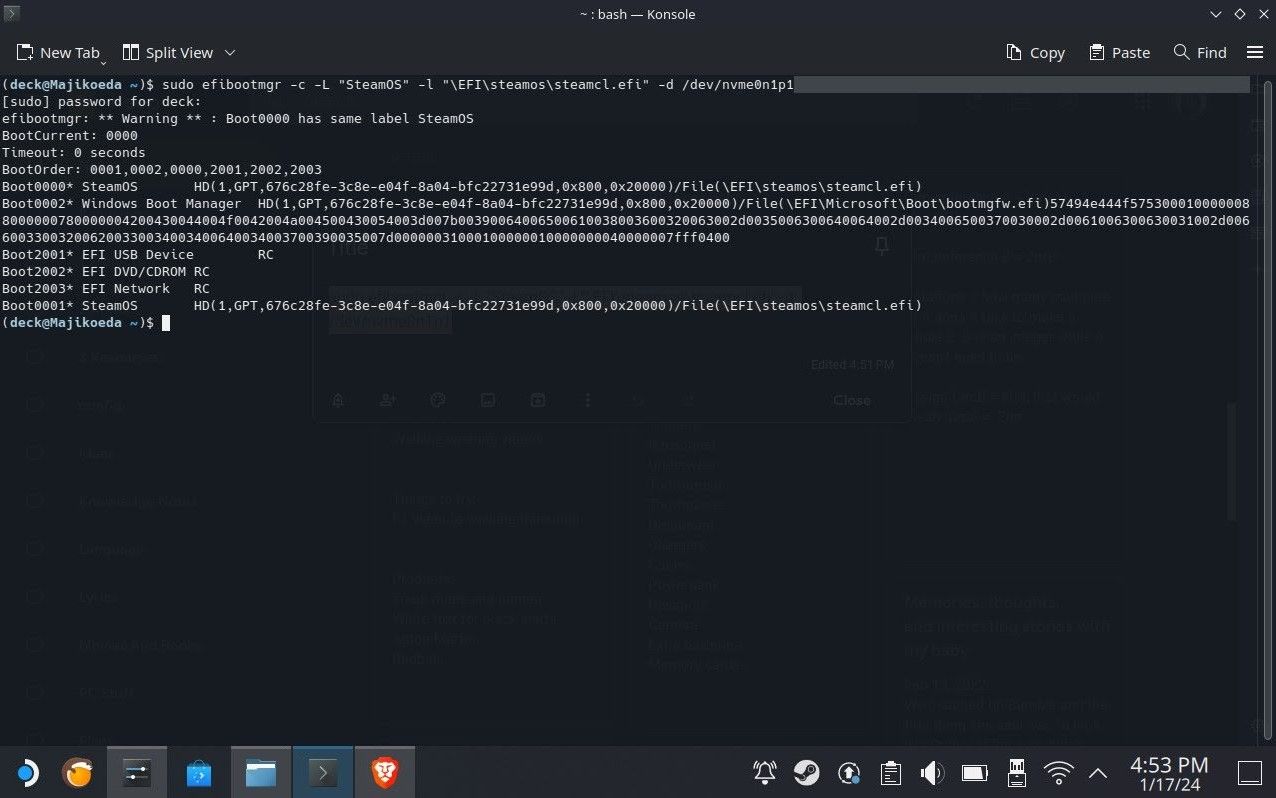
On desktop mode, click on the Steam Deck icon on the bottom left and open Konsole. You can search for it by bringing up the keyboard by clicking on the text box and pressing on the Steam button X.
Then type:
sudo efibootmgr -c -L "SteamOS" -l "\EFI\steamos\steamcl.efi" -d /dev/nvme0n1p1 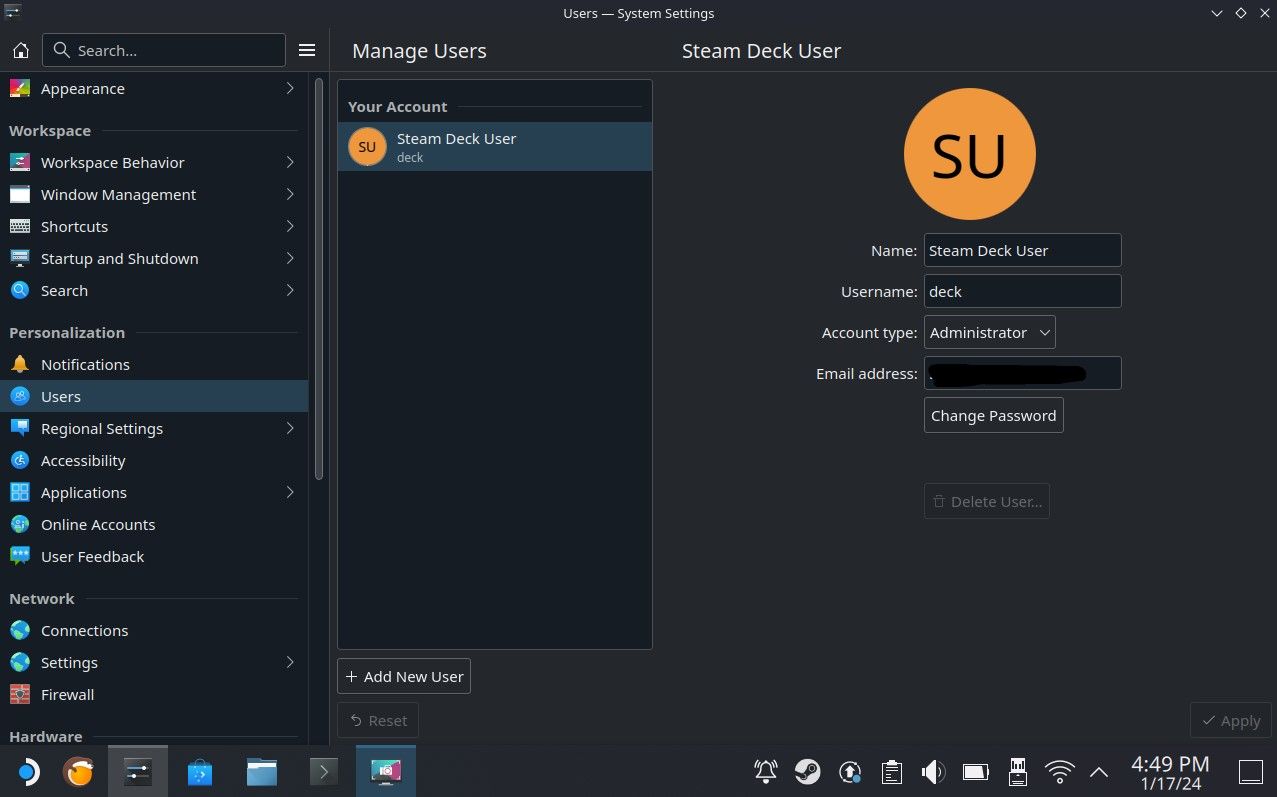
In case you don’t have a sudo account and can’t add the command, go to Settings > Users then assign a username and password. You can then try adding the same command in Konsole and adding your password after pressing Enter. It will then show your boot options.
If you can see steamcl.efi with an asterisk next to its boot order number, it means that it’s in your boot manager now. You can verify it by shutting your Steam Deck down and entering the boot manager.
Steam Deck Navigation and Controls on Windows
If you’re having a hard time with the Steam Deck controls on Windows and want to use the controls like on SteamOS, download Steam and have it open.
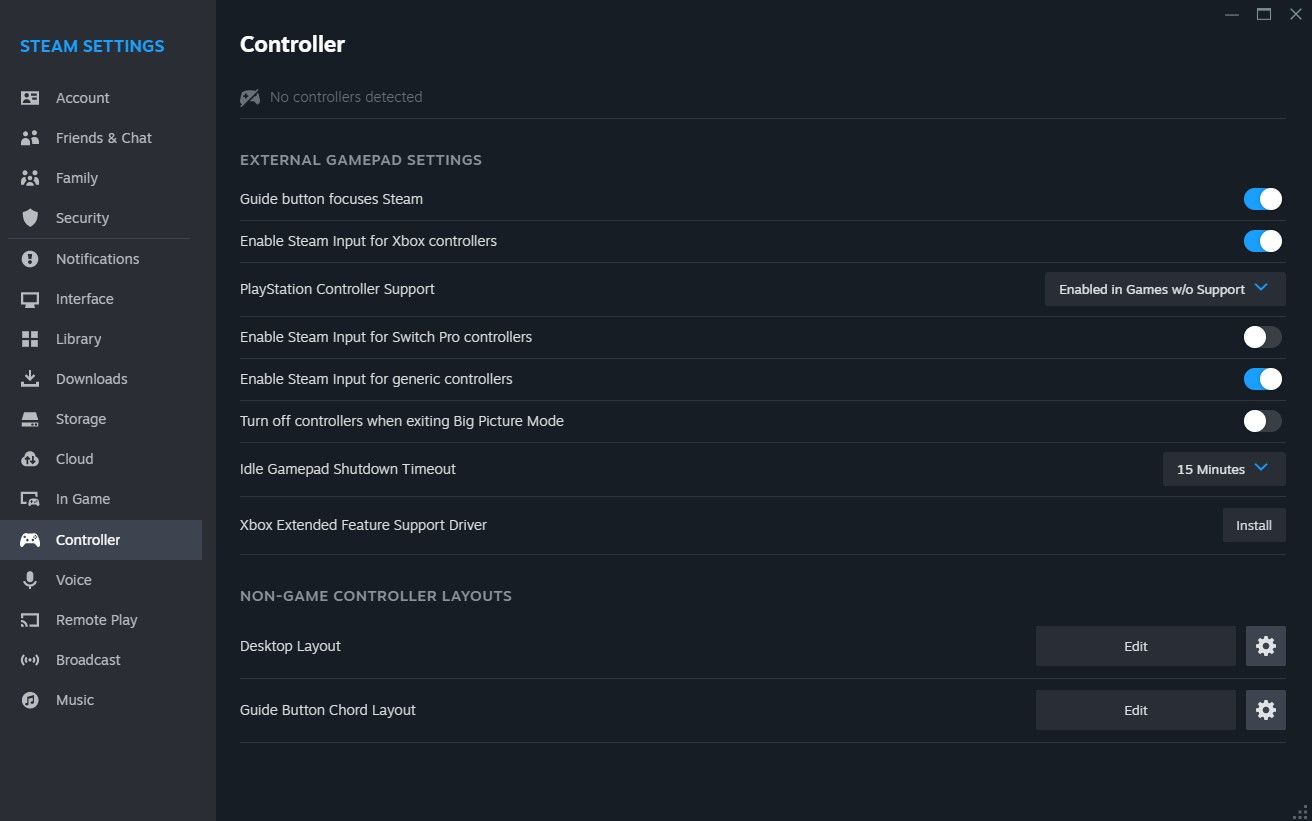
Then go to Steam > Settings > Controller > Enable Steam Input for Xbox Controllers. You should then be able to use both trackpads like on SteamOS. You may also configure it by scrolling down and editing it on the Non-game controller layouts.
The Steam Deck is a very versatile device as it’s not just a full-on gaming device, but also a full-on PC. Installing Windows on it will allow you to use it similarly to your desktop PC for regular writing work, but also for more intensive work like video and photo editing.
We hope this guide has helped you figure out how to install Windows on your Steam Deck and fix some of the issues you might face while doing so.
-
 如何刪除時間機器備份?如何擦除並重新開始?Time Machine是Apple內置備份解決方案,提供自動增量備份,可保留多個文件版本,以便於恢復。 但是,這些備份可以佔用大量的存儲空間。本指南詳細介紹了幾種刪除舊時間機器備份的方法,從而釋放了Mac或外部驅動器上有價值的磁盤空間。 您應該手動刪除時機備份嗎? 雖然時間機自動在存儲較低時...軟體教學 發佈於2025-03-25
 -
如何防止人們竊取您的Wi-Fi保護您的Wi-Fi網絡對於您的在線安全性和隱私至關重要。 未經授權的訪問可以揭示您的瀏覽歷史記錄和存儲的文件。 幸運的是,確保網絡比您想像的要容易。這是使不受歡迎的客人遠離Wi-Fi的方法。 常規密碼更改:辯護的第一行 防止Wi-Fi盜竊的最簡單方法是經常更改網絡密碼。訪問路由器的設置(請諮詢...軟體教學 發佈於2025-03-25
-
現在,為Android找到我的設備Android查找我的設備應用程序已通過新的,用戶友好的接口進行了更新。現在以單獨的“設備”和“ People”標籤為特色,簡化了與朋友和家人共享的位置,從而易於協調聚會或檢查兒童安全到達家。 可用在像素設備上預裝,作為其他Android用戶的免費下載,該應用程序還提供Web訪問權限。 雖然iO...軟體教學 發佈於2025-03-25
-
Excel中的貨幣與會計編號格式:有什麼區別?Excel貨幣與會計數字格式詳解:何時該用哪個? 本文將深入探討Excel中貨幣和會計數字格式的細微差別,幫助您更好地選擇適合電子表格的格式。兩者都用於顯示貨幣值,包括所選貨幣的符號,但其默認對齊方式、零值顯示、負值顯示以及可調整性方面存在差異。 默認對齊方式 在Excel中,未格式化的數字默認...軟體教學 發佈於2025-03-25
-
4個聆聽更多播客的技巧,更快[2 今天可用的播客量很大! 從科學到真正的犯罪,都有一個播客。但是這種豐富的人會導致越來越多的未知情節積壓。 這是征服您的播客隊列的方法: 1。加速播放: 大多數播客應用程序都可以調整播放速度而不會影響音高。 將速度提高到1.25倍甚至2倍會大大減少聽力時間。 雖然這可能不允許對每個...軟體教學 發佈於2025-03-25
-
我會喜歡帶有可交換相機鏡頭的電話:為什麼不發生?就像手机摄像机一样,它们可以通过使用可分离的镜头来提供更好的镜头,就像专用摄像机一样。我希望这是一件事情。 像大多数人一样,我的相机是我的手机你知道的格言:最好的相机是你身上的相机。多年来,这感觉像是一种牺牲。电话摄像头不能完全与便携式数码相机相提并论,但是这些照片已经足够好,值得一提。硬件继续以这...軟體教學 發佈於2025-03-25
-
如何將PC遊戲流式傳輸到所有屏幕[2 除了音樂和電影之外,遊戲流媒體迅速越來越受歡迎。 這不僅僅是基於雲的遊戲;您還可以將游戲從一個設備流式傳輸到家中的另一個設備。 在您的臥室裡有一台功能強大的遊戲PC? 將這些遊戲流式傳輸到其他計算機或機頂盒,例如您的客廳電視。 幾個平台可以促進這一點;這是我們的首選,可滿足各種硬件和軟件...軟體教學 發佈於2025-03-24
-
如何通過網絡在安全模式下重新啟動遠程PC阅读我们的披露页面,以了解如何帮助Mspoweruser维持编辑团队阅读更多 如果您是技术人员或管理自己的远程计算机,则可能想知道如何在...軟體教學 發佈於2025-03-24
-
三星Galaxy S25+與Galaxy S24+:值得升級嗎?三星Galaxy S25擁有更強大的處理器和增強的相機軟件,但這是否證明了S24的升級合理?讓我們深入研究細節。 [2 Galaxy S25(256GB)的零售價為999.99美元,可用於在線預訂,並在2025年2月7日起在商店中。 S24(256GB)最初以類似的價格推出,但目前以最佳購買折扣...軟體教學 發佈於2025-03-24
-
什麼是Apple Carplay,它比僅僅在車上使用手機好嗎?Apple CarPlay:驾车更安全、更便捷的iPhone体验 Apple CarPlay 为您提供了一种比在车内使用手机更安全的方式,让您轻松访问应用程序和Siri功能。虽然无线CarPlay更加方便,无需连接手机,但有线CarPlay更为常见且运行良好。您可以通过更改壁纸、添加、删除和重新排列...軟體教學 發佈於2025-03-24
-
頂級技術交易:Pixel 9 Pro XL,Samsung Portable SSD,視頻門鈴等等本週的技術交易太過錯過了,無論您是在尋找總統的日間討價還價還是情人節驚喜! 我們在頂級技術上發現了絕佳的折扣,包括最新的Kindle Paperwhite,Beats Studio Pro耳機,令人印象深刻的Pixel 9 Pro XL等。 請參閱下面的亮點: Google Pixel 9 p...軟體教學 發佈於2025-03-23
-
Android 16最終可以為通知混亂帶來訂單Android 16或將推出“捆綁通知”功能,解決通知過載問題! 面對日益增多的手機通知,谷歌似乎找到了新的解決方案——“捆綁通知” (Bundled Notifications),該功能可能在Android 16系統中正式亮相。 什麼是“捆綁通知”? 這一功能最早由Mishaal Rahma...軟體教學 發佈於2025-03-23
-
將您的數碼照片帶入現實世界的5種方法将珍藏的数码照片带入现实生活,让回忆更加生动!本文介绍五种方法,让您不再让照片沉睡在电子设备中,而是以更持久、更令人愉悦的方式展示它们。 本文已更新,最初发表于2018年3月1日 手机拍照如此便捷,照片却常常被遗忘?别让照片蒙尘!以下五种方法,让您轻松将心爱的照片变为可触可感的现实存在。 使用专业照...軟體教學 發佈於2025-03-23
-
為什麼我的筆記本電腦的鼠標檯面連接到充電器時無法正常工作?插入時,筆記本電腦的Mousepad的原因不起作用。 在我們開始對此問題進行故障排除之前,讓我們檢查一些潛在的原因,一旦連接充電器,您的筆記本電腦的鼠標都無法正常工作。 充電端口鬆動,導致充電器無法正確插入。 充電器存在問題,一旦連接了充電器,就會導致鼠標故障。 筆記本電腦主板的接地問題使鼠標台充...軟體教學 發佈於2025-03-23
-
未找到防暴客戶錯誤的5個有效方法想像一下,當您想通過玩遊戲休息時,您的騷亂行不通,並向您展示未找到的錯誤消息。那將是多麼令人沮喪!因此,要擺脫這場瘟疫,該指南在Minitool上將幫助您修復未找到的Riot客戶端錯誤。 您必須與上述問題相同,並且非常渴望解決它,以便跳入您喜歡的遊戲。 Without further ado, le...軟體教學 發佈於2025-03-23


學習中文
- 1 走路用中文怎麼說? 走路中文發音,走路中文學習
- 2 坐飛機用中文怎麼說? 坐飞机中文發音,坐飞机中文學習
- 3 坐火車用中文怎麼說? 坐火车中文發音,坐火车中文學習
- 4 坐車用中文怎麼說? 坐车中文發音,坐车中文學習
- 5 開車用中文怎麼說? 开车中文發音,开车中文學習
- 6 游泳用中文怎麼說? 游泳中文發音,游泳中文學習
- 7 騎自行車用中文怎麼說? 骑自行车中文發音,骑自行车中文學習
- 8 你好用中文怎麼說? 你好中文發音,你好中文學習
- 9 謝謝用中文怎麼說? 谢谢中文發音,谢谢中文學習
- 10 How to say goodbye in Chinese? 再见Chinese pronunciation, 再见Chinese learning


