
如何使用 Vite 和 Axios 在 React 中實現 MUI 檔案上傳:綜合指南
 瀏覽:623
Introduction
In modern web applications, file uploads play a vital role, enabling users to upload documents, images, and more, directly to a server. Implementing efficient file upload functionality can significantly enhance the user experience. In this blog, we'll explore how to create a sleek mui file upload feature using React and Material UI (MUI). React is a powerful JavaScript library for building user interfaces, while MUI is a collection of customizable React components based on Google's Material Design. We'll leverage Vite, a modern build tool, for faster development compared to traditional bundlers like Webpack. This step-by-step guide will walk you through creating a reliable file upload feature, focusing on performance and user experience.
Setting Up the React Project with Vite
To get started with the mui file upload project, we'll set up a React environment using Vite. If you need a more in-depth guide, check out our detailed Beginners Guide to Using Vite with React. Below are the essential steps to get you up and running:
- First, create a new React project using Vite by running the following command:
npm create vite@latest mui-file-upload
- Navigate to the project directory:
cd mui-file-upload
- Install project dependencies:
npm install
- Next, add MUI and Axios to your project:
npm install @mui/material axios
Vite offers blazing-fast build times, hot module replacement, and a simpler configuration than Webpack. These benefits make it an excellent choice when building performance-sensitive features like a mui file upload. Now, let's dive into creating the file upload functionality!
Creating the File Upload Button with MUI
To start building our mui file upload feature, we'll create a simple and user-friendly upload button using Material UI (MUI). The Button component from MUI is versatile and easy to style, making it perfect for creating an intuitive file upload button.
First, let's import the Button component and set up a basic button for file uploads:
import React from 'react';
import Button from '@mui/material/Button';
export default function UploadButton() {
return (
);
}
Here, the Button component uses the variant="contained" prop for a filled style, and the color="primary" prop to match your theme's primary color. The component="label" prop makes the button a label for the hidden element, triggering file selection when clicked.
To make your button stand out, you can customize it using MUI’s powerful theming capabilities. MUI allows you to adjust the button’s color, size, and even add icons. Here's an example of a more customized button:
}
  sx={{ margin: 2, padding: '10px 20px' }}
>
  Upload
This example uses startIcon to add an icon at the beginning of the button, and the sx prop for inline styling. The ability to quickly change button styles makes MUI an ideal choice for creating visually appealing mui file upload components.
Building the File Upload Form
Now, let's create a form component for our mui file upload feature using MUI’s TextField. The TextField component can be customized to handle various input types, but in this case, we’ll focus on file uploads.
Here’s a basic form setup with a file input field:
import React from 'react';
import Button from '@mui/material/Button';
import TextField from '@mui/material/TextField';

export default function UploadForm() {
  return (
);
}
and after some styles it will look like this
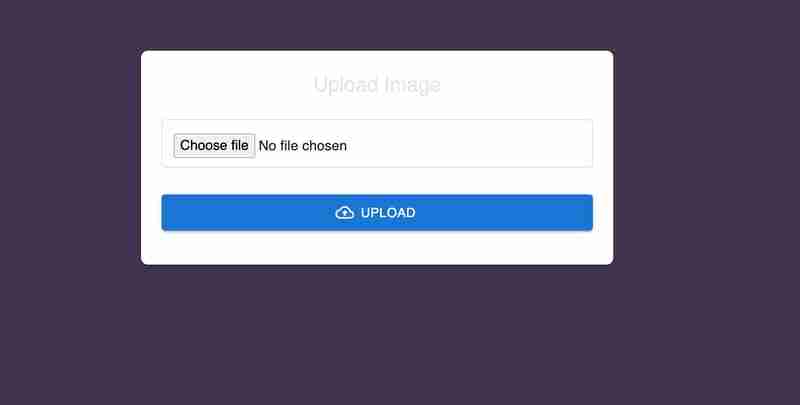
Using the type="file" attribute is crucial for file uploads, ensuring that the user can select files from their local system. You can add validation through attributes like accept, which limits file types (e.g., accept="image/*" allows only image files). This attention to detail improves the user experience by preventing invalid file types from being selected. The full-width TextField with proper margin also makes the form more accessible and visually appealing for the mui file upload functionality.
Handling File Upload with Axios
Uploading files efficiently is a crucial task in modern web applications, and using Axios makes this process both straightforward and manageable. In our mui file upload example, Axios takes center stage, handling the file transfer seamlessly while keeping our React app responsive.
The heart of our upload process lies in a function that triggers when the user submits the form. We use a FormData object, a native JavaScript tool, that’s perfect for handling multipart data like files. The setup is simple: the selected file is wrapped in FormData and passed to Axios, which then takes care of sending it to the server.
const handleFileUpload = async (event) => {
  event.preventDefault();
  setUploadProgress(0);
  setUploadComplete(false);

  const formData = new FormData();
  const file = event.target.elements.fileInput.files[0];
  formData.append('file', file);

  try {
    await axios.post('https://api.escuelajs.co/api/v1/files/upload', formData, {
      onUploadProgress: (progressEvent) => {
        const percentCompleted = Math.round((progressEvent.loaded * 100) / progressEvent.total);
        setUploadProgress(percentCompleted);
      },
    });
    setUploadComplete(true);
  } catch (error) {
    console.error('Error uploading file:', error);
  }
};
The logic here is clean and straightforward. We handle the file selection through an element, pass it to FormData, and let Axios do the heavy lifting. By leveraging onUploadProgress, we can keep users updated on the progress—an essential feature that makes the upload experience engaging rather than frustrating.
Beyond the mechanics, it’s wise to validate files on the client side before sending them off, ensuring that our server isn't burdened with invalid requests. Additionally, keeping the upload secure over HTTPS adds a layer of protection for sensitive data, making the mui file upload process both reliable and safe.
Implementing Progress Feedback Using MUI
Feedback during a file upload can be the difference between a confident user and a confused one. That's where MUI’s flexibility shines, allowing us to seamlessly integrate progress indicators that keep users in the loop.
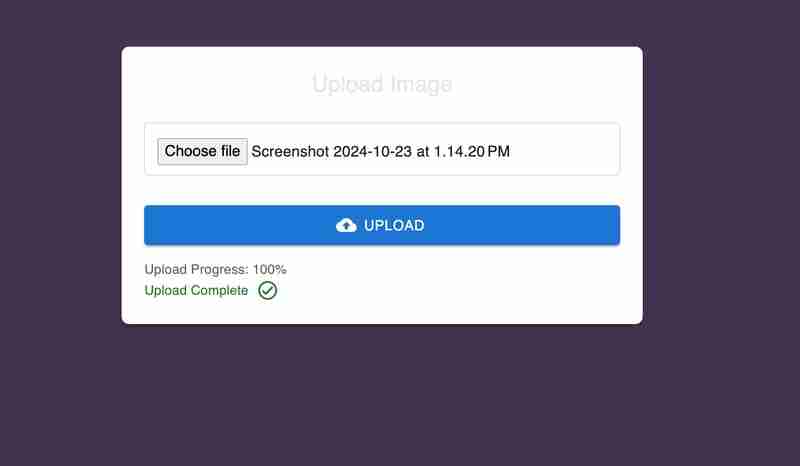
Using Axios’s onUploadProgress feature, we can dynamically update the state with the current progress percentage. MUI’s Typography component provides a straightforward yet elegant way to display this feedback, without cluttering the UI.
{uploadProgress > 0 && (

    Upload Progress: {uploadProgress}%

)}
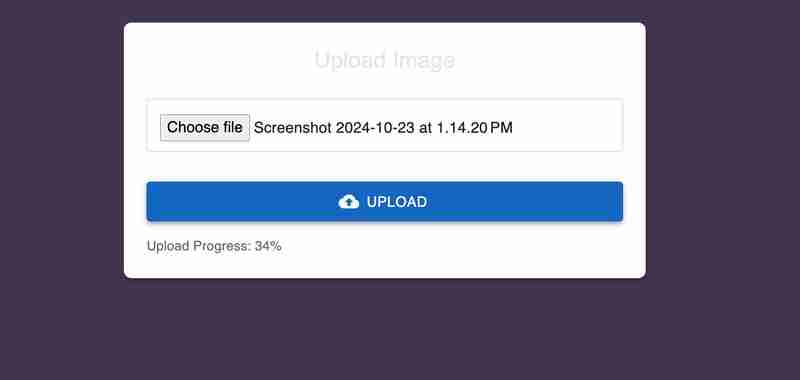
This component elegantly fades in once the upload starts, clearly displaying the percentage completed. It’s a small touch but adds a professional feel to the user experience. Similarly, when the upload completes, a confirmation message appears—celebrating a job well done:
{uploadComplete && (

    Upload Complete

)}

This combination of progress feedback and visual confirmation ensures that users are never left guessing. The dynamic update of the upload progress keeps the interaction engaging, while the success message provides closure. It’s about creating a seamless journey—from file selection to completion—where users feel in control at every step. That's the beauty of building a robust mui file upload feature with modern tools like Axios and MUI.
Error Handling and User Feedback
Handling errors during a file upload is crucial for a smooth user experience. Common issues include network disruptions, server errors, and uploading unsupported file types. React’s state management combined with Axios’s error handling makes it straightforward to manage these problems gracefully.
In our mui file upload example, error feedback is handled using MUI's Typography component. If an upload fails, we display a user-friendly error message.
const handleFileUpload = async (event) => {
  event.preventDefault();
  setUploadProgress(0);
  setUploadComplete(false);
  setUploadError(null);

  const formData = new FormData();
  const file = event.target.elements.fileInput.files[0];
  formData.append('file', file);

  try {
    await axios.post('https://api.escuelajs.co/api/v1/files/upload', formData, {
      onUploadProgress: (progressEvent) => {
        const percentCompleted = Math.round((progressEvent.loaded * 100) / progressEvent.total);
        setUploadProgress(percentCompleted);
      },
    });
    setUploadComplete(true);
  } catch (error) {
    console.error('Error uploading file:', error);
    setUploadError('Failed to upload file. Please try again.');
  }
};
Errors are displayed dynamically using:
{uploadError && (

    {uploadError}

)}
This ensures users are kept informed of any issues, enhancing the mui file upload experience with clear, actionable feedback.
Enhancing Reusability with Custom Hooks
Custom hooks in React are a fantastic way to streamline your code and manage reusable logic. In the context of our mui file upload functionality, we can create a custom hook to encapsulate the file upload process, including error handling, progress updates, and completion status.
Here’s a custom hook that manages the core upload logic:
import { useState } from 'react';
import axios from 'axios';

const useFileUpload = () => {
  const [uploadProgress, setUploadProgress] = useState(0);
  const [uploadComplete, setUploadComplete] = useState(false);
  const [uploadError, setUploadError] = useState(null);

  const uploadFile = async (file) => {
    setUploadProgress(0);
    setUploadComplete(false);
    setUploadError(null);

    const formData = new FormData();
    formData.append('file', file);

    try {
      await axios.post('https://api.escuelajs.co/api/v1/files/upload', formData, {
        onUploadProgress: (progressEvent) => {
          const percentCompleted = Math.round((progressEvent.loaded * 100) / progressEvent.total);
          setUploadProgress(percentCompleted);
        },
      });
      setUploadComplete(true);
    } catch (error) {
      console.error('Error uploading file:', error);
      setUploadError('Failed to upload file. Please try again.');
    }
  };

  return { uploadProgress, uploadComplete, uploadError, uploadFile };
};
By using useFileUpload, you can simplify any component that handles file uploads, ensuring consistent behavior across your application. This makes the mui file upload logic more readable, maintainable, and reusable.
Creating a Higher-Order Component (HOC) for File Upload
In React, a Higher-Order Component (HOC) is a pattern that allows you to reuse component logic. An HOC is essentially a function that takes a component as an argument and returns a new component with additional features. For our mui file upload, creating an HOC allows us to abstract the file upload logic and apply it across different components effortlessly.
Here's how we can create an HOC to handle file uploads:
import React from 'react';
import useFileUpload from './useFileUpload'; // Custom hook for file upload
// Higher-Order Component for file upload
const withFileUpload = (WrappedComponent) => {
return function (props) {
const { uploadProgress, uploadComplete, uploadError, uploadFile } = useFileUpload();
const handleFileChange = (event) => {
const file = event.target.files[0];
if (file) uploadFile(file);
};
return (
This HOC wraps any component, adding upload logic to it. For example:
import React from 'react';
import withFileUpload from './withFileUpload';
function UploadInput({ onFileChange, uploadProgress, uploadComplete, uploadError }) {
return (
{uploadProgress > 0 && Progress: {uploadProgress}%
}
{uploadComplete && Upload Complete!
}
{uploadError && Error: {uploadError}
}
);
}
export default withFileUpload(UploadInput);
By using this pattern, our file upload logic is modular, reusable, and easy to maintain. It enables consistent behavior across components, minimizing duplication and making the codebase cleaner.
Conclusion
Throughout this blog, we've explored how to implement a powerful mui file upload feature using React, MUI, Vite, and Axios. We started by setting up the project, creating customizable file upload components, and adding robust error handling and progress feedback. Custom hooks and HOCs have demonstrated how to make the code modular, reusable, and easier to manage.
Using Vite, we benefited from faster builds and simplified configuration. MUI’s components provided a polished UI, while Axios’s simplicity made file handling straightforward. For the complete code, you can explore the GitHub repository where all examples are available, allowing you to experiment and extend the functionality further. Dive in, and feel free to adapt the concepts for your own projects!
-
 如何將多種用戶類型(學生,老師和管理員)重定向到Firebase應用中的各自活動?Red: How to Redirect Multiple User Types to Respective ActivitiesUnderstanding the ProblemIn a Firebase-based voting app with three distinct user type...程式設計 發佈於2025-07-16
 -
解決Spring Security 4.1及以上版本CORS問題指南彈簧安全性cors filter:故障排除常見問題 在將Spring Security集成到現有項目中時,您可能會遇到與CORS相關的錯誤,如果像“訪問Control-allo-allow-Origin”之類的標頭,則無法設置在響應中。為了解決此問題,您可以實現自定義過濾器,例如代碼段中的MyFi...程式設計 發佈於2025-07-16
-
用戶本地時間格式及時區偏移顯示指南在用戶的語言環境格式中顯示日期/時間,並使用時間偏移在向最終用戶展示日期和時間時,以其localzone and格式顯示它們至關重要。這確保了不同地理位置的清晰度和無縫用戶體驗。以下是使用JavaScript實現此目的的方法。 方法:推薦方法是處理客戶端的Javascript中的日期/時間格式化和...程式設計 發佈於2025-07-16
-
PHP未來:適應與創新PHP的未來將通過適應新技術趨勢和引入創新特性來實現:1)適應云計算、容器化和微服務架構,支持Docker和Kubernetes;2)引入JIT編譯器和枚舉類型,提升性能和數據處理效率;3)持續優化性能和推廣最佳實踐。 引言在編程世界中,PHP一直是網頁開發的中流砥柱。作為一個從1994年就開始發展...程式設計 發佈於2025-07-16
-
在Ubuntu/linux上安裝mysql-python時,如何修復\“ mysql_config \”錯誤?mysql-python安裝錯誤:“ mysql_config找不到”“ 由於缺少MySQL開發庫而出現此錯誤。解決此問題,建議在Ubuntu上使用該分發的存儲庫。使用以下命令安裝Python-MysqldB: sudo apt-get安裝python-mysqldb sudo pip in...程式設計 發佈於2025-07-16
-
在Python中如何創建動態變量?在Python 中,動態創建變量的功能可以是一種強大的工具,尤其是在使用複雜的數據結構或算法時,Dynamic Variable Creation的動態變量創建。 Python提供了幾種創造性的方法來實現這一目標。 利用dictionaries 一種有效的方法是利用字典。字典允許您動態創建密鑰並...程式設計 發佈於2025-07-16
-
eval()vs. ast.literal_eval():對於用戶輸入,哪個Python函數更安全?稱量()和ast.literal_eval()中的Python Security 在使用用戶輸入時,必須優先確保安全性。強大的Python功能Eval()通常是作為潛在解決方案而出現的,但擔心其潛在風險。 This article delves into the differences betwee...程式設計 發佈於2025-07-16
-
Java是否允許多種返回類型:仔細研究通用方法?在Java中的多個返回類型:一種誤解類型:在Java編程中揭示,在Java編程中,Peculiar方法簽名可能會出現,可能會出現,使開發人員陷入困境,使開發人員陷入困境。 getResult(string s); ,其中foo是自定義類。該方法聲明似乎擁有兩種返回類型:列表和E。但這確實是如此嗎...程式設計 發佈於2025-07-16
-
如何有效地轉換PHP中的時區?在PHP 利用dateTime對象和functions DateTime對象及其相應的功能別名為時區轉換提供方便的方法。例如: //定義用戶的時區 date_default_timezone_set('歐洲/倫敦'); //創建DateTime對象 $ dateTime = ne...程式設計 發佈於2025-07-16
-
如何使用替換指令在GO MOD中解析模塊路徑差異?在使用GO MOD時,在GO MOD 中克服模塊路徑差異時,可能會遇到衝突,其中可能會遇到一個衝突,其中3派對軟件包將另一個帶有導入套件的path package the Imptioned package the Imptioned package the Imported tocted pac...程式設計 發佈於2025-07-16
-
Async Void vs. Async Task在ASP.NET中:為什麼Async Void方法有時會拋出異常?在ASP.NET async void void async void void void void void的設計無需返回asynchroncon而無需返回任務對象。他們在執行過程中增加未償還操作的計數,並在完成後減少。在某些情況下,這種行為可能是有益的,例如未期望或明確預期操作結果的火災和...程式設計 發佈於2025-07-16
-
同實例無需轉儲複製MySQL數據庫方法在同一實例上複製一個MySQL數據庫而無需轉儲在同一mySQL實例上複製數據庫,而無需創建InterMediate sqql script。以下方法為傳統的轉儲和IMPORT過程提供了更簡單的替代方法。 直接管道數據 MySQL手動概述了一種允許將mysqldump直接輸出到MySQL cli...程式設計 發佈於2025-07-16
-
如何使用Python的請求和假用戶代理繞過網站塊?如何使用Python的請求模擬瀏覽器行為,以及偽造的用戶代理提供了一個用戶 - 代理標頭一個有效方法是提供有效的用戶式header,以提供有效的用戶 - 設置,該標題可以通過browser和Acterner Systems the equestersystermery和操作系統。通過模仿像Chro...程式設計 發佈於2025-07-16
-
Java中如何使用觀察者模式實現自定義事件?在Java 中創建自定義事件的自定義事件在許多編程場景中都是無關緊要的,使組件能夠基於特定的觸發器相互通信。本文旨在解決以下內容:問題語句我們如何在Java中實現自定義事件以促進基於特定事件的對象之間的交互,定義了管理訂閱者的類界面。 以下代碼片段演示瞭如何使用觀察者模式創建自定義事件: args...程式設計 發佈於2025-07-16
-
input: Why Does "Warning: mysqli_query() expects parameter 1 to be mysqli, resource given" Error Occur and How to Fix It? output: 解決“Warning: mysqli_query() 參數應為 mysqli 而非 resource”錯誤的解析與修復方法mysqli_query()期望參數1是mysqli,resource給定的,嘗試使用mysql Query進行執行MySQLI_QUERY_QUERY formation,be be yessqli:sqli:sqli:sqli:sqli:sqli:sqli: mysqli,給定的資源“可能發...程式設計 發佈於2025-07-16


學習中文
- 1 走路用中文怎麼說? 走路中文發音,走路中文學習
- 2 坐飛機用中文怎麼說? 坐飞机中文發音,坐飞机中文學習
- 3 坐火車用中文怎麼說? 坐火车中文發音,坐火车中文學習
- 4 坐車用中文怎麼說? 坐车中文發音,坐车中文學習
- 5 開車用中文怎麼說? 开车中文發音,开车中文學習
- 6 游泳用中文怎麼說? 游泳中文發音,游泳中文學習
- 7 騎自行車用中文怎麼說? 骑自行车中文發音,骑自行车中文學習
- 8 你好用中文怎麼說? 你好中文發音,你好中文學習
- 9 謝謝用中文怎麼說? 谢谢中文發音,谢谢中文學習
- 10 How to say goodbye in Chinese? 再见Chinese pronunciation, 再见Chinese learning


