
使用 Golang 和 AWS Cognito 進行身份驗證
 瀏覽:683
What is cognito?
The authentication of an application is something very important in the system, but also very sensitive, there are various implementations, security, validation to be considered.
I decided to make a post demonstrating a about Cognito, a very nice tool from AWS that can help you in the authentication and validation of the user for Web and mobile applications that many people do not know.
Cognito is an AWS platform responsible for creating and validating user access data, as well as being able to register users and store their information, in addition to generating OAuth tokens, and Cognito can also provide all user validation.
We can create some user data such as: email, name, phone, birthdate, nickname, gender, website and many others, we can also place custom fields.
Cognito still allows us to work with "federated providers", known as social logins, such as Google, Facebook and GitHub, we are not going to address this post, but it is possible to do it with cognito.
What are we going to do?
We are going to make some endpoints to show how cognito works, we are going to create a user, confirm email, login, search for a user using the token provided by cognito, update information.
Setting up the project
We are going to do something very simple, we are not going to worry about the project father, we want to address only the use of knowledge.
To create the endpoints we are going to use gin.
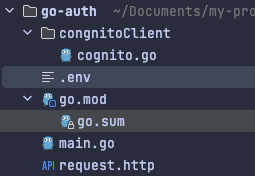
Let's create the following files:
The entrypoint of our application main.go at the root of the project
.env To save cognitive credentials
A paste called cognitoClient and inside a file called cognito.go
There is a file called request.http, to complete your requests.
The structure will be as follows:
Setting up Cognito on AWS
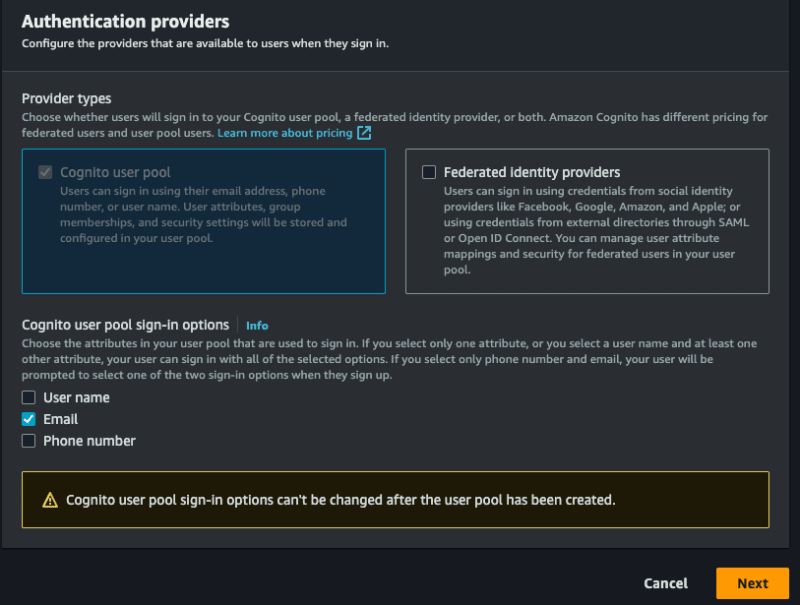
Before starting the code, we will configure the cognito in AWS, to access the panel and search by cognito, after we will create our pool, select the option Add user directories to your app.
For Provider types, select the Cognito user pool option, you can choose to allow login using email, user name and phone, you can only opt for email, select what you prefer, select assim to first stage:
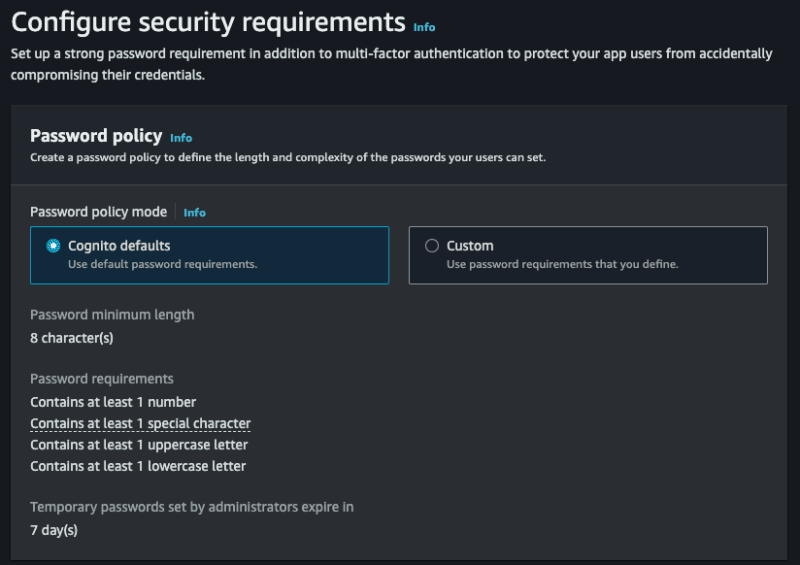
I need to configure some more things, let's go!
- Password policy mode allows you to select a specific policy, let's deixar the Cognito defaults.
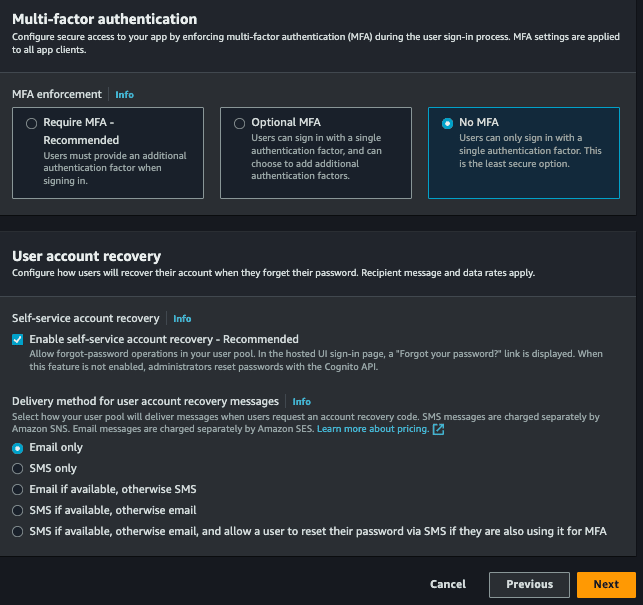
- Multi-factor authentication allows our login to have two-factor authentication, let's go without, but you can implement it if desired, you can opt for No MFA.
- Finally, or User account recovery, you can choose ways to recover your account, you can just choose email.
Next step:
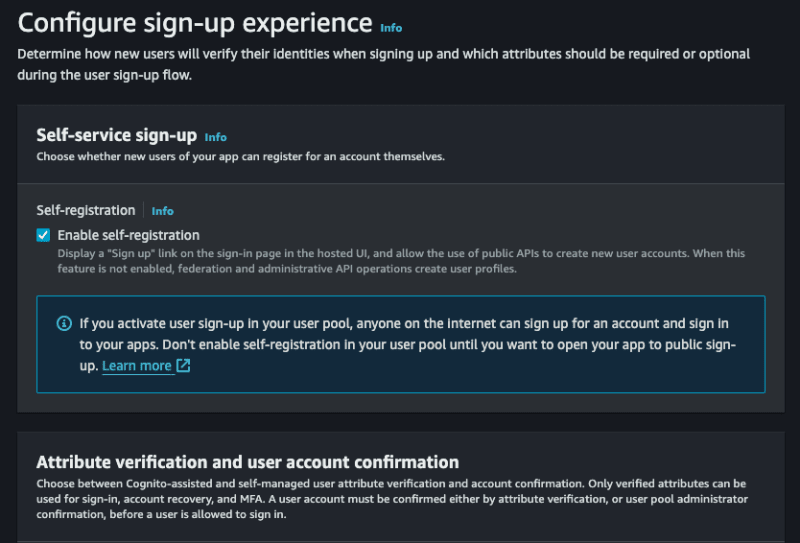
- Self-service sign-up, we will allow any person to do so, leave selected.
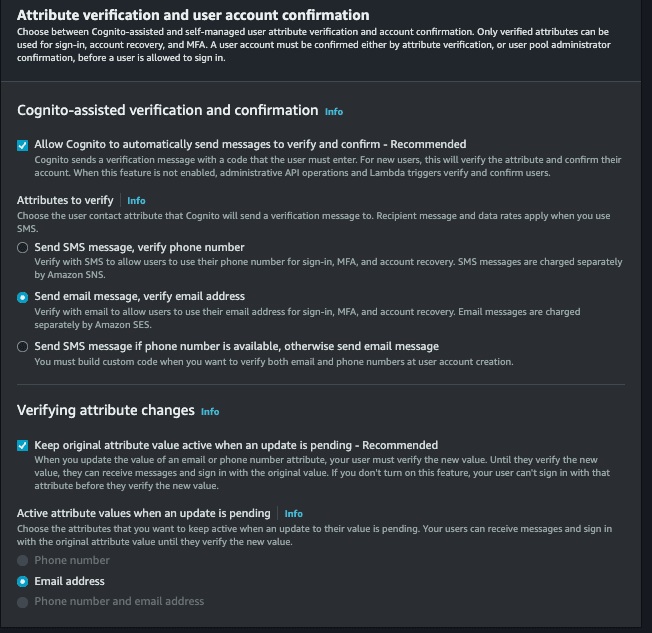
- Cognito-assisted verification and confirmation, allow cognito to be responsible for confirming the user's identity, check it, and also select the option Send email message, verify email address.
- Verifying attribute changes, check this option, so that updating the user's email needs to be validated again.
- Required attributes, select the fields that you want to make mandatory to create a new user, you will select the options, email (and the name) and the name will also be required by your father.
- Custom attributes, it is optional, but you can add custom fields, for example, you will create a field called custom_id which will be any uuid.
This stage also occurred:

Next, select the Send email with Cognito option, so we do not need to configure anything to trigger the emails.
In the next step, in User pool name put the name you want in App client name, also put the name you want and continue.
In the last stage we will not need to alter anything, just finish and create the user pool.
With everything, access or cognito > User pools, select the pool that you just created, this part will list all the users of your application, and it is possible to revoke the user's token, deactivate, verify among other functionalities.
We are going to specify the id of the pool, to be able to use the Go sdk for aws, for access to the created pool App integration > App client list and see our Client ID:
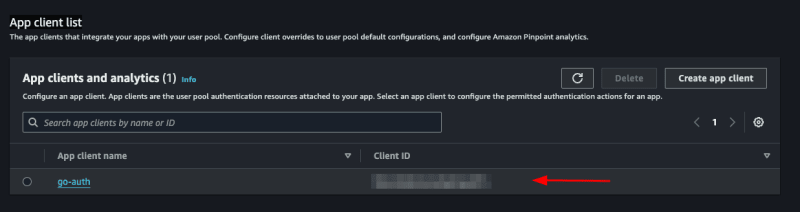
Let's save this id in our .env file:
COGNITO_CLIENT_ID=client_id
Remembering that you still need to have the AWS credentials, usually located in the /Users/your-user/.aws directory, if you haven't configured it yet, see here how to do it.
Implementing cognito
Let's separate the cognito part into another file.
Registering the user
Inside the cognito.go file, we will initialize our cognito and create our interface:
  package congnitoClient

  import (
    "github.com/aws/aws-sdk-go/aws"
    "github.com/aws/aws-sdk-go/aws/session"
    cognito "github.com/aws/aws-sdk-go/service/cognitoidentityprovider"
    "github.com/google/uuid"
  )

  type User struct {
    Name     string `json:"name" binding:"required"`
    Email    string `json:"email" binding:"required,email"`
    Password string `json:"password" binding:"required"`
  }

  type CognitoInterface interface {
    SignUp(user *User) error
  }

  type cognitoClient struct {
    cognitoClient *cognito.CognitoIdentityProvider
    appClientID   string
  }

  func NewCognitoClient(appClientId string) CognitoInterface {
    config := &aws.Config{Region: aws.String("us-east-1")}
    sess, err := session.NewSession(config)
    if err != nil {
      panic(err)
    }
    client := cognito.New(sess)

    return &cognitoClient{
      cognitoClient: client,
      appClientID:   appClientId,
    }
  }

  func (c *cognitoClient) SignUp(user *User) error {
    return nil
  }
First we create a struct called User, this struct will have the user fields that we need to save in cognito.
Then we create an interface called CognitoInterface, we will have the methods that we will use, first we will only have SignUp which will receive a pointer to the User struct.
Then we will have another struct called cognitoClient that will contain our instance for NewCognitoClient that will be our constructor.
As mentioned, NewCognitoClient will be like our constructor, it is where we will create the session with AWS and return this connection. This connection could be a global variable, in our case we will not do this, it is up to you to check which is the best approach for your use case.
Now let's implement SignUp:
  func (c *cognitoClient) SignUp(user *User) error {
    userCognito := &cognito.SignUpInput{
      ClientId: aws.String(c.appClientID),
      Username: aws.String(user.Email),
      Password: aws.String(user.Password),
      UserAttributes: []*cognito.AttributeType{
        {
          Name:  aws.String("name"),
          Value: aws.String(user.Name),
        },
        {
          Name:  aws.String("email"),
          Value: aws.String(user.Email),
        },
        {
          Name:  aws.String("custom:custom_id"),
          Value: aws.String(uuid.NewString()),
        },
      },
    }
    _, err := c.cognitoClient.SignUp(userCognito)
    if err != nil {
      return err
    }
    return nil
  }
We will use the AttributeType from Cognito to assemble the parameters that we will send to the SignUp of the AWS SDK, note that the custom_id which is our custom field, needs to be placed custom before, without this it will not be accepted, we just created a uuid with the Google package, this field is just to show how to use custom attributes.
The ClientId field refers to the COGNITO_CLIENT_ID of our env, we will pass it on when starting main.go.
This is what we need to save the user, simple isn't it?
Don't forget to start the project with:
go mod init
And install the necessary packages:
go mod tidy
Confirming the account
Let's create another function to verify the user's account via email. To verify the account, the user will need to enter the code sent by email. Let's create a new struct and add the new ConfirmAccount method to the interface:
  type UserConfirmation struct {
    Email string `json:"email" binding:"required,email"`
    Code  string `json:"code" binding:"required"`
  }
  type CognitoInterface interface {
    SignUp(user *User) error
    ConfirmAccount(user *UserConfirmation) error
  }
Now let's implement:
  func (c *cognitoClient) ConfirmAccount(user *UserConfirmation) error {
    confirmationInput := &cognito.ConfirmSignUpInput{
      Username:         aws.String(user.Email),
      ConfirmationCode: aws.String(user.Code),
      ClientId:         aws.String(c.appClientID),
    }
    _, err := c.cognitoClient.ConfirmSignUp(confirmationInput)
    if err != nil {
      return err
    }
    return nil
  }
It's very simple, we will use the ConfirmSignUpInput from the cognito package to assemble the parameters, remembering that the Username is the user's email. Finally, we will call ConfirmSignUp passing the confirmationInput.
Remembering that we only returned the error, you could improve and check the types of error messages.
Login
This should be the functionality that will be used the most, let's create a method called SignIn and a struct:
  type UserLogin struct {
    Email    string `json:"email" binding:"required,email"`
    Password string `json:"password" binding:"required"`
  }
  type CognitoInterface interface {
    SignUp(user *User) error
    ConfirmAccount(user *UserConfirmation) error
    SignIn(user *UserLogin) (string, error)
  }
Our SignIn will receive a UserLogin.
Let's implement:
  func (c *cognitoClient) SignIn(user *UserLogin) (string, error) {
    authInput := &cognito.InitiateAuthInput{
      AuthFlow: aws.String("USER_PASSWORD_AUTH"),
      AuthParameters: aws.StringMap(map[string]string{
        "USERNAME": user.Email,
        "PASSWORD": user.Password,
      }),
      ClientId: aws.String(c.appClientID),
    }
    result, err := c.cognitoClient.InitiateAuth(authInput)
    if err != nil {
      return "", err
    }
    return *result.AuthenticationResult.AccessToken, nil
  }
We will use the InitiateAuth function from the aws cognito package, we need to pass the username (user's email), password and the AuthFlow, this field refers to the type of access that we will allow, in our case USER_PASSWORD_AUTH.
If you receive an error like this:
You trusted all proxies, this is NOT safe. We recommend you to set a value
It will be necessary to enable the ALLOW_USER_PASSWORD_AUTH flow, to configure it access cognito on the aws panel, go to:
User pools > Selecione seu pool > App integration > App client list > Selecione um client, will open this screen:
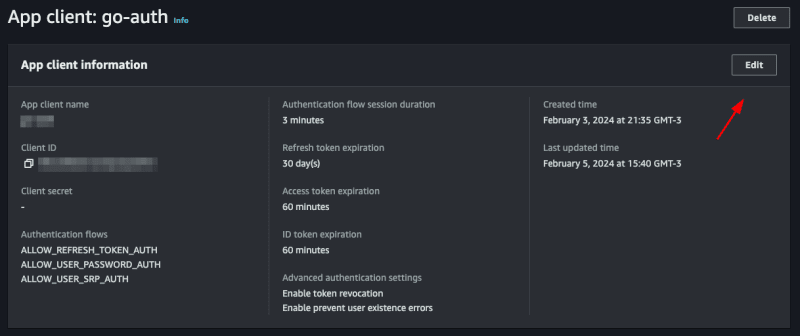
Click on edit and in Authentication flows select the option ALLOW_USER_PASSWORD_AUTH then save, with this you can now log in with the user's password and email.
Listando um usuário
Para mostrar como utilizar o token jwt fornecido pelo cognito vamos criar um endpoint que mostra os dados do usuário salvos no cognito apenas com o token.
Let's create another function called GetUserByToken that will receive a token and return a struct of type GetUserOutput that we will get from the cognito package.
  type CognitoInterface interface {
    SignUp(user *User) error
    ConfirmAccount(user *UserConfirmation) error
    SignIn(user *UserLogin) (string, error)
    GetUserByToken(token string) (*cognito.GetUserOutput, error)
  }
If you click on GetUserOutput you will see what is inside this struct
  type GetUserOutput struct {
    _ struct{} `type:"structure"`
    MFAOptions []*MFAOptionType `type:"list"`
    PreferredMfaSetting *string `type:"string"`
    UserAttributes []*AttributeType `type:"list" required:"true"`
    UserMFASettingList []*string `type:"list"`
    Username *string `min:"1" type:"string" required:"true" sensitive:"true"`
  }
inside the _ struct{} there are custom attributes that we created for our user, in our case the custom_id.
Let's implement:
  func (c *cognitoClient) GetUserByToken(token string) (*cognito.GetUserOutput, error) {
    input := &cognito.GetUserInput{
      AccessToken: aws.String(token),
    }
    result, err := c.cognitoClient.GetUser(input)
    if err != nil {
      return nil, err
    }
    return result, nil
  }
We use GetUser from the cognito package, it only needs an AccessToken which is the token provided by cognito itself.
Updating password
Finally, we will update the user's password. To do this, we will need the email address and the new password. We already have the UserLogin struct with the fields we need. We will reuse it. If you wish, create a new one just for this function. Let's create the UpdatePassword function:
  type CognitoInterface interface {
    SignUp(user *User) error
    ConfirmAccount(user *UserConfirmation) error
    SignIn(user *UserLogin) (string, error)
    GetUserByToken(token string) (*cognito.GetUserOutput, error)
    UpdatePassword(user *UserLogin) error
  }
Let's implement:
  func (c *cognitoClient) UpdatePassword(user *UserLogin) error {
    input := &cognito.AdminSetUserPasswordInput{
      UserPoolId: aws.String(os.Getenv("COGNITO_USER_POOL_ID")),
      Username:   aws.String(user.Email),
      Password:   aws.String(user.Password),
      Permanent:  aws.Bool(true),
    }
    _, err := c.cognitoClient.AdminSetUserPassword(input)
    if err != nil {
      return err
    }
    return nil
  }
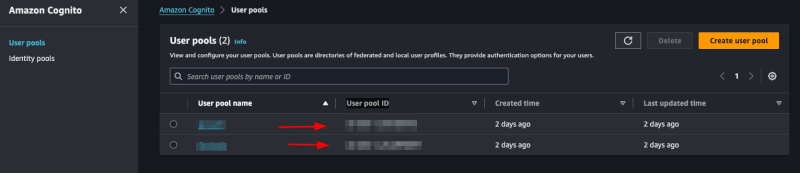
We will use the AdminSetUserPassword function from the cognito package, we need to pass the user's email and the new password, in addition we have to pass the UserPoolId, we will put the COGNITO_USER_POOL_ID in the .env file, to search in aws just access your pool and copy the User pool ID
We will also pass Permanent, informing that it is a permanent password, you could pass false, so Cognito would create a temporary password for the user, this will depend on the strategy you will use in your application.
Creating the main
Let's create our main.go, this will be the file where we will start cognito and create our routes.
  func main() {
    err := godotenv.Load()
    if err != nil {
      panic(err)
    }
    cognitoClient := congnitoClient.NewCognitoClient(os.Getenv("COGNITO_CLIENT_ID"))
    r := gin.Default()

    fmt.Println("Server is running on port 8080")
    err = r.Run(":8080")
    if err != nil {
      panic(err)
    }
  }
First we will load our envs with the godotenv package, then we start our cognito client, passing the COGNITO_CLIENT_ID, which we got earlier, then we start gin and create a server, that's enough.
Creating the endpoints
Creating a user
Let's create a function inside the main.go file itself, let's call it CreateUser:
  func CreateUser(c *gin.Context, cognito congnitoClient.CognitoInterface) error {
    var user congnitoClient.User
    if err := c.ShouldBindJSON(&user); err != nil {
      return errors.New("invalid json")
    }
    err := cognito.SignUp(&user)
    if err != nil {
      return errors.New("could not create use")
    }
    return nil
  }
Something simple, we just convert what we receive in the body to our struct using gin's ShouldBindJSON, then we call the SignUp that we created in cognito.go.
Now let's create the endpoint inside the main.go function:
  r.POST("user", func(context *gin.Context) {
        err := CreateUser(context, cognitoClient)
        if err != nil {
            context.JSON(http.StatusBadRequest, gin.H{"error": err.Error()})
            return
        }
        context.JSON(http.StatusCreated, gin.H{"message": "user created"})
    })
We call the function we just created CreateUser, if there is an error we throw a StatusBadRequest, if it is successful a StatusCreated, let's test.
Let's do a go mod tidy downloading all the packages, then we'll run the application with go run main.go
Now we can create a call in the request.http file and execute:
POST http://localhost:8080/user HTTP/1.1
content-type: application/json

{
  "Name": "John Doe",
  "email": "[email protected]",
  "password": "Pass@1234"
}
If everything is correct we will receive the message:
{
  "message": "user created"
}
Now entering the Cognito panel on AWS, and accessing the pool then the users, we will have our user there:
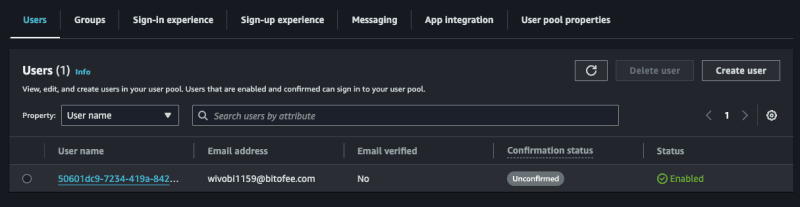
Confirming a user
Note that the user we created above is not confirmed, let's confirm it!
Create a function called ConfirmAccount in the main.go file:
  func ConfirmAccount(c *gin.Context, cognito congnitoClient.CognitoInterface) error {
    var user congnitoClient.UserConfirmation
    if err := c.ShouldBindJSON(&user); err != nil {
      return errors.New("invalid json")
    }
    err := cognito.ConfirmAccount(&user)
    if err != nil {
      return errors.New("could not confirm user")
    }
    return nil
  }
Same concept we used before, let's convert the body to the UserConfirmation struct and pass it to ConfirmAccount in cognito.go.
Let's create the endpoint:
  r.POST("user/confirmation", func(context *gin.Context) {
        err := ConfirmAccount(context, cognitoClient)
        if err != nil {
            context.JSON(http.StatusBadRequest, gin.H{"error": err.Error()})
            return
        }
        context.JSON(http.StatusCreated, gin.H{"message": "user confirmed"})
    })
It's also simple, we just handle the error and return a message, let's create our call and test it:
POST http://localhost:8080/user/confirmation HTTP/1.1
content-type: application/json

{
  "email": "[email protected]",
  "code": "363284"
}
We will receive the message:
{
  "message": "user confirmed"
}
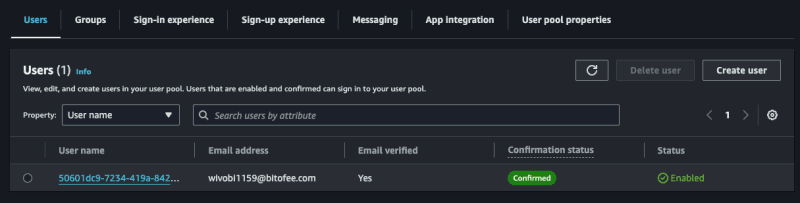
Now accessing Cognito again on the AWS panel, notice that the user is confirmed, remembering that you need to enter a valid email, you can use a temporary email to play around, but it needs to be valid, as Cognito will send the confirmation code and it needs to be a valid code to confirm successfully.
Login
Now let's create our token, to do this in the main.go file create a function called SignIn, this function will return an error and a token.
  func SignIn(c *gin.Context, cognito congnitoClient.CognitoInterface) (string, error) {
    var user congnitoClient.UserLogin
    if err := c.ShouldBindJSON(&user); err != nil {
      return "", errors.New("invalid json")
    }
    token, err := cognito.SignIn(&user)
    if err != nil {
      return "", errors.New("could not sign in")
    }
    return token, nil
  }
Same pattern as the other functions, we convert the body to the UserLogin struct and pass it to SignIn of cognito.go.
Let's create the endpoint:
  r.POST("user/login", func(context *gin.Context) {
        token, err := SignIn(context, cognitoClient)
        if err != nil {
            context.JSON(http.StatusBadRequest, gin.H{"error": err.Error()})
            return
        }
        context.JSON(http.StatusCreated, gin.H{"token": token})
    })
Now we return a token to the user, let's create the call and test:
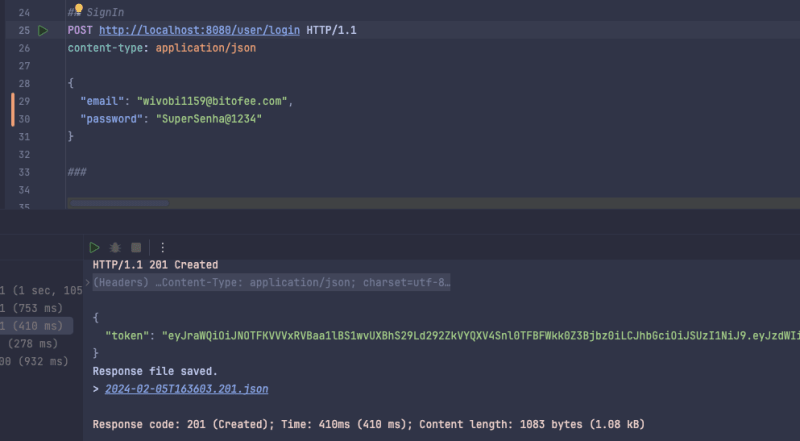
POST http://localhost:8080/user/login HTTP/1.1
content-type: application/json

{
  "email": "[email protected]",
  "password": "Pass@1234"
}
When making the call we will receive our jwt token:
{
  "token": "token_here"
}
If we get the jwt token we can see what's inside, using the website jwt.io.
Listing a user
Now we will list the user data saved in cognito using only the token, to do this create a function called GetUserByToken in main.go and we will need a struct to represent the response that we will return to the user, we will create it in main as well:
  type UserResponse struct {
    ID            string `json:"id"`
    Name          string `json:"name"`
    Email         string `json:"email"`
    CustomID      string `json:"custom_id"`
    EmailVerified bool   `json:"email_verified"`
  }

  func main() {}
Now the function:
  func GetUserByToken(c *gin.Context, cognito congnitoClient.CognitoInterface) (*UserResponse, error) {
    token := strings.TrimPrefix(c.GetHeader("Authorization"), "Bearer ")
    if token == "" {
      return nil, errors.New("token not found")
    }
    cognitoUser, err := cognito.GetUserByToken(token)
    if err != nil {
      return nil, errors.New("could not get user")
    }
    user := &UserResponse{}
    for _, attribute := range cognitoUser.UserAttributes {
      switch *attribute.Name {
      case "sub":
        user.ID = *attribute.Value
      case "name":
        user.Name = *attribute.Value
      case "email":
        user.Email = *attribute.Value
      case "custom:custom_id":
        user.CustomID = *attribute.Value
      case "email_verified":
        emailVerified, err := strconv.ParseBool(*attribute.Value)
        if err == nil {
          user.EmailVerified = emailVerified
        }
      }
    }
    return user, nil
  }
This will be the biggest function, we need to map what we receive from Cognito to our UserResponse struct, we do this with a for and a switch, of course we could improve it, but for the sake of example we will keep it like this. Also to map custom attributes we need to put custom before, like custom:custom_id.
We also check if the user passed the token in the header, if not we return an error.
Let's create the endpoint:
  r.GET("user", func(context *gin.Context) {
        user, err := GetUserByToken(context, cognitoClient)
        if err != nil {
            if err.Error() == "token not found" {
                context.JSON(http.StatusUnauthorized, gin.H{"error": "token not found"})
                return
            }
            context.JSON(http.StatusBadRequest, gin.H{"error": err.Error()})
            return
        }
        context.JSON(http.StatusOK, gin.H{"user": user})
    })
We perform the same validation as the other endpoints, but now we check the error type and if it is of the token not found type we return a StatusUnauthorized.
Let's test:
GET http://localhost:8080/user HTTP/1.1
content-type: application/json
Authorization: Bearer token_jwt
Let's receive the user:
{
  "user": {
    "id": "50601dc9-7234-419a-8427-2a4bda92d33f",
    "name": "John Doe",
    "email": "[email protected]",
    "custom_id": "cb748d09-40de-457a-af23-ed9483d69f8d",
    "email_verified": true
  }
}
Updating password
Finally, let's create the UpdatePassword function that will update the user's password:
  func UpdatePassword(c *gin.Context, cognito congnitoClient.CognitoInterface) error {
    token := strings.TrimPrefix(c.GetHeader("Authorization"), "Bearer ")
    if token == "" {
      return errors.New("token not found")
    }
    var user congnitoClient.UserLogin
    if err := c.ShouldBindJSON(&user); err != nil {
      return errors.New("invalid json")
    }
    err := cognito.UpdatePassword(&user)
    if err != nil {
      return errors.New("could not update password")
    }
    return nil
  }
We also make it mandatory to inform the token in the header, the rest of the function is what we have already done previously.
Let's create the last endpoint:
  r.PATCH("user/password", func(context *gin.Context) {
        err := UpdatePassword(context, cognitoClient)
        if err != nil {
            if err.Error() == "token not found" {
                context.JSON(http.StatusUnauthorized, gin.H{"error": "token not found"})
                return
            }
            context.JSON(http.StatusBadRequest, gin.H{"error": err.Error()})
            return
        }
        context.JSON(http.StatusOK, gin.H{"message": "password updated"})
    })
Let's make the call:
PATCH http://localhost:8080/user/password HTTP/1.1
content-type: application/json
Authorization: Bearer token_jwt

{
  "email": "[email protected]",
  "password": "NovaSenha2@2222"
}
Now when you update your password and try to log in you will receive an error, and if you use the new password, everything will work.
Final considerations
In this post we talk a little about Cognito, one of the many AWS services that many people don't know about but that helps a lot in the evolution of your system.
Cognito's practicality goes beyond what I've discussed. Making a basic login is simple, but Cognito stands out for already providing you with an account verification system "ready", a login option with social networks (which can be quite annoying to implement without Coginito), two-factor authentication, among others, and it also has AWS security to protect user data.
Cognito has more functionality, it's worth seeing all of them in the documentation.
Repository link
Project repository
See the post on my blog here
Subscribe and receive notification of new posts, participate
-
 如何從PHP中的Unicode字符串中有效地產生對URL友好的sl。為有效的slug生成首先,該函數用指定的分隔符替換所有非字母或數字字符。此步驟可確保slug遵守URL慣例。隨後,它採用ICONV函數將文本簡化為us-ascii兼容格式,從而允許更廣泛的字符集合兼容性。 接下來,該函數使用正則表達式刪除了不需要的字符,例如特殊字符和空格。此步驟可確保slug僅包...程式設計 發佈於2025-07-12
 -
如何使用Python的請求和假用戶代理繞過網站塊?如何使用Python的請求模擬瀏覽器行為,以及偽造的用戶代理提供了一個用戶 - 代理標頭一個有效方法是提供有效的用戶式header,以提供有效的用戶 - 設置,該標題可以通過browser和Acterner Systems the equestersystermery和操作系統。通過模仿像Chro...程式設計 發佈於2025-07-12
-
CSS強類型語言解析您可以通过其强度或弱输入的方式对编程语言进行分类的方式之一。在这里,“键入”意味着是否在编译时已知变量。一个例子是一个场景,将整数(1)添加到包含整数(“ 1”)的字符串: result = 1 "1";包含整数的字符串可能是由带有许多运动部件的复杂逻辑套件无意间生成的。它也可以是故意从单个真理...程式設計 發佈於2025-07-12
-
反射動態實現Go接口用於RPC方法探索在GO 使用反射來實現定義RPC式方法的界面。例如,考慮一個接口,例如:鍵入myService接口{ 登錄(用戶名,密碼字符串)(sessionId int,錯誤錯誤) helloworld(sessionid int)(hi String,錯誤錯誤) } 替代方案而不是依靠反射...程式設計 發佈於2025-07-12
-
解決Spring Security 4.1及以上版本CORS問題指南彈簧安全性cors filter:故障排除常見問題 在將Spring Security集成到現有項目中時,您可能會遇到與CORS相關的錯誤,如果像“訪問Control-allo-allow-Origin”之類的標頭,則無法設置在響應中。為了解決此問題,您可以實現自定義過濾器,例如代碼段中的MyFi...程式設計 發佈於2025-07-12
-
如何在Chrome中居中選擇框文本?選擇框的文本對齊:局部chrome-inly-ly-ly-lyly solument 您可能希望將文本中心集中在選擇框中,以獲取優化的原因或提高可訪問性。但是,在CSS中的選擇元素中手動添加一個文本 - 對屬性可能無法正常工作。 初始嘗試 state)</option> < o...程式設計 發佈於2025-07-12
-
如何使用Python有效地以相反順序讀取大型文件?在python 中,如果您使用一個大文件,並且需要從最後一行讀取其內容,則在第一行到第一行,Python的內置功能可能不合適。這是解決此任務的有效解決方案:反向行讀取器生成器 == ord('\ n'): 緩衝區=緩衝區[:-1] ...程式設計 發佈於2025-07-12
-
PHP SimpleXML解析帶命名空間冒號的XML方法在php 很少,請使用該限制很大,很少有很高。例如:這種技術可確保可以通過遍歷XML樹和使用兒童()方法()方法的XML樹和切換名稱空間來訪問名稱空間內的元素。程式設計 發佈於2025-07-12
-
Java字符串非空且非null的有效檢查方法檢查字符串是否不是null而不是空的 if(str!= null && str.isementy())二手: if(str!= null && str.length()== 0) option 3:trim()。 isement(Isement() trim whitespace whites...程式設計 發佈於2025-07-12
-
如何檢查對像是否具有Python中的特定屬性?方法來確定對象屬性存在尋求一種方法來驗證對像中特定屬性的存在。考慮以下示例,其中嘗試訪問不確定屬性會引起錯誤: >>> a = someClass() >>> A.property Trackback(最近的最新電話): 文件“ ”,第1行, AttributeError: SomeClass...程式設計 發佈於2025-07-12
-
Python讀取CSV文件UnicodeDecodeError終極解決方法在試圖使用已內置的CSV模塊讀取Python中時,CSV文件中的Unicode Decode Decode Decode Decode decode Error讀取,您可能會遇到錯誤的錯誤:無法解碼字節 在位置2-3中:截斷\ uxxxxxxxx逃脫當CSV文件包含特殊字符或Unicode的路徑逃...程式設計 發佈於2025-07-12
-
解決MySQL插入Emoji時出現的\\"字符串值錯誤\\"異常Resolving Incorrect String Value Exception When Inserting EmojiWhen attempting to insert a string containing emoji characters into a MySQL database us...程式設計 發佈於2025-07-12
-
為什麼不````''{margin:0; }`始終刪除CSS中的最高邊距?在CSS 問題:不正確的代碼: 全球範圍將所有餘量重置為零,如提供的代碼所建議的,可能會導致意外的副作用。解決特定的保證金問題是更建議的。 例如,在提供的示例中,將以下代碼添加到CSS中,將解決餘量問題: body H1 { 保證金頂:-40px; } 此方法更精確,避免了由全局保證金重置...程式設計 發佈於2025-07-12
-
如何使用Depimal.parse()中的指數表示法中的數字?在嘗試使用Decimal.parse(“ 1.2345e-02”中的指數符號表示法表示的字符串時,您可能會遇到錯誤。這是因為默認解析方法無法識別指數符號。 成功解析這樣的字符串,您需要明確指定它代表浮點數。您可以使用numbersTyles.Float樣式進行此操作,如下所示:[&& && && ...程式設計 發佈於2025-07-12


學習中文
- 1 走路用中文怎麼說? 走路中文發音,走路中文學習
- 2 坐飛機用中文怎麼說? 坐飞机中文發音,坐飞机中文學習
- 3 坐火車用中文怎麼說? 坐火车中文發音,坐火车中文學習
- 4 坐車用中文怎麼說? 坐车中文發音,坐车中文學習
- 5 開車用中文怎麼說? 开车中文發音,开车中文學習
- 6 游泳用中文怎麼說? 游泳中文發音,游泳中文學習
- 7 騎自行車用中文怎麼說? 骑自行车中文發音,骑自行车中文學習
- 8 你好用中文怎麼說? 你好中文發音,你好中文學習
- 9 謝謝用中文怎麼說? 谢谢中文發音,谢谢中文學習
- 10 How to say goodbye in Chinese? 再见Chinese pronunciation, 再见Chinese learning


