
CSS의 간단한 이미지 비교
2024-11-04에 게시됨
 검색:586
CSS에서 이미지 비교를 위한 간단한 방법

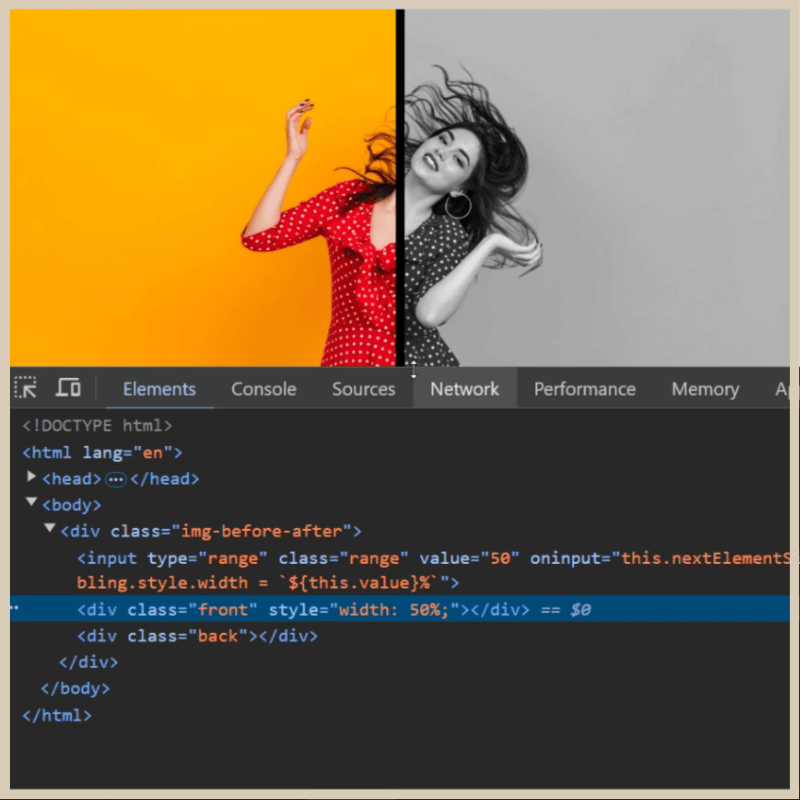
입력 범위 슬라이더와 그 아래에 클래스 이름이 '.img-before-after인 상위 div 내부에 클래스 이름이 .front, .back인 두 개의 div를 만들 수 있습니다. '. 인라인 스타일 width:50%를 .front div
에 할당
img-before-after, 입력 범위, input-slider-thumb, 앞, 뒤쪽에
body {
    background: #d6d6d6;
}

.img-before-after {
    position: relative;
    width: 900px;
    height: 600px;
}

input[type="range"] {
    background: transparent;
    width: 100%;
    height: 100%;
    margin: 0;
    outline: none;
    position: absolute;
    z-index: 2;
    -webkit-appearance: none;
}

input[type="range"]::-webkit-slider-thumb {
    width: 10px;
    height: 600px;
    cursor: pointer;
    -webkit-appearance: none;
    background: black;
}
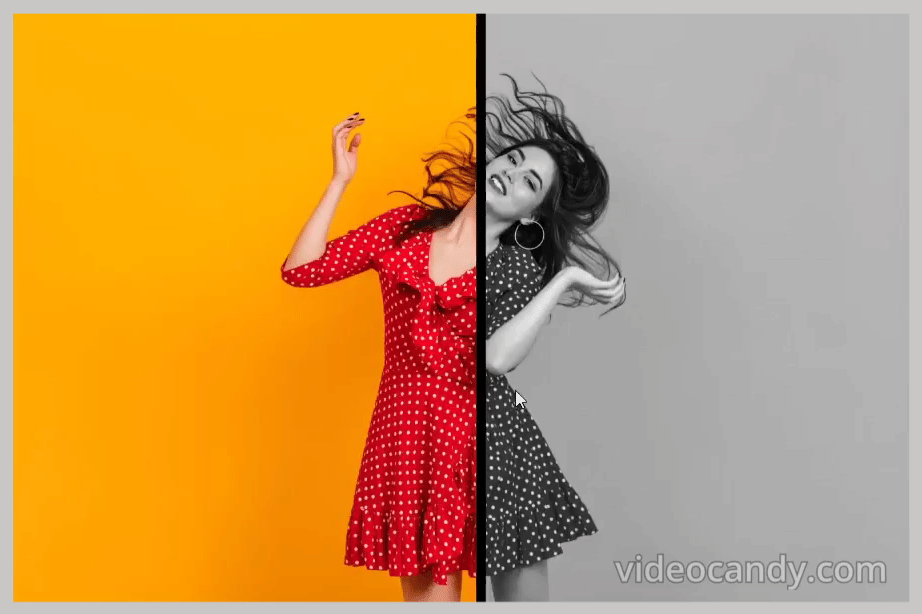
.front 및 .back div에 배경 이미지를 추가합니다.
.front, .back {
    position: absolute;
    width: 100%;
    height: 600px;
    background: url("https://shorturl.at/kbKhz") no-repeat;
    background-size: cover;
    z-index: 1;
}
z-index를 사용하여 .front div 뒤에 .back div를 보내고 회색조로 만듭니다.
.back {
    filter: grayscale(1);
    z-index: 0;
}
입력 슬라이더를 드래그할 때 '.front' div의 너비를 동적으로 늘리거나 줄여야 합니다. '.front' div
의 너비에 입력 범위 값을 추가해야 합니다.
oninput="this.nextElementSibling.style.width = `${this.value}%`"
산출:

아래에서 슬라이더 범위를 드래그할 때 개발 도구에서 너비가 어떻게 증가하고 감소하는지 확인할 수 있습니다.
아래와 같이 흐림, 반전 등과 같은 CSS의 다양한 변형을 시도해 볼 수 있습니다.
흐림
.back {
    filter: blur(5px);
    z-index: 0;
}

거꾸로 하다
.back {
    filter: invert(1);
    z-index: 0;
}

최종 출력: 회색조 포함
시청해주셔서 감사합니다...
릴리스 선언문
이 글은 https://dev.to/prahalad/simple-image-comparison-in-css-48fd?1에서 복제됩니다.1 침해 내용이 있는 경우, [email protected]으로 연락하여 삭제하시기 바랍니다.
최신 튜토리얼
더>
-
 PYTZ가 처음에 예상치 못한 시간대 오프셋을 표시하는 이유는 무엇입니까?import pytz pytz.timezone ( 'Asia/Hong_kong') std> discrepancy source 역사 전반에 걸쳐 변동합니다. PYTZ가 제공하는 기본 시간대 이름 및 오프...프로그램 작성 2025-07-08에 게시되었습니다
 -
FormData ()로 여러 파일 업로드를 처리하려면 어떻게해야합니까?); 그러나이 코드는 첫 번째 선택된 파일 만 처리합니다. 파일 : var files = document.getElementById ( 'filetOUpload'). 파일; for (var x = 0; x프로그램 작성 2025-07-08에 게시되었습니다
-
JavaScript 객체에서 키를 동적으로 설정하는 방법은 무엇입니까?jsobj = 'example'1; jsObj['key' i] = 'example' 1; 배열은 특수한 유형의 객체입니다. 그것들은 숫자 특성 (인치) + 1의 수를 반영하는 길이 속성을 유지합니다. 이 특별한 동작은 표준 객체에...프로그램 작성 2025-07-08에 게시되었습니다
-
동시에 비동기 작업을 동시에 실행하고 JavaScript에서 오류를 올바르게 처리하는 방법은 무엇입니까?동시 동시 대기 업무 수행 실행 비동기 작업을 수행 할 때 문제가 발생합니다. getValue2async (); 이 구현은 다음 작업을 시작하기 전에 각 작업의 완료를 순차적으로 기다립니다. 동시 실행을 가능하게하려면 수정 된 접근 방식...프로그램 작성 2025-07-08에 게시되었습니다
-
PHP를 사용하여 XML 파일에서 속성 값을 효율적으로 검색하려면 어떻게해야합니까?옵션> 1 varnum "varnum"을 복원 할 수 있습니다. stumped. 이 기능은 XML 요소의 속성에 대한 액세스를 연관 배열로 제공합니다. $ xml = simplexml_load_file ($ file);...프로그램 작성 2025-07-08에 게시되었습니다
-
Homebrew에서 GO를 설정하면 명령 줄 실행 문제가 발생하는 이유는 무엇입니까?발생하는 문제를 해결하려면 다음 단계를 따르십시오. 1. 필요한 디렉토리 만들기 mkdir $ home/go mkdir -p $ home/go/src/github.com/user 2. 환경 변수 구성프로그램 작성 2025-07-08에 게시되었습니다
-
전체 HTML 문서에서 특정 요소 유형의 첫 번째 인스턴스를 어떻게 스타일링하려면 어떻게해야합니까?javascript 솔루션 < /h2> : 최초의 유형 문서 전체를 달성합니다 유형의 첫 번째 요소와 일치하는 JavaScript 솔루션이 필요합니다. 문서에서 첫 번째 일치 요소를 선택하고 사용자 정의를 적용 할 수 있습니다. 그런 ...프로그램 작성 2025-07-08에 게시되었습니다
-
\ "(1) 대 (;;) : 컴파일러 최적화는 성능 차이를 제거합니까? \"대답 : 대부분의 최신 컴파일러에는 (1)과 (;;). 컴파일러 : s-> 7 8 v-> 4를 풀립니다 -e syntax ok gcc : GCC에서 두 루프는 다음과 같이 동일한 어셈블리 코드로 컴파일합니다. . t_while : ...프로그램 작성 2025-07-08에 게시되었습니다
-
교체 지시문을 사용하여 GO MOD에서 모듈 경로 불일치를 해결하는 방법은 무엇입니까?[ github.com/coreos/coreos/client github.com/coreos/etcd/client.test imports github.com/coreos/etcd/integration에 의해 테스트 된 Echoed 메시지에 의해 입증 된 바와...프로그램 작성 2025-07-08에 게시되었습니다
-
PHP 배열 키-값 이상 : 07 및 08의 호기심 사례 이해이 문제는 PHP의 주요 제로 해석에서 비롯됩니다. 숫자가 0 (예 : 07 또는 08)으로 접두사를 넣으면 PHP는 소수점 값이 아닌 옥탈 값 (기본 8)으로 해석합니다. 설명 : echo 07; // 인쇄 7 (10 월 07 = 10 진수 7) ...프로그램 작성 2025-07-08에 게시되었습니다
-
PHP를 사용하여 Blob (이미지)을 MySQL에 올바르게 삽입하는 방법은 무엇입니까?문제 $ sql = "삽입 imagesStore (imageId, image) 값 ( '$ this- & gt; image_id', 'file_get_contents ($ tmp_image)'; 결과적으로 실제 ...프로그램 작성 2025-07-08에 게시되었습니다
-
오른쪽에서 CSS 배경 이미지를 찾는 방법은 무엇입니까?/ 오른쪽에서 10px 요소를 배치하려면 / 배경 위치 : 오른쪽 10px 상단; 이 CSS 상단 코너는 오른쪽 상단의 왼쪽에서 10 pixels가되어야합니다. 요소의 상단 에지. 이 기능은 Internet Explorer 8 또는 이...프로그램 작성 2025-07-08에 게시되었습니다
-
Fastapi Custom 404 페이지 제작 가이드custom 404 fastapi 가없는 페이지를 찾을 수 없습니다. 적절한 방법은 특정 요구 사항에 따라 다릅니다. 404 상태 코드에서 리디렉션 response = await call_next(request) if response.sta...프로그램 작성 2025-07-08에 게시되었습니다
-
파이썬에서 문자열에서 이모티콘을 제거하는 방법 : 일반적인 오류 수정에 대한 초보자 가이드?Codecs 가져 오기. 가져 오기 re text = codecs.decode ( '이 개 \ u0001f602'.encode ('utf-8 '),'utf-8 ') 인쇄 (텍스트) # 이모티콘으로 emoji_patter...프로그램 작성 2025-07-08에 게시되었습니다
-
두 날짜 사이의 일 수를 계산하는 JavaScript 방법const date1 = 새로운 날짜 ( '7/13/2010'); const date2 = new 날짜 ('12/15/2010 '); const difftime = math.abs (date2 -date1); const diff...프로그램 작성 2025-07-08에 게시되었습니다


중국어 공부
- 1 "걷다"를 중국어로 어떻게 말하나요? 走路 중국어 발음, 走路 중국어 학습
- 2 "비행기를 타다"를 중국어로 어떻게 말하나요? 坐飞机 중국어 발음, 坐飞机 중국어 학습
- 3 "기차를 타다"를 중국어로 어떻게 말하나요? 坐火车 중국어 발음, 坐火车 중국어 학습
- 4 "버스를 타다"를 중국어로 어떻게 말하나요? 坐车 중국어 발음, 坐车 중국어 학습
- 5 운전을 중국어로 어떻게 말하나요? 开车 중국어 발음, 开车 중국어 학습
- 6 수영을 중국어로 뭐라고 하나요? 游泳 중국어 발음, 游泳 중국어 학습
- 7 자전거를 타다 중국어로 뭐라고 하나요? 骑自行车 중국어 발음, 骑自行车 중국어 학습
- 8 중국어로 안녕하세요를 어떻게 말해요? 你好중국어 발음, 你好중국어 학습
- 9 감사합니다를 중국어로 어떻게 말하나요? 谢谢중국어 발음, 谢谢중국어 학습
- 10 How to say goodbye in Chinese? 再见Chinese pronunciation, 再见Chinese learning


