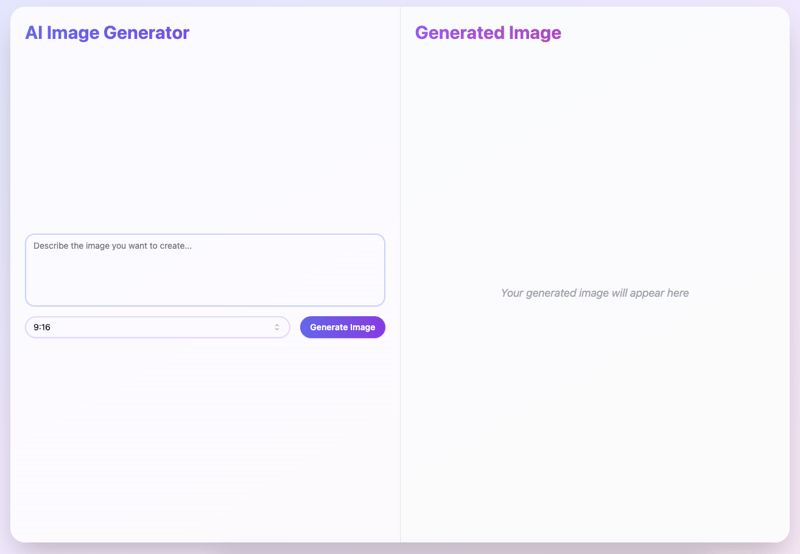
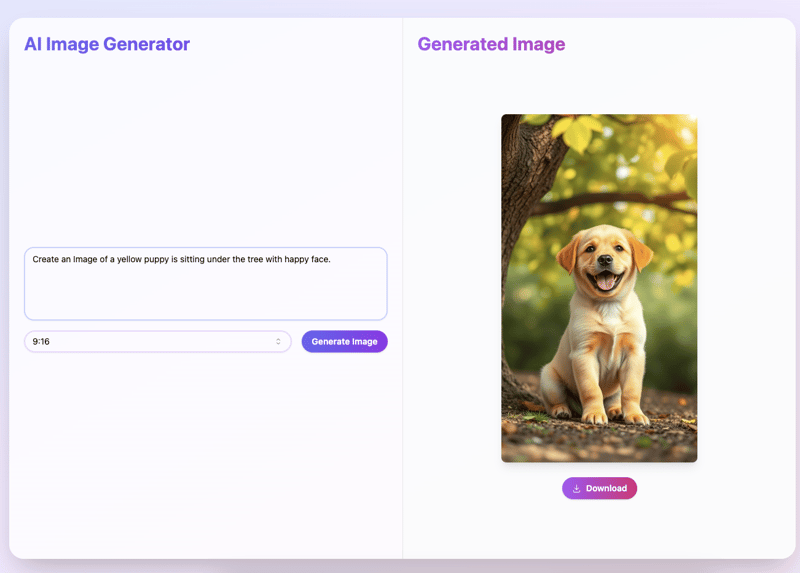
ReactJS로 무료 AI 이미지 생성기 구축
안녕하세요 개발자 여러분,
오늘은 ReactJS를 사용하여 이미지 생성기를 만드는 방법을 보여 드리겠습니다. Black Forest Labs와 Together AI 덕분에 모두 무료로 사용할 수 있습니다.
1단계: 프로젝트 설정
이 튜토리얼에서는 Vite를 사용하여 앱을 초기화하고 Shadcn을 UI로 사용하겠습니다. 이미 프로젝트를 설정하고 Shadcn을 설치했다고 가정하겠습니다.
2단계: Together AI 패키지 설치
이미지 생성을 위한 무료 Flux 모델에 액세스하려면 Together AI 패키지를 설치해야 합니다.
터미널에서 다음 명령을 실행하세요.
npm i together-ai
3단계: UI 구축
이제 앱의 UI를 만들어 보겠습니다. 다음은 이미지 생성기 구성 요소의 전체 코드입니다. 여기에는 프롬프트에 대한 텍스트 입력이 포함됩니다. 종횡비 선택을 위한 드롭다운입니다.
"black-forest-labs/FLUX.1-schnell-Free"는 무료이므로 사용해야 합니다.
import { useRef, useState } from "react";
import Together from "together-ai";
import { ImagesResponse } from "together-ai";
import { Button } from "@/components/ui/button";
import {
Select,
SelectContent,
SelectItem,
SelectTrigger,
SelectValue,
} from "@/components/ui/select";
import { Textarea } from "@/components/ui/textarea";
import { motion } from "framer-motion";
import { Separator } from "@/components/ui/separator";
import { DownloadIcon } from "@radix-ui/react-icons";
import { save } from "@tauri-apps/plugin-dialog";
import { writeFile } from "@tauri-apps/plugin-fs";
function App() {
const [input, setInput] = useState("");
const [imageUrl, setImageUrl] = useState("");
const [ratio, setRatio] = useState("9:16");
const [isLoading, setIsLoading] = useState(false);
const [downloading, setDownloading] = useState(false);
const imageRef = useRef(null);
const hRatio = ratio.split(":").map(Number)[0];
const vRatio = ratio.split(":").map(Number)[1];
const width = hRatio === 1 ? 512 : hRatio * 64;
const height = vRatio === 1 ? 512 : vRatio * 64;
const together = new Together({
apiKey: import.meta.env.VITE_TOGETHER_API_KEY,
});
const handleGenerateImage = async () => {
setIsLoading(true);
try {
console.log(width, height);
const response: ImagesResponse = await together.images.create({
model: "black-forest-labs/FLUX.1-schnell-Free",
prompt: input,
width: width,
height: height,
// @ts-expect-error response_format is not defined in the type
response_format: "b64_json",
});
const base64Image = response.data[0].b64_json;
const dataUrl = `data:image/png;base64,${base64Image}`;
setImageUrl(dataUrl);
} catch (error) {
console.error("Error generating image:", error);
// You might want to add some error handling UI here
} finally {
setIsLoading(false);
}
};
const handleDownloadImage = async () => {
if (imageUrl) {
setDownloading(true);
try {
// Remove the data URL prefix
const base64Data = imageUrl.replace(/^data:image\/\w ;base64,/, "");
// Convert base64 to binary
const imageBuffer = Uint8Array.from(atob(base64Data), (c) =>
c.charCodeAt(0)
);
// Open a save dialog
const filePath = await save({
filters: [
{
name: "Image",
extensions: ["png"],
},
],
});
if (filePath) {
// Write the file
await writeFile(filePath, imageBuffer);
console.log("File saved successfully");
}
} catch (error) {
console.error("Error saving image:", error);
} finally {
setDownloading(false);
}
}
};
return (
AI Image Generator for "Thảo"
Generated Image
{imageUrl ? (

) : (
Your generated image will appear here
)}
);
}
export default App;


최종 생각
이 설정을 통해 이제 AI 생성 이미지를 생성하고 다운로드할 수 있는 간단한 ReactJS 앱이 생겼습니다.
읽어주셔서 감사합니다! 이 게시물이 흥미롭다고 생각하시면 주저하지 말고 좋아요를 눌러주세요. 즐거운 코딩하세요!
-
 Spring Security 4.1 이상에서 CORS 문제를 해결하기위한 안내서Spring Security 4.1 이후 Cors 지원을 활성화하기위한보다 간단한 접근 방식이 있습니다. webmvcconfigureradapter { @override public void addcorsmappings (corsregistry Registry) {...프로그램 작성 2025-04-27에 게시되었습니다
 -
 McRypt에서 OpenSSL로 암호화를 마이그레이션하고 OpenSSL을 사용하여 McRypt 암호화 데이터를 해제 할 수 있습니까?질문 : McRypt에서 OpenSSL로 내 암호화 라이브러리를 업그레이드 할 수 있습니까? 그렇다면 어떻게? 대답 : 대답 : 예, McRypt에서 암호화 라이브러리를 OpenSSL로 업그레이드 할 수 있습니다. OpenSSL을 사용하여 McRyp...프로그램 작성 2025-04-27에 게시되었습니다
 -
 Point-In-Polygon 감지에 더 효율적인 방법 : Ray Tracing 또는 Matplotlib \ 's Path.contains_points?Ray Tracing MethodThe ray tracing method intersects a horizontal ray from the point under examination with the polygon's sides. 교차로의 수를 계산하고 지점이 패...프로그램 작성 2025-04-27에 게시되었습니다
 -
 동시에 비동기 작업을 동시에 실행하고 JavaScript에서 오류를 올바르게 처리하는 방법은 무엇입니까?동시 동시 대기 업무 수행 실행 비동기 작업을 수행 할 때 문제가 발생합니다. getValue2async (); 이 구현은 다음 작업을 시작하기 전에 각 작업의 완료를 순차적으로 기다립니다. 동시 실행을 가능하게하려면 수정 된 접근 방식...프로그램 작성 2025-04-27에 게시되었습니다
 -
 PYTZ가 처음에 예상치 못한 시간대 오프셋을 표시하는 이유는 무엇입니까?import pytz pytz.timezone ( 'Asia/Hong_kong') std> discrepancy source 역사 전반에 걸쳐 변동합니다. PYTZ가 제공하는 기본 시간대 이름 및 오프...프로그램 작성 2025-04-27에 게시되었습니다
 -
 Firefox Back 버튼을 사용할 때 JavaScript 실행이 중단되는 이유는 무엇입니까?원인 및 솔루션 : 이 동작은 브라우저 캐싱 자바 스크립트 리소스에 의해 발생합니다. 이 문제를 해결하고 후속 페이지 방문에서 스크립트가 실행되도록하기 위해 Firefox 사용자는 Window.onload 이벤트에서 호출되도록 빈 기능을 설정해야합니다. ...프로그램 작성 2025-04-26에 게시되었습니다
 -
 자바 스크립트 객체의 키를 알파벳순으로 정렬하는 방법은 무엇입니까?object.keys (...) . .sort () . 정렬 된 속성을 보유 할 새 개체를 만듭니다. 정렬 된 키 어레이를 반복하고 리소셔 함수를 사용하여 원래 객체에서 새 객체에 해당 값과 함께 각 키를 추가합니다. 다음 코드는 프로세...프로그램 작성 2025-04-26에 게시되었습니다
 -
 입력 : "경고 : mysqli_query ()는 왜 매개 변수 1이 mysqli, 주어진 리소스"오류가 발생하고이를 수정하는 방법을 기대 하는가? 출력 : 오류를 해결하는 분석 및 수정 방법 "경고 : MySQLI_QUERY () 매개 변수는 리소스 대신 MySQLI 여야합니다."mysqli_query () mysqli_query ()는 매개 변수 1이 mysqli, 리소스가 주어진 리소스, mysqli_query () 함수를 사용하여 mysql query를 실행하려고 시도 할 때 "경고 : mysqli_query (...프로그램 작성 2025-04-26에 게시되었습니다
 -
 \ "일반 오류 : 2006 MySQL Server가 사라졌습니다 \"데이터를 삽입 할 때?를 해결하는 방법 "일반 오류 : 2006 MySQL Server가 사라졌습니다. 이 오류는 일반적으로 MySQL 구성의 두 변수 중 하나로 인해 서버에 대한 연결이 손실 될 때 발생합니다. 솔루션 : 이 오류를 해결하기위한 키는 Wait_Ti...프로그램 작성 2025-04-26에 게시되었습니다
 -
 전체 HTML 문서에서 특정 요소 유형의 첫 번째 인스턴스를 어떻게 스타일링하려면 어떻게해야합니까?javascript 솔루션 < /h2> : 최초의 유형 문서 전체를 달성합니다 유형의 첫 번째 요소와 일치하는 JavaScript 솔루션이 필요합니다. 문서에서 첫 번째 일치 요소를 선택하고 사용자 정의를 적용 할 수 있습니다. 그런 ...프로그램 작성 2025-04-26에 게시되었습니다
 -
 Google API에서 최신 JQuery 라이브러리를 검색하는 방법은 무엇입니까?https://code.jquery.com/jquery-latest.min.js (jQuery Hosted, Minified) https://code.jquery.com/jquery-latest.js (JQuery Hosted, Hosted, 비 압축) 압축...프로그램 작성 2025-04-26에 게시되었습니다
 -
 열의 열이 다른 데이터베이스 테이블을 어떻게 통합하려면 어떻게해야합니까?다른 열이있는 결합 테이블 ] 는 데이터베이스 테이블을 다른 열로 병합하려고 할 때 도전에 직면 할 수 있습니다. 간단한 방법은 열이 적은 테이블의 누락 된 열에 null 값을 추가하는 것입니다. 예를 들어, 표 B보다 더 많은 열이있는 두 개의 테이블,...프로그램 작성 2025-04-26에 게시되었습니다
 -
 동적 인 크기의 부모 요소 내에서 요소의 스크롤 범위를 제한하는 방법은 무엇입니까?문제 : 고정 된 사이드 바로 조정을 유지하면서 사용자의 수직 스크롤과 함께 이동하는 스크롤 가능한 맵 디브가있는 레이아웃을 고려합니다. 그러나 맵의 스크롤은 뷰포트의 높이를 초과하여 사용자가 페이지 바닥 글에 액세스하는 것을 방지합니다. ...프로그램 작성 2025-04-26에 게시되었습니다
 -
 PHP를 사용하여 XML 파일에서 속성 값을 효율적으로 검색하려면 어떻게해야합니까?옵션> 1 varnum "varnum"을 복원 할 수 있습니다. stumped. 이 기능은 XML 요소의 속성에 대한 액세스를 연관 배열로 제공합니다. $ xml = simplexml_load_file ($ file);...프로그램 작성 2025-04-26에 게시되었습니다
 -
 순수한 CS로 여러 끈적 끈적한 요소를 서로 쌓을 수 있습니까?순수한 CSS에서 서로 위에 여러 개의 끈적 끈적 요소가 쌓일 수 있습니까? 원하는 동작을 볼 수 있습니다. 여기 : https://webthemez.com/demo/sticky-multi-header-scroll/index.html Java...프로그램 작성 2025-04-26에 게시되었습니다
중국어 공부
- 1 "걷다"를 중국어로 어떻게 말하나요? 走路 중국어 발음, 走路 중국어 학습
- 2 "비행기를 타다"를 중국어로 어떻게 말하나요? 坐飞机 중국어 발음, 坐飞机 중국어 학습
- 3 "기차를 타다"를 중국어로 어떻게 말하나요? 坐火车 중국어 발음, 坐火车 중국어 학습
- 4 "버스를 타다"를 중국어로 어떻게 말하나요? 坐车 중국어 발음, 坐车 중국어 학습
- 5 운전을 중국어로 어떻게 말하나요? 开车 중국어 발음, 开车 중국어 학습
- 6 수영을 중국어로 뭐라고 하나요? 游泳 중국어 발음, 游泳 중국어 학습
- 7 자전거를 타다 중국어로 뭐라고 하나요? 骑自行车 중국어 발음, 骑自行车 중국어 학습
- 8 중국어로 안녕하세요를 어떻게 말해요? 你好중국어 발음, 你好중국어 학습
- 9 감사합니다를 중국어로 어떻게 말하나요? 谢谢중국어 발음, 谢谢중국어 학습
- 10 How to say goodbye in Chinese? 再见Chinese pronunciation, 再见Chinese learning


