JavaScript で単一リンクリストを実装する方法
こんにちは、リンク リストのこのシリーズへようこそ。前回の記事では、リンク リストの定義、用語、配列との違い、リンク リストの種類など、リンク リストの基本について学びました。リンク リストの実装についてさらに深く掘り下げると約束したので、始めましょう。

コース概要
- 導入
-
単一リンクリストの実装
- 新しいノードの作成
- 先頭に挿入
- 最後に挿入
- ノードの削除
- ノードを検索
- リストを調べる
- 結論
導入
前の記事で学んだように、リンク リストはプログラミングの世界における基本的なデータ構造です。これらはノードで構成され、各ノードにはデータと、シーケンス内の次のノード (単一リンク リストの場合) または次と前のノードの両方 (二重リンク リストの場合) への参照 (またはリンク) が含まれます。配列とは異なり、リンク リストは連続したメモリ位置に要素を格納しないため、効率的な挿入と削除が可能です。
リンク リストの概念を理解することは、データ構造とアルゴリズムを習得するために非常に重要です。この記事では、単一リンク リストの基本から始めて、リンク リストの実装について詳しく説明します。
単一リンクリストの実装
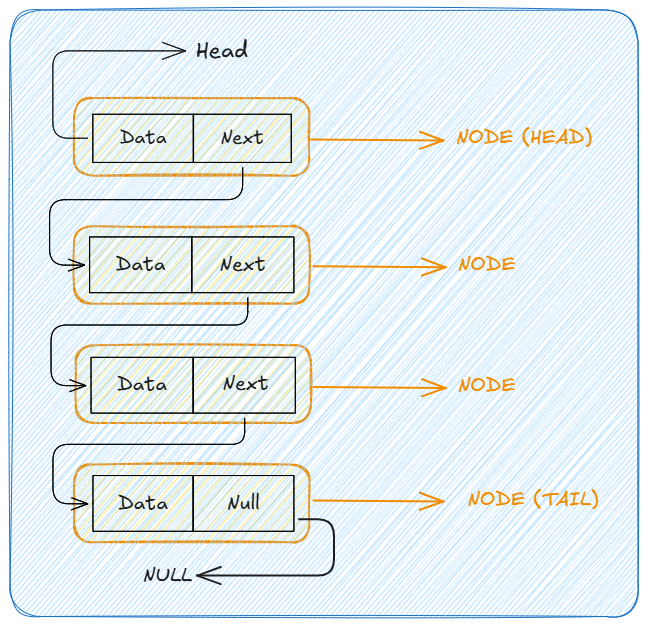
単一リンク リストは最も単純なタイプのリンク リストで、各ノードがシーケンス内の次のノードを指します。下の画像のように。

さて、単一リンクリストの基本操作の実装を開始します。しましょうか?
新しいノードの作成
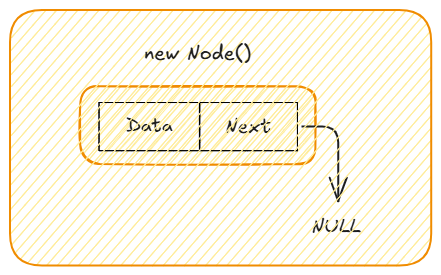
新しい Node クラスを作成することから始めましょう。 Node クラスには、ノードのデータを受け取るコンストラクターと、最初に null に設定される次のポインターが含まれます。
// Node class for Singly Linked List
class Node {
  constructor(data) {
    this.data = data;
    this.next = null;
  }
}
この新しく作成された Node クラス (リンク リスト内のノードを表す) は、以下のように視覚化できます。

次に進む前に、リンク リストの操作を保持する SinglyLinkedList クラスの新しいインスタンスを作成しましょう。
// Singly Linked List class
class SinglyLinkedList {
  constructor() {
    this.head = null;
  }

  // Operations come here ?
}
先頭に挿入
class SinglyLinkedList {
  constructor() {
    this.head = null;
  }
  // Previous `SinglyLinkedList` class codes here ?
  // .
  // .
  // .
  // Insert at the beginning
  insertAtBeginning(data) {
    const newNode = new Node(data); // Create a new node with the given data
    newNode.next = this.head; // Set the new node's next pointer to the current head
    this.head = newNode; // Update the head to be the new node
  }

  // Other operations come here ?
  // .
  // .
  // .
}
説明: 先頭に挿入することは、新しい人が先頭の列に加わるようなものです。彼らは新しい一人称となり、以前の一人称にリンクします。
最後に挿入
class SinglyLinkedList {
  constructor() {
    this.head = null;
  }
  // Previous `SinglyLinkedList` class codes here ?
  // .
  // .
  // .
  // Insert at the end
  insertAtEnd(data) {
    const newNode = new Node(data); // Create a new node with the given data

    // check if the list does not have a head i.e the list is empty
    // NOTE: Every non-empty linked list will have a head
    if (!this.head) {
      this.head = newNode; // If the list is empty, set the new node as the head
      return;
    }
    let current = this.head; // Start at the head of the list
    while (current.next) {
      current = current.next; // Move to the next node in the list by updating the current node
    }
    current.next = newNode; // Set the next pointer of the last node to the new node
  }

  // Other operations come here ?
  // .
  // .
  // .
}
説明: 最後に挿入することは、行の最後に誰かが参加するのと同じです。最後まで歩いて最後の人を見つけ、その人を新しい人にリンクする必要があります。
ノードの削除
class SinglyLinkedList {
  constructor() {
    this.head = null;
  }

  // Previous `SinglyLinkedList` class codes here ?
  // .
  // .
  // .

  // Delete a node
  deleteNode(data) {
    if (!this.head) return; // If the list is empty, do nothing
    if (this.head.data === data) {
      this.head = this.head.next; // If the node to delete is the head, update the head to the next node
      return;
    }
    let current = this.head;
    while (current.next) {
      if (current.next.data === data) {
        current.next = current.next.next; // If the node to delete is found, update the next pointer to skip it
        return;
      }
      current = current.next;
    }
  }

  // Other operations come here ?
  // .
  // .
  // .
}
説明: ノードの削除は、列の途中にいる誰かが退席を決意するようなものです。私たちはその人を見つけて、その前の人と後の人を結びつけます。
ノードを検索する
class SinglyLinkedList {
  constructor() {
    this.head = null;
  }

  // Previous `SinglyLinkedList` class codes here ?
  // .
  // .
  // .

  // Search note
  search(data) {
    let current = this.head; // Start at the head of the list
    while (current) {
      if (current.data === data) {
        // If the data is found, return true
        return true;
      }
      current = current.next; // Move to the next node
    }
    return false;
  }

  // Other operations come here ?
  // .
  // .
  // .
}
説明: ノードの検索は、列内の特定の人を見つけようとするのと似ています。私たちは先頭から始めて、見つけるか最後尾に到達するまで、各人に質問します。
リストをたどる
class SinglyLinkedList {
  constructor() {
    this.head = null;
  }
  // Previous `SinglyLinkedList` class codes here ?
  // .
  // .
  // .
  traverse() {
    let current = this.head; // Start at the head of the list
    while (current) {
      console.log(current.data); // Print the data of the current node
      current = current.next; // Move to the next node
    }
  }
}

// End of class
説明: トラバースは、ラインを歩いて各人に挨拶するようなものです。私たちは先頭からスタートして、最後まで進み続けます。
結論
この記事では、リンク リストの基本的な操作と、それを JavaScript で実装する方法について学びました。次の記事では、二重リンクリストについて学びます。
リンクされたリストをマスターするには練習が必要であることを覚えておいてください。引き続き問題を解決し、さまざまなシナリオでこれらのデータ構造を実装します。
常に最新情報を入手してつながりを保つ
このシリーズのどの部分も見逃さないようにし、ソフトウェア開発 (Web、サーバー、モバイル、またはスクレイピング / オートメーション)、データ構造とアルゴリズム、その他のエキサイティングな技術に関するより詳細なディスカッションのために私に連絡してください。トピックについては、フォローしてください:
- GitHub
- リンク済み
- X (Twitter)
引き続きコーディングをお楽しみください ???
-
 Go で WebSocket を使用してリアルタイム通信を行うチャット アプリケーション、ライブ通知、共同作業ツールなど、リアルタイムの更新が必要なアプリを構築するには、従来の HTTP よりも高速でインタラクティブな通信方法が必要です。そこで WebSocket が登場します。今日は、アプリケーションにリアルタイム機能を追加できるように、Go で WebSo...プログラミング 2024 年 11 月 17 日に公開
 -
 一意の ID を保持し、重複した名前を処理しながら、PHP で 2 つの連想配列を結合するにはどうすればよいですか?PHP での連想配列の結合PHP では、2 つの連想配列を 1 つの配列に結合するのが一般的なタスクです。次のリクエストを考えてみましょう:問題の説明:提供されたコードは 2 つの連想配列 $array1 と $array2 を定義します。目標は、両方の配列のすべてのキーと値のペアを統合する新しい配...プログラミング 2024 年 11 月 17 日に公開
 -
 macOS 上の Django で「ImproperlyConfigured: MySQLdb モジュールのロード中にエラーが発生しました」を修正する方法?MySQL の不適切な構成: 相対パスの問題Django で python manage.py runserver を実行すると、次のエラーが発生する場合があります:ImproperlyConfigured: Error loading MySQLdb module: dlopen(/Library...プログラミング 2024 年 11 月 17 日に公開
 -
 Bootstrap 4 ベータ版の列オフセットはどうなりましたか?Bootstrap 4 ベータ: 列オフセットの削除と復元Bootstrap 4 は、ベータ 1 リリースで、その方法に大幅な変更を導入しました。列がオフセットされました。ただし、その後の Beta 2 リリースでは、これらの変更は元に戻されました。offset-md-* から ml-autoBoo...プログラミング 2024 年 11 月 17 日に公開
 -
 MySQL を使用して今日が誕生日のユーザーを見つけるにはどうすればよいですか?MySQL を使用して今日の誕生日を持つユーザーを識別する方法MySQL を使用して今日がユーザーの誕生日かどうかを判断するには、誕生日が一致するすべての行を検索する必要があります。今日の日付。これは、UNIX タイムスタンプとして保存されている誕生日と今日の日付を比較する単純な MySQL クエリ...プログラミング 2024 年 11 月 17 日に公開
 -
 「if」ステートメントを超えて: 明示的な「bool」変換を伴う型をキャストせずに使用できる場所は他にありますか?キャストなしで bool へのコンテキスト変換が可能クラスは bool への明示的な変換を定義し、そのインスタンス 't' を条件文で直接使用できるようにします。ただし、この明示的な変換では、キャストなしで bool として 't' を使用できる場所はどこですか?コン...プログラミング 2024 年 11 月 17 日に公開
 -
 ナンピーチートシートComprehensive Guide to NumPy: The Ultimate Cheat Sheet NumPy (Numerical Python) is a fundamental library for scientific computing in Python. ...プログラミング 2024 年 11 月 17 日に公開
 -
 プロのように技術記事を読む必要があるペースの速いテクノロジーの世界では、読んだものすべてが正確または公平であるとは限りません。あなたが読んだものすべてが人間によって書かれたわけではありません。 詳細が微妙に間違っていたり、記事が意図的に誤解を招く可能性があります。テクノロジー記事やメディア コンテンツを利用するのに役立つスキルをいく...プログラミング 2024 年 11 月 17 日に公開
 -
 ある多次元配列には存在するが、別の多次元配列には存在しない行を検索するにはどうすればよいですか?多次元配列の連想行の比較$pageids と $parentpage という 2 つの多次元配列があり、各行は列を持つレコードを表します「id」、「リンクラベル」、「url」。 $pageids には存在するが $parentpage には存在しない行を検索し、欠落している行を含む配列 ($page...プログラミング 2024 年 11 月 17 日に公開
 -
 Windows で「Java が認識されません」エラーが発生する理由とその修復方法Windows での「Java が認識されません」エラーの解決Windows 7 で Java のバージョンを確認しようとすると、「'Java' が認識されません」というエラーが発生する場合があります内部または外部コマンドとして。」この問題は通常、Java がインストールされていない...プログラミング 2024 年 11 月 17 日に公開
 -
 ファイルの存在とアクセス許可にもかかわらず、File.delete() が False を返すのはなぜですか?File.delete() が存在し権限をチェックしているにもかかわらず False を返すFileOutputStream を使用してファイルに書き込んだ後にファイルを削除しようとすると、一部のユーザーが予期しない問題に遭遇します。 file.delete() は false を返します。この問題...プログラミング 2024 年 11 月 17 日に公開
 -
 Go のスライスから重複ピアを効率的に削除するにはどうすればよいですか?スライスから重複項目を削除「アドレス」と「ピアID」を持つオブジェクトとして表されるピアのリストを含むテキスト ファイルが与えられたとします。属性の場合、タスクは、コードの「ブートストラップ」スライスから一致する「アドレス」と「ピアID」に基づいて重複するピアをすべて削除することです。 config...プログラミング 2024 年 11 月 17 日に公開
 -
 Bootstrap 4 のファイル入力コンポーネントをカスタマイズするにはどうすればよいですか?Bootstrap 4 のファイル入力の制限を回避するBootstrap 4 は、ユーザーのファイル選択を簡素化するカスタム ファイル入力コンポーネントを提供します。ただし、「ファイルを選択...」プレースホルダー テキストをカスタマイズしたり、選択したファイルの名前を表示したりする場合は、いくつか...プログラミング 2024 年 11 月 17 日に公開
 -
 CSS ボックスに斜めの角を作成するにはどうすればよいですか?CSS ボックスに斜めの角を作成するCSS ボックスに斜めの角を作成するには、さまざまな方法を使用します。 1 つのアプローチを以下に説明します。境界線を使用する方法この手法は、コンテナの左側に沿って透明な境界線を作成し、底部に沿って斜めの境界線を作成することに依存しています。 。次のコードは、これ...プログラミング 2024 年 11 月 17 日に公開
 -
 Pandas DataFrame の文字列に先頭のゼロを追加するにはどうすればよいですか?Pandas データフレームの文字列に先頭のゼロを追加するPandas では、文字列を操作するときに書式設定の変更が必要になる場合があります。一般的なタスクは、データフレーム内の文字列に先頭のゼロを追加することです。これは、ID や日付などの文字列形式に変換する必要がある数値データを扱う場合に特に便...プログラミング 2024 年 11 月 17 日に公開
中国語を勉強する
- 1 「歩く」は中国語で何と言いますか? 走路 中国語の発音、走路 中国語学習
- 2 「飛行機に乗る」は中国語で何と言いますか? 坐飞机 中国語の発音、坐飞机 中国語学習
- 3 「電車に乗る」は中国語で何と言いますか? 坐火车 中国語の発音、坐火车 中国語学習
- 4 「バスに乗る」は中国語で何と言いますか? 坐车 中国語の発音、坐车 中国語学習
- 5 中国語でドライブは何と言うでしょう? 开车 中国語の発音、开车 中国語学習
- 6 水泳は中国語で何と言うでしょう? 游泳 中国語の発音、游泳 中国語学習
- 7 中国語で自転車に乗るってなんて言うの? 骑自行车 中国語の発音、骑自行车 中国語学習
- 8 中国語で挨拶はなんて言うの? 你好中国語の発音、你好中国語学習
- 9 中国語でありがとうってなんて言うの? 谢谢中国語の発音、谢谢中国語学習
- 10 How to say goodbye in Chinese? 再见Chinese pronunciation, 再见Chinese learning


