カスタム ブートストラップ リードクラム - Ver 2
Custom Breadcrumbs for Bootstrap 5 framework
Abstract: We are presenting code (CSS) for custom Bootstrap 5 breadcrumbs. This is an improved version of the previously published article.
1 The need for better Breadcrumbs
Bootstrap 5 framework is coming with very basic Breadcrumbs implementation. I needed something much better, both visually and more functional. Over time, in my applications, I found it very useful to use Breadcrumbs to enable the user to go back to the higher level, after he drills into details on the particular item/object.
Very important to me was the ability to present TEXT DATA IN TWO ROWS, especially in cases where I am showing some data and ID, like an indication that is the data for some Account, and at the same time providing the Account number.
I was not satisfied with the solutions I saw on the internet, so I developed my own.
While the title says this is a “Bootstrap 5” library, it is completely independent of the Bootstrap CSS and only chosen colors were taken from the Bootstrap CSS to align with the Bootstrap 5 theme. You can use it independently from Bootstrap if you like.
1.1 Changes in this version
This version incorporates suggestions and code from [email protected] to make the code shorter. I do not necessarily agree with all the suggestions, because I think code human readability is more important than shorter code. So, I made my own new version.
Also, this version uses Bootstrap Icons [1] instead of Font Awesome Icons.
2 Final result
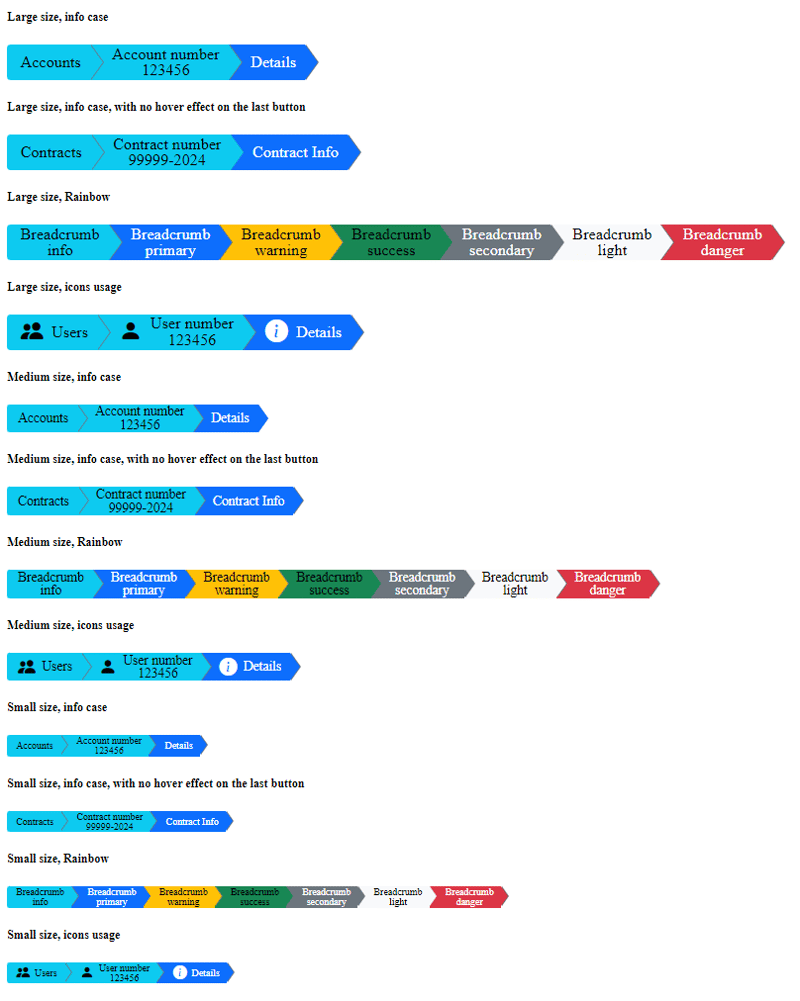
Here is what the final result looks like, together with the demo code that generates it. I created breadcrumbs strips in 3 sizes (large, medium, small), with optional usage of icons. Colors can be chosen at will, and the hover effect is present by default, unless explicitly disabled. The hover effect is usually disabled for the last breadcrumb because that is the current selection in effect.

Here is the HTML code that generates the above rendering. Any web developer should be able to read the HTML code and match it to the above picture to find the variant he/she likes.
If you want to use icons, you can install the free version of Bootstrap Icons [1], and refer to it, similar to how it is done in this example. HTML code for icon usage is a bit complicated because we needed to separate icons and text into 2 separate elements so they could be styled independently.
Large size, info case
Large size, info case, with no hover effect on the last button
Large size, Rainbow
Large size, icons usage
Medium size, info case
Medium size, info case, with no hover effect on the last button
Medium size, Rainbow
Medium size, icons usage
Small size, info case
Small size, info case, with no hover effect on the last button
Small size, Rainbow
Small size, icons usage
3 Breadcrumbs CSS
Here is the CSS, no JavaScript is needed. I deliberately used the class name “breadcrumbs3” to avoid name collision with the Bootstrap 5 original class.
/* breadcrumb3.css */
/* by [email protected],
   using partly code from [email protected]  */

.breadcrumb3-lg, .breadcrumb3-md, .breadcrumb3-sm{
    /* colors taken from bootstrap.css Bootstrap v5.1.0 */
    --bs-primary: #0d6efd;
    --bs-secondary: #6c757d;
    --bs-success: #198754;
    --bs-info: #0dcaf0;
    --bs-warning: #ffc107;
    --bs-danger: #dc3545;
    --bs-light: #f8f9fa;
    --bs-dark: #212529;
    --bs-gray: #6c757d;
    --bs-white: white;
    --bs-black: black;

    /* changeable colors */
    --_bgcolor: var(--bs-info);
    --_color: var(--bs-black);
    --_arrowbordercolor: var(--bs-gray);
    --_hover-bgcolor: var(--bs-primary);
    --_hover-color: var(--bs-white);
}

@media (max-width: 767px) {
    /* making it responsive, using CSS Flexbox with column (vertical) direction*/
    .breadcrumb3-lg, .breadcrumb3-md, .breadcrumb3-sm {
        display: flex;
        flex-direction: column;
    }

    .breadcrumb3-lg  .breadcrumb3-item {
        width: 80% ;
        border-radius: 4px 0 0 4px;
        padding-left: 25px ;
    }

    .breadcrumb3-md .breadcrumb3-item {
        width: 80% ;
        border-radius: 3px 0 0 3px;
        padding-left: 20px ;
    }

    .breadcrumb3-sm .breadcrumb3-item {
        width: 80% ;
        border-radius: 3px 0 0 3px;
        padding-left: 18px ;
    }
}

/* large size breadcrumb3-item -----------------------------------*/
.breadcrumb3-item {
    position: relative;
    display: table-cell;
    vertical-align: middle;
    color: var(--_color);
    background-color: var(--_bgcolor);
    height: 40px;
    line-height: 18px;
    font-size: 18px;
    text-align: center;
    padding-right: 10px;
    padding-left: 25px;
    text-decoration: none;
}

.breadcrumb3-text {
    display: table-cell;
    vertical-align: middle;
    text-align: center;
}

.breadcrumb3-icon {
    display: table-cell;
    text-align: center;
    line-height: 25px;
    font-size: 25px;
    padding-right: 10px;
    vertical-align: middle;
}

.breadcrumb3-item:first-child {
    border-radius: 4px 0 0 4px;
    padding-left: 15px;
}

.breadcrumb3-item:before,
.breadcrumb3-item:after {
    content: "";
    display: block;
    width: 0;
    height: 0;
    border-top: 20px solid transparent;
    position: absolute;
    margin-top: -20px;
    border-bottom: 20px solid transparent;
    left: 100%;
    top: 50%;
}
/* all this to create edge on arrow, creating gray arrow in background */
.breadcrumb3-item:after {
    border-left: 15px solid var(--_arrowbordercolor);
    margin-left: 1px;
    z-index: 2;
}

/* this is arrow itself, overwriting gray arrow */
.breadcrumb3-item:before {
    border-left: 15px solid var(--_bgcolor);
    margin-left: 0px;
    z-index: 3;
}

.breadcrumb3-item:hover:not(.no-hover-effect) ,
.breadcrumb3-item:focus:not(.no-hover-effect){
    background-color: var(--_hover-bgcolor);
    color: var(--_hover-color);
}

.breadcrumb3-item:hover:not(.no-hover-effect):before,
.breadcrumb3-item:focus:not(.no-hover-effect):before {
    border-left-color: var(--_hover-bgcolor);
}

/* remove keyboard navigation focus rectangle */
.breadcrumb3-item:focus-visible {
  outline: none;
}

/* medium size breadcrumb3-item -----------------------------------*/
.breadcrumb3-md .breadcrumb3-item {
    height: 32px;
    line-height: 15px;
    font-size: 15px;
    padding-left: 20px;
}

.breadcrumb3-md .breadcrumb3-icon {
    line-height: 20px;
    font-size: 20px;
    padding-right: 7px;
}

.breadcrumb3-md .breadcrumb3-item:first-child {
    border-radius: 3px 0 0 3px;
    padding-left: 12px;
}

/* all this to create edge on arrow, creating gray arrow in background */
.breadcrumb3-md .breadcrumb3-item:after {
    border-top: 16px solid transparent;
    border-bottom: 16px solid transparent;
    border-left: 12px solid var(--_arrowbordercolor);
    margin-top: -16px;
    margin-left: 1px;
}

/* this is arrow itself, overwriting gray arrow */
.breadcrumb3-md .breadcrumb3-item:before {
    border-top: 16px solid transparent;
    border-bottom: 16px solid transparent;
    border-left: 12px solid var(--_bgcolor);
    margin-top: -16px;
}

/* small size breadcrumb3-item-sm -----------------------------------*/
.breadcrumb3-sm .breadcrumb3-item {
    height: 24px;
    line-height: 11px;
    font-size: 11px;
    padding-right: 8px;
    padding-left: 18px;
}

.breadcrumb3-sm .breadcrumb3-icon {
    line-height: 16px;
    font-size: 16px;
    padding-right: 5px;
}

.breadcrumb3-sm .breadcrumb3-item:first-child {
    border-radius: 3px 0 0 3px;
    padding-left: 10px;
}

/* all this to create edge on arrow, creating gray arrow in background */
.breadcrumb3-sm .breadcrumb3-item:after {
    border-top: 12px solid transparent;
    border-bottom: 12px solid transparent;
    border-left: 8px solid var(--_arrowbordercolor);
    margin-top: -12px;
    margin-left: 1px;
}

/* this is arrow itself, overwriting gray arrow */
.breadcrumb3-sm .breadcrumb3-item:before {
    border-top: 12px solid transparent;
    border-bottom: 12px solid transparent;
    border-left: 8px solid var(--_bgcolor);
    margin-top: -12px;
}

/*breadcrumb3-item colors ------------------------------------------*/
/* we like specificity, to avoid namespace collisions */
.breadcrumb3-lg .info, .breadcrumb3-md .info, .breadcrumb3-sm .info {
    --_color: var(--bs-black);
    --_bgcolor: var(--bs-info);
    --_arrowbordercolor: var(--bs-gray);
    --_hover-bgcolor: var(--bs-primary);
    --_hover-color: var(--bs-white);
}

.breadcrumb3-lg .primary , .breadcrumb3-md .primary , .breadcrumb3-sm .primary {
    --_color: var(--bs-white);
    --_bgcolor: var(--bs-primary);
    --_arrowbordercolor: var(--bs-gray);
    --_hover-bgcolor: var(--bs-success);
    --_hover-color: var(--bs-white);
}

.breadcrumb3-lg .warning, .breadcrumb3-md .warning, .breadcrumb3-sm .warning {
    --_color: var(--bs-black);
    --_bgcolor: var(--bs-warning);
    --_arrowbordercolor: var(--bs-gray);
    --_hover-bgcolor: var(--bs-primary);
    --_hover-color: var(--bs-white);
}

.breadcrumb3-lg .success, .breadcrumb3-md .success, .breadcrumb3-sm .success {
    --_color: var(--bs-black);
    --_bgcolor: var(--bs-success);
    --_arrowbordercolor: var(--bs-gray);
    --_hover-bgcolor: var(--bs-primary);
    --_hover-color: var(--bs-white);
}

.breadcrumb3-lg .secondary, .breadcrumb3-md .secondary, .breadcrumb3-sm .secondary {
    --_color: var(--bs-white);
    --_bgcolor: var(--bs-secondary);
    --_arrowbordercolor: var(--bs-gray);
    --_hover-bgcolor: var(--bs-primary);
    --_hover-color: var(--bs-white);
}

.breadcrumb3-lg .light, .breadcrumb3-md .light, .breadcrumb3-sm .light {
    --_color: var(--bs-black);
    --_bgcolor: var(--bs-light);
    --_arrowbordercolor: var(--bs-gray);
    --_hover-bgcolor: var(--bs-primary);
    --_hover-color: var(--bs-white);
}

.breadcrumb3-lg .danger, .breadcrumb3-md .danger, .breadcrumb3-sm .danger {
    --_color: var(--bs-white);
    --_bgcolor: var(--bs-danger);
    --_arrowbordercolor: var(--bs-gray);
    --_hover-bgcolor: var(--bs-primary);
    --_hover-color: var(--bs-white);
}
4 How CSS works
Here we will give some hints on how CSS works, although this is pretty simple CSS code and mostly is self-explanatory.
4.1 Trick to make triangles with CSS
A very popular trick on how to make triangles with CSS is used here. The point is to abuse CSS's ability to render borders and make it render a border that is of the shape of a triangle. You do that by creating a block element with zero width and height and colored border on one side that acts as an arrow, and two transparent borders on two adjacent sides.
4.2 Trick to create a border to the CSS triangle
Since the triangle itself is a border, we can not create a border on it. So, the trick to create a border on the triangle/arrow is to create 2 triangles and render one over the other with minimal offset aside. That way we create the border appearance.
You can look into CSS code into selectors (.breadcrumb3-item:after) and (.breadcrumb3-item:before) and you will see that we there create 2 triangles, one gray and one info-color over it. Look carefully into CSS rules for the first (margin-left: 1px; z-index: 2;) and for the second (margin-left: 0px; z-index: 3;). You can see a slight offset and rendering of the second triangle over the first one.
Pseudo-elements (:before, :after) have just the purpose of attaching those triangles to the .breadcrumb3-item element.
4.3 Tutorial Example
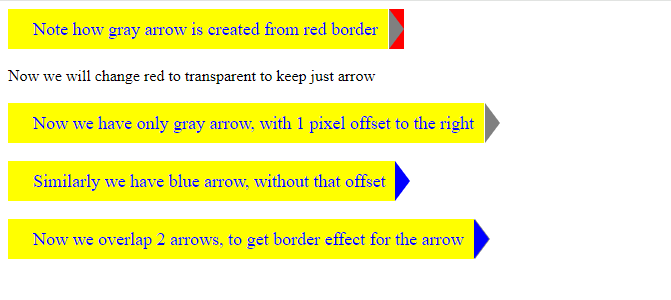
Here we will provide a tutorial example code, just to show how triangles are created. Here is a tutorial code:
Note how gray arrow is created from red border
Now we will change red to transparent to keep just arrow
Now we have only gray arrow, with 1 pixel offset to the right
Similarly we have blue arrow, without that offset
Now we overlap 2 arrows, to get border effect for the arrow
And here is the result of the execution:

Any better programmer should be able to match code samples to produced results.
5 Bootstrap Icons usage
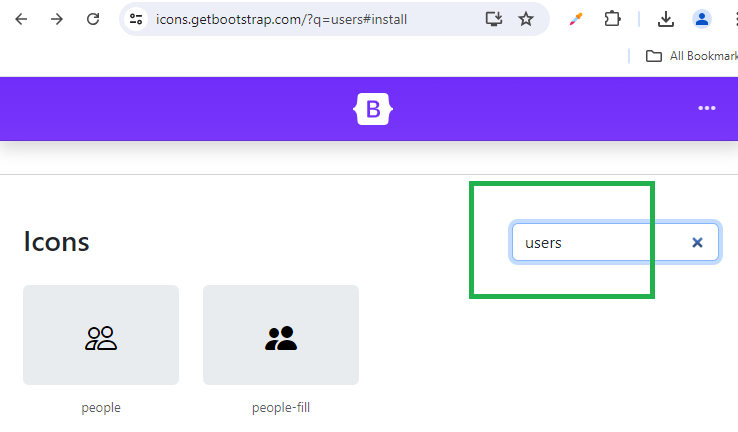
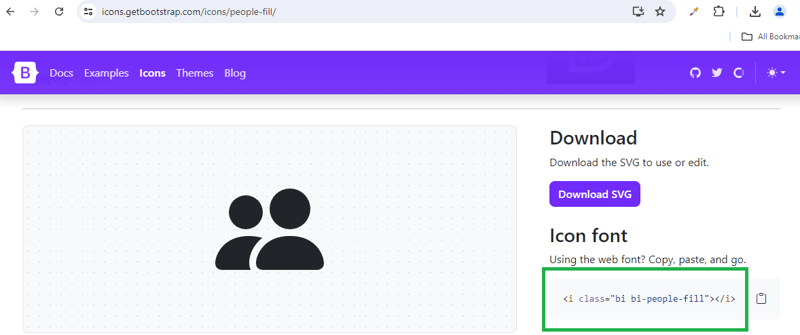
It might look complicated to find the proper Bootstrap Icons icon for your application but is really pretty easy. Icons are indexed by keywords, so you need to search for your keyword first, then choose (in this example free) the icon of interest, and then copy its ID- class into your app. Here are screenshots showing that process.


6 References
[1] https://icons.getbootstrap.com/#install
-
 PDO エラー処理に「if {} else {}」の代わりに「try {} catch {}」を使用する必要があるのはなぜですか?例外的なエラー処理: Try {} Catch {} vs. If {} Else {}プレーン MySQL から PDO への移行中PHP では、エラー処理に if {} else {} の組み合わせではなく try {} catch {} ブロックを使用する方向への移行が普及しています。このアプ...プログラミング 2024 年 11 月 9 日に公開
 -
 PHP で名前にスペースが含まれるクラス プロパティにアクセスするにはどうすればよいですか?PHP でスペースを含むプロパティにアクセスするPHP では、名前にスペースを含むクラス プロパティにアクセスするのが難しい場合があります。 「Sector」および「Date Found」プロパティを持つ stdClass オブジェクトを考えてみましょう。 $object->Sector を使...プログラミング 2024 年 11 月 9 日に公開
 -
 フレックス項目はブロックレベルですか、それともフレックスレベルですか? CSS レイアウトの詳細フレックス アイテムの複雑な性質: ブロック レベルかフレックス レベル?フレックス アイテムがブロック レベルであるかどうかという問題は、以前から話題になっています。 CSS 開発者間での議論。 CSS フレキシブル ボックス レイアウト モジュール レベル 1 では、フレックス項目はブロック レ...プログラミング 2024 年 11 月 9 日に公開
 -
 JavaScript でタイムアウト実行を制御し、残り時間を判断するにはどうすればよいですか?JavaScript でのタイムアウトの一時停止と再開JavaScript を使用する場合、タイムアウトなどの非同期操作のフローを制御することが必要になる場合があります。ここでは、アクティブなタイムアウトを一時停止および再開する方法、および現在のタイムアウトの残り時間を取得する方法を検討します。タイ...プログラミング 2024 年 11 月 9 日に公開
 -
 document.write() が非同期的に読み込まれるスクリプトで制限されているのはなぜですか?非同期でロードされたスクリプトの実行制限: document.write() の制限について非同期でロードされたスクリプトからドキュメントに書き込もうとすると、コンソール メッセージ「'Document' で 'write' の実行に失敗しました: を実行することはで...プログラミング 2024 年 11 月 9 日に公開
 -
 macOS 上の Django で「ImproperlyConfigured: MySQLdb モジュールのロード中にエラーが発生しました」を修正する方法?MySQL の不適切な構成: 相対パスの問題Django で python manage.py runserver を実行すると、次のエラーが発生する場合があります:ImproperlyConfigured: Error loading MySQLdb module: dlopen(/Library...プログラミング 2024 年 11 月 9 日に公開
 -
 要素の高さに基づいて要素のアスペクト比を維持するにはどうすればよいですか?高さに基づいた Div アスペクト比の維持要素の幅を高さのパーセンテージとして維持するのは難しい場合があります。 padding-top にパーセンテージ値を使用すると逆の効果が得られる可能性がありますが、padding-left のパーセンテージはオブジェクトの高さではなく幅に依存します。この問題...プログラミング 2024 年 11 月 9 日に公開
 -
 PHP または Perl を使用してブラウザで PDF ファイルを直接表示するにはどうすればよいですか?PHP または Perl を使用してブラウザに PDF ファイルを表示するブラウザ内に PDF ファイルを直接表示することは、ユーザー エンゲージメントや機密ファイルの場所を保護します。 PDF をダウンロードまたは作成する簡単な方法は存在しますが、既存の PDF ファイルを読み込んで表示する方法は...プログラミング 2024 年 11 月 9 日に公開
 -
 なぜcurl_exec()はFalseを返すのか、そしてそれを効果的に処理する方法は何ですか?curl_exec() が False を返した場合: エラー処理の領域を詳しく調べるWeb 開発の世界では、curl_exec() 関数が使用されます。リモートサーバーからデータを取得する際に重要な役割を果たします。ただし、プログラマは、この関数が一貫して false を返すという不可解なシナリオ...プログラミング 2024 年 11 月 9 日に公開
 -
 Bootstrap 4 ベータ版の列オフセットはどうなりましたか?Bootstrap 4 ベータ: 列オフセットの削除と復元Bootstrap 4 は、ベータ 1 リリースで、その方法に大幅な変更を導入しました。列がオフセットされました。ただし、その後の Beta 2 リリースでは、これらの変更は元に戻されました。offset-md-* から ml-autoBoo...プログラミング 2024 年 11 月 9 日に公開
 -
 ブートストラップのスタックされた行のギャップを排除する方法: 包括的なガイドブートストラップのスタック行のギャップ: 包括的なソリューションブートストラップのスタック行のギャップの存在は、開発者にとってイライラする問題となる可能性があります。この懸念に対処するために、いくつかの効果的な解決策が利用可能です。1.要素の高さの標準化の設定:すべてのポートフォリオ要素に固定の高さ...プログラミング 2024 年 11 月 9 日に公開
 -
 「shell_exec」を使用して PHP から呼び出されたときに Bash スクリプトが実行に失敗するのはなぜですか?PHP からの Bash コマンドの実行: 失敗したスクリプト実行のトラブルシューティングこの質問では、PHP 開発者が Shell_exec を使用して PHP から bash スクリプトを実行しようとしています。使用される構文は次のとおりです:$output = shell_exec("...プログラミング 2024 年 11 月 9 日に公開
 -
 「display: block」と「width: auto」でコンテナを満たすまでボタンが伸びないのはなぜですか?「display: block」と「width: auto」がコンテナを埋めるようにボタンを引き伸ばさないのはなぜですか?「display: block」と「」を使用する場合ボタン上で「width: auto」を指定すると、コンテナが引き伸ばされて満たされることが期待される場合があります。ただし、常...プログラミング 2024 年 11 月 9 日に公開
 -
 Dockerコンテナ上でRedmineをセットアップするRedmine は、柔軟なオープンソースのプロジェクト管理および問題追跡 Web アプリケーションです。プロジェクトの管理、バグの追跡、タスクと期限の処理に広く使用されています。 Ruby on Rails を使用して開発された Redmine は高度にカスタマイズ可能で、チームのコラボレーションと...プログラミング 2024 年 11 月 9 日に公開
 -
 最も包括的な範囲を提供する HTML5 リセット CSS はどれですか?広範囲に対応できる HTML5 リセット CSS はどれですか?ブラウザのバージョンが膨大であるため、Web デザインに課題が生じ、リセットの使用が必要になりますプラットフォーム間で一貫したスタイルを確保するための CSS。ただし、利用可能なオプションが多すぎるため、適切なリセット CSS を選択す...プログラミング 2024 年 11 月 9 日に公開
中国語を勉強する
- 1 「歩く」は中国語で何と言いますか? 走路 中国語の発音、走路 中国語学習
- 2 「飛行機に乗る」は中国語で何と言いますか? 坐飞机 中国語の発音、坐飞机 中国語学習
- 3 「電車に乗る」は中国語で何と言いますか? 坐火车 中国語の発音、坐火车 中国語学習
- 4 「バスに乗る」は中国語で何と言いますか? 坐车 中国語の発音、坐车 中国語学習
- 5 中国語でドライブは何と言うでしょう? 开车 中国語の発音、开车 中国語学習
- 6 水泳は中国語で何と言うでしょう? 游泳 中国語の発音、游泳 中国語学習
- 7 中国語で自転車に乗るってなんて言うの? 骑自行车 中国語の発音、骑自行车 中国語学習
- 8 中国語で挨拶はなんて言うの? 你好中国語の発音、你好中国語学習
- 9 中国語でありがとうってなんて言うの? 谢谢中国語の発音、谢谢中国語学習
- 10 How to say goodbye in Chinese? 再见Chinese pronunciation, 再见Chinese learning


