Next.js Caching: Turbocharging Your App with Efficient Data Fetching
Caching in Next.js isn’t just about saving time—it’s about reducing redundant network requests, keeping data fresh, and making your app perform like a rockstar.
Whether you’re trying to keep data cached for longer or refresh it on-demand, Next.js gives you all the tools you need. In this article, we will break down how to use caching effectively in Next.js
Next.js extends the fetch API to give you superpowers when it comes to caching. With simple fetch options like cache: 'no-store' and cache: 'force-cache', you can easily control when and how data is cached.
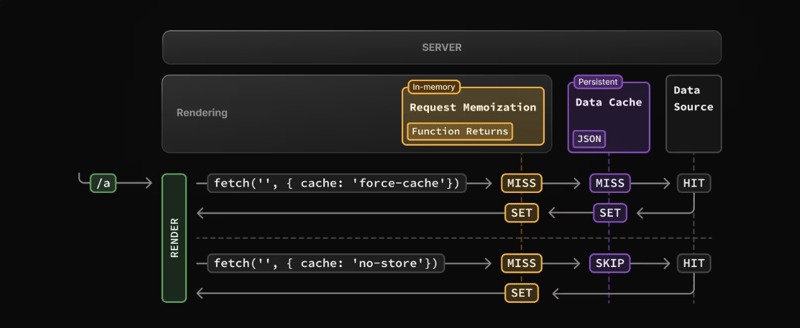
Always Fresh with cache: 'no-store' (Equivalent to unstable_noStore())
Want fresh data every time? cache: 'no-store' is the one to go with. This fetch option skips the cache entirely and grabs the latest data with every request. It’s perfect when you need real-time accuracy—no leftovers from yesterday's fetch allowed.
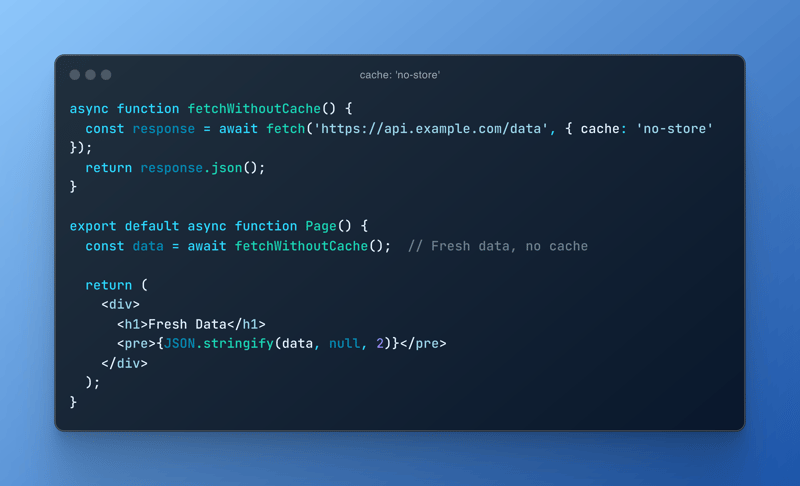
Note: You can also use unstable_noStore() if you want to skip the cache on a server component. The syntax may change later, so stick with cache: 'no-store' for stability.
Reuse Data with cache: 'force-cache' (Equivalent to unstable_cache())
On the other hand, if you’re okay with using cached data (think static content that doesn’t change often), go with cache: 'force-cache'. It’ll save the response for future use and skip redundant network requests.
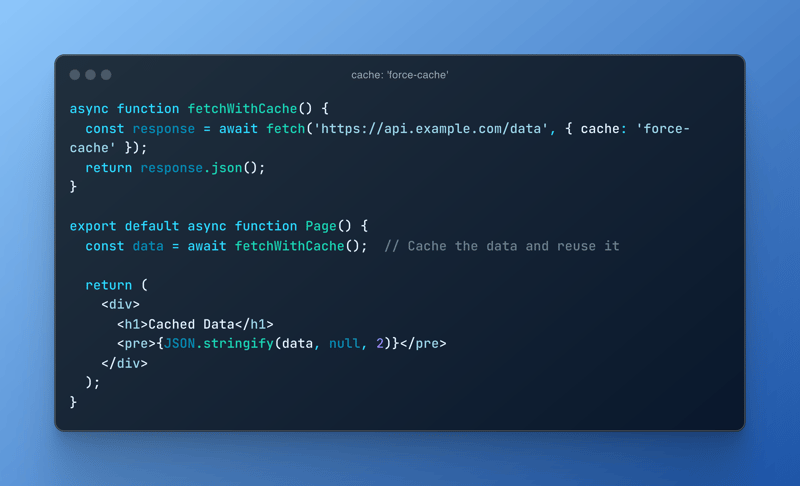
Note: unstable_cache() also caches data, but using the stable cache: 'force-cache' is more reliable if you’re avoiding surprises down the road.
Keep It Fresh with Revalidations
Sometimes cached data needs a refresh—whether it's after a certain time or when triggered by an event. Lucky for you, Next.js lets you revalidate your cached data in several ways.
Revalidate with Time: next.revalidate
If your data needs to refresh periodically (like every hour or day), you can set a revalidation period using the next.revalidate option in your fetch request. It’ll grab the latest data after the time you specify while keeping things cached the rest of the time.
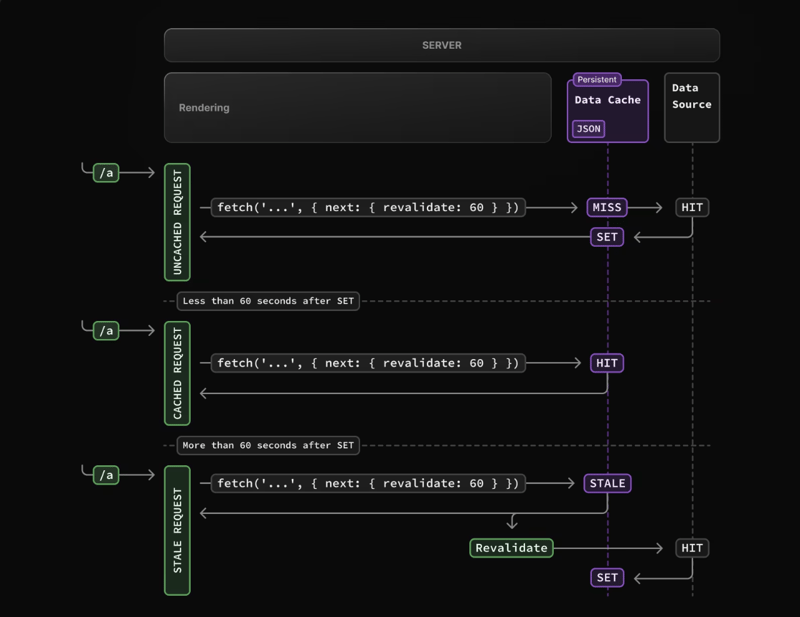
fetch('https://api.example.com/data', {
  next: { revalidate: 3600 }  // Revalidate data every hour (3600 seconds)
});
On-Demand Revalidation with Tags: revalidateTag()
Now, Imagine you can tell Next.js to refresh specific bits of cached data when something important happens—like a form submission or a new blog post going live. You can assign tags to your cached data, and then revalidate those tags whenever needed.
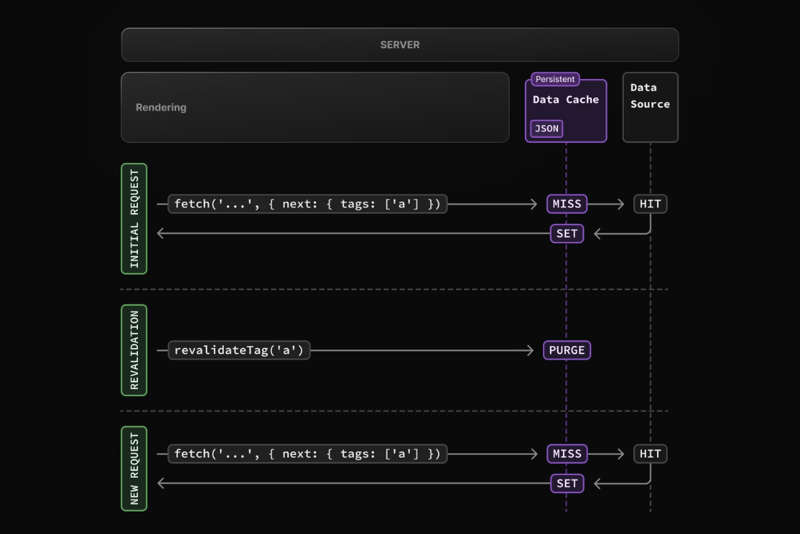
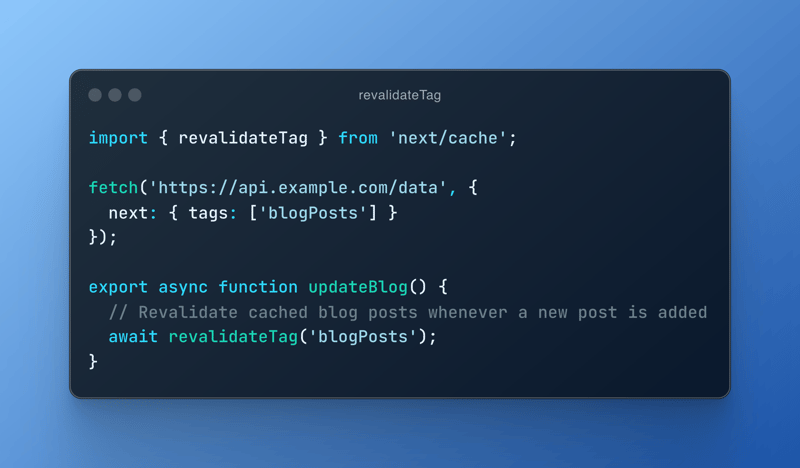
This way, you can manually refresh parts of your cache on demand without waiting for the next scheduled revalidation.
Using the Unstable Methods
If you’re the adventurous type, you can also use the unstable_noStore() and unstable_cache() methods directly on server components to manage caching behavior. Just keep in mind, that these are "unstable" for a reason, so they might change in the future( or might have been changed at the time you are reading it).
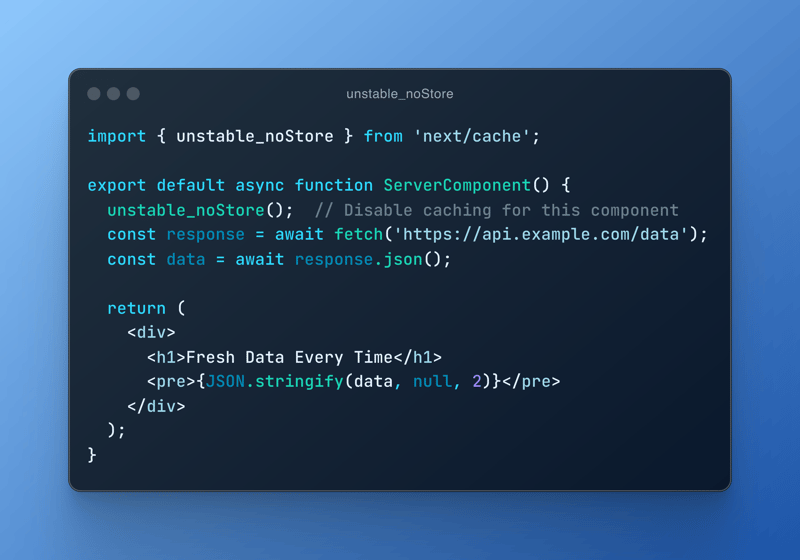
Or if you’re into caching, here’s how you can use unstable_cache():
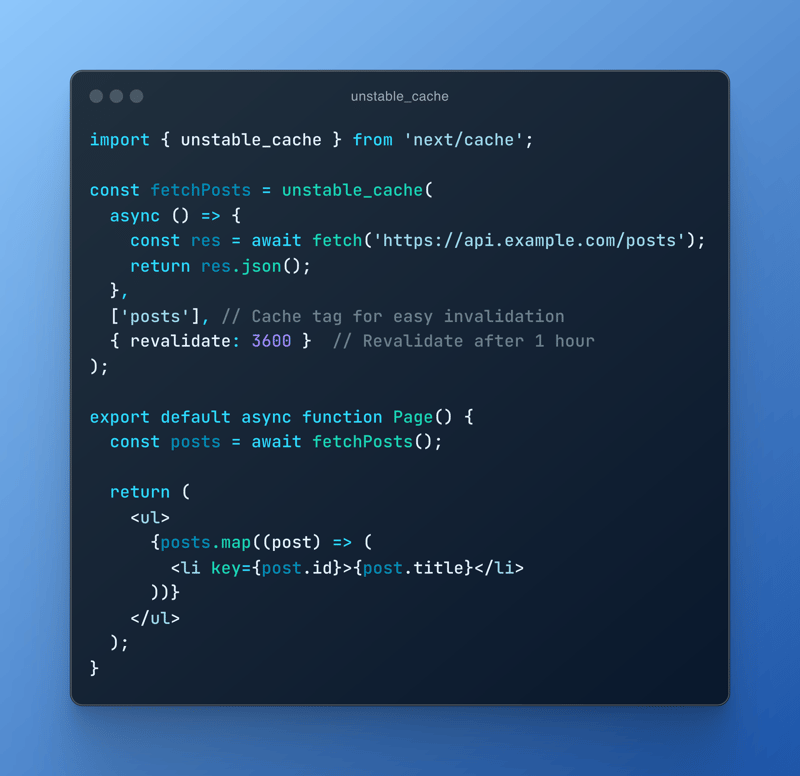
Skip the Prop Drilling
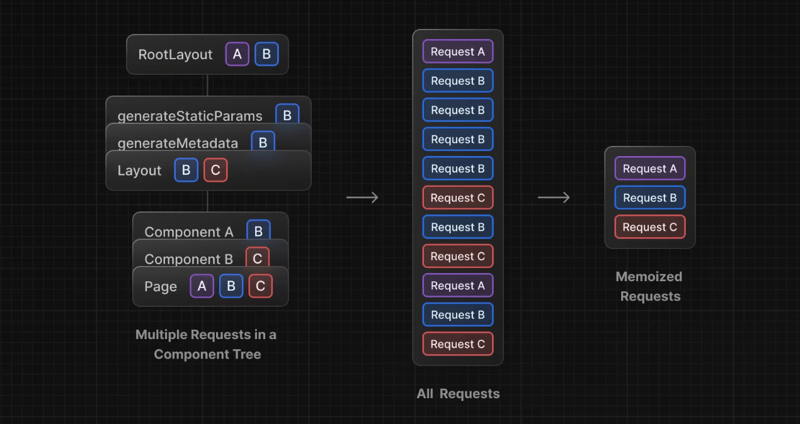
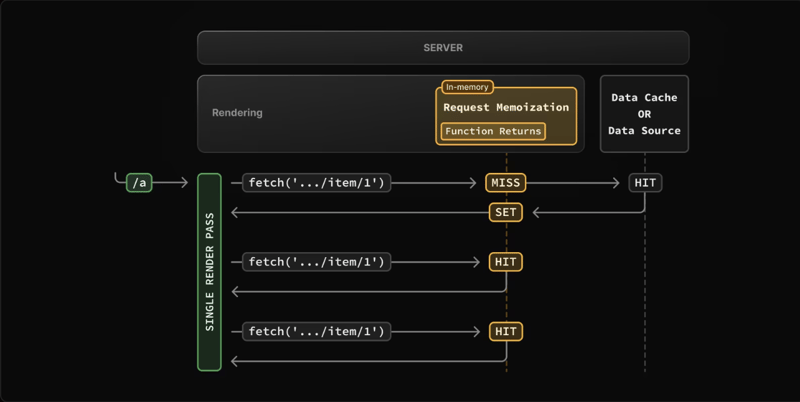
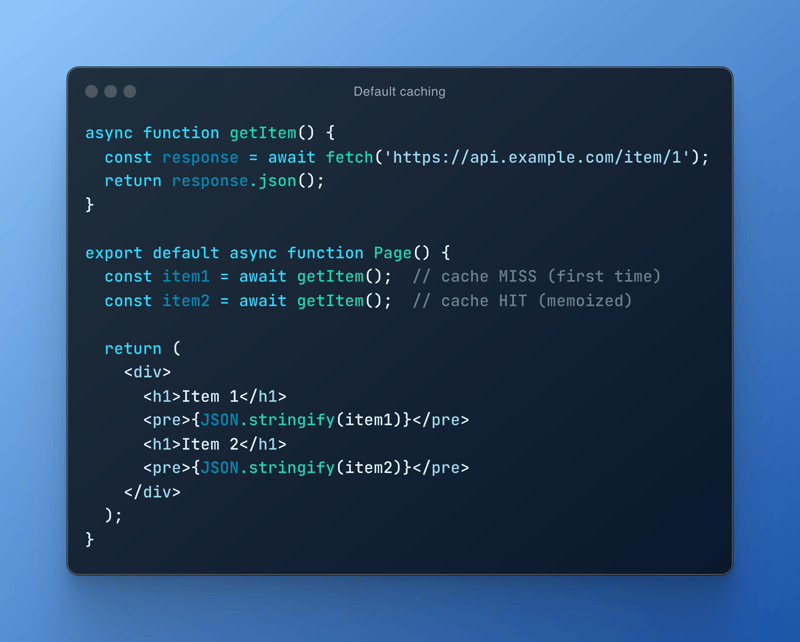
Here’s a neat trick: if you’re fetching the same data across multiple components (like a Layout, Page, and some inner components), don’t stress about fetching it once at the top and passing it down or having to make a request for that data multiple times on multiple components that cause slowing down the performance. Next.js automatically memoizes fetch requests during server rendering, meaning if you fetch the same data multiple times, it’s smart enough to only hit the network once and share the result in multiple components.
Wrapping It Up
Next.js gives you all the tools you need to manage caching effectively, whether through fetch API options like cache: 'no-store' and cache: 'force-cache', or the more experimental unstable_noStore() and unstable_cache() methods. Add in revalidation strategies like next.revalidate and revalidateTag, and you’ve got everything you need to keep your data fresh without breaking a sweat.
Sources:
Next.js caching
-
 How to Simplify JSON Parsing in PHP for Multi-Dimensional Arrays?Parsing JSON with PHPTrying to parse JSON data in PHP can be challenging, especially when dealing with multi-dimensional arrays. To simplify the proce...Programming Posted on 2025-04-29
 -
 How to get function name inside a function in JavaScript?How to Retrieve the Function's Name Within the Function Itself?Determining a function's name internally can be useful for debugging or dynamic...Programming Posted on 2025-04-29
 -
 Why can't Java create generic arrays?Generic Array Creation ErrorQuestion:When attempting to create an array of generic classes using an expression like:public static ArrayList<myObjec...Programming Posted on 2025-04-29
 -
 Solve MySQL error 1153: Packet exceeds 'max_allowed_packet' limitMySQL Error 1153: Troubleshooting Got a Packet Bigger Than 'max_allowed_packet' BytesFacing the enigmatic MySQL Error 1153 while importing a d...Programming Posted on 2025-04-29
 -
 Can template parameters in C++20 Consteval function depend on function parameters?Consteval Functions and Template Parameters Dependent on Function ArgumentsIn C 17, a template parameter cannot depend on a function argument because...Programming Posted on 2025-04-29
 -
 How to increase date by one day in Java?How to augment a date by a single day?When you need to adjust a particular date by one day, several methods are available.Solution 1: Utilize the Cale...Programming Posted on 2025-04-29
 -
 How do you extract a random element from an array in PHP?Random Selection from an ArrayIn PHP, obtaining a random item from an array can be accomplished with ease. Consider the following array:$items = [523,...Programming Posted on 2025-04-29
 -
 How to add axes and tags to PNG files in Java?How to Annotate a PNG File with Axes and Labels in JavaAdding axes and labels to an existing PNG image can be challenging. Rather than attempting modi...Programming Posted on 2025-04-29
 -
 Is There a Performance Difference Between Using a For-Each Loop and an Iterator for Collection Traversal in Java?For Each Loop vs. Iterator: Efficiency in Collection TraversalIntroductionWhen traversing a collection in Java, the choice arises between using a for-...Programming Posted on 2025-04-29
 -
 PHP SimpleXML parsing XML method with namespace colonParsing XML with Namespace Colons in PHPSimpleXML encounters difficulties when parsing XML containing tags with colons, such as XML elements with pref...Programming Posted on 2025-04-29
 -
 Solve the \\"String value error\\" exception when MySQL inserts EmojiResolving Incorrect String Value Exception When Inserting EmojiWhen attempting to insert a string containing emoji characters into a MySQL database us...Programming Posted on 2025-04-29
 -
 How does Android send POST data to PHP server?Sending POST Data in AndroidIntroductionThis article addresses the need to send POST data to a PHP script and display the result in an Android applica...Programming Posted on 2025-04-29
 -
 Why Doesn't `body { margin: 0; }` Always Remove Top Margin in CSS?Addressing Body Margin Removal in CSSFor novice web developers, removing the margin of the body element can be a confusing task. Often, the code provi...Programming Posted on 2025-04-29
 -
 Tips for finding element position in Java arrayRetrieving Element Position in Java ArraysWithin Java's Arrays class, there is no direct "indexOf" method to determine the position of a...Programming Posted on 2025-04-29
 -
 How to efficiently insert data into multiple MySQL tables in one transaction?MySQL Insert into Multiple TablesAttempting to insert data into multiple tables with a single MySQL query may yield unexpected results. While it may s...Programming Posted on 2025-04-29
Study Chinese
- 1 How do you say "walk" in Chinese? 走路 Chinese pronunciation, 走路 Chinese learning
- 2 How do you say "take a plane" in Chinese? 坐飞机 Chinese pronunciation, 坐飞机 Chinese learning
- 3 How do you say "take a train" in Chinese? 坐火车 Chinese pronunciation, 坐火车 Chinese learning
- 4 How do you say "take a bus" in Chinese? 坐车 Chinese pronunciation, 坐车 Chinese learning
- 5 How to say drive in Chinese? 开车 Chinese pronunciation, 开车 Chinese learning
- 6 How do you say swimming in Chinese? 游泳 Chinese pronunciation, 游泳 Chinese learning
- 7 How do you say ride a bicycle in Chinese? 骑自行车 Chinese pronunciation, 骑自行车 Chinese learning
- 8 How do you say hello in Chinese? 你好Chinese pronunciation, 你好Chinese learning
- 9 How do you say thank you in Chinese? 谢谢Chinese pronunciation, 谢谢Chinese learning
- 10 How to say goodbye in Chinese? 再见Chinese pronunciation, 再见Chinese learning


