How to Enable or Disable Auto Save Screenshots to OneDrive
This guide describes how to enable or disable auto save screenshots to OneDrive for all users in Windows 10. If you capture a screenshot by pressing PrtScn, Alt PrtScn, or Ctrl PrtScn, you might be asked if you want to automatically save your screenshots to OneDrive( see in the picture). To stop this window prompting every time you print screen, you can turn on Auto Save screenshots to OneDrive feature.
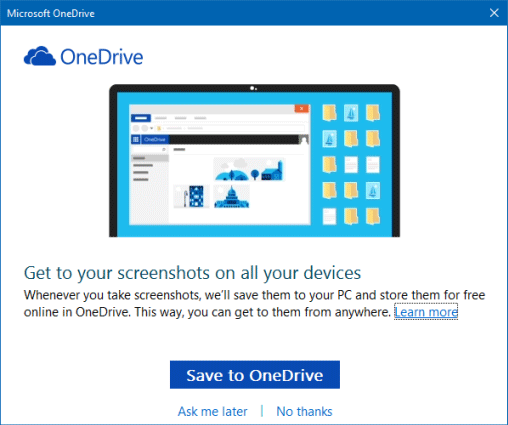
To Enable Auto Save Screenshots to OneDrive, here's how:
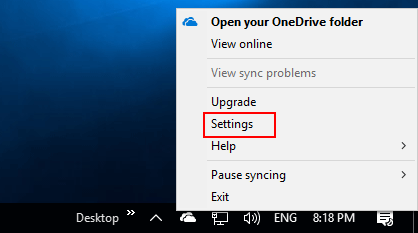
Step 1: Right-click on OneDrive icon on the taskbar notification area, and then click Settings.
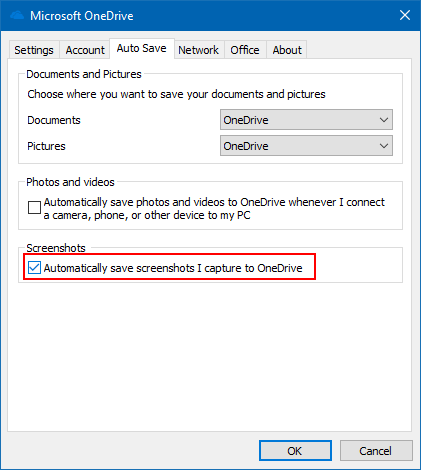
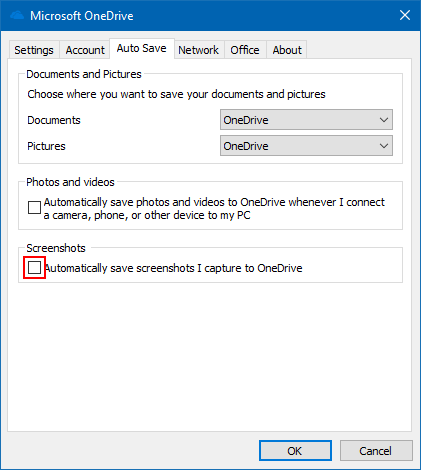
Step 2: Select Auto Save tab, check Automatically save screenshots I capture to OneDrive box.
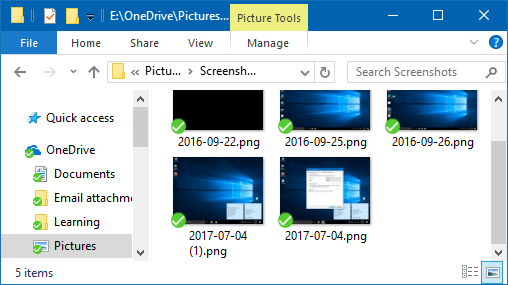
With this setting, screenshots you capture will be saved to the "OneDrive/Pictures/Screenshots" folder on your PC and automatically uploaded to your online storage. You can get to the folder in File Explorer by opening OneDrive in the left folder pane.
If you no longer want to automatically save screenshots to OneDrive, you can turn off this setting.
Step 1: Right-click the OneDrive icon in the notification area on the taskbar, and then click Settings.
Step 2: Click the Auto save tab, then clear the Automatically save screenshots I capture to OneDrive box.
-
 How to clone your voice on your iPhone or MacUnlock the Power of Personal Voice on Your Apple Devices: A Comprehensive Guide iOS 17 and macOS Sonoma introduced a groundbreaking accessibility feat...Software tutorial Posted on 2025-02-25
 -
 Fixed - Final Fantasy VII Rebirth an Unreal Process Has CrashedSolve the Unreal engine process crash in Final Fantasy VII Rebirth After "Final Fantasy VII Rebirth" was launched on PC, some players encou...Software tutorial Posted on 2025-02-24
 -
 How to Change Monitor 1 and 2 in WindowsA common issue in a dual-monitor setup is when you need to move your mouse cursor to the wrong side of the screen to reach the second monitor. You ca...Software tutorial Posted on 2025-02-22
 -
 Assetto Corsa EVO Crashing on Windows? Learn This Top GuideAssetto Corsa EVO crashes after starting or running? Don't worry, this is common in the newly released games! This article provides 4 reliable way...Software tutorial Posted on 2025-02-08
 -
 Encountering Valorant Friends List Not Working? Here’s GuideEncountering the Valorant friends list not working error can be quite frustrating, particularly when you’re eager to team up with your buddies. This i...Software tutorial Posted on 2025-02-07
 -
 Nokia Didn’t Think the iPhone’s Touch Keyboard Would Take OffIn an amazing piece of technology history, a Nokia internal presentation from after the iPhone's 2007 unveiling shows what the company was thinkin...Software tutorial Posted on 2025-02-07
 -
 How to Fix SET_OF_INVALID_CONTEXT BSOD Windows 10/11It’s common to encounter blue screen of death errors like SET_OF_INVALID_CONTEXT BSOD on a Windows 10/11. How to get rid of it from your computer. If ...Software tutorial Posted on 2025-02-06
 -
 How to Group and Ungroup Objects in PowerPointPowerPoint's grouping feature simplifies presentation design by allowing you to combine multiple objects into a single unit. This tutorial demonst...Software tutorial Posted on 2025-02-06
 -
 The Best iPhone 16 Cases of 2025Protecting your new iPhone 16 is crucial, even if you love its sleek design. A quality case ensures it stays pristine. Here are some top picks to sui...Software tutorial Posted on 2025-02-06
 -
 Windows 11 KB5050094 Rolled out to 24H2, Learn New FeaturesWindows 11 Build 26100.3025 (KB5050094) is now logged into the Release Preview channel! This update brings many improvements to the Windows 11 24H2 ve...Software tutorial Posted on 2025-02-06
 -
 The Definitive Guide for Skyjem Virus & 5 Ways to Remove ItSkyjem is a browser hijacker that redirects search queries to other websites. To prevent further loss, you had better remove it as soon as possible. T...Software tutorial Published on 2025-01-26
 -
 5 Fixes for WhatsApp Desktop Not Downloading ImagesFix 1: Check Internal Storage If you can’t download images using WhatsApp Desktop, start by checking your internal storage on Mac or Windows PC. On Ma...Software tutorial Published on 2025-01-25
 -
 EOS-ERR-1603: 4 Useful Methods to Resolve This ErrorSuffering from the Epic Online Services failed to install issue on your device? If you get the EOS-ERR-1603 error while installing EOS, this post from...Software tutorial Published on 2025-01-15
 -
 External Hard Drive Slows Down PC? Fix It Easily Now!If your external hard drive slows down PC, your work efficiency or entertainment experience will be greatly affected. Here this tutorial on MiniTool S...Software tutorial Published on 2024-12-23
 -
 How to Fix Grounded Crashing on PC: Here’s a Full GuideGrounded is among the most well-known survival adventure games. Although the game provides a smooth gaming experience, PC players might face issues su...Software tutorial Published on 2024-12-22
Study Chinese
- 1 How do you say "walk" in Chinese? 走路 Chinese pronunciation, 走路 Chinese learning
- 2 How do you say "take a plane" in Chinese? 坐飞机 Chinese pronunciation, 坐飞机 Chinese learning
- 3 How do you say "take a train" in Chinese? 坐火车 Chinese pronunciation, 坐火车 Chinese learning
- 4 How do you say "take a bus" in Chinese? 坐车 Chinese pronunciation, 坐车 Chinese learning
- 5 How to say drive in Chinese? 开车 Chinese pronunciation, 开车 Chinese learning
- 6 How do you say swimming in Chinese? 游泳 Chinese pronunciation, 游泳 Chinese learning
- 7 How do you say ride a bicycle in Chinese? 骑自行车 Chinese pronunciation, 骑自行车 Chinese learning
- 8 How do you say hello in Chinese? 你好Chinese pronunciation, 你好Chinese learning
- 9 How do you say thank you in Chinese? 谢谢Chinese pronunciation, 谢谢Chinese learning
- 10 How to say goodbye in Chinese? 再见Chinese pronunciation, 再见Chinese learning


