How to Disable Auto Lock Screen Feature in Windows 8
When you use Windows 8, you will find it will lock screen automatically every time you leave the computer inactive for some time, which is just like a smartphone. Yes, it is just the new feature named Auto Lock Screen in Windows 8 and the later Windows 8.1. This new feature is enabled by default, which brings convenience to secure computer, but also sometimes invades people because it means you have to type password to login back to Windows 8 every time you leave the screen idle for a while. But actually, you can disable Windows 8 auto lock screen feature if you don't want it to invade you.
Two ways to disable auto lock screen feature in Windows 8
- Way 1: By changing settings in Group Policy
- Way 1: By editing value in Registry Editor
Way 1: Disable Windows 8 Auto lock screen feature by changing setting in Group Policy
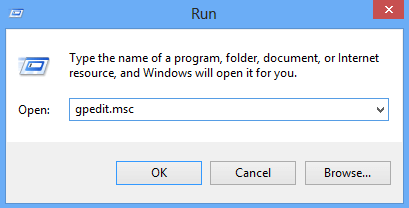
Step 1: Simultaneously press Win R to open Run dialog box.
Step 2: Type gpedit.msc and hit Enter.
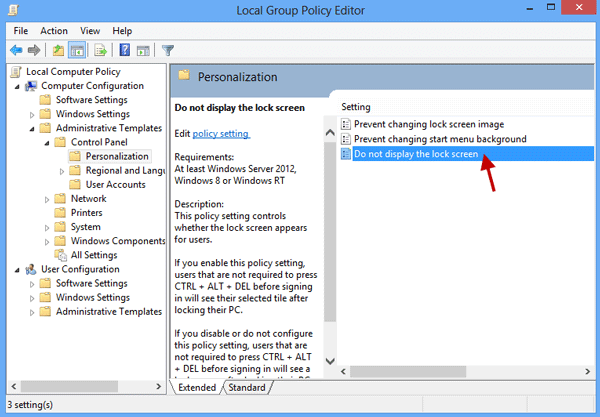
Step 3: Then Local Group Policy Editor opens. Expand the folder Computer Configuration -> Administrative Templates -> Control Panel -> Personalization. Then double-click on Do not display the lock screen.
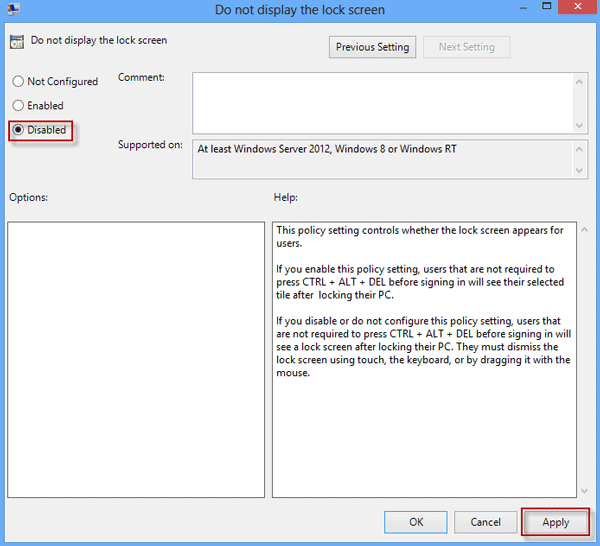
Step 4: The setting is not configured by default. You need to select Disabled, click the Apply button, and click OK to save the setting. Then Windows 8 auto lock screen feature can be disabled.
Way 2: Disable Windows 8 Auto lock screen feature by editing value in Registry Editor
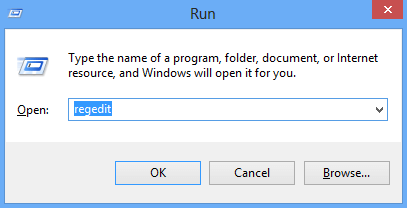
Step 1: Simultaneously press Win R to open Run dialog box.
Step 2: Type regedit and hit Enter.
Step 3: Then Registry Editor opens. Navigate to Computer\HKEY_LOCAL_MACHINE\SOFTWARE\Policies\Windows\Personalization. If you can't see the Personalization folder, select Windows folder, right-click in the right pane and click New to create a new DWORD value named NoLockScreen.
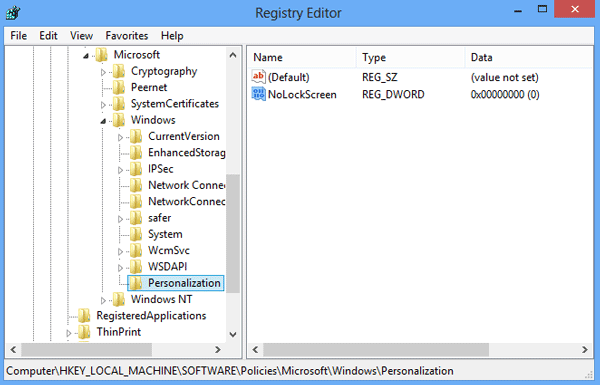
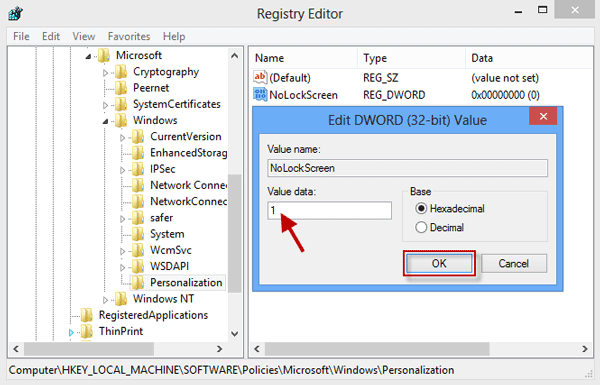
Step 4: Double-click the NoLockScreen and set its value data to 1. Then click on OK to save the changes. Close the Registry Editor and the auto lock screen feature has been disabled.
Tips:
1. You need to log into Windows 8 as administrator, and you don't need to restart the computer to make it take effect while using the above two ways to disable auto lock screen feature.
2. Many settings in Windows can be changed in "Group Policy" and "Registry Editor". But we remind people to be careful when making any changes in Registry Editor because some errors can cause system failure.
3. Once auto lock screen feature is disabled, Windows 8 won't lock screen automatically. You can manually lock screen when necessary by pressing Win L or Ctrl Alt Del key combination.
-
 How to clone your voice on your iPhone or MacUnlock the Power of Personal Voice on Your Apple Devices: A Comprehensive Guide iOS 17 and macOS Sonoma introduced a groundbreaking accessibility feat...Software tutorial Posted on 2025-02-25
 -
 Fixed - Final Fantasy VII Rebirth an Unreal Process Has CrashedSolve the Unreal engine process crash in Final Fantasy VII Rebirth After "Final Fantasy VII Rebirth" was launched on PC, some players encou...Software tutorial Posted on 2025-02-24
 -
 How to Change Monitor 1 and 2 in WindowsA common issue in a dual-monitor setup is when you need to move your mouse cursor to the wrong side of the screen to reach the second monitor. You ca...Software tutorial Posted on 2025-02-22
 -
 Assetto Corsa EVO Crashing on Windows? Learn This Top GuideAssetto Corsa EVO crashes after starting or running? Don't worry, this is common in the newly released games! This article provides 4 reliable way...Software tutorial Posted on 2025-02-08
 -
 Encountering Valorant Friends List Not Working? Here’s GuideEncountering the Valorant friends list not working error can be quite frustrating, particularly when you’re eager to team up with your buddies. This i...Software tutorial Posted on 2025-02-07
 -
 Nokia Didn’t Think the iPhone’s Touch Keyboard Would Take OffIn an amazing piece of technology history, a Nokia internal presentation from after the iPhone's 2007 unveiling shows what the company was thinkin...Software tutorial Posted on 2025-02-07
 -
 How to Fix SET_OF_INVALID_CONTEXT BSOD Windows 10/11It’s common to encounter blue screen of death errors like SET_OF_INVALID_CONTEXT BSOD on a Windows 10/11. How to get rid of it from your computer. If ...Software tutorial Posted on 2025-02-06
 -
 How to Group and Ungroup Objects in PowerPointPowerPoint's grouping feature simplifies presentation design by allowing you to combine multiple objects into a single unit. This tutorial demonst...Software tutorial Posted on 2025-02-06
 -
 The Best iPhone 16 Cases of 2025Protecting your new iPhone 16 is crucial, even if you love its sleek design. A quality case ensures it stays pristine. Here are some top picks to sui...Software tutorial Posted on 2025-02-06
 -
 Windows 11 KB5050094 Rolled out to 24H2, Learn New FeaturesWindows 11 Build 26100.3025 (KB5050094) is now logged into the Release Preview channel! This update brings many improvements to the Windows 11 24H2 ve...Software tutorial Posted on 2025-02-06
 -
 The Definitive Guide for Skyjem Virus & 5 Ways to Remove ItSkyjem is a browser hijacker that redirects search queries to other websites. To prevent further loss, you had better remove it as soon as possible. T...Software tutorial Published on 2025-01-26
 -
 5 Fixes for WhatsApp Desktop Not Downloading ImagesFix 1: Check Internal Storage If you can’t download images using WhatsApp Desktop, start by checking your internal storage on Mac or Windows PC. On Ma...Software tutorial Published on 2025-01-25
 -
 EOS-ERR-1603: 4 Useful Methods to Resolve This ErrorSuffering from the Epic Online Services failed to install issue on your device? If you get the EOS-ERR-1603 error while installing EOS, this post from...Software tutorial Published on 2025-01-15
 -
 External Hard Drive Slows Down PC? Fix It Easily Now!If your external hard drive slows down PC, your work efficiency or entertainment experience will be greatly affected. Here this tutorial on MiniTool S...Software tutorial Published on 2024-12-23
 -
 How to Fix Grounded Crashing on PC: Here’s a Full GuideGrounded is among the most well-known survival adventure games. Although the game provides a smooth gaming experience, PC players might face issues su...Software tutorial Published on 2024-12-22
Study Chinese
- 1 How do you say "walk" in Chinese? 走路 Chinese pronunciation, 走路 Chinese learning
- 2 How do you say "take a plane" in Chinese? 坐飞机 Chinese pronunciation, 坐飞机 Chinese learning
- 3 How do you say "take a train" in Chinese? 坐火车 Chinese pronunciation, 坐火车 Chinese learning
- 4 How do you say "take a bus" in Chinese? 坐车 Chinese pronunciation, 坐车 Chinese learning
- 5 How to say drive in Chinese? 开车 Chinese pronunciation, 开车 Chinese learning
- 6 How do you say swimming in Chinese? 游泳 Chinese pronunciation, 游泳 Chinese learning
- 7 How do you say ride a bicycle in Chinese? 骑自行车 Chinese pronunciation, 骑自行车 Chinese learning
- 8 How do you say hello in Chinese? 你好Chinese pronunciation, 你好Chinese learning
- 9 How do you say thank you in Chinese? 谢谢Chinese pronunciation, 谢谢Chinese learning
- 10 How to say goodbye in Chinese? 再见Chinese pronunciation, 再见Chinese learning


