How to Create a Restore Point in Windows 11
The restore point feature in Windows 11 is one of the many recovery options available. Whether you want to make changes to your registry entries, install new Windows updates, or just fix issues with your PC, a restore point can help when things go awry. Here, we show you how to enable and create a restore point in Windows 11.
Should You Create a Restore Point in Windows 11?
The Windows operating system can save a working backup image of your system at a given date and time, which are known as restore points. If something goes wrong, you can use a restore point to undo any changes and revert your system to its last working state.
A restore point comprises Windows system files, installed programs, registry settings, and system drivers. However, it does not back up your personal files and folders, so you'll need alternative backup options for your data. Once configured, Windows automatically creates a new restore point before making any significant changes to your system, such as installing or uninstalling a Windows update.

By default, Windows creates a new restore point on a weekly basis and replaces it with the oldest one to manage storage space. However, you can also manually create new restore points as frequently as you want.
Having multiple restore points is useful for troubleshooting system-related issues. For example, if a bad driver update causes your system to malfunction and uninstalling it does not help, you can use the system restore to restore your PC to an earlier point when the problem did not exist.
Does a System Restore Affect My Personal Files and Programs?
No, using a restore point does not affect your personal files. However, it will uninstall any apps, hardware drivers, and system updates installed after the restore point was created. This also applies to any modifications you made at the system level, including system settings and other advanced modifications.
Similarly, any app or driver deleted after creating the restore point will be brought back. Some apps, however, may need a reinstall to work properly.
How to Enable Restore Points in Windows 11
System Restore isn't enabled by default. So you'll need to manually set up and configure it to create restore points for each partition/drive. To enable System Restore:
- Press Win S to open Windows search.
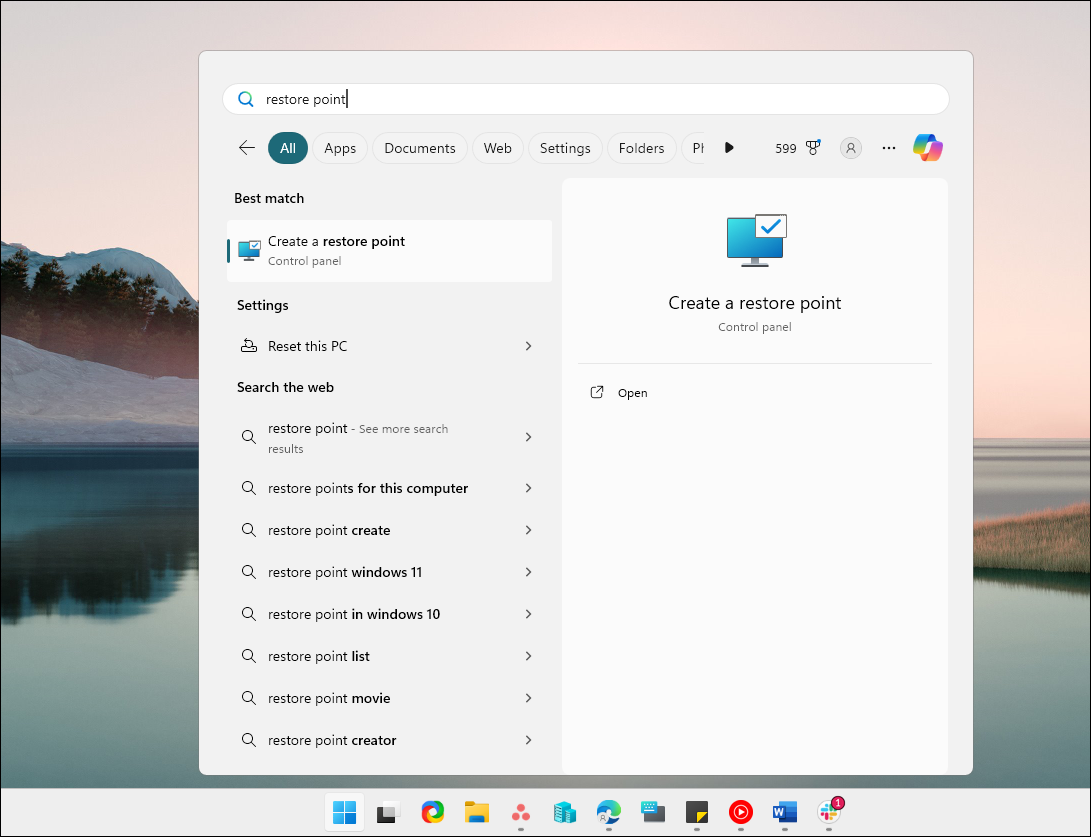
- Type restore point and click on Create a restore point from the search results.

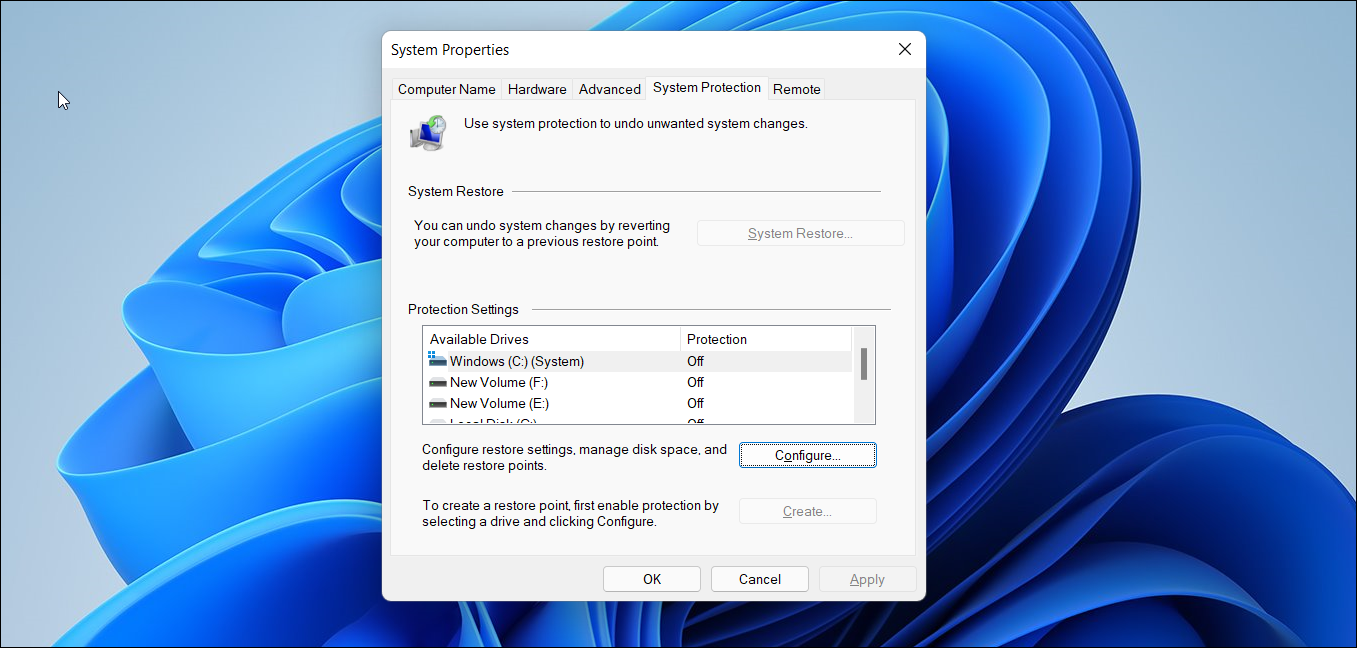
- In the System Properties window, open the System Protection tab.
- Under Protection Settings, check if Protection is set to On or Off.

- If it is set to Off, then click the Configure button.
- Choose Turn on System Protection under Restore Settings.
- Under Disk Space Usage, drag the slider to allocate the maximum disk space to save restore points.
- Click Apply and OK to save the changes.
Repeat the steps if you want to enable system restore for other available drives on your system. We recommend doing so if you install apps on a different drive other than the C:\ drive.
How to Create a Restore Point in Windows 11
While you can create and use a restore point using Command Prompt, a simpler way involves using the System Protection dialog. Here's how you can manually create a restore point in Windows 11:
- Press the Win key, type System Restore, and click Create a Restore Point.

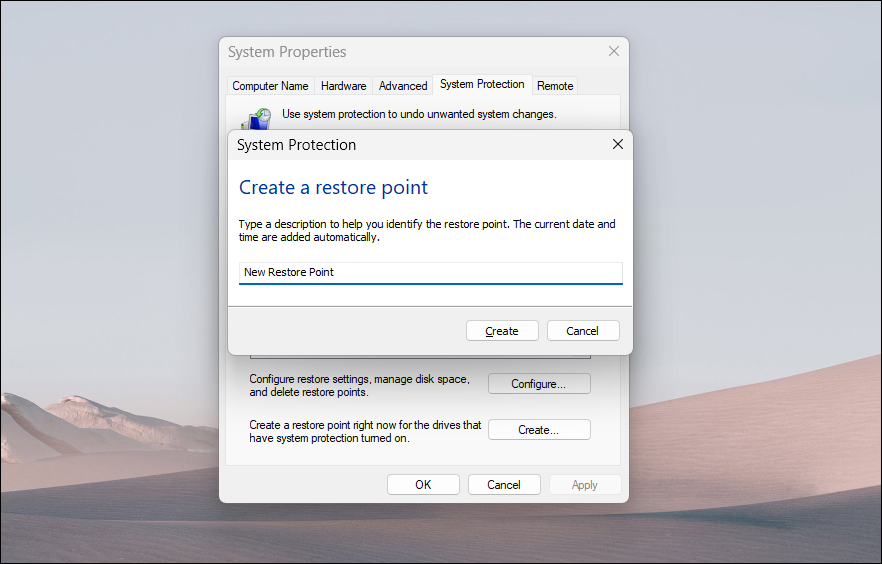
- Click the Create button.

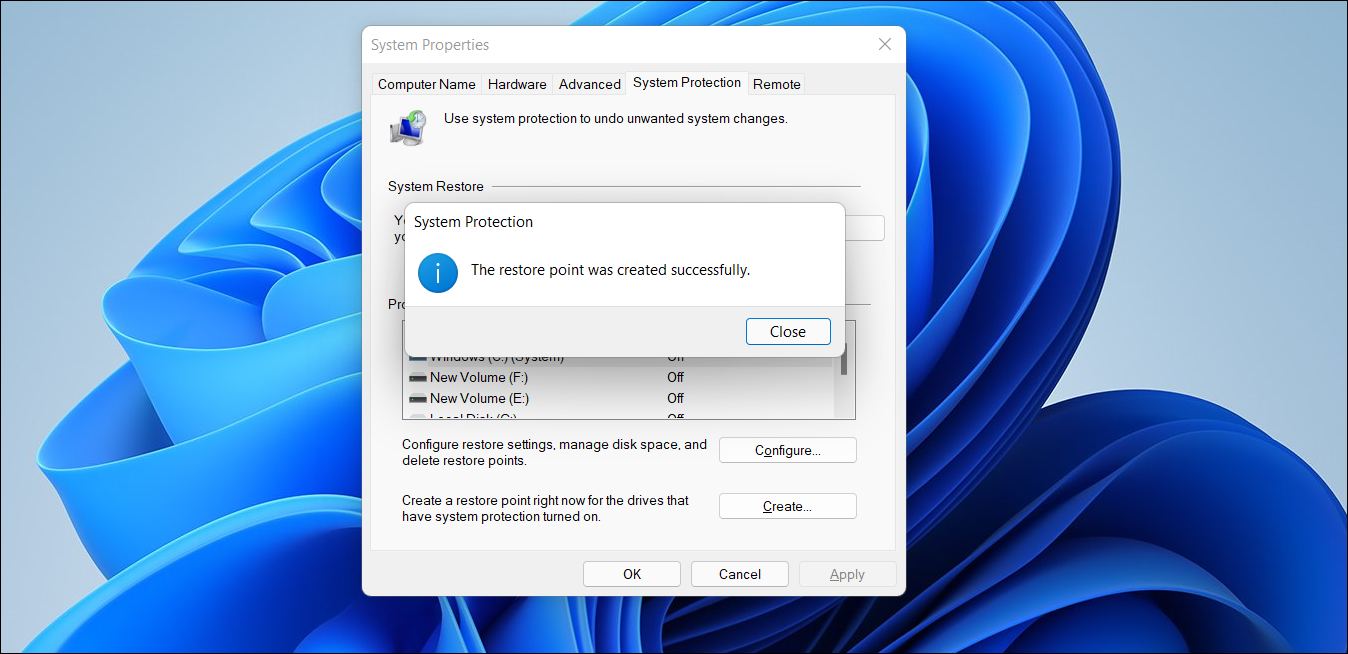
- Type a description or name for the restore point and click Create. System Protection will start creating the restore point and display a success message if successful. It may take a few seconds, so wait till it is completed.

- Click Close.
Using restore points to fix issues with your computer is easy. In the System Restore dialog, select the most recent restore point, read the description, and click Next. Windows will restart and attempt to restore to the selected point. If your computer can't boot or you are unable to log in, you can access system restore through the Windows Recovery Environment (WinRE).
System Restore is a handy utility for Windows users. It is more viable than other recovery options that involve resets or full reinstallations. If you end up with too many restore points and run into disk space issues, you can use the Disk Cleanup tool or manually delete restore points from your PC.
-
 Teams Calendar Not Syncing With Outlook: How To Resolve ItRead our disclosure page to find out how can you help MSPoweruser sustain the editorial team Read more ...Software tutorial Posted on 2025-03-04
 -
 PNY’s New USB-C Flash Drives Are FastPNY Elite-X Fit Type-C USB 3.2 Flash ...Software tutorial Posted on 2025-03-04
 -
![CoinMiner Malware: What Is It & How to Remove It from your Mac? [Protection Against Virus]](/style/images/moren/moren.png) CoinMiner Malware: What Is It & How to Remove It from your Mac? [Protection Against Virus]CoinMiner恶意软件:保护您的Mac免受加密货币挖矿攻击 CoinMiner恶意软件是一种利用您的Mac硬件资源来挖掘加密货币的恶意软件。您的Mac开始运行缓慢,直到后期才发现这是由于CoinMiner恶意软件造成的。更糟糕的是,您甚至不知道它已安装在您的Mac上。 本文将分享更多关于Coin...Software tutorial Posted on 2025-03-04
CoinMiner Malware: What Is It & How to Remove It from your Mac? [Protection Against Virus]CoinMiner恶意软件:保护您的Mac免受加密货币挖矿攻击 CoinMiner恶意软件是一种利用您的Mac硬件资源来挖掘加密货币的恶意软件。您的Mac开始运行缓慢,直到后期才发现这是由于CoinMiner恶意软件造成的。更糟糕的是,您甚至不知道它已安装在您的Mac上。 本文将分享更多关于Coin...Software tutorial Posted on 2025-03-04 -
 How to clone your voice on your iPhone or MacUnlock the Power of Personal Voice on Your Apple Devices: A Comprehensive Guide iOS 17 and macOS Sonoma introduced a groundbreaking accessibility feat...Software tutorial Posted on 2025-02-25
 -
 Fixed - Final Fantasy VII Rebirth an Unreal Process Has CrashedSolve the Unreal engine process crash in Final Fantasy VII Rebirth After "Final Fantasy VII Rebirth" was launched on PC, some players encou...Software tutorial Posted on 2025-02-24
 -
 How to Change Monitor 1 and 2 in WindowsA common issue in a dual-monitor setup is when you need to move your mouse cursor to the wrong side of the screen to reach the second monitor. You ca...Software tutorial Posted on 2025-02-22
 -
 Assetto Corsa EVO Crashing on Windows? Learn This Top GuideAssetto Corsa EVO crashes after starting or running? Don't worry, this is common in the newly released games! This article provides 4 reliable way...Software tutorial Posted on 2025-02-08
 -
 Encountering Valorant Friends List Not Working? Here’s GuideEncountering the Valorant friends list not working error can be quite frustrating, particularly when you’re eager to team up with your buddies. This i...Software tutorial Posted on 2025-02-07
 -
 Nokia Didn’t Think the iPhone’s Touch Keyboard Would Take OffIn an amazing piece of technology history, a Nokia internal presentation from after the iPhone's 2007 unveiling shows what the company was thinkin...Software tutorial Posted on 2025-02-07
 -
 How to Fix SET_OF_INVALID_CONTEXT BSOD Windows 10/11It’s common to encounter blue screen of death errors like SET_OF_INVALID_CONTEXT BSOD on a Windows 10/11. How to get rid of it from your computer. If ...Software tutorial Posted on 2025-02-06
 -
 How to Group and Ungroup Objects in PowerPointPowerPoint's grouping feature simplifies presentation design by allowing you to combine multiple objects into a single unit. This tutorial demonst...Software tutorial Posted on 2025-02-06
 -
 The Best iPhone 16 Cases of 2025Protecting your new iPhone 16 is crucial, even if you love its sleek design. A quality case ensures it stays pristine. Here are some top picks to sui...Software tutorial Posted on 2025-02-06
 -
 Windows 11 KB5050094 Rolled out to 24H2, Learn New FeaturesWindows 11 Build 26100.3025 (KB5050094) is now logged into the Release Preview channel! This update brings many improvements to the Windows 11 24H2 ve...Software tutorial Posted on 2025-02-06
 -
 The Definitive Guide for Skyjem Virus & 5 Ways to Remove ItSkyjem is a browser hijacker that redirects search queries to other websites. To prevent further loss, you had better remove it as soon as possible. T...Software tutorial Published on 2025-01-26
 -
 5 Fixes for WhatsApp Desktop Not Downloading ImagesFix 1: Check Internal Storage If you can’t download images using WhatsApp Desktop, start by checking your internal storage on Mac or Windows PC. On Ma...Software tutorial Published on 2025-01-25
Study Chinese
- 1 How do you say "walk" in Chinese? 走路 Chinese pronunciation, 走路 Chinese learning
- 2 How do you say "take a plane" in Chinese? 坐飞机 Chinese pronunciation, 坐飞机 Chinese learning
- 3 How do you say "take a train" in Chinese? 坐火车 Chinese pronunciation, 坐火车 Chinese learning
- 4 How do you say "take a bus" in Chinese? 坐车 Chinese pronunciation, 坐车 Chinese learning
- 5 How to say drive in Chinese? 开车 Chinese pronunciation, 开车 Chinese learning
- 6 How do you say swimming in Chinese? 游泳 Chinese pronunciation, 游泳 Chinese learning
- 7 How do you say ride a bicycle in Chinese? 骑自行车 Chinese pronunciation, 骑自行车 Chinese learning
- 8 How do you say hello in Chinese? 你好Chinese pronunciation, 你好Chinese learning
- 9 How do you say thank you in Chinese? 谢谢Chinese pronunciation, 谢谢Chinese learning
- 10 How to say goodbye in Chinese? 再见Chinese pronunciation, 再见Chinese learning


![CoinMiner Malware: What Is It & How to Remove It from your Mac? [Protection Against Virus]](http://www.luping.net/uploads/20250304/174105612967c668816cbd1.jpg174105612967c668816cbd9.jpg)


