We don't need more for the layout part because our application will define only one page.
The implementation of the main page is in the file: src/pages/IndexPage.vue
this is the main page where we will position our text field and the save button.
For this file, we simply remove the Quasar logo from the template (the tag) and modify the script part to use the vueJS 3 composition api, so that the source looks like the following file:
We will now add the text field using the Quasar component QInput
To do this we add the q-input component to the page template:
You can see that the text field is displayed in the center of the screen, this is due to the Quasar flex and flex-center classes. These classes are defined by Quasar: Flexbox. We will fix this by placing the text field at the top of the screen, we will also take advantage of this to style the component.
Quasar even provides us with a Flex Playground to experiment and find the classes to put.
As you can see, we have defined a sentence reference in the script part to store the value entered by the user. It is associated via the v-model directive to the q-input component
We will finish this first part by adding the button allowing the recording of our pronunciation of the word or sentence. For this we will simply use the q-button component of Quasar and position it after our text field.
Note that we added the q-mt-lg class to air out the interface a bit by leaving some space above each component. You can refer to the Quasar documentation on spacing.
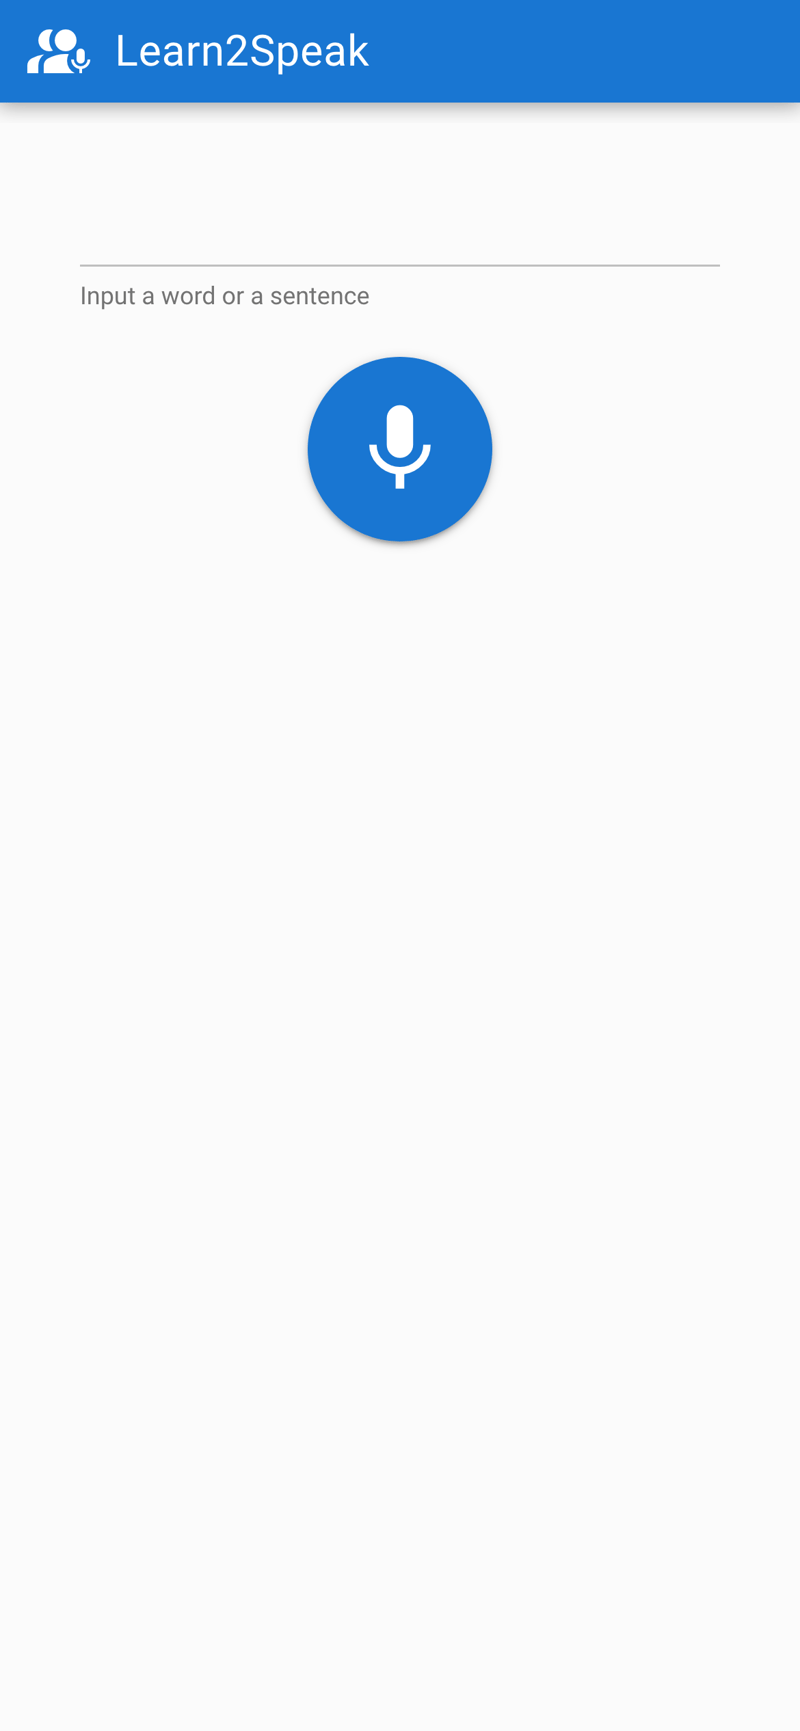
The application will look like:

We have therefore managed to obtain the skeleton of our application.
In a future part we will see how to acquire the audio, then how to obtain a score via the SpeechSuper API
Don't hesite on comments the post ! Part 2 will follow soon !
","image":"http://www.luping.net/uploads/20240828/172485325166cf2c030035a.png","datePublished":"2024-08-28T21:54:10+08:00","dateModified":"2024-08-28T21:54:10+08:00","author":{"@type":"Person","name":"luping.net","url":"https://www.luping.net/articlelist/0_1.html"}}The purpose of this tutorial is to create an application to control the user's pronunciation.
To follow it, you must have knowledge of javascript and more ideally Vue.js 3.
I recently decided to get back to German. The main difficulty I encounter in this language is pronouncing it correctly. Usually I listen to an example, record myself repeating it and listen to myself again. It's a complicated process and I must admit I don't have a very good ear.
Based on this observation, I wondered if there was an App or an API that could tell me if I was pronouncing a word or a sentence correctly in German! After some investigations and great discoveries, I wanted to code my own App to solve my problem.
Here's how I did it!
After some research, I was able to find Apps that solved my problem. But overall, pronunciation validation was often just an additional function of a paid application (or one that worked with a subscription). I then decided to look for APIs.
Here is the list of APIs that do the job :
These APIs are paid but generally allow you to get 2 weeks of access to test and experiment.
Since I wanted to check my pronunciation of German, I chose to test with the SpeechSuper API because it supports several languages including German. Later in the tutorial we will try the Speechace API to demonstrate how easy it is to switch from one API to another depending on your needs.
The goal is to implement a simple App that allows you to enter a word, record your voice, send the audio recording to the API and display your score.
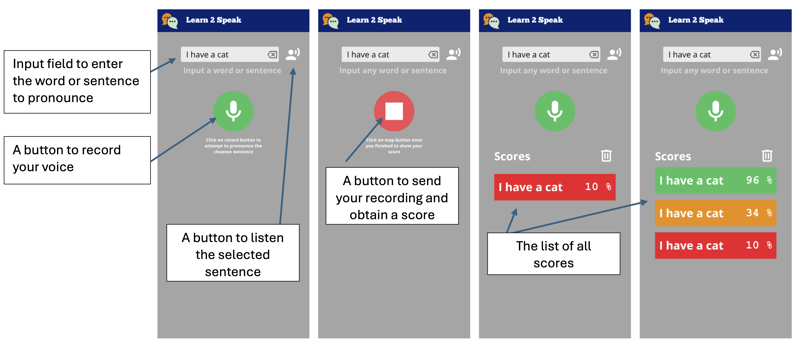
This is what the application will look like:

So we will create an application that will present a text field allowing the entry of a word or a sentence. A button will allow you to listen to it.
We then have a button to record our voice, this one will change style when it is in recording mode. Just click on it to stop and send to the API to obtain a pronunciation score.
Once the score is obtained, it is displayed as a tile with a color representing our score, from red to green to orange.
The ideal would be to be able to deploy the App as a webapp, but also as a native Android application. For this reason we will use Quasar.
Quasar is an open-source Vue.js framework for developing applications with a single codebase. They can be deployed on the web (SPA, PWA, SSR), as a mobile application (Android, iOS) or as a Desktop application (MacOs, Windows, Linux).
If this is not already the case, you need to install NodeJS. The better is to use volta as it will allow you to use differents versions of NodeJs depending on your projects.
We will start by initializing our project with the Quasar scaffolding tool.
npm i -g @quasar/cli
npm init quasar
The cli will ask us several questions, choose the following options :
Options List
Once the command is executed, you can enter the directory and serve the application locally:
cd learn2speak
npm run dev
Your default browser should open the page at the following address http://localhost:9000

The example application is available, we will remove the elements we do not need. To do this we will open the source code in VSCode (you can of course use another editor)
code .
Quasar provides us with the notion of Layout and then of page included in the latter. The pages and the layout are chosen via the router. For this tutorial, we do not need to know these notions, but you can learn them here: Quasar layout
We do not need drawer, at least not for now so we will delete it from the src/layouts/MainLayout.vue file. To do this, delete the section of the included between the
Learn2Speak
We can then remove the entire script part and replace it with the following code:
We don't need more for the layout part because our application will define only one page.
The implementation of the main page is in the file: src/pages/IndexPage.vue
this is the main page where we will position our text field and the save button.
For this file, we simply remove the Quasar logo from the template (the tag) and modify the script part to use the vueJS 3 composition api, so that the source looks like the following file:
We will now add the text field using the Quasar component QInput
To do this we add the q-input component to the page template:
You can see that the text field is displayed in the center of the screen, this is due to the Quasar flex and flex-center classes. These classes are defined by Quasar: Flexbox. We will fix this by placing the text field at the top of the screen, we will also take advantage of this to style the component.
Quasar even provides us with a Flex Playground to experiment and find the classes to put.
As you can see, we have defined a sentence reference in the script part to store the value entered by the user. It is associated via the v-model directive to the q-input component
We will finish this first part by adding the button allowing the recording of our pronunciation of the word or sentence. For this we will simply use the q-button component of Quasar and position it after our text field.
Note that we added the q-mt-lg class to air out the interface a bit by leaving some space above each component. You can refer to the Quasar documentation on spacing.
The application will look like:

We have therefore managed to obtain the skeleton of our application.
In a future part we will see how to acquire the audio, then how to obtain a score via the SpeechSuper API
Don't hesite on comments the post ! Part 2 will follow soon !


Disclaimer: All resources provided are partly from the Internet. If there is any infringement of your copyright or other rights and interests, please explain the detailed reasons and provide proof of copyright or rights and interests and then send it to the email: [email protected] We will handle it for you as soon as possible.
Copyright© 2022 湘ICP备2022001581号-3