Build a Free AI Image Generator with ReactJS
Hi Devs,
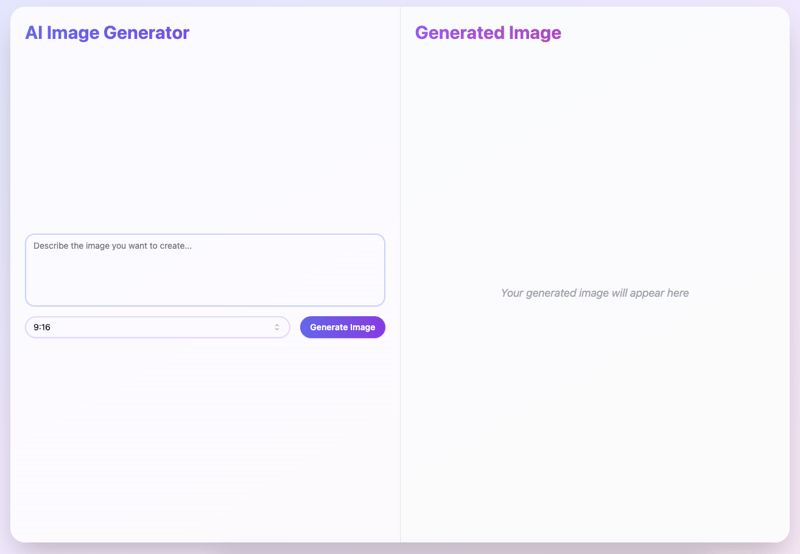
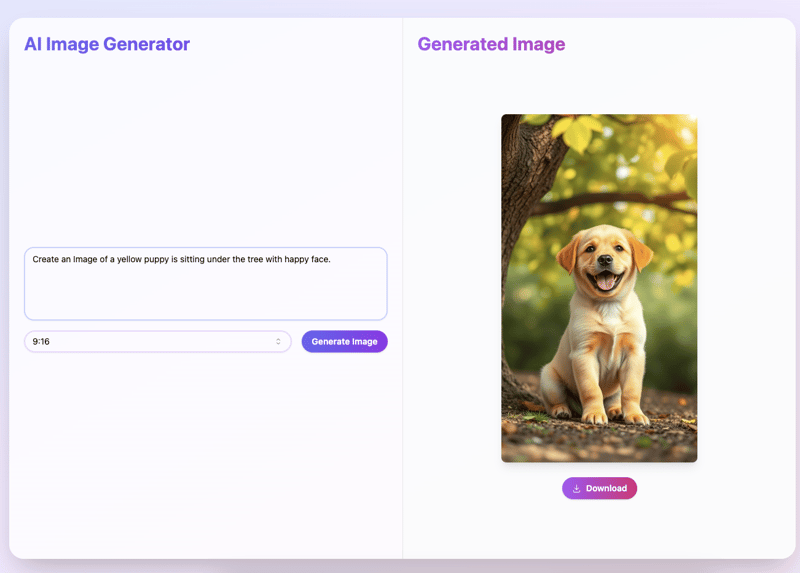
Today, I'm going to show you how to create an image generator using ReactJS, and it's all free to use, thanks to black forest labs and Together AI.
Step 1: Setting Up the Project
For this tutorial, we'll be using Vite to initialize the app and Shadcn for the UI. I'll assume you're already set up the project and installed Shadcn.
Step 2: Intall the Together AI package
We need to install the Together AI package to access the free Flux model for image generation.
Run following command in your terminal
npm i together-ai
Step 3: Building the UI
Now, let's create the UI for our app. Below is the full code for image generator component. it includes a text input for prompts. a dropdown for aspect ratios selection.
Keep in mind, we need to use "black-forest-labs/FLUX.1-schnell-Free" because it's free.
import { useRef, useState } from "react";
import Together from "together-ai";
import { ImagesResponse } from "together-ai";
import { Button } from "@/components/ui/button";
import {
Select,
SelectContent,
SelectItem,
SelectTrigger,
SelectValue,
} from "@/components/ui/select";
import { Textarea } from "@/components/ui/textarea";
import { motion } from "framer-motion";
import { Separator } from "@/components/ui/separator";
import { DownloadIcon } from "@radix-ui/react-icons";
import { save } from "@tauri-apps/plugin-dialog";
import { writeFile } from "@tauri-apps/plugin-fs";
function App() {
const [input, setInput] = useState("");
const [imageUrl, setImageUrl] = useState("");
const [ratio, setRatio] = useState("9:16");
const [isLoading, setIsLoading] = useState(false);
const [downloading, setDownloading] = useState(false);
const imageRef = useRef(null);
const hRatio = ratio.split(":").map(Number)[0];
const vRatio = ratio.split(":").map(Number)[1];
const width = hRatio === 1 ? 512 : hRatio * 64;
const height = vRatio === 1 ? 512 : vRatio * 64;
const together = new Together({
apiKey: import.meta.env.VITE_TOGETHER_API_KEY,
});
const handleGenerateImage = async () => {
setIsLoading(true);
try {
console.log(width, height);
const response: ImagesResponse = await together.images.create({
model: "black-forest-labs/FLUX.1-schnell-Free",
prompt: input,
width: width,
height: height,
// @ts-expect-error response_format is not defined in the type
response_format: "b64_json",
});
const base64Image = response.data[0].b64_json;
const dataUrl = `data:image/png;base64,${base64Image}`;
setImageUrl(dataUrl);
} catch (error) {
console.error("Error generating image:", error);
// You might want to add some error handling UI here
} finally {
setIsLoading(false);
}
};
const handleDownloadImage = async () => {
if (imageUrl) {
setDownloading(true);
try {
// Remove the data URL prefix
const base64Data = imageUrl.replace(/^data:image\/\w ;base64,/, "");
// Convert base64 to binary
const imageBuffer = Uint8Array.from(atob(base64Data), (c) =>
c.charCodeAt(0)
);
// Open a save dialog
const filePath = await save({
filters: [
{
name: "Image",
extensions: ["png"],
},
],
});
if (filePath) {
// Write the file
await writeFile(filePath, imageBuffer);
console.log("File saved successfully");
}
} catch (error) {
console.error("Error saving image:", error);
} finally {
setDownloading(false);
}
}
};
return (
AI Image Generator for "Thảo"
Generated Image
{imageUrl ? (

) : (
Your generated image will appear here
)}
);
}
export default App;


Final Thoughts
With this setup, you now have a simple ReactJS app that can generate and download AI-generated images.
Thanks for reading! If you think this post is interesting, don’t hesitate to give it a like. Happy coding!
-
 Effective checking method for Java strings that are non-empty and non-nullChecking if a String is Not Null and Not EmptyTo determine if a string is not null and not empty, Java provides various methods.Option 1: isEmpty()For...Programming Posted on 2025-07-06
 -
 How can I safely concatenate text and values when constructing SQL queries in Go?Concatenating Text and Values in Go SQL QueriesWhen constructing a text SQL query in Go, there are certain syntax rules to follow when concatenating s...Programming Posted on 2025-07-06
 -
 How Can I Efficiently Read a Large File in Reverse Order Using Python?Reading a File in Reverse Order in PythonIf you're working with a large file and need to read its contents from the last line to the first, Python...Programming Posted on 2025-07-06
 -
 How to Parse JSON Arrays in Go Using the `json` Package?Parsing JSON Arrays in Go with the JSON PackageProblem: How can you parse a JSON string representing an array in Go using the json package?Code Exampl...Programming Posted on 2025-07-06
 -
 PHP Future: Adaptation and InnovationThe future of PHP will be achieved by adapting to new technology trends and introducing innovative features: 1) Adapting to cloud computing, container...Programming Posted on 2025-07-06
 -
 MySQL database method is not required to dump the same instanceCopying a MySQL Database on the Same Instance without DumpingCopying a database on the same MySQL instance can be done without having to create an int...Programming Posted on 2025-07-06
 -
 How to Correctly Use LIKE Queries with PDO Parameters?Using LIKE Queries in PDOWhen trying to implement LIKE queries in PDO, you may encounter issues like the one described in the query below:$query = &qu...Programming Posted on 2025-07-06
 -
 How Can I Handle UTF-8 Filenames in PHP's Filesystem Functions?Handling UTF-8 Filenames in PHP's Filesystem FunctionsWhen creating folders containing UTF-8 characters using PHP's mkdir function, you may en...Programming Posted on 2025-07-06
 -
 Async Void vs. Async Task in ASP.NET: Why does the Async Void method sometimes throw exceptions?Understanding the Distinction Between Async Void and Async Task in ASP.NetIn ASP.Net applications, asynchronous programming plays a crucial role in en...Programming Posted on 2025-07-06
 -
 Tips for floating pictures to the right side of the bottom and wrapping around textFloating an Image to the Bottom Right with Text Wrapping AroundIn web design, it is sometimes desirable to float an image to the bottom right corner o...Programming Posted on 2025-07-06
 -
 The compiler error "usr/bin/ld: cannot find -l" solutionError Encountered: "usr/bin/ld: cannot find -l"When attempting to compile a program, you may encounter the following error message:usr/bin/l...Programming Posted on 2025-07-06
 -
 How to upload files with additional parameters using java.net.URLConnection and multipart/form-data encoding?Uploading Files with HTTP RequestsTo upload files to an HTTP server while also submitting additional parameters, java.net.URLConnection and multipart/...Programming Posted on 2025-07-06
 -
 How to solve the error "Cannot guess file type, use application/octet-stream..." in AppEngine?AppEngine Static File MIME Type OverrideIn AppEngine, static file handlers can occasionally override the correct MIME type, resulting in the error mes...Programming Posted on 2025-07-06
 -
 How Can I Execute Multiple SQL Statements in a Single Query Using Node-MySQL?Multi-Statement Query Support in Node-MySQLIn Node.js, the question arises when executing multiple SQL statements in a single query using the node-mys...Programming Posted on 2025-07-06
 -
 CSS strongly typed language analysisOne of the ways you can classify a programming language is by how strongly or weakly typed it is. Here, “typed” means if variables are known at compil...Programming Posted on 2025-07-06
Study Chinese
- 1 How do you say "walk" in Chinese? 走路 Chinese pronunciation, 走路 Chinese learning
- 2 How do you say "take a plane" in Chinese? 坐飞机 Chinese pronunciation, 坐飞机 Chinese learning
- 3 How do you say "take a train" in Chinese? 坐火车 Chinese pronunciation, 坐火车 Chinese learning
- 4 How do you say "take a bus" in Chinese? 坐车 Chinese pronunciation, 坐车 Chinese learning
- 5 How to say drive in Chinese? 开车 Chinese pronunciation, 开车 Chinese learning
- 6 How do you say swimming in Chinese? 游泳 Chinese pronunciation, 游泳 Chinese learning
- 7 How do you say ride a bicycle in Chinese? 骑自行车 Chinese pronunciation, 骑自行车 Chinese learning
- 8 How do you say hello in Chinese? 你好Chinese pronunciation, 你好Chinese learning
- 9 How do you say thank you in Chinese? 谢谢Chinese pronunciation, 谢谢Chinese learning
- 10 How to say goodbye in Chinese? 再见Chinese pronunciation, 再见Chinese learning


