 Front page > Software tutorial > You Should Make Your Apple ID Recoverable Right Now, It Only Takes 5 Minutes
You Should Make Your Apple ID Recoverable Right Now, It Only Takes 5 Minutes
Your Apple ID is an account that’s worth guarding at all costs. Here are some simple steps you can take to secure it and make sure you can quickly recover it if the worst happens.
Why You Should Do This
Let’s suppose for a moment that you lose access to your Apple ID. This could be as part of a deliberate attack or due to you not having access to your password or a trusted device. Remember that two-factor authentication requires that you not only know your password but also provide a code to log in.
Suddenly, you lose access to any data you depend on in iCloud. This includes your iCloud Photos, Notes, Reminders, and iCloud Drive contents. You can’t make FaceTime calls or partake in iMessage conversations if you’re unable to log in. If you use an iCloud email account then your email is also out of action.
Apple has a process called Account Recovery that is designed for use by anyone who has set up two-factor authentication. The process requires a waiting period of around 72 hours and even requires that you avoid using devices connected to your Apple ID while you wait.
Though there are methods that Apple can use to speed up the process (like verifying payment information), this is less than ideal particularly if you use your account for work purposes. Setting up a recovery contact or generating a recovery key offers a way to expedite or bypass this process entirely.
This is enough to get you back up and running quickly if something goes wrong with your account.
Set Up a Recovery Contact
A recovery contact is someone that you nominate to verify your identity if you somehow lose access to your account. They can generate a six-digit code that you can use as part of the account recovery process to verify your identity.
The idea is that a recovery contact will know that you are indeed the person who owns the account. These people should only share this code if they are certain of your identity, so this works best either over the phone or ideally in person.

Since phone numbers and accounts can be hijacked, this process should not take place over SMS or other instant messaging protocols. You should be sure that the person understands this before you add them as a recovery contact so that the code isn’t given out in error.
A recovery contact won’t have access to your account or any of the data within. Their purpose here is to verify your identity should you ask them for a recovery code. They should always refuse to provide the code if they have any doubts.
To set up a recovery contact on an iPhone:
- Launch Settings on your iPhone.
- Tap on your name then select Sign-In & Security > Account Recovery.
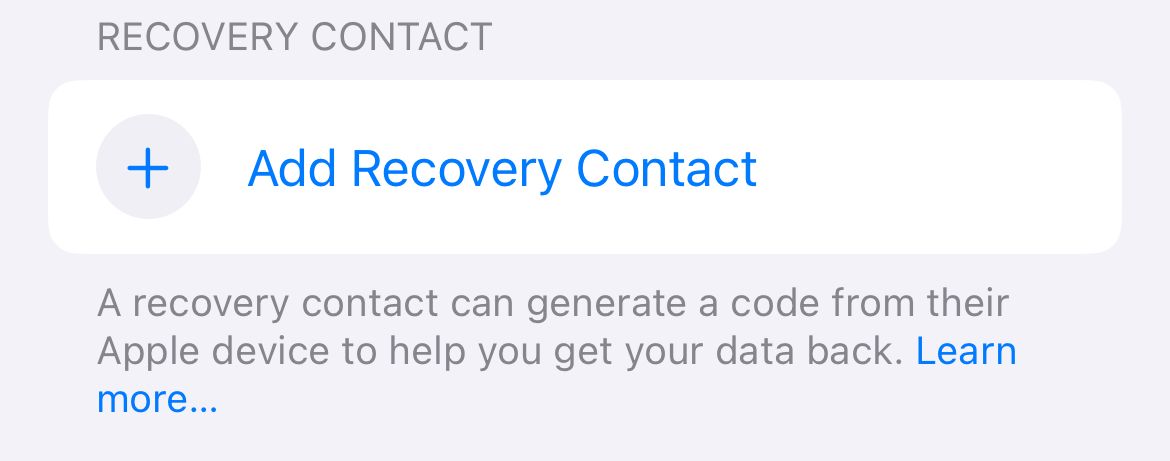
- Tap “ Add Recovery Contact” and then tap the “Add Recovery Contact” button in the pop-up and authenticate with Face ID or Touch ID.
- Account Recovery will check to see if you have any outdated devices that need updating or removing from your account (see note below).
- Nominate a contact you would like to use. Family Sharing groups will automatically suggest family members, who will automatically be added, whereas standard contacts will need to accept the request.
- Wait for your contact to accept the request, after which you will see them appear in the Settings > Sign-In & Security > Account Recovery menu.
You can also set up an Apple ID recovery contact on an iPad or a Mac.
Some older devices may need to be updated or removed from your account because they fall short of the minimum required iOS feature to use this. Account Recovery will notify you of your options and whether you need to update an old device or remove it altogether.
Recovering Your Account With the Help of a Recovery Contact
Should you lose access to your account, you can get a code from your recovery contact:
- Follow the instructions on-screen or at iforgot.apple.com to start the recovery process.
- Reach out to your recovery contact either by phone or in person and tell them you need to recover your Apple ID.
- Have them navigate to (System) Settings > Name > Sign-In & Security > Account Recovery.
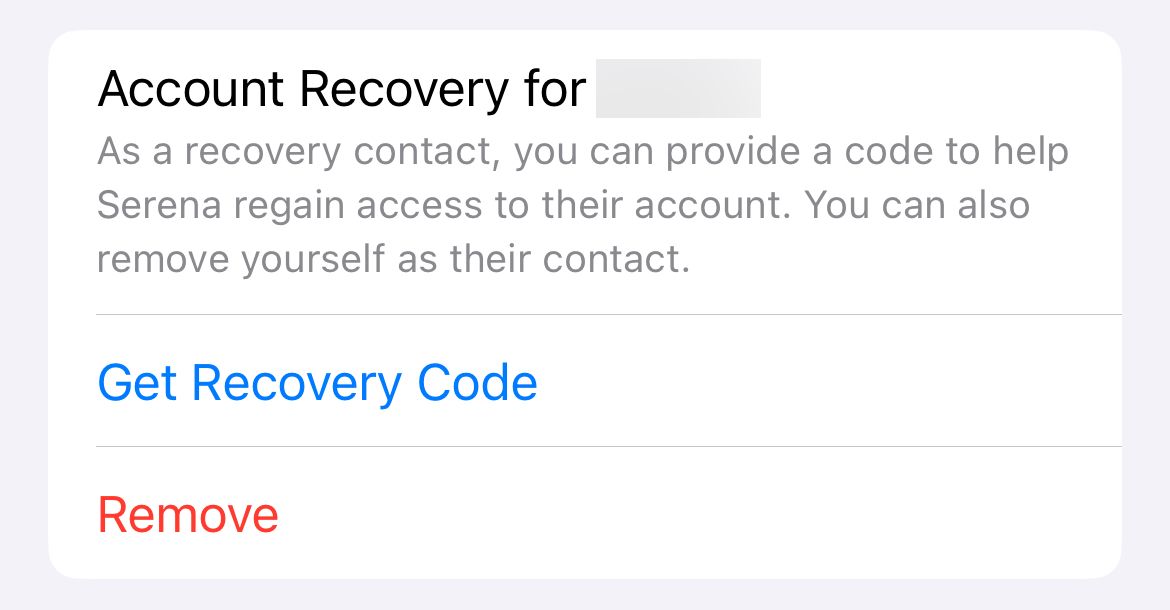
- Your name should be in the “Account Recovery For” section at the bottom of the screen.
- Ask them to tap on your name and use the “Get Recovery Code” button.

Recovery contacts need to have an Apple device running iOS 15, iPadOS 15, or macOS Monterey or later. They will need to be using two-factor authentication and have a passcode or password on their device. They also need to be over the age of 13.
Set Up a Recovery Key
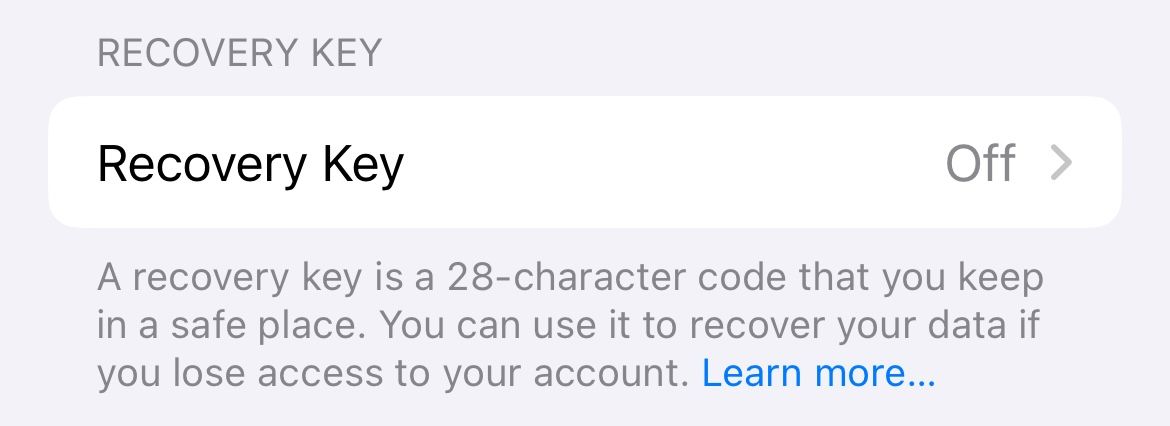
If you don’t want to use a recovery contact, you can opt instead to use a recovery key. This is a 28-character code that disables Apple’s standard Account Recovery process entirely. The only way to recover your account when you go this route is with another trusted device or your 28-character code.
This has the benefit of leaving you less exposed to social engineering attacks. For example, if an attacker manages to convince Apple or your recovery contact that they are you, your account could be compromised (admittedly, this is unlikely to happen).

It also places all of the responsibility for your account recovery in your hands. You can put copies of your 28-character code in multiple locations, but you should be sure to keep them safe.
If you lose your key and access to your account via a trusted device, you won’t be able to recover your Apple ID. If you’re concerned that this is a real possibility, we’d recommend the Recovery Contact method (above) instead.
To set up a recovery key:
- Launch Settings on an iPhone or iPad or System Settings on a Mac.
- Select your name followed by Sign-in and Security > Account Recovery.
- Tap Recovery Key > Use Recovery Key (iPhone and iPad) or click “Manage” on a Mac.
- Authenticate with your device passcode or password.
- Record the recovery key displayed on the screen.
- Confirm your recovery key to turn the feature on.
You can print your passcode and store it in a secure location, like a safe or a locked briefcase. You can give copies to trusted friends and family. You could put it in a text file on a USB flash drive and keep it in a drawer. You could tattoo it on the bottom of your foot (but we wouldn’t recommend it).
One thing you should definitely not do is store it in a location that might become hard to access if you lose access to your account. So don’t put it in your Apple Notes, in a document stored on iCloud Drive, in an email sent to your iCloud Mail address, and so on.
We’d also recommend obfuscating the true nature of the code. Perhaps don’t store it with a label saying exactly what it is, just in case someone finds it.
Just In Case
The good news is that with two-factor authentication enabled and good password practices, you’ll probably never need to recover your Apple ID. If you have more than one trusted device (like a Mac and an iPhone) you already have a failsafe way of getting access to your account should you need it.
Then again, you can never be too careful when securing your accounts.
-
 How to delete duplicate photos on Mac?Digital clutter is a common problem, especially with photos. Most people take numerous shots from similar angles, leading to a proliferation of dupli...Software tutorial Posted on 2025-05-02
 -
 Recommended Best Solar Chargers in 2025Whether you often camp off the grid, go backpacking, or grapple with power outages, a solar charger is a nifty gadget to have in your arsenal. It can ...Software tutorial Posted on 2025-05-02
 -
 The ultimate guide to resetting your phone without losing dataRejuvenate Your Smartphone: A Guide to Factory Resets Remember that initial thrill of powering on your new phone? That pristine interface, lightning-...Software tutorial Posted on 2025-05-01
 -
 7 practical tips for Apple's new version of Messages applicationiMessage's Hidden Gems: Mastering iOS 16's Enhanced Messaging Features iMessage, Apple's secure messaging platform, has evolved significan...Software tutorial Posted on 2025-05-01
 -
 How to hide yourself on social platforms such as Instagram, Facebook, XMaintaining online privacy on social media is crucial, even for close friends and family. You might want to limit access to prevent unwanted attentio...Software tutorial Posted on 2025-05-01
 -
 A simple tutorial on how to fax files on your phoneSome organizations still don't accept documents via email—you may need to fax documents instead. No, you can't use your smartphone's phon...Software tutorial Posted on 2025-04-29
 -
 How to delete temporary Mac files? Find and clear methodsClearing Temporary Files on Your Mac: Reclaim Disk Space and Boost Performance Temporary files, often overlooked, can consume significant disk space o...Software tutorial Posted on 2025-04-29
 -
 Is the volume stuck at 100% in Windows? Try these solutionsWindows volume stuck at 100%? Easy to fix! Computer volume issues are a headache! If your Windows volume is stuck at 100%, don't worry, this Min...Software tutorial Posted on 2025-04-29
 -
 How to delete your data from a person search siteThis article was last updated on February 24, 2025. Many people are unaware that a significant amount of their personal data is readily accessible on...Software tutorial Posted on 2025-04-21
 -
 How to disguise an iPad as a laptopThis updated article (originally published October 31, 2019) explores how to transform your iPad into a laptop alternative using iPadOS 16 beta featur...Software tutorial Posted on 2025-04-21
 -
 How to clean Mac mailbox cache? How to delete it on Mac?This guide explains how to clear the Mail cache on your Mac, addressing common issues like slow performance and email loading problems. The macOS Mai...Software tutorial Posted on 2025-04-21
 -
 How to prioritize the allocation of WiFi to the most needed devicesModern homes usually have multiple devices connected to Wi-Fi access networks simultaneously, which often leads to bandwidth tightness, especially w...Software tutorial Posted on 2025-04-19
 -
 McAfee antivirus software review: Is it enough? 【Function, Price】McAfee: A Veteran Antivirus, But Is It the Best for Macs? McAfee, a long-standing and reputable name in cybersecurity, offers a robust antivirus suite...Software tutorial Posted on 2025-04-19
 -
 OnePlus Watch 3 is postponed to April due to funny issuesAfter the long-awaited OnePlus Watch 3 smartwatch is released, the purchase plan may require a slight adjustment. A ridiculous production problem has...Software tutorial Posted on 2025-04-19
 -
 Tips to make the most of the tap function on the back of your iPhoneOver the years, Apple has developed a large number of tools to make using iPhones more convenient. Although the "Tap Back" feature is dull,...Software tutorial Posted on 2025-04-18
Study Chinese
- 1 How do you say "walk" in Chinese? 走路 Chinese pronunciation, 走路 Chinese learning
- 2 How do you say "take a plane" in Chinese? 坐飞机 Chinese pronunciation, 坐飞机 Chinese learning
- 3 How do you say "take a train" in Chinese? 坐火车 Chinese pronunciation, 坐火车 Chinese learning
- 4 How do you say "take a bus" in Chinese? 坐车 Chinese pronunciation, 坐车 Chinese learning
- 5 How to say drive in Chinese? 开车 Chinese pronunciation, 开车 Chinese learning
- 6 How do you say swimming in Chinese? 游泳 Chinese pronunciation, 游泳 Chinese learning
- 7 How do you say ride a bicycle in Chinese? 骑自行车 Chinese pronunciation, 骑自行车 Chinese learning
- 8 How do you say hello in Chinese? 你好Chinese pronunciation, 你好Chinese learning
- 9 How do you say thank you in Chinese? 谢谢Chinese pronunciation, 谢谢Chinese learning
- 10 How to say goodbye in Chinese? 再见Chinese pronunciation, 再见Chinese learning


