5 Fixes for “Can’t Save IP Settings” Error on Windows
Fix 1: Try Changing IP Settings From the Control Panel
Using the Settings app isn’t the only way to change the IP settings on Windows. So, if you keep encountering the “Can’t save IP settings, check one or more settings and try again” error, try changing the IP settings from the Control Panel.
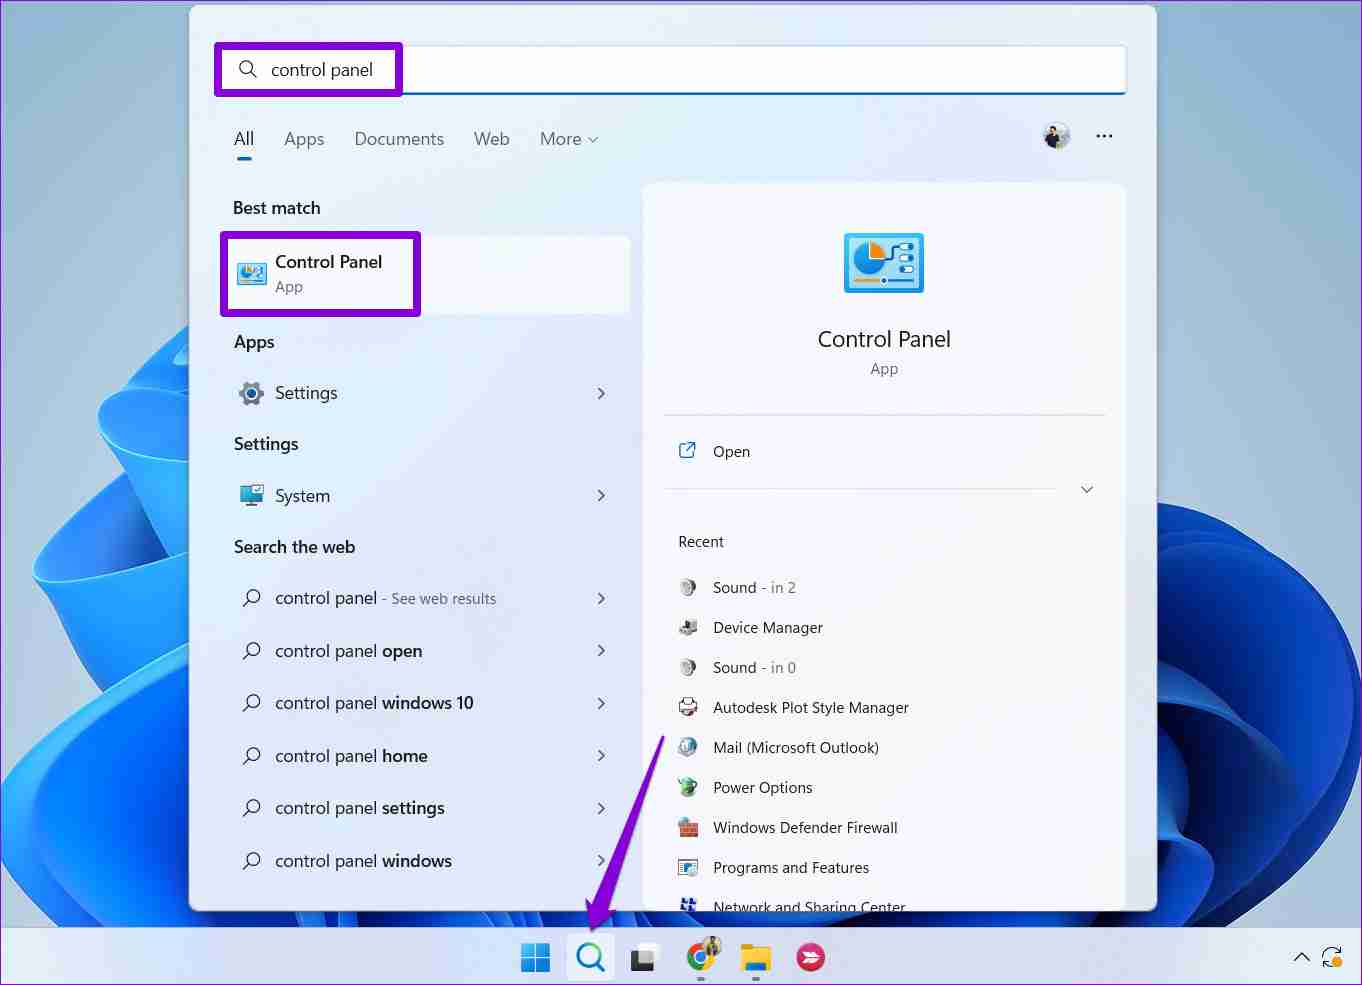
Step 1: Click the magnifying icon on the taskbar to open the search menu. Type control in the box and press Enter.
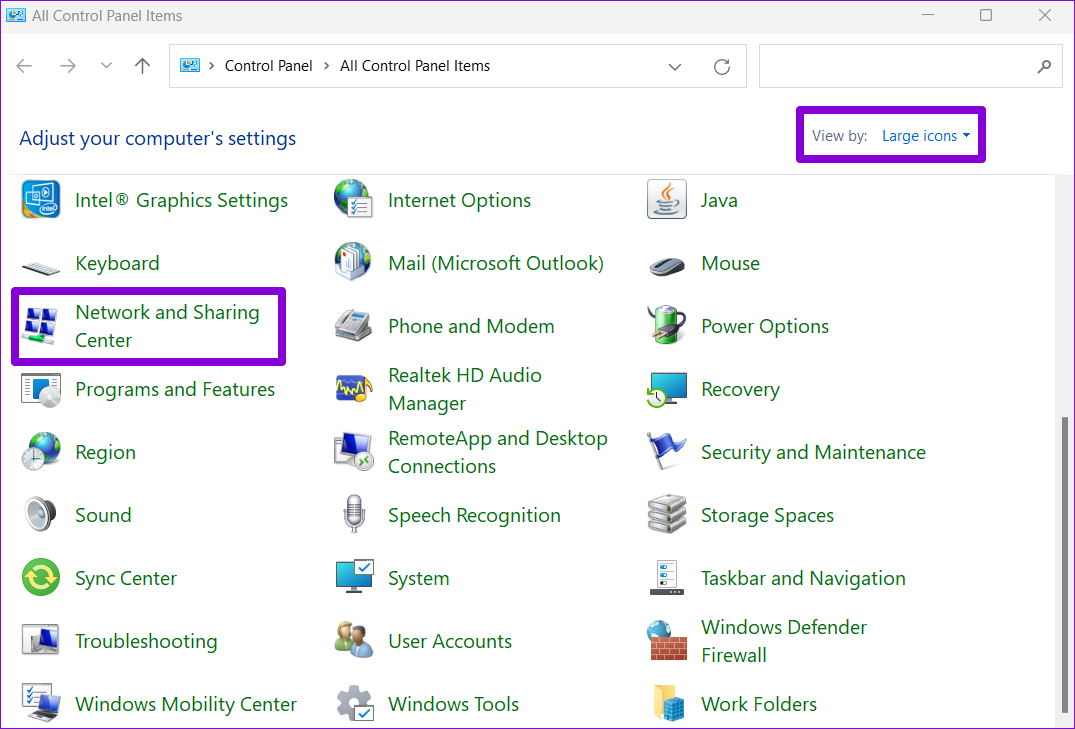
Step 2: Change the view type to Large icons and select Network and Sharing Center.
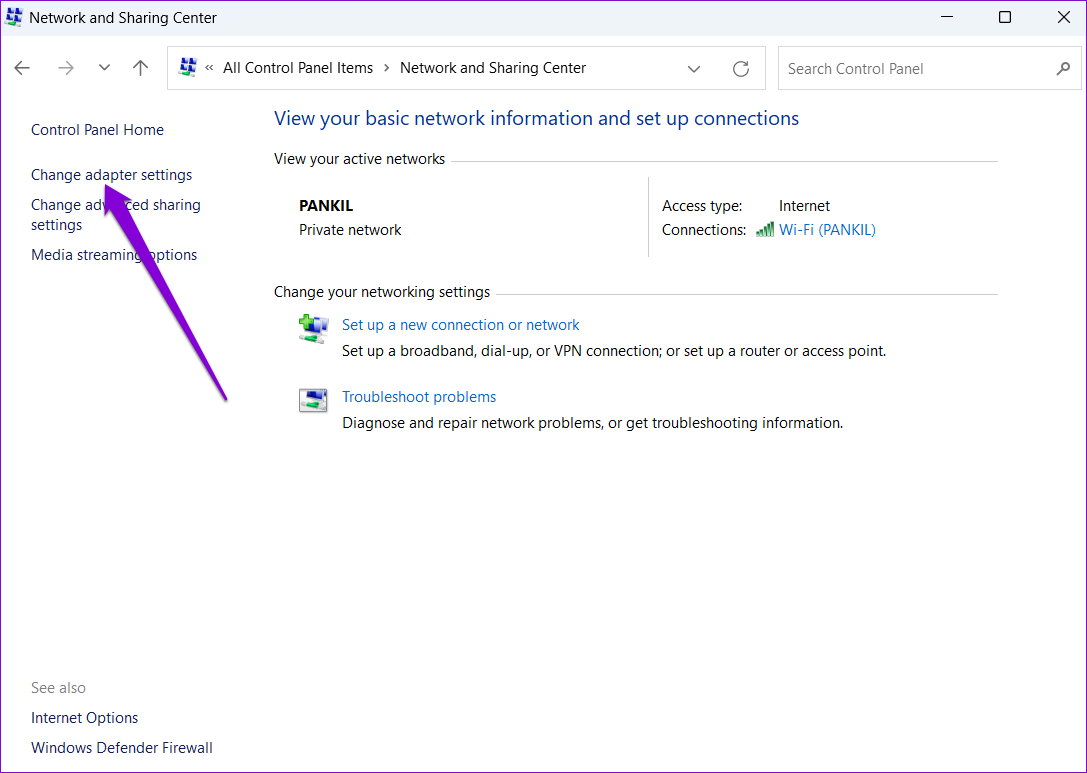
Step 3: Click Change adapter settings in the left pane.
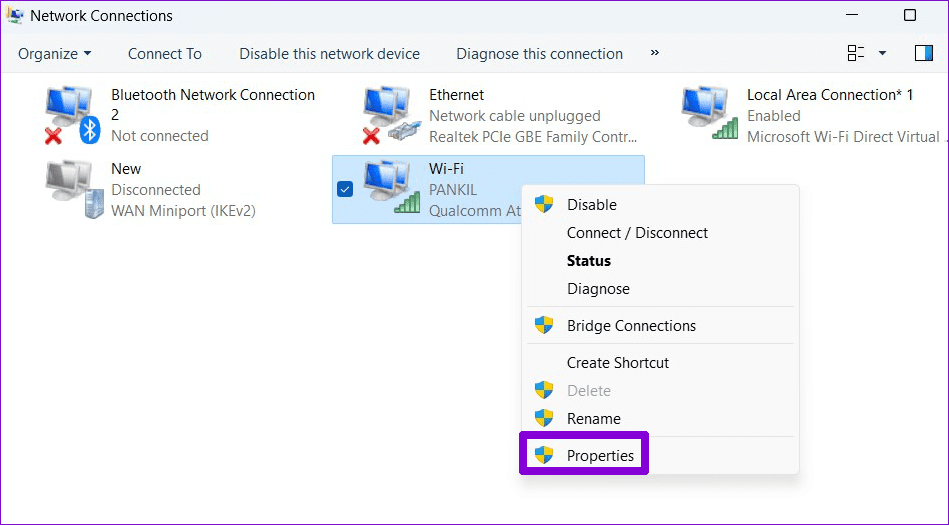
Step 4: Right-click on your network connection and select Properties.
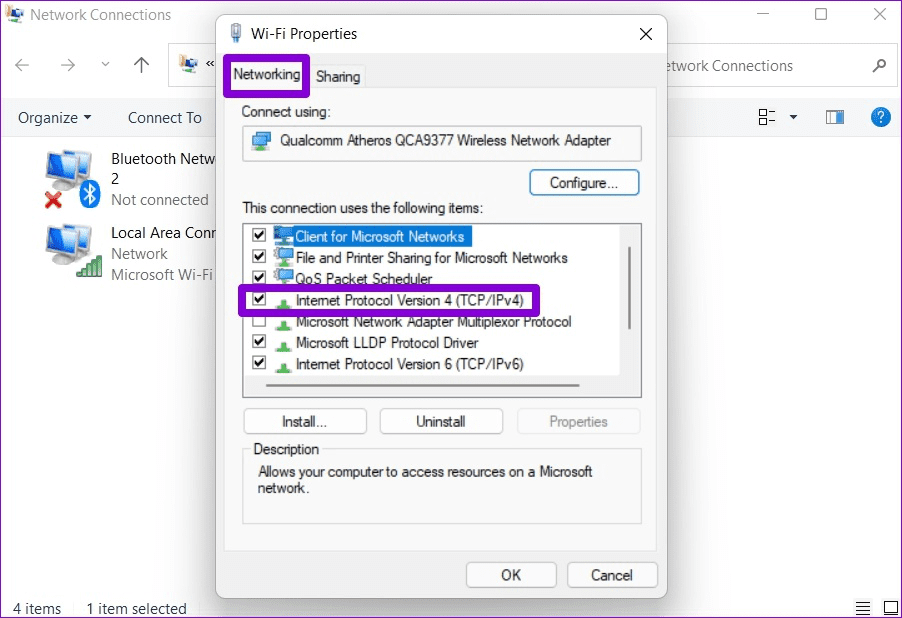
Step 5: Under the Networking tab, double-click the Internet Protocol Version 4 (TCP/IPv4) option.
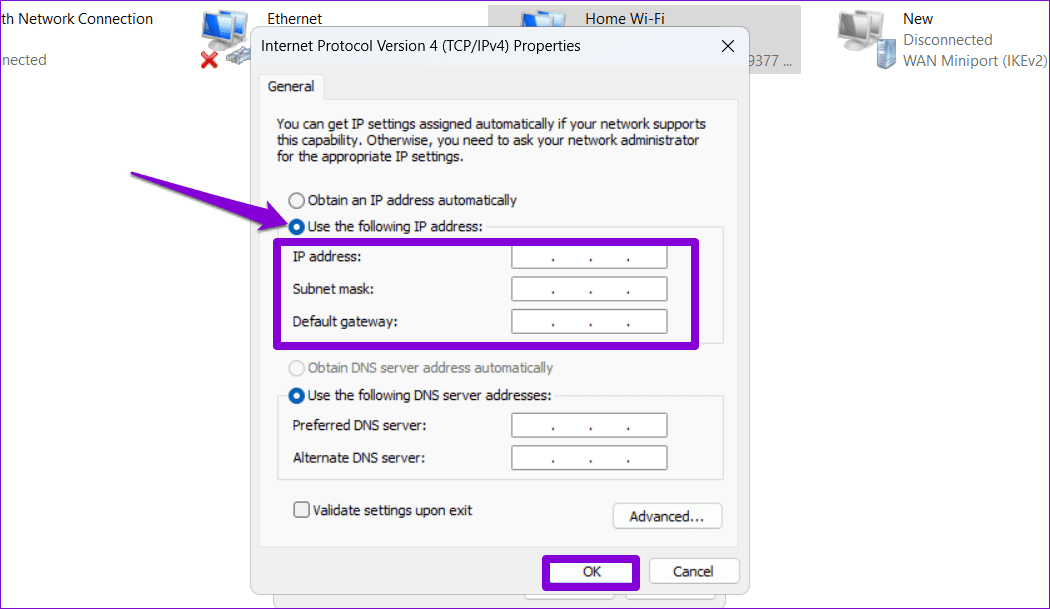
Step 6: Select the Use the following IP address option. Then, enter the IP address, subnet mask, and default gateway. Enter preferred and alternate DNS servers, or leave them empty and click OK.
Fix 2: Reset TCP/IP
Your Windows PC relies on the Transmission Control Protocol and Internet Protocol (TCP/IP) to transmit and receive digital data from other machines on the network. If there’s a problem with the TCP/IP, you may have trouble changing the IP settings.
So, if you can’t save IP or DNS settings, even from the Control Panel, you may need to reset the TCP/IP stack.
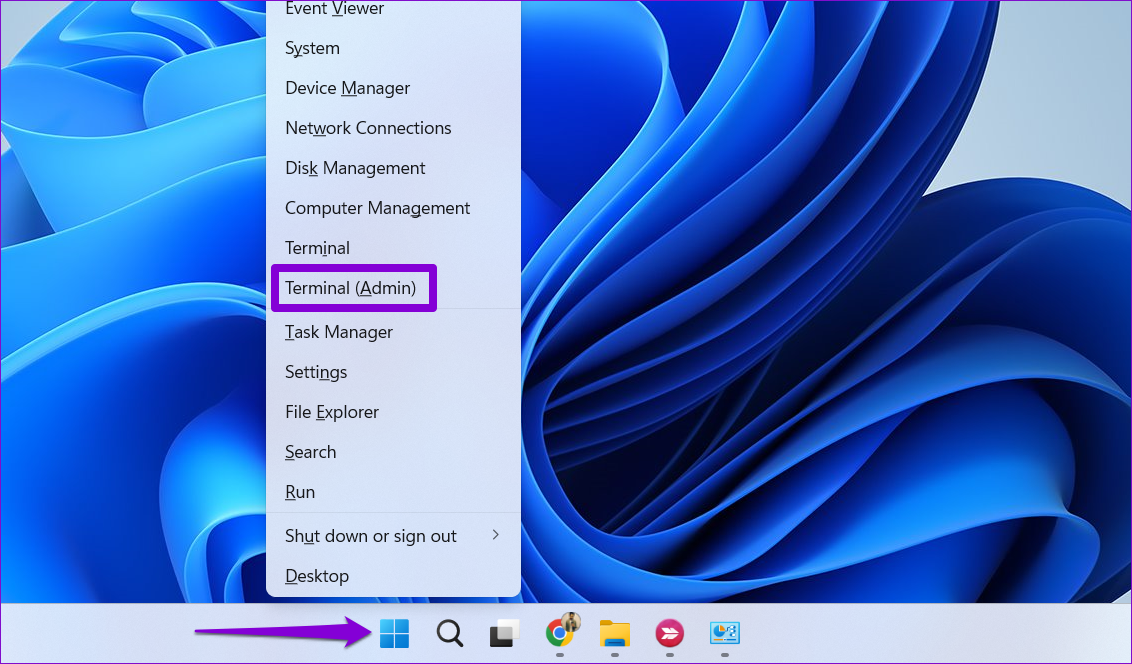
Step 1: Right-click on the Start icon and select Terminal (Admin) from the list.
Step 2: Run the following commands in the console and press Enter after each one:
netsh winsock reset
netsh int ip reset
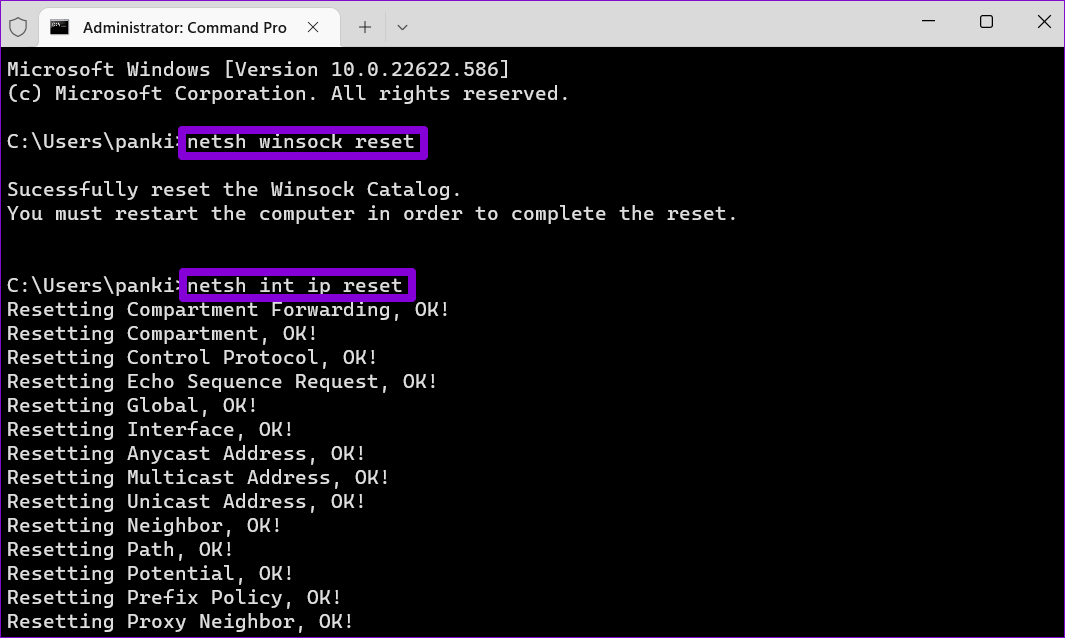
Restart your PC after running the above commands and check if the issue is still there.
Fix 3: Disable Proxy Server or VPN
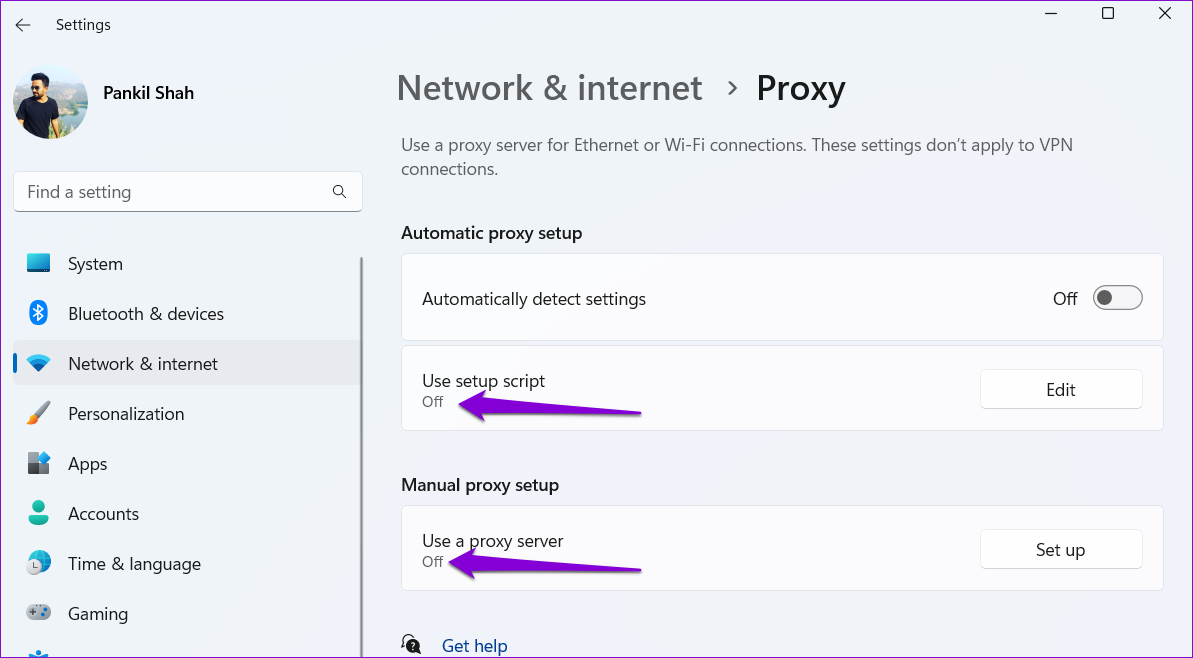
Using a proxy server on Windows can also result in the ‘Can’t save IP settings’ error on your Windows 10 or 11 PC. Turning off the proxy server should solve the problem if that’s the case.
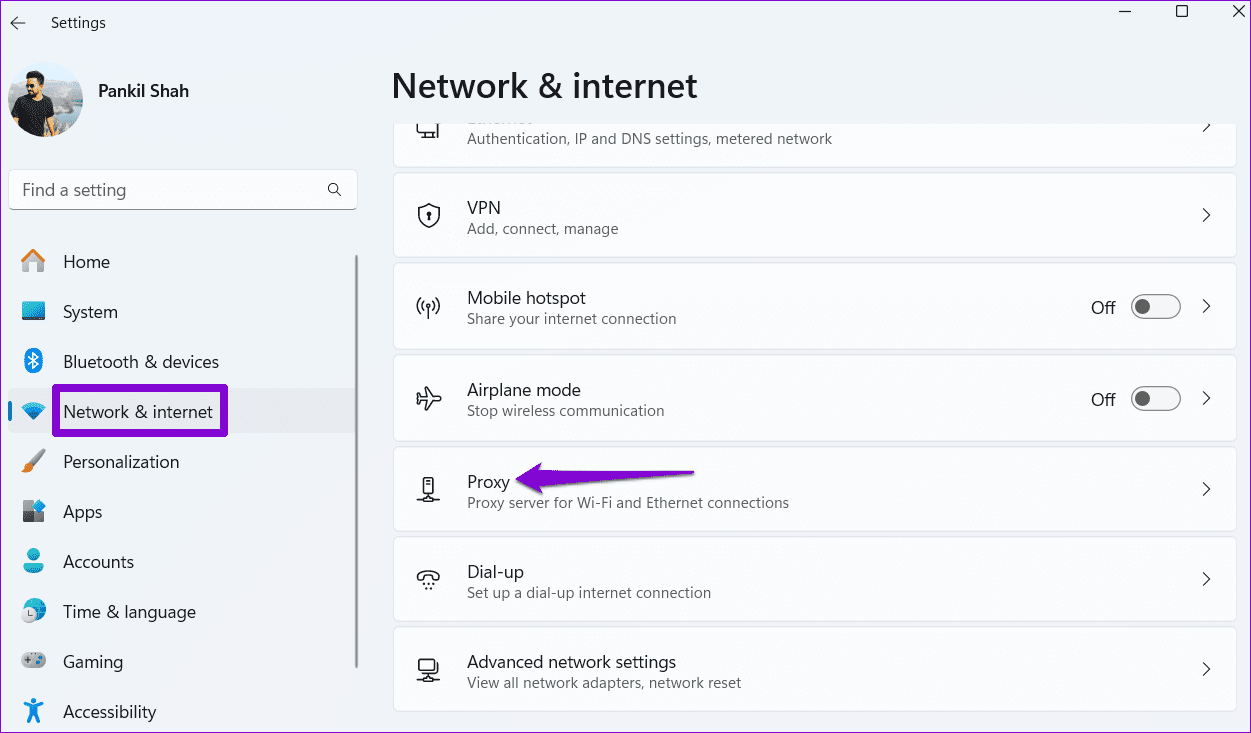
Step 1: Press the Windows I keyboard shortcut to launch the Settings app. Switch to the Network & internet tab and select Proxy.
Step 2: Make sure proxy settings are turned off.
Similarly, if you are using a VPN service on Windows, try turning it off and then try changing IP settings.
Fix 4: Flush DNS Cache
Another reason you may be unable to change the IP settings is due to corrupt or inaccessible DNS cache data. You can try clearing the existing DNS cache on Windows to see if that helps. Here are the steps for the same.
Step 1: Right-click on the Start icon and select Terminal (Admin) from the list.
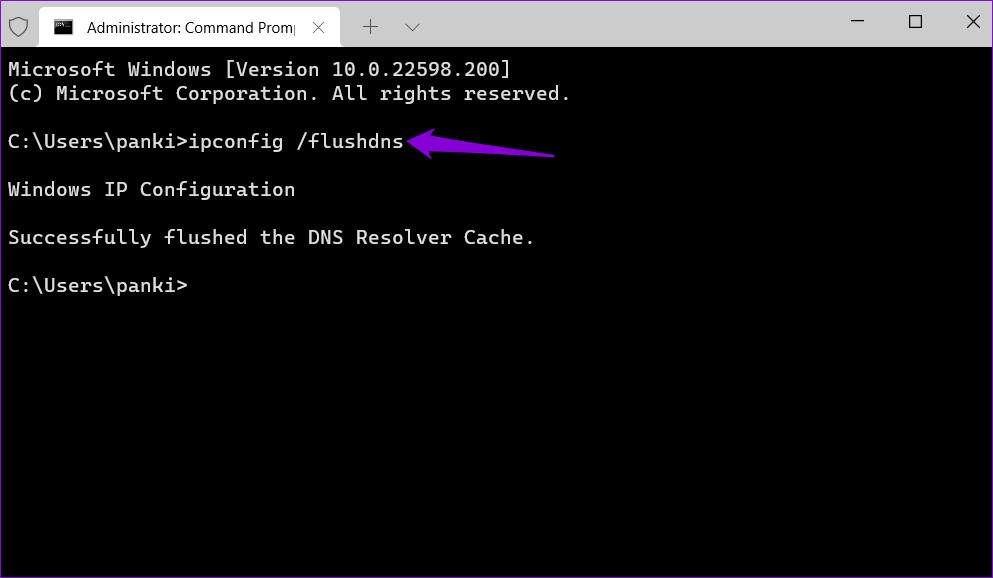
Step 2: In the console, type the command shown below and press Enter.
ipconfig /flushdns
Fix 5: Reset Network Settings
If none of the previous solutions work, resetting the network settings on Windows may be your best option. Note that this will erase all of your saved Wi-Fi networks, paired Bluetooth devices, and other network settings. If you are okay with that, use these steps to reset network settings on Windows:
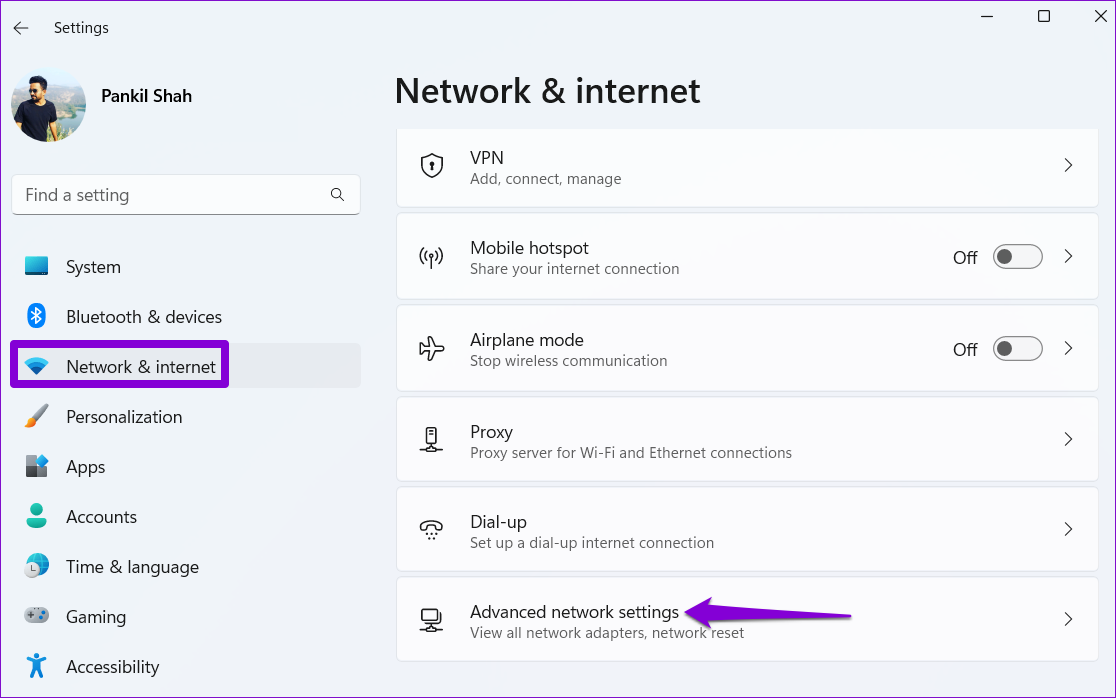
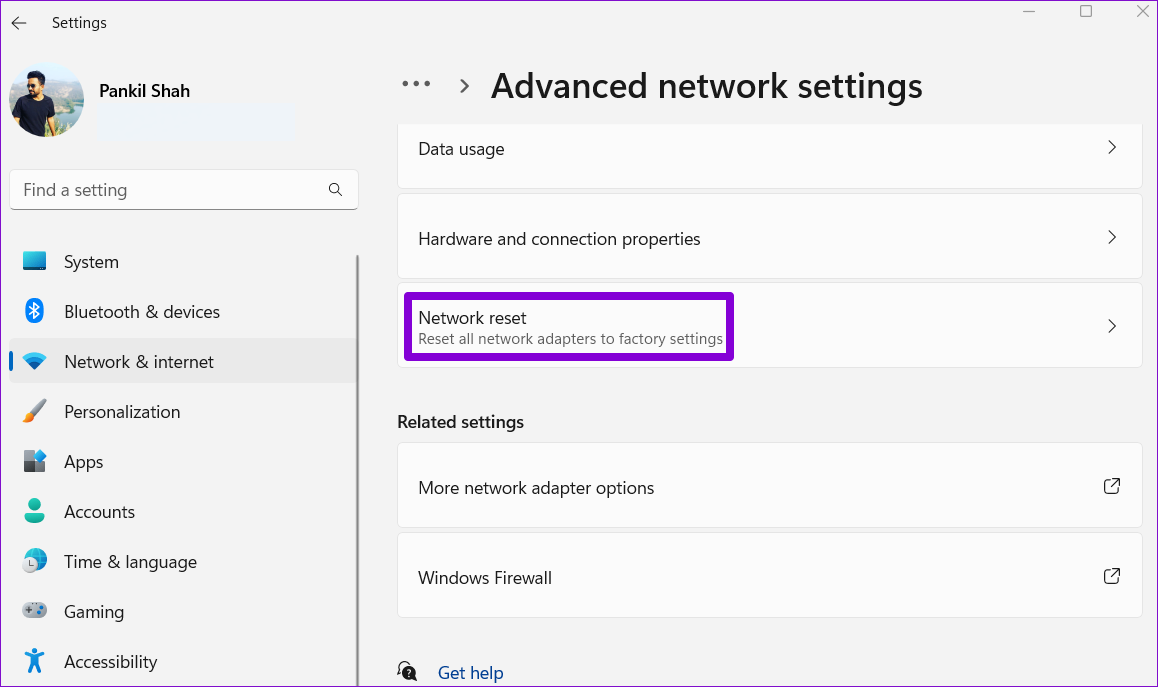
Step 1: Press the Windows key I to open the Settings app. Select the Network & internet tab on your left and click on Advanced network settings.
Step 2: Under More settings, click on Network reset.
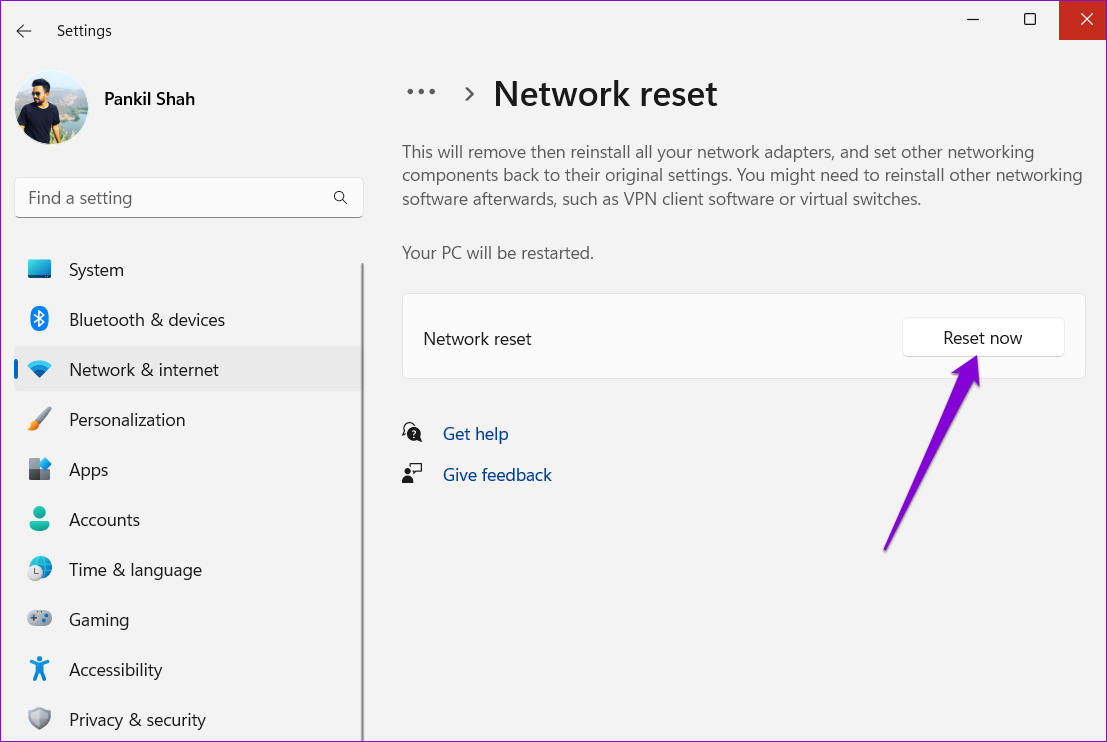
Step 3: Click the Reset now button next to Network reset.
-
 How to delete your data from a person search siteThis article was last updated on February 24, 2025. Many people are unaware that a significant amount of their personal data is readily accessible on...Software tutorial Posted on 2025-04-21
 -
 How to disguise an iPad as a laptopThis updated article (originally published October 31, 2019) explores how to transform your iPad into a laptop alternative using iPadOS 16 beta featur...Software tutorial Posted on 2025-04-21
 -
 How to clean Mac mailbox cache? How to delete it on Mac?This guide explains how to clear the Mail cache on your Mac, addressing common issues like slow performance and email loading problems. The macOS Mai...Software tutorial Posted on 2025-04-21
 -
 How to prioritize the allocation of WiFi to the most needed devicesModern homes usually have multiple devices connected to Wi-Fi access networks simultaneously, which often leads to bandwidth tightness, especially w...Software tutorial Posted on 2025-04-19
 -
 McAfee antivirus software review: Is it enough? 【Function, Price】McAfee: A Veteran Antivirus, But Is It the Best for Macs? McAfee, a long-standing and reputable name in cybersecurity, offers a robust antivirus suite...Software tutorial Posted on 2025-04-19
 -
 OnePlus Watch 3 is postponed to April due to funny issuesAfter the long-awaited OnePlus Watch 3 smartwatch is released, the purchase plan may require a slight adjustment. A ridiculous production problem has...Software tutorial Posted on 2025-04-19
 -
 Tips to make the most of the tap function on the back of your iPhoneOver the years, Apple has developed a large number of tools to make using iPhones more convenient. Although the "Tap Back" feature is dull,...Software tutorial Posted on 2025-04-18
 -
 Quickly get Windows 11 24H2 updates, skip the waiting queueIn the comprehensive guide, MiniTool will walk you through how to bypass Windows 11 24H2 waiting line using Group Policy and Registry. Take action if ...Software tutorial Posted on 2025-04-18
 -
 Tips for using mobile phone hotspots: How to avoid the surge in data trafficUsing your phone as a hotspot for your laptop on the go is convenient, but laptops are data hogs. Unlike phones, which prioritize Wi-Fi for tasks like...Software tutorial Posted on 2025-04-18
 -
 Which one is better compared to iPhone and Android?Choosing between iOS and Android: A Detailed Comparison The mobile phone market is dominated by two major players: iOS and Android. Both boast millio...Software tutorial Posted on 2025-04-17
 -
 Safari slows down on Mac? The secret to speeding up safari!Safari browser runs slowly? A must-see guide to acceleration for Mac users! Safari is one of the fastest browsers on Mac, but it is also not complete...Software tutorial Posted on 2025-04-17
 -
 I thought I would never need a wallet until this happenedYou’re in a nice restaurant with your beloved; perhaps both of you are enjoying a lovely steak. After a while, you raise your hand and ask the waiter ...Software tutorial Posted on 2025-04-17
 -
 Comparison between McAfee and MacKeeper: Which one is better? How to choose antivirus software?Choosing the right cybersecurity solution for your Mac can be tricky. This comparison of McAfee and MacKeeper helps you decide between a well-establi...Software tutorial Posted on 2025-04-17
 -
 7 security communication apps you should useChoosing a messaging app often boils down to what your contacts use, overlooking a crucial factor: security. We share incredibly sensitive informatio...Software tutorial Posted on 2025-04-17
 -
 The ultimate guide to how to label any websiteBeyond Static: Annotating Web Pages with Ease The web shouldn't be a static experience. With the right tools, you can actively engage with websit...Software tutorial Posted on 2025-04-17
Study Chinese
- 1 How do you say "walk" in Chinese? 走路 Chinese pronunciation, 走路 Chinese learning
- 2 How do you say "take a plane" in Chinese? 坐飞机 Chinese pronunciation, 坐飞机 Chinese learning
- 3 How do you say "take a train" in Chinese? 坐火车 Chinese pronunciation, 坐火车 Chinese learning
- 4 How do you say "take a bus" in Chinese? 坐车 Chinese pronunciation, 坐车 Chinese learning
- 5 How to say drive in Chinese? 开车 Chinese pronunciation, 开车 Chinese learning
- 6 How do you say swimming in Chinese? 游泳 Chinese pronunciation, 游泳 Chinese learning
- 7 How do you say ride a bicycle in Chinese? 骑自行车 Chinese pronunciation, 骑自行车 Chinese learning
- 8 How do you say hello in Chinese? 你好Chinese pronunciation, 你好Chinese learning
- 9 How do you say thank you in Chinese? 谢谢Chinese pronunciation, 谢谢Chinese learning
- 10 How to say goodbye in Chinese? 再见Chinese pronunciation, 再见Chinese learning


