5 Ways to Fix Memory Integrity Errors on Windows 11
Are you seeing the Memory integrity is off message in Windows Security and are unable to enable it because its toggle is grayed out? Having this feature disabled means that your system is at a risk of being invaded by malware. Read along to know what's causing this problem and how you can fix it.
What Causes Memory Integrity Errors on Windows
Memory integrity is a virtualization-based security feature that safeguards your computer against malware that tries to exploit the Windows kernel. You can turn it on or off in the Core isolation section of the Windows Security app. Open the Windows Security app, click the "Device Security" tab on the left, and scroll to Core Isolation.
Sometimes, the memory integrity toggle may appear grayed out with a message stating, "Memory integrity is off. Your device may be vulnerable."
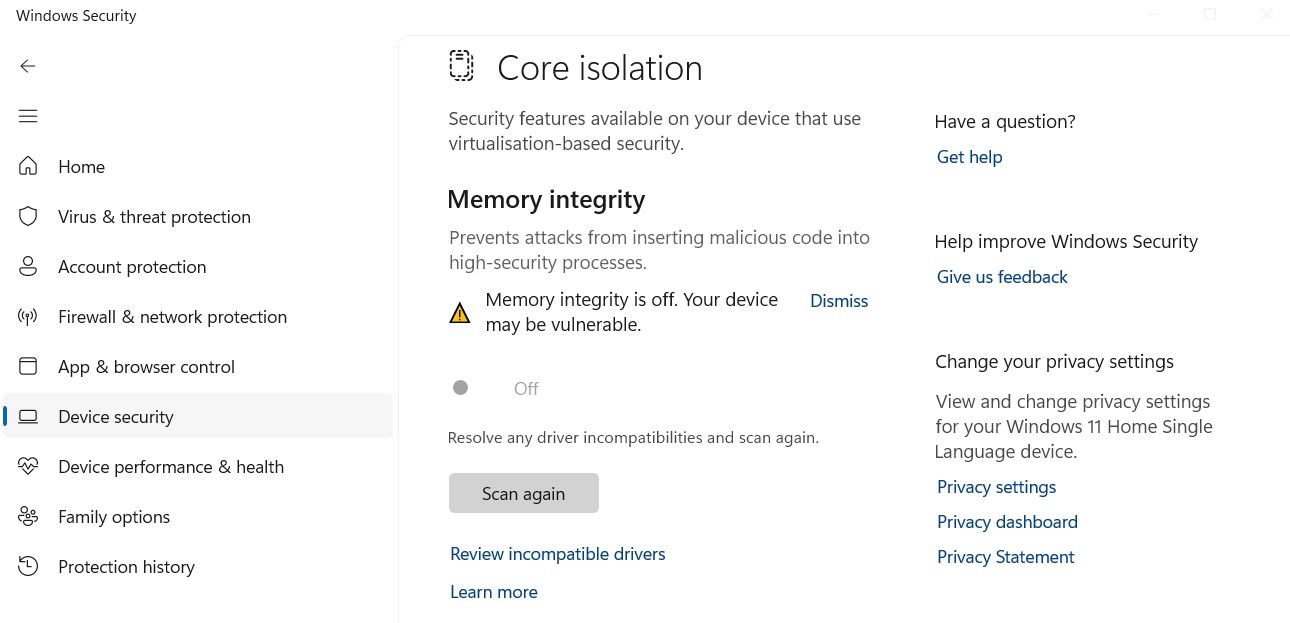
This issue is often linked to your drivers. If your drivers become corrupted due to reasons such as improper system shutdowns or BSOD, you'll likely encounter this problem.
Another situation where you might encounter this issue is when you connect a new device to your computer. If you see this message in such cases, it suggests that your computer may not be compatible with the driver of the newly connected device.
In addition to all those scenarios, it could simply be an interface problem. This means the feature is functioning correctly in the background, but you're seeing the message due to an interface bug in Windows 11.
Now that you understand what usually causes the Memory integrity error on Windows 11, let's check out some of the solutions to fix the problem.
Review and Update Incompatible Driver
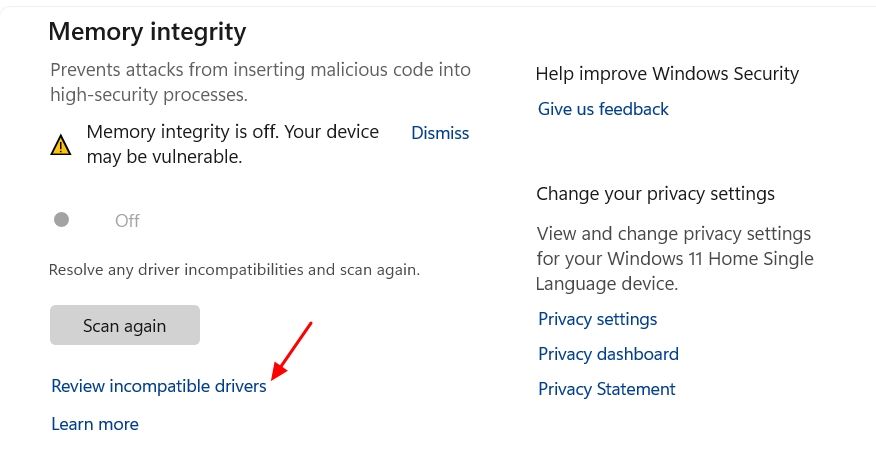
In the Core isolation window, where you'll see the Memory integrity is off message, there will be a "Review Incompatible Drivers" option below the message. When you click this option, you'll see the incompatible driver that is causing the issue.
You'll see information about the incompatible driver, such as its product name, driver version, and published name.
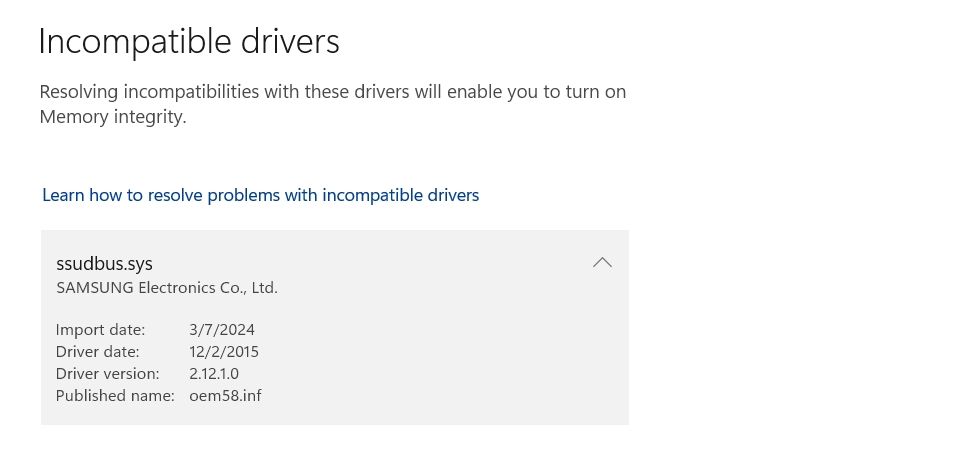
If clicking on the driver's name does not provide all these details, you can execute a DISM command to retrieve them. To run the DISM command, open the Start menu, type Command Prompt in the search bar, and select "Run as Administrator."
In the elevated Command Prompt window, input the following command and press Enter:
dism /online /get-drivers /format:table 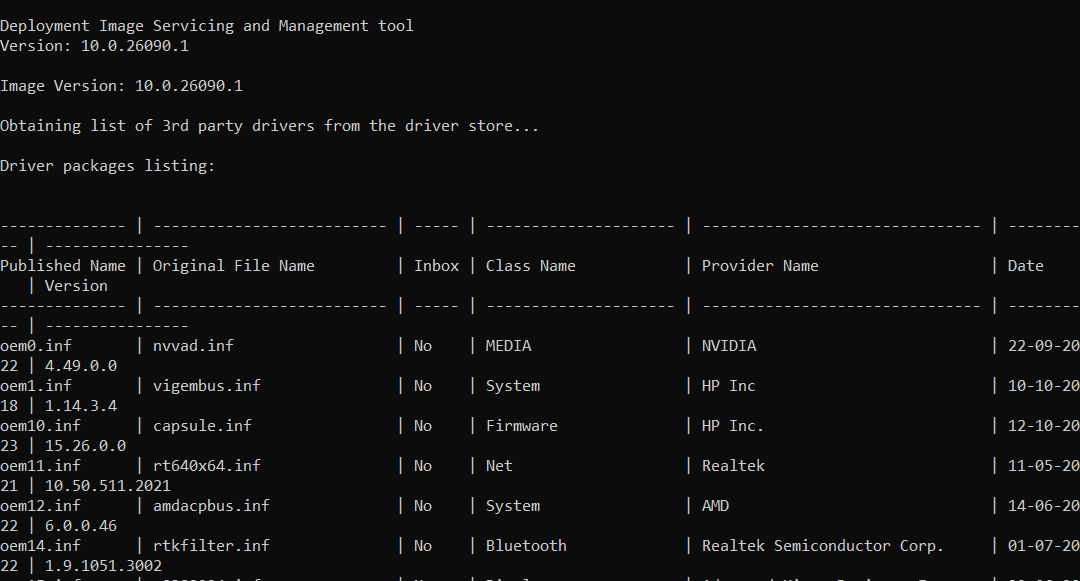
This command will list all the drivers installed on your computer along with other information. You'll have to find the incompatible driver that was flagged in Windows Security under the Published Name column.
Once you've located it, make a note of its provider name. After that, you'll have to update the incompatible driver. This is because the issue likely occurs due to a corrupted or outdated driver; in either situation, updating the driver should fix the issue.
To update the driver, open the Device Manager, click "View," and select "Devices by Driver."
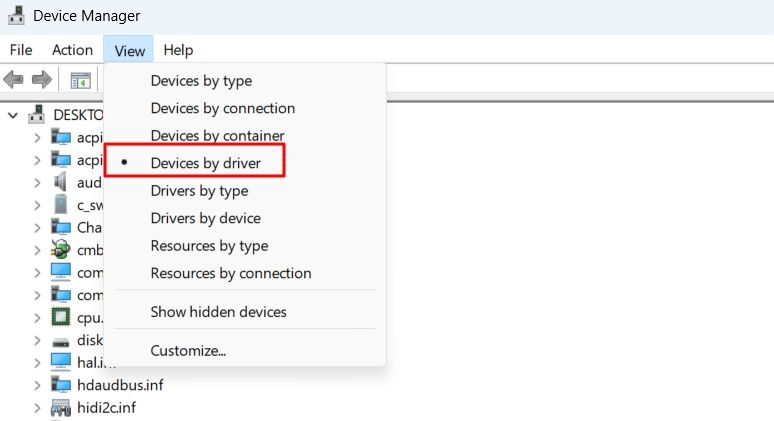
Locate the incompatible driver, double-click on it, then right-click the relevant device and choose "Update Driver."
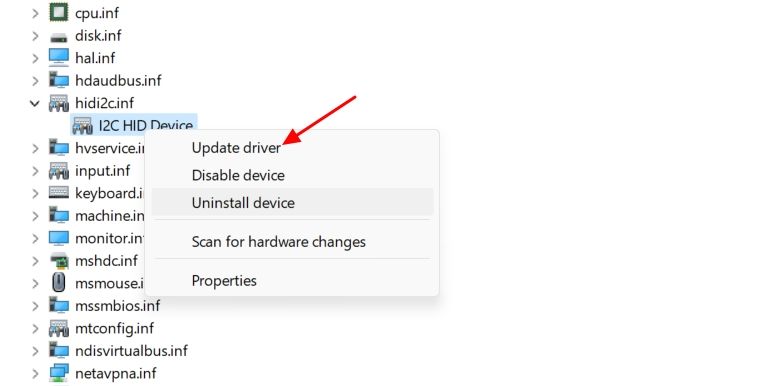
Choose "Search Automatically for Drivers." Then, Windows will try to find and download the latest driver for that device. If Windows is unable to find the update, you can visit the device manufacturer's website to download the latest driver update.
For instance, if the issue relates to your keyboard driver, then visit your keyboard manufacturer's website and download the most recent driver update for your keyboard. The update will be in .exe format, so you can install it like any other Windows application. After updating the driver, restart your computer and check if you're still getting a memory integrity error.
Delete the Incompatible Driver
If updating the incompatible driver was unable to fix the problem, you should consider deleting it completely. Don't worry, deleting the driver will not have any adverse effects, as Windows will automatically reinstall the driver once you use the related device again. However, this time Windows will install the newest working driver for that device.
To delete the incompatible driver, open Command Prompt as an administrator and execute the following command to view the list of installed drivers.
dism /online /get-drivers /format:table Type the command below and press Enter. Make sure to replace
pnputil /delete-driver /uninstall /force For example, if the published name of the incompatible driver is oem58.inf, then the command will be:
pnputil /delete-driver oem58.inf /uninstall /force 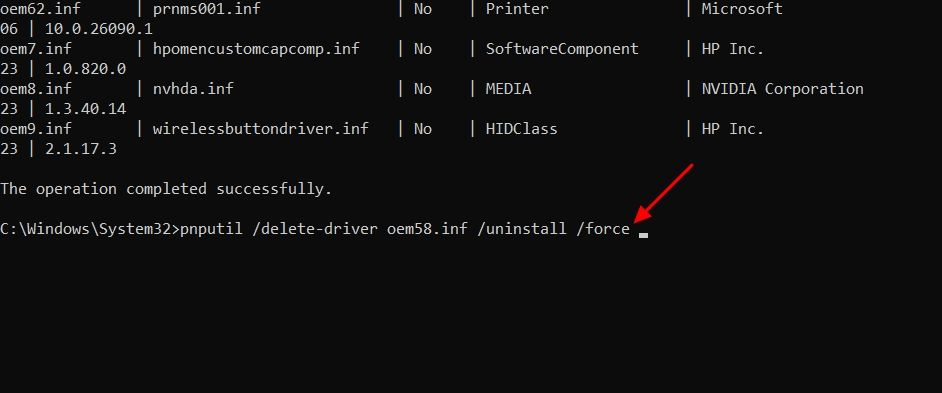
Once the command is executed, you'll see the "Driver Package Uninstalled" message. After that, restart your computer and then check if you're still facing the problem.
Download Any Available Windows Updates
The issue can also occur due to a bug in the Windows version you are currently using. A bug in the Windows Security app could also be the reason behind the problem.
Either way, you should check for and download any available Windows updates. Downloading Windows updates will not only update the Windows version but may also include updates for the Windows Security app that could resolve the issue.
Once you have downloaded the available updates for your Windows PC, open the Windows Security app and check if the "Memory integrity is off" message still appears.
Perform a Clean Boot
Your computer has numerous processes and services running in the background that help the operating system run smoothly. Sometimes, these processes or services may interfere with other programs, which may lead to various issues, including the one at hand.
You can identify that problematic agent by performing a clean boot. Once you have identified the problematic service or process, you can either delete it or download any available driver updates for it.
Enable Core Integrity Using the Registry Editor
If none of the above solutions were helpful, the last step you can take is to use the Registry Editor to forcibly enable the memory integrity feature. However, you must be very careful when applying this fix, as a single incorrect edit in the registry can make your system unstable.
To be on the safe side, you must back up the registry and create a restore point. This way, you can easily restore your computer to a working state in case any issues arise during the registry editing process.
Once you have taken these essential safety measures, let's begin. First, open the Start menu, type Registry Editor in the search bar, and press Enter.
In the Registry Editor, navigate to the following location:
HKEY_LOCAL_MACHINESYSTEMCurrentControlSetControlDeviceGuardScenariosHypervisorEnforcedCodeIntegrity Double-click the "Enabled" key, type 1 in the Value data field, and click "OK."
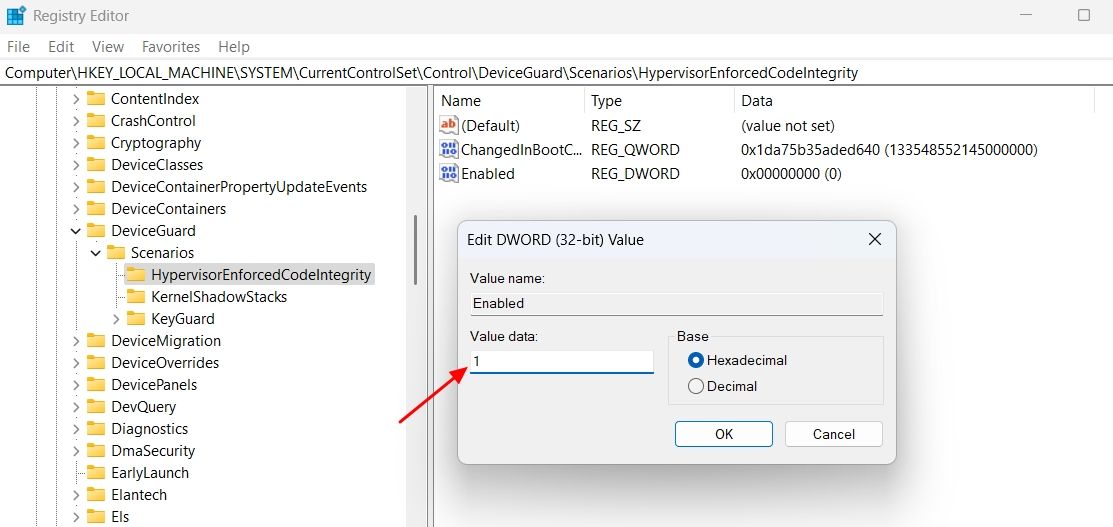
Restart your computer, and you will find that you can activate the memory integrity toggle without any problems.
We hope the above solutions were helpful in fixing the problem. Memory integrity is an important security feature, and now that you have enabled it, you shouldn't worry about malicious agents exploiting critical parts of your Windows operating system.
-
 Quickly resolve: External file volume change issueTroubling into the volume for a file externally altered error and wondering how to fix it? Why does this error message keep popping up? Now read this ...Software tutorial Posted on 2025-03-13
 -
 Teams Calendar Not Syncing With Outlook: How To Resolve ItRead our disclosure page to find out how can you help MSPoweruser sustain the editorial team Read more ...Software tutorial Posted on 2025-03-04
 -
 PNY’s New USB-C Flash Drives Are FastPNY Elite-X Fit Type-C USB 3.2 Flash ...Software tutorial Posted on 2025-03-04
 -
![CoinMiner Malware: What Is It & How to Remove It from your Mac? [Protection Against Virus]](/style/images/moren/moren.png) CoinMiner Malware: What Is It & How to Remove It from your Mac? [Protection Against Virus]CoinMiner恶意软件:保护您的Mac免受加密货币挖矿攻击 CoinMiner恶意软件是一种利用您的Mac硬件资源来挖掘加密货币的恶意软件。您的Mac开始运行缓慢,直到后期才发现这是由于CoinMiner恶意软件造成的。更糟糕的是,您甚至不知道它已安装在您的Mac上。 本文将分享更多关于Coin...Software tutorial Posted on 2025-03-04
CoinMiner Malware: What Is It & How to Remove It from your Mac? [Protection Against Virus]CoinMiner恶意软件:保护您的Mac免受加密货币挖矿攻击 CoinMiner恶意软件是一种利用您的Mac硬件资源来挖掘加密货币的恶意软件。您的Mac开始运行缓慢,直到后期才发现这是由于CoinMiner恶意软件造成的。更糟糕的是,您甚至不知道它已安装在您的Mac上。 本文将分享更多关于Coin...Software tutorial Posted on 2025-03-04 -
 How to clone your voice on your iPhone or MacUnlock the Power of Personal Voice on Your Apple Devices: A Comprehensive Guide iOS 17 and macOS Sonoma introduced a groundbreaking accessibility feat...Software tutorial Posted on 2025-02-25
 -
 Fixed - Final Fantasy VII Rebirth an Unreal Process Has CrashedSolve the Unreal engine process crash in Final Fantasy VII Rebirth After "Final Fantasy VII Rebirth" was launched on PC, some players encou...Software tutorial Posted on 2025-02-24
 -
 How to Change Monitor 1 and 2 in WindowsA common issue in a dual-monitor setup is when you need to move your mouse cursor to the wrong side of the screen to reach the second monitor. You ca...Software tutorial Posted on 2025-02-22
 -
 Assetto Corsa EVO Crashing on Windows? Learn This Top GuideAssetto Corsa EVO crashes after starting or running? Don't worry, this is common in the newly released games! This article provides 4 reliable way...Software tutorial Posted on 2025-02-08
 -
 Encountering Valorant Friends List Not Working? Here’s GuideEncountering the Valorant friends list not working error can be quite frustrating, particularly when you’re eager to team up with your buddies. This i...Software tutorial Posted on 2025-02-07
 -
 Nokia Didn’t Think the iPhone’s Touch Keyboard Would Take OffIn an amazing piece of technology history, a Nokia internal presentation from after the iPhone's 2007 unveiling shows what the company was thinkin...Software tutorial Posted on 2025-02-07
 -
 How to Fix SET_OF_INVALID_CONTEXT BSOD Windows 10/11It’s common to encounter blue screen of death errors like SET_OF_INVALID_CONTEXT BSOD on a Windows 10/11. How to get rid of it from your computer. If ...Software tutorial Posted on 2025-02-06
 -
 How to Group and Ungroup Objects in PowerPointPowerPoint's grouping feature simplifies presentation design by allowing you to combine multiple objects into a single unit. This tutorial demonst...Software tutorial Posted on 2025-02-06
 -
 The Best iPhone 16 Cases of 2025Protecting your new iPhone 16 is crucial, even if you love its sleek design. A quality case ensures it stays pristine. Here are some top picks to sui...Software tutorial Posted on 2025-02-06
 -
 Windows 11 KB5050094 Rolled out to 24H2, Learn New FeaturesWindows 11 Build 26100.3025 (KB5050094) is now logged into the Release Preview channel! This update brings many improvements to the Windows 11 24H2 ve...Software tutorial Posted on 2025-02-06
 -
 The Definitive Guide for Skyjem Virus & 5 Ways to Remove ItSkyjem is a browser hijacker that redirects search queries to other websites. To prevent further loss, you had better remove it as soon as possible. T...Software tutorial Published on 2025-01-26
Study Chinese
- 1 How do you say "walk" in Chinese? 走路 Chinese pronunciation, 走路 Chinese learning
- 2 How do you say "take a plane" in Chinese? 坐飞机 Chinese pronunciation, 坐飞机 Chinese learning
- 3 How do you say "take a train" in Chinese? 坐火车 Chinese pronunciation, 坐火车 Chinese learning
- 4 How do you say "take a bus" in Chinese? 坐车 Chinese pronunciation, 坐车 Chinese learning
- 5 How to say drive in Chinese? 开车 Chinese pronunciation, 开车 Chinese learning
- 6 How do you say swimming in Chinese? 游泳 Chinese pronunciation, 游泳 Chinese learning
- 7 How do you say ride a bicycle in Chinese? 骑自行车 Chinese pronunciation, 骑自行车 Chinese learning
- 8 How do you say hello in Chinese? 你好Chinese pronunciation, 你好Chinese learning
- 9 How do you say thank you in Chinese? 谢谢Chinese pronunciation, 谢谢Chinese learning
- 10 How to say goodbye in Chinese? 再见Chinese pronunciation, 再见Chinese learning


![CoinMiner Malware: What Is It & How to Remove It from your Mac? [Protection Against Virus]](http://www.luping.net/uploads/20250304/174105612967c668816cbd1.jpg174105612967c668816cbd9.jpg)


