4 Ways to Blur Out a Part of Picture on Mac
Method 1. Using the Photos App
The Retouch tool in the default Photos app on Mac lets you blur information in pictures. While it’s not perfect or offers precise control like other apps, the Retouch tool is still worth trying out.
Note: To transfer the image to the Photos app, drag and drop it from Finder to the Photos app. It will be stored in the Imports section.
Step 1: Launch the Photos app. Open the picture you want to edit.
Step 2: Click Edit at the top right.

Step 3: Select the Retouch tool from the menu. Click the brush icon to activate the tool. (You can change the brush size as per your preference.)
Step 4: Click and drag the brush over the part of the picture you want to blur, and voila! The Photos app will blur the part instantly.
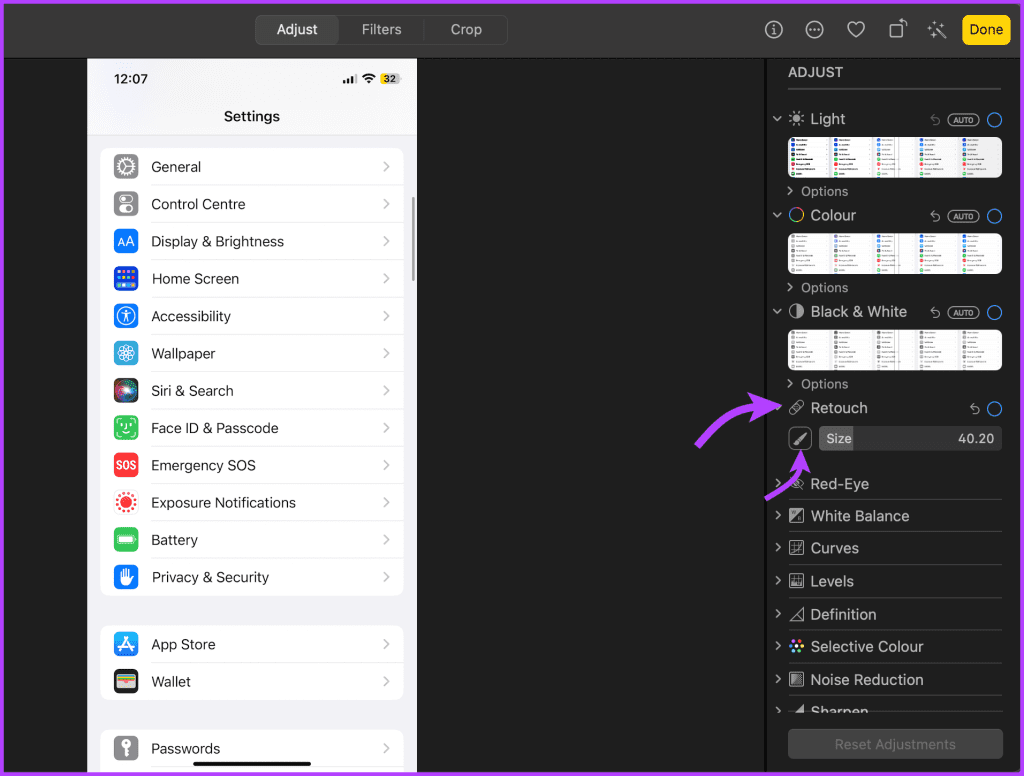
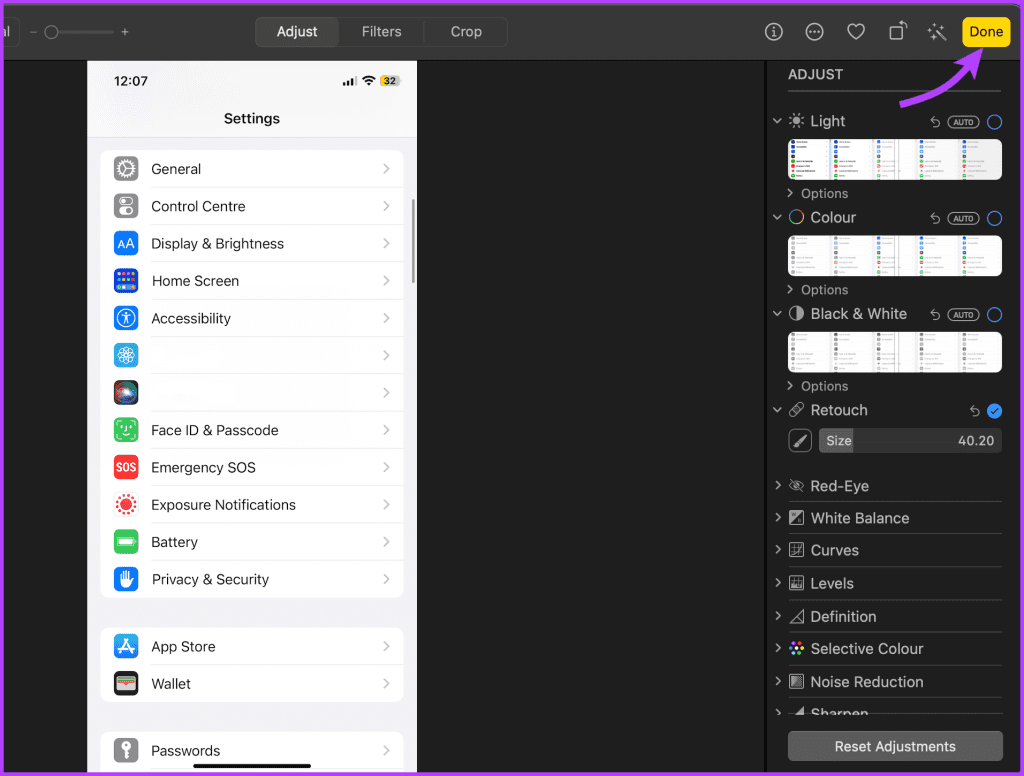
Step 5: Tap Done to save the changes. Your edited photo is now ready to share on the web.
Method 2. Use Preview to Hide Part of Picture
While the handy Preview app does not offer a blur tool, you can manage to hide some portions of an image.
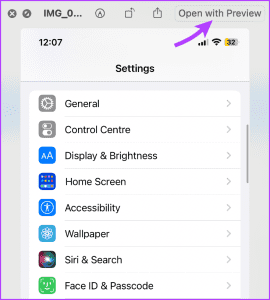
Step 1: Open Finder and select the photo. Next, click Open with Preview.
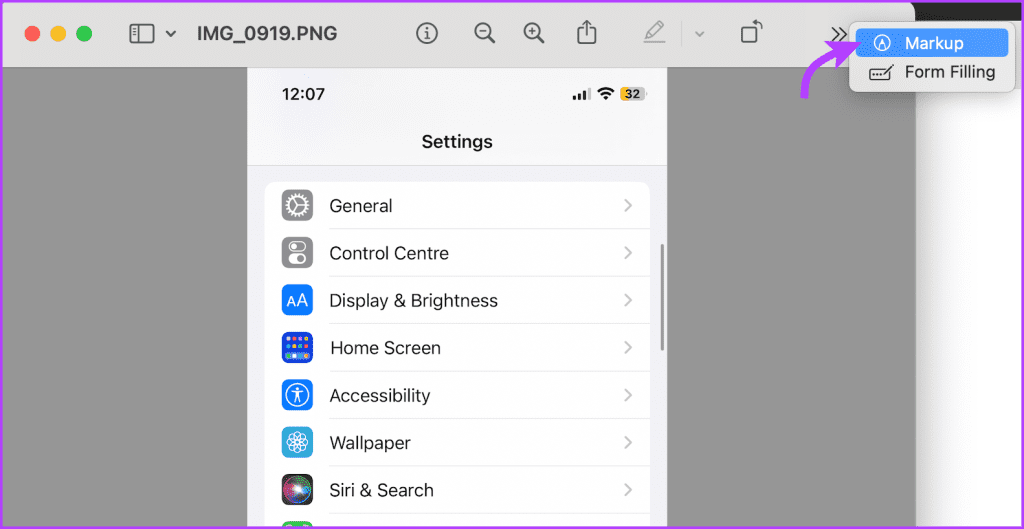
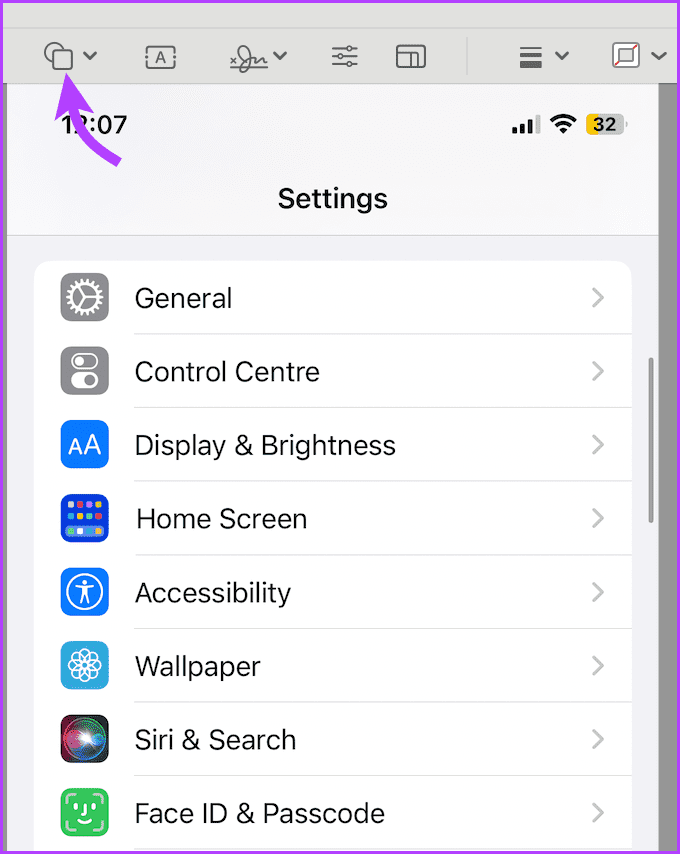
Step 2: Click Markup at the top bar. If you can’t see it, click the >> icon and select it.
Step 3: Select the Shape tool from the Markup toolbar.
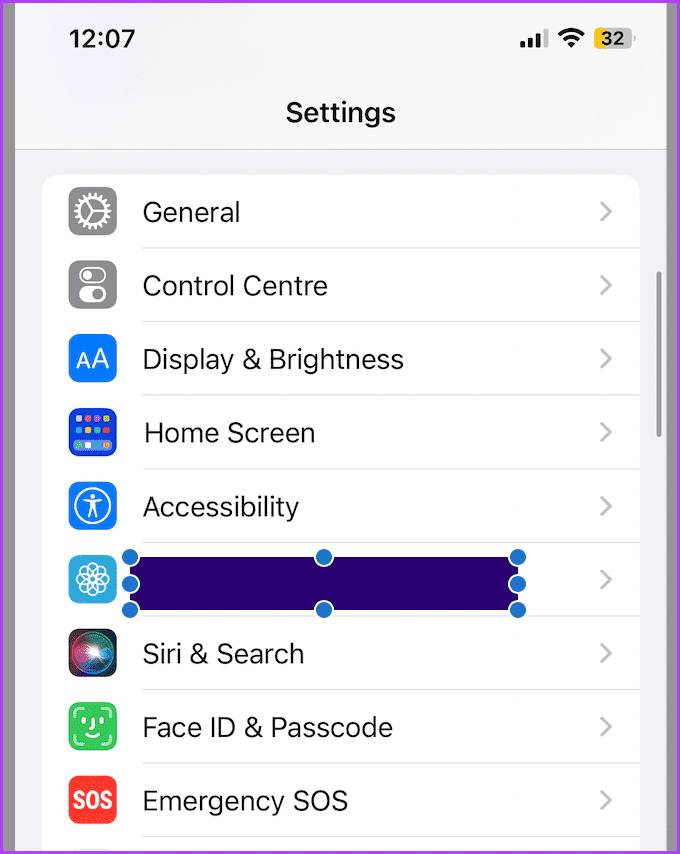
Step 4: The shape will auto-appear on the image. Resize and move the shape as per requirement.
Step 5: Click the color selection tool to change the color of the box.
Step 6: To select a custom color, click Show Colors. Select the color or use the Droplet tool to pick up any color from the image.
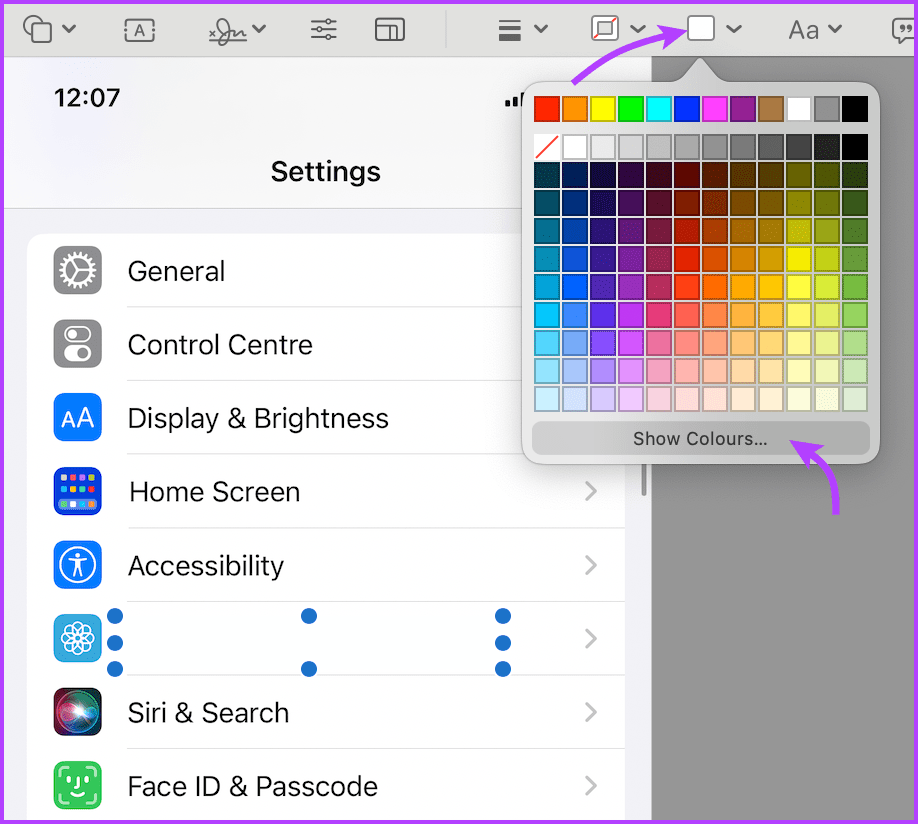
And that’s it. You can create as many shapes and in as many colors as you want. In the end, press Cmd S to save the changes or go to File → Export to save changes as a new image or format.
Tip: You can also use the Markup tool to hide parts of a picture on iPhone or iPad.
Method 3. Use Web tool – Photopea
Photopea is an excellent Photoshop alternative on the web. If you don’t want to download dedicated software to blur out a part of a picture on a Mac, use Photopea to do the job.
Step 1: Visit Photopea on the web. Click Open from Computer to import the image.
Step 2: Click the selection tool from the sidebar. Select a part of the image you want to blur.

Step 3: Select Filter in the top menu bar. Expand the Blur menu. Select a relevant blur option, say Gaussian Blur.
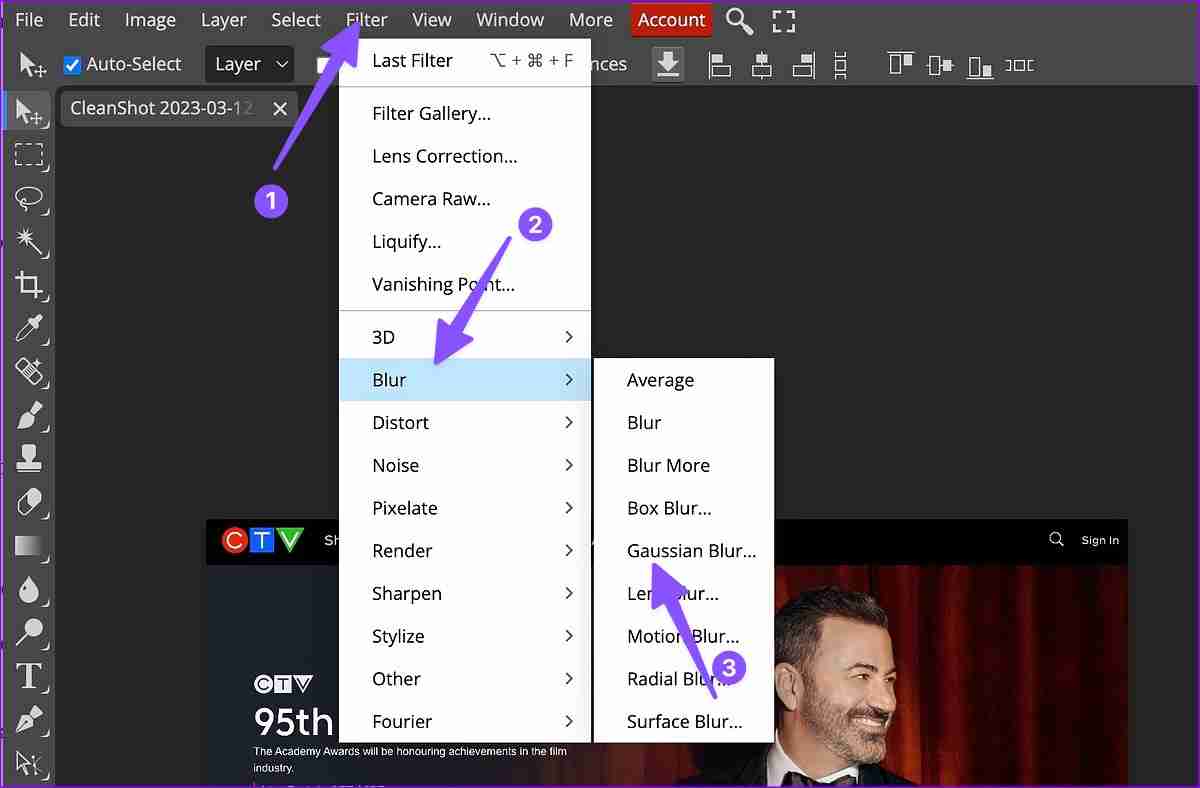
Step 4: You can change the blur radius to tweak the intensity. Hit OK.

Step 5: Once done, click File at the top left. Expand the Export as menu and save the edited picture on your Mac.
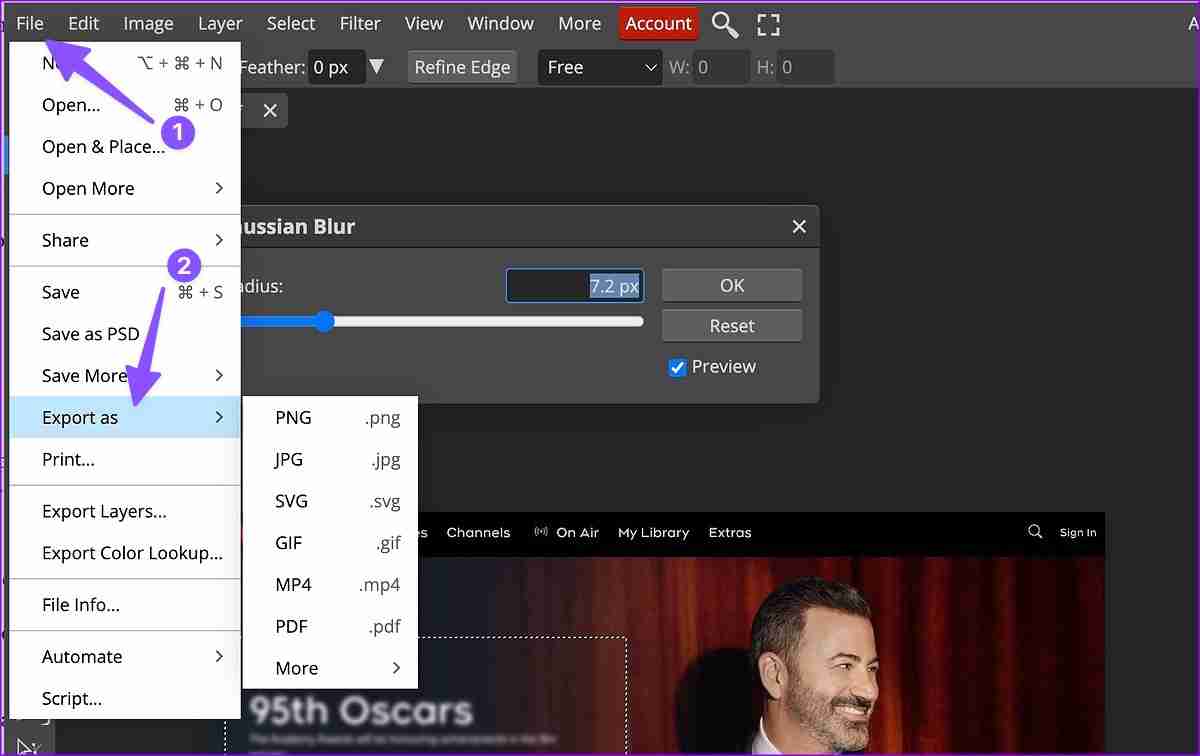
Photopea is free to use on the web. You can even use it to remove things from images, crop them, add watermarks, and more. You can start a $5 monthly subscription to remove ads and unlock 5GB of PeaDrive storage.
Alternative: You can also use Canva to blur out stuff from photos easily.
Method 4. Use Third-Party App – PhotoScape X
Several third-party apps can blur out part of a picture on Mac. I am using PhotoScape X as an example.
Step 1: Open the Photoscape app. Go to the Editor tab, browse the location of the image from the sidebar, and select the image.
Step 2: Click the Tools section from the left toolbar.
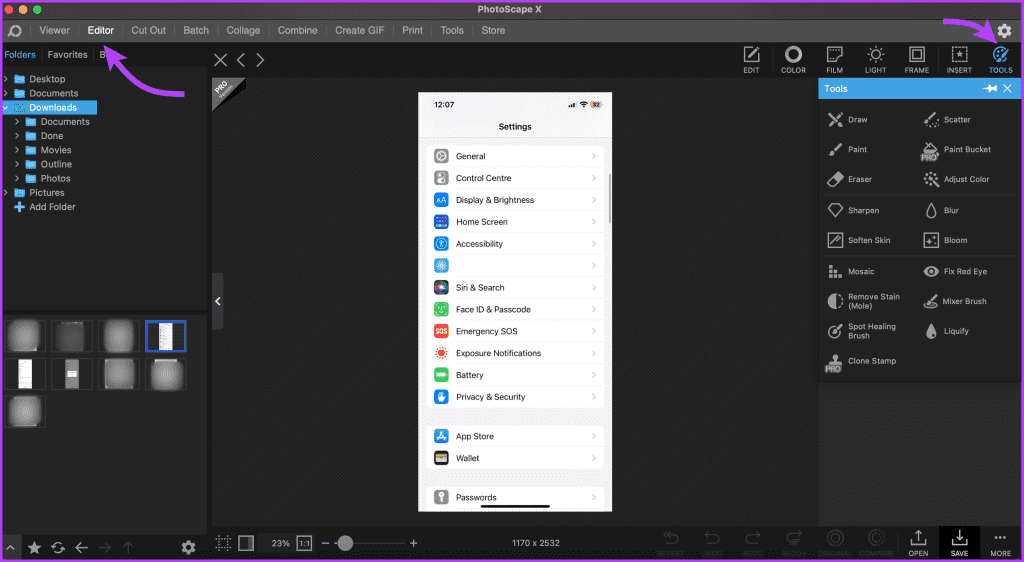
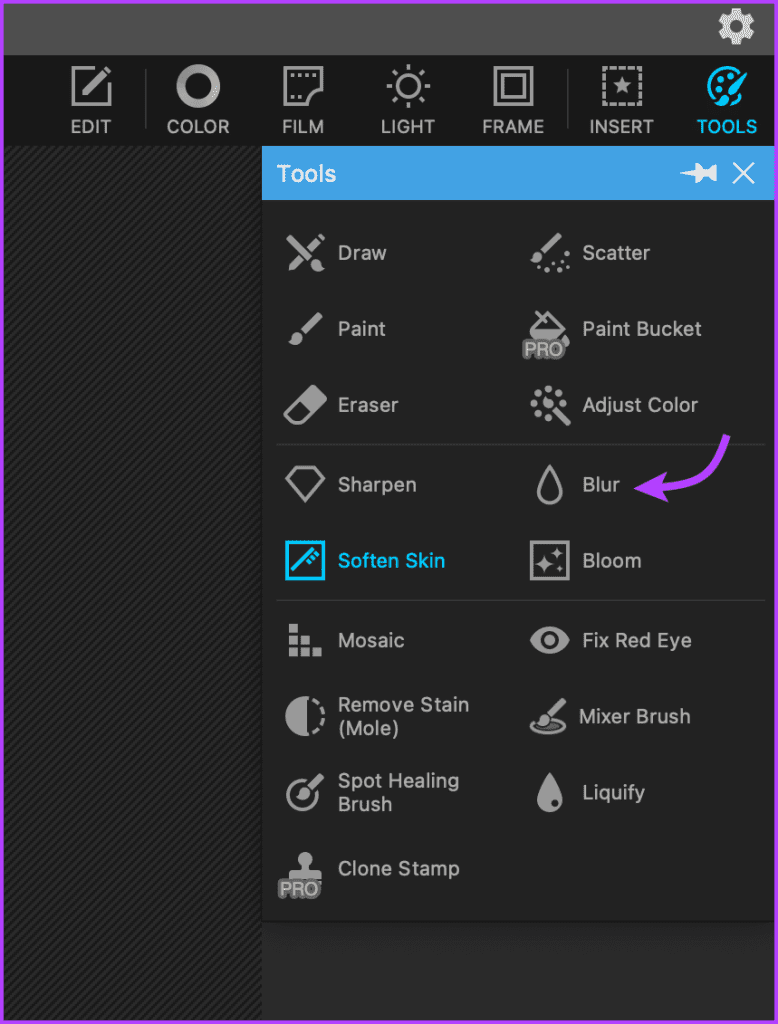
Step 3: Choose Blur from the menu. Select the brush shape and size, blur intensity, and blur style as needed.
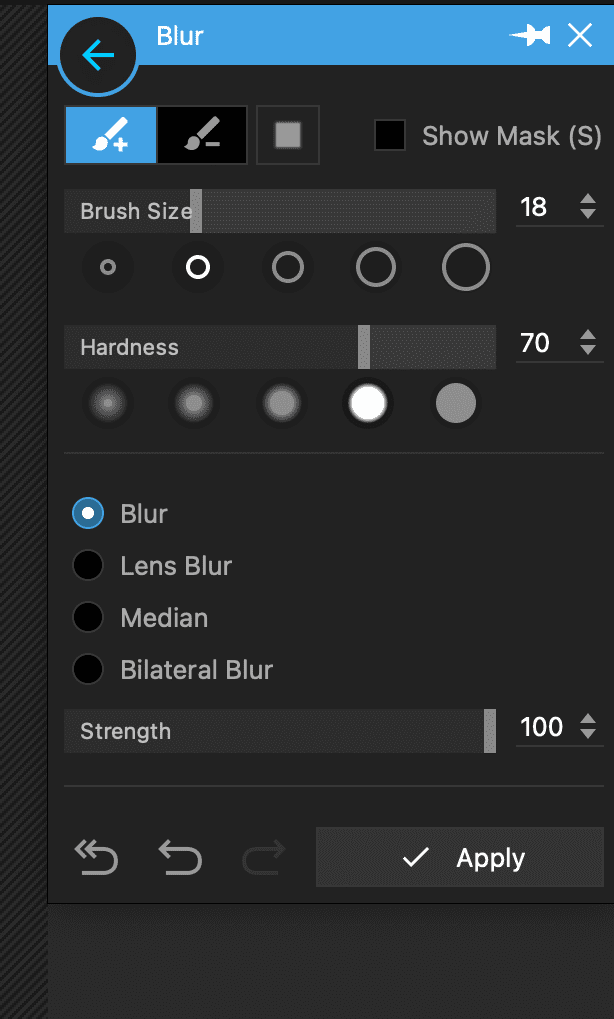
Step 4: Drag the brush of the parts to be blurred.
Step 5. Once done, tap Apply > Save to export the image as desired.
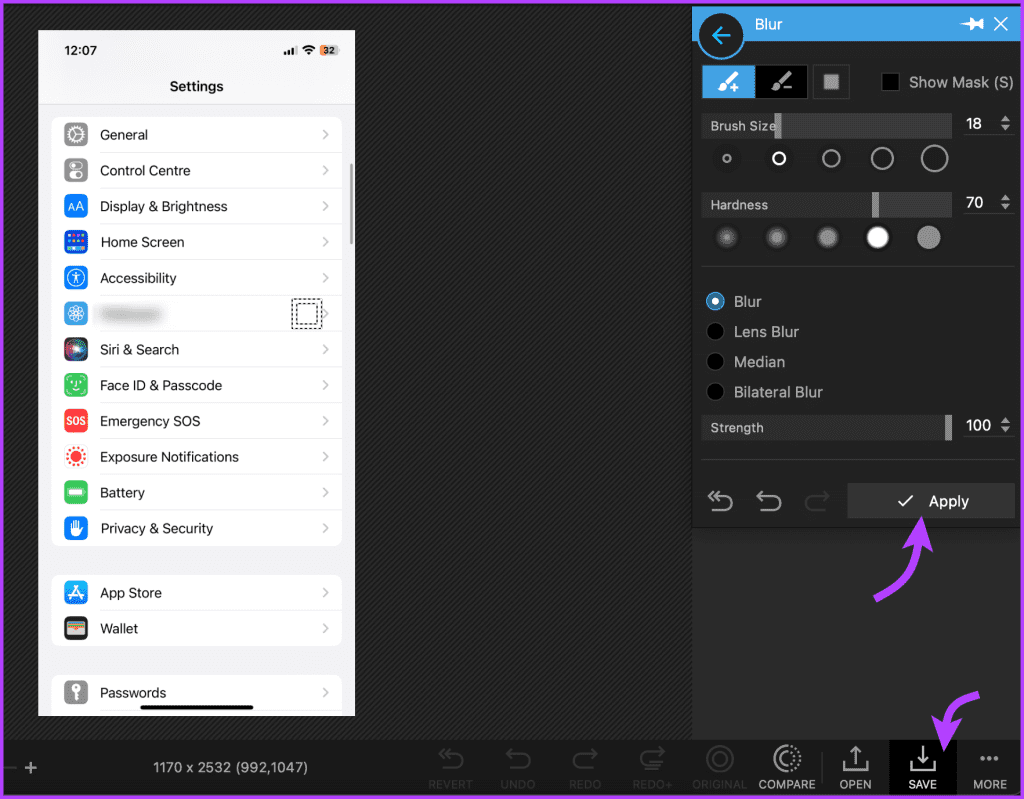
PhotoScape is free and easy to use. It has many features for editing images.
-
 How to clone your voice on your iPhone or MacUnlock the Power of Personal Voice on Your Apple Devices: A Comprehensive Guide iOS 17 and macOS Sonoma introduced a groundbreaking accessibility feat...Software tutorial Posted on 2025-02-25
 -
 Fixed - Final Fantasy VII Rebirth an Unreal Process Has CrashedSolve the Unreal engine process crash in Final Fantasy VII Rebirth After "Final Fantasy VII Rebirth" was launched on PC, some players encou...Software tutorial Posted on 2025-02-24
 -
 How to Change Monitor 1 and 2 in WindowsA common issue in a dual-monitor setup is when you need to move your mouse cursor to the wrong side of the screen to reach the second monitor. You ca...Software tutorial Posted on 2025-02-22
 -
 Assetto Corsa EVO Crashing on Windows? Learn This Top GuideAssetto Corsa EVO crashes after starting or running? Don't worry, this is common in the newly released games! This article provides 4 reliable way...Software tutorial Posted on 2025-02-08
 -
 Encountering Valorant Friends List Not Working? Here’s GuideEncountering the Valorant friends list not working error can be quite frustrating, particularly when you’re eager to team up with your buddies. This i...Software tutorial Posted on 2025-02-07
 -
 Nokia Didn’t Think the iPhone’s Touch Keyboard Would Take OffIn an amazing piece of technology history, a Nokia internal presentation from after the iPhone's 2007 unveiling shows what the company was thinkin...Software tutorial Posted on 2025-02-07
 -
 How to Fix SET_OF_INVALID_CONTEXT BSOD Windows 10/11It’s common to encounter blue screen of death errors like SET_OF_INVALID_CONTEXT BSOD on a Windows 10/11. How to get rid of it from your computer. If ...Software tutorial Posted on 2025-02-06
 -
 How to Group and Ungroup Objects in PowerPointPowerPoint's grouping feature simplifies presentation design by allowing you to combine multiple objects into a single unit. This tutorial demonst...Software tutorial Posted on 2025-02-06
 -
 The Best iPhone 16 Cases of 2025Protecting your new iPhone 16 is crucial, even if you love its sleek design. A quality case ensures it stays pristine. Here are some top picks to sui...Software tutorial Posted on 2025-02-06
 -
 Windows 11 KB5050094 Rolled out to 24H2, Learn New FeaturesWindows 11 Build 26100.3025 (KB5050094) is now logged into the Release Preview channel! This update brings many improvements to the Windows 11 24H2 ve...Software tutorial Posted on 2025-02-06
 -
 The Definitive Guide for Skyjem Virus & 5 Ways to Remove ItSkyjem is a browser hijacker that redirects search queries to other websites. To prevent further loss, you had better remove it as soon as possible. T...Software tutorial Published on 2025-01-26
 -
 5 Fixes for WhatsApp Desktop Not Downloading ImagesFix 1: Check Internal Storage If you can’t download images using WhatsApp Desktop, start by checking your internal storage on Mac or Windows PC. On Ma...Software tutorial Published on 2025-01-25
 -
 EOS-ERR-1603: 4 Useful Methods to Resolve This ErrorSuffering from the Epic Online Services failed to install issue on your device? If you get the EOS-ERR-1603 error while installing EOS, this post from...Software tutorial Published on 2025-01-15
 -
 External Hard Drive Slows Down PC? Fix It Easily Now!If your external hard drive slows down PC, your work efficiency or entertainment experience will be greatly affected. Here this tutorial on MiniTool S...Software tutorial Published on 2024-12-23
 -
 How to Fix Grounded Crashing on PC: Here’s a Full GuideGrounded is among the most well-known survival adventure games. Although the game provides a smooth gaming experience, PC players might face issues su...Software tutorial Published on 2024-12-22
Study Chinese
- 1 How do you say "walk" in Chinese? 走路 Chinese pronunciation, 走路 Chinese learning
- 2 How do you say "take a plane" in Chinese? 坐飞机 Chinese pronunciation, 坐飞机 Chinese learning
- 3 How do you say "take a train" in Chinese? 坐火车 Chinese pronunciation, 坐火车 Chinese learning
- 4 How do you say "take a bus" in Chinese? 坐车 Chinese pronunciation, 坐车 Chinese learning
- 5 How to say drive in Chinese? 开车 Chinese pronunciation, 开车 Chinese learning
- 6 How do you say swimming in Chinese? 游泳 Chinese pronunciation, 游泳 Chinese learning
- 7 How do you say ride a bicycle in Chinese? 骑自行车 Chinese pronunciation, 骑自行车 Chinese learning
- 8 How do you say hello in Chinese? 你好Chinese pronunciation, 你好Chinese learning
- 9 How do you say thank you in Chinese? 谢谢Chinese pronunciation, 谢谢Chinese learning
- 10 How to say goodbye in Chinese? 再见Chinese pronunciation, 再见Chinese learning


