
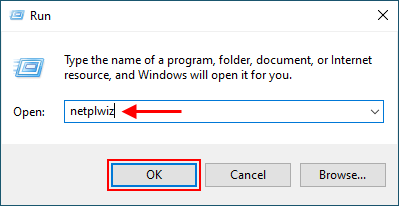
Step 1: Press Windows key R to open the Run dialog. Then type netplwiz in the Run dialog box and click OK.
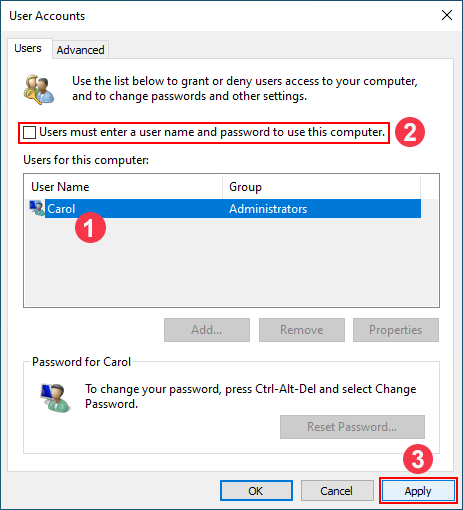
Step 2: When the User Accounts dialog opens, select your user account name, uncheck the \\\"Users must enter a user name and password to use this computer\\\" checkbox, and then click Apply.

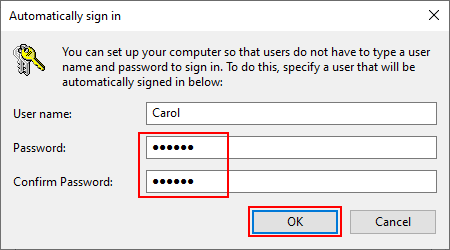
Step 3: An Automatically sign in dialog pops up. Confirm your user account name, enter your current password, and then click OK.

That's it. Next time Windows 10 starts or restarts, it will automatically log on to the desktop without requiring you to enter a password. If you want to turn off or disable automatic login, just check \\\"Users must enter a user name and password to use this computer\\\" and click Apply.
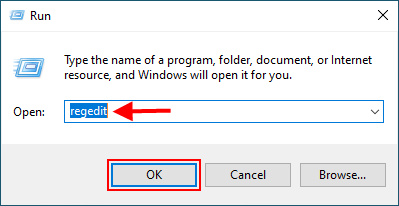
Step 1: Press Windows key R to open the Run dialog. Then type regedit in the Run dialog box and click OK.

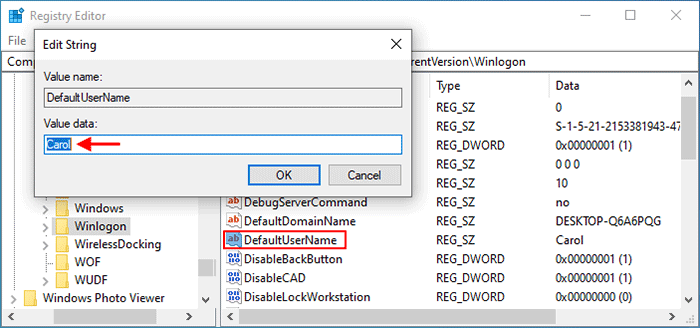
Step 3: When the Registry Editor opens, locate the key: Computer\\\\HKEY_LOCAL_MACHINE\\\\SOFTWARE\\\\Microsoft\\\\Windows NT\\\\CurrentVersion\\\\Winlogon.
Step 4: In the right pane of the Winlogon key, locate the DefaultUserName and make sure its value data is the name of the user account for which you want to enable automatic login.

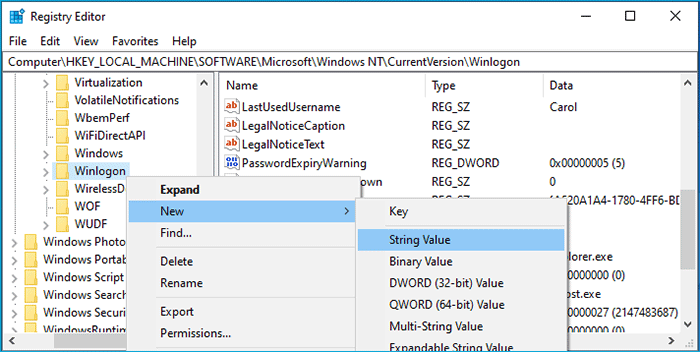
Note: If the DefaultUserName value doesn't exist, right-click the Winlogon key and select New > String Value to create a new string value. Then name the value DefaultUserName and set its data to your user name.

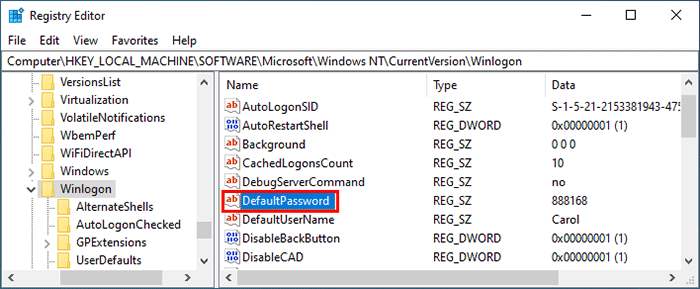
Step 5: Locate the DefaultPassword value. If this value does not exist, create a new string value and name it DefaultPassword. Then double click it to change its value data to your user account password.

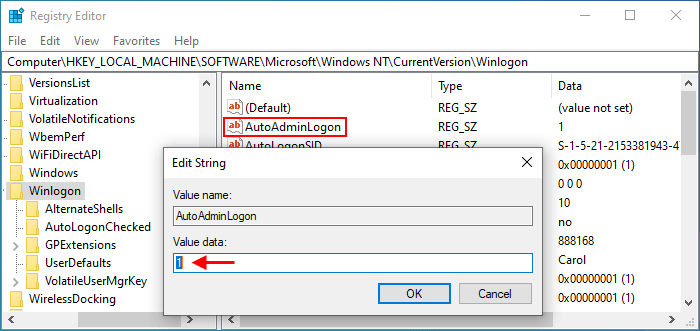
Step 6: Locate the AutoAdminLogon value. If this value does not exit, create a new string value and name it AutoAdminLogon. Then double click it to change its value data to 1.

That's it. Next time your Windows 10 starts or restarts, it will automatically log on to the desktop without requiring you to enter your password. To disable automatic login, just delete the AutoAdminLogon value or change its value data from 1 to 0.
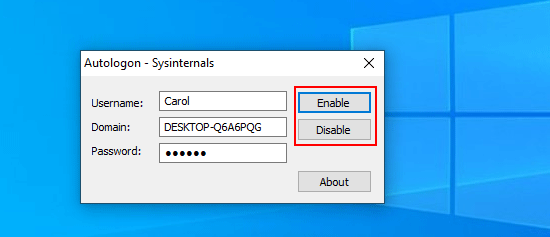
Step 1: Download the Autologon. Then extract it.
Step 2: Double click the Autologon application to run it.
Step 3: The Autologon utility will automatically get your current user account name and domain name. Enter your user account password and click Enable to enable automatic login, or click Disable to disable auto login.

Turning on automatic login allows you to quickly log in to Windows 10 without entering a password, but on the other hand, it may pose a security risk to your computer. Therefore, use this feature with caution.
","image":"http://www.luping.net/uploads/20240816/172378908266beef1ab31c3.png","datePublished":"2024-08-16T14:18:02+08:00","dateModified":"2024-08-16T14:18:02+08:00","author":{"@type":"Person","name":"luping.net","url":"https://www.luping.net/articlelist/0_1.html"}} Browse:263
If you are tired of entering your password on the Windows 10 login screen, you don't have to delete the password, but just enable automatic login. When the automatic login feature is turned on, Windows 10 will skip the password prompt screen and automatically log on to the desktop every time it starts or restarts. This means that although your user account has a password, you do not need to enter your password to log in. Now, in this post, we'll show you how to enable or disable automatic login in Windows 10. There are three ways to choose from, all of which apply to local accounts and Microsoft accounts.
Step 1: Press Windows key R to open the Run dialog. Then type netplwiz in the Run dialog box and click OK.
Step 2: When the User Accounts dialog opens, select your user account name, uncheck the "Users must enter a user name and password to use this computer" checkbox, and then click Apply.
Step 3: An Automatically sign in dialog pops up. Confirm your user account name, enter your current password, and then click OK.
That's it. Next time Windows 10 starts or restarts, it will automatically log on to the desktop without requiring you to enter a password. If you want to turn off or disable automatic login, just check "Users must enter a user name and password to use this computer" and click Apply.
Step 1: Press Windows key R to open the Run dialog. Then type regedit in the Run dialog box and click OK.
Step 3: When the Registry Editor opens, locate the key: Computer\HKEY_LOCAL_MACHINE\SOFTWARE\Microsoft\Windows NT\CurrentVersion\Winlogon.
Step 4: In the right pane of the Winlogon key, locate the DefaultUserName and make sure its value data is the name of the user account for which you want to enable automatic login.
Note: If the DefaultUserName value doesn't exist, right-click the Winlogon key and select New > String Value to create a new string value. Then name the value DefaultUserName and set its data to your user name.
Step 5: Locate the DefaultPassword value. If this value does not exist, create a new string value and name it DefaultPassword. Then double click it to change its value data to your user account password.
Step 6: Locate the AutoAdminLogon value. If this value does not exit, create a new string value and name it AutoAdminLogon. Then double click it to change its value data to 1.
That's it. Next time your Windows 10 starts or restarts, it will automatically log on to the desktop without requiring you to enter your password. To disable automatic login, just delete the AutoAdminLogon value or change its value data from 1 to 0.
Step 1: Download the Autologon. Then extract it.
Step 2: Double click the Autologon application to run it.
Step 3: The Autologon utility will automatically get your current user account name and domain name. Enter your user account password and click Enable to enable automatic login, or click Disable to disable auto login.
Turning on automatic login allows you to quickly log in to Windows 10 without entering a password, but on the other hand, it may pose a security risk to your computer. Therefore, use this feature with caution.


Disclaimer: All resources provided are partly from the Internet. If there is any infringement of your copyright or other rights and interests, please explain the detailed reasons and provide proof of copyright or rights and interests and then send it to the email: [email protected] We will handle it for you as soon as possible.
Copyright© 2022 湘ICP备2022001581号-3


